2004 Hyundai Grandeur engine coolant
[x] Cancel search: engine coolantPage 183 of 235

6. Do-It-Yourself Maintenance
Engine Compartment ..................................................................... 6-2
General Checks .............................................................................. 6-5
Checking the Engine Oil ................................................................ 6-6
Changing the Oil and Filter ........................................................... 6-7
Checking and Changing the Engine Coolant ............................... 6-8
Spark Plugs ..................................................................................6-10
Changing the Air Cleaner Filter ................................................... 6-11
Checking the Transaxle Oil (Manual) .......................................... 6-13
Checking the Transaxle Fluid (Automatic) .................................. 6-14
Checking the Brakes .................................................................... 6-15
Checking the Clutch Fluid ............................................................ 6-16
Air Conditioning Care ................................................................... 6-17
Changing the Air Filter (For Evaporator and Blower Unit) ......... 6-18
Checking Drive Belts .................................................................... 6-21
Checking and Replacing Fuses ................................................... 6-21
Power Steering Fluid Level .......................................................... 6-24
Headlight Aiming Adjustment ....................................................... 6-24
Replacement of Light Bulbs ......................................................... 6-26
Bulb Wattage ................................................................................ 6-33
Junction Box Description ............................................................. 6-34
6
Page 184 of 235

6- 2 DO-IT-YOURSELF MAINTENANCE
1. Brake fluid reservoir
2. Brake booster
3. Windshield washer fluid reservoir
4. Power steering fluid reservoir 5. Engine oil filler cap
6. Engine oil level dipstick
7. Radiator cap
8. Auto transaxle fluid level dipstick
(Vehicle with Automatic Transaxle) 9. Air filter element
10.Coolant reservoir cap
11.Battery
12.Under hood junction boxG010C01L
12
34 56 7891011
G010C01L-AAT
ENGINE COMPARTMENT (3.5 V6)
12 CAUTION:
When inspecting or servicing the
engine, you should handle tools and other heavy objects carefully so that the plastic cover of the engine is not damaged.
!
Page 185 of 235

DO-IT-YOURSELF MAINTENANCE 6- 3
G010A02L-GAT
ENGINE COMPARTMENT (3.0 V6)
HXGS003
164
7891011 1213
1. Cruise control actuator (If installed)
2. Engine oil filler cap
3. Brake booster
4. Brake fluid reservoir
5. Air filter element 6. Under hood junction box
7. Windshield washer fluid reservoir
8. Power steering fluid reservoir
9. Engine oil level dipstick
10.Radiator cap11.Automatic transaxle fluid level dip-
stick (Vehicle with Automatic Transaxle)
12.Coolant reservoir cap
13.Battery
235
CAUTION:
When inspecting or servicing the engine, you should handle tools and other heavy objects carefullyso that the plastic cover of the engine is not damaged.!
Page 186 of 235
6- 4 DO-IT-YOURSELF MAINTENANCE
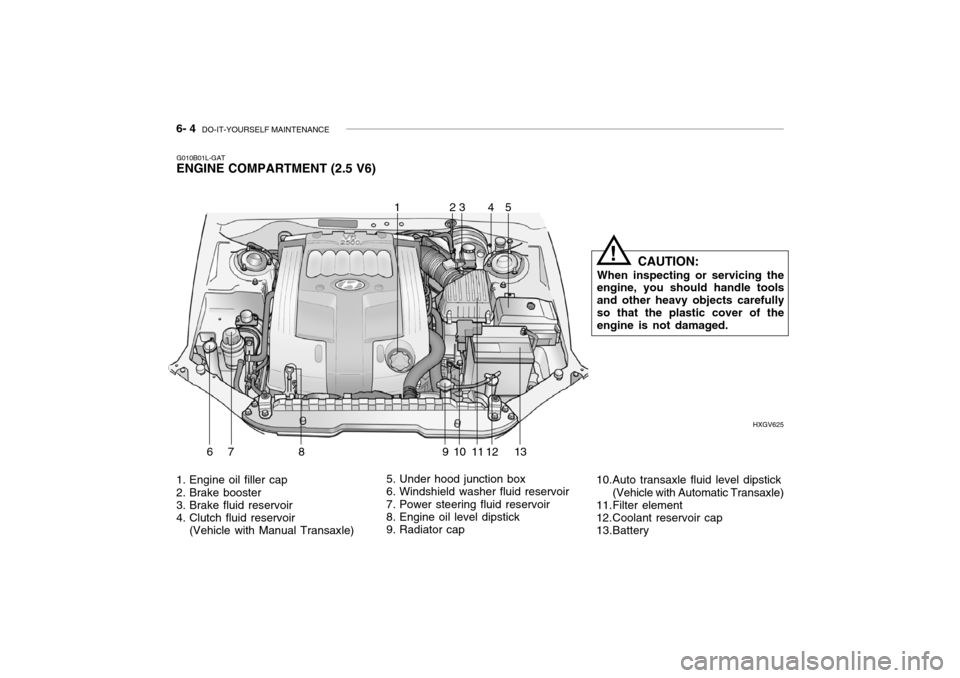
1. Engine oil filler cap
2. Brake booster
3. Brake fluid reservoir
4. Clutch fluid reservoir
(Vehicle with Manual Transaxle) 5. Under hood junction box
6. Windshield washer fluid reservoir
7. Power steering fluid reservoir
8. Engine oil level dipstick
9. Radiator cap
10.Auto transaxle fluid level dipstick
(Vehicle with Automatic Transaxle)
11.Filter element
12.Coolant reservoir cap
13.Battery HXGV625
G010B01L-GAT
ENGINE COMPARTMENT (2.5 V6)
53
678910 1112
124
13
CAUTION:
When inspecting or servicing the engine, you should handle tools and other heavy objects carefullyso that the plastic cover of the engine is not damaged.!
Page 187 of 235

DO-IT-YOURSELF MAINTENANCE 6- 5
G020A02A-AAT
GENERAL CHECKS Engine Compartment
The following should be checked regu- larly:
o Engine oil level and condition
o Transaxle fluid level and condition
o Brake fluid level
o Clutch fluid level
o Coolant level
o Windshield washer fluid level
o Accessory drive belt condition
o Coolant hose condition
o Fluid leaks (on or below compo- nents)
o Power steering fluid level and con- dition
o Battery condition
o Air filter condition G020C01A-AAT Vehicle Interior The following should be checked each time when the vehicle is driven:
o Lights operation
o Windshield wiper operation
o Horn operation
o Defroster, heater system operation
(and air conditioning, if installed)
o Steering operation and condition
o Mirror condition and operation
o Turn signal operation
o Accelerator pedal operation
o Brake operation, including parking
brake
o Manual transaxle operation, includ- ing clutch operation
o Automatic transaxle operation, in- cluding "Park" mechanism opera-tion
o Seat control condition and opera- tion
o Seat belt condition and operation
o Sunvisor operation If you notice anything that does not operate correctly or appears to befunctioning incorrectly, inspect it care- fully and seek assistance from your Hyundai dealer if service is needed.
G020B01A-AAT
Vehicle Exterior
The following should be checked
monthly:
o Overall appearance and condition
o Wheel condition and wheel nut torgue
o Exhaust system condition
o Light condition and operation
o Windshield glass condition
o Wiper blade condition
o Paint condition and body corrosion
o Fluid leaks
o Door and hood lock condition
o Tire pressure and condition (including spare tire)
Page 189 of 235
DO-IT-YOURSELF MAINTENANCE 6- 7
G040A02A-AAT
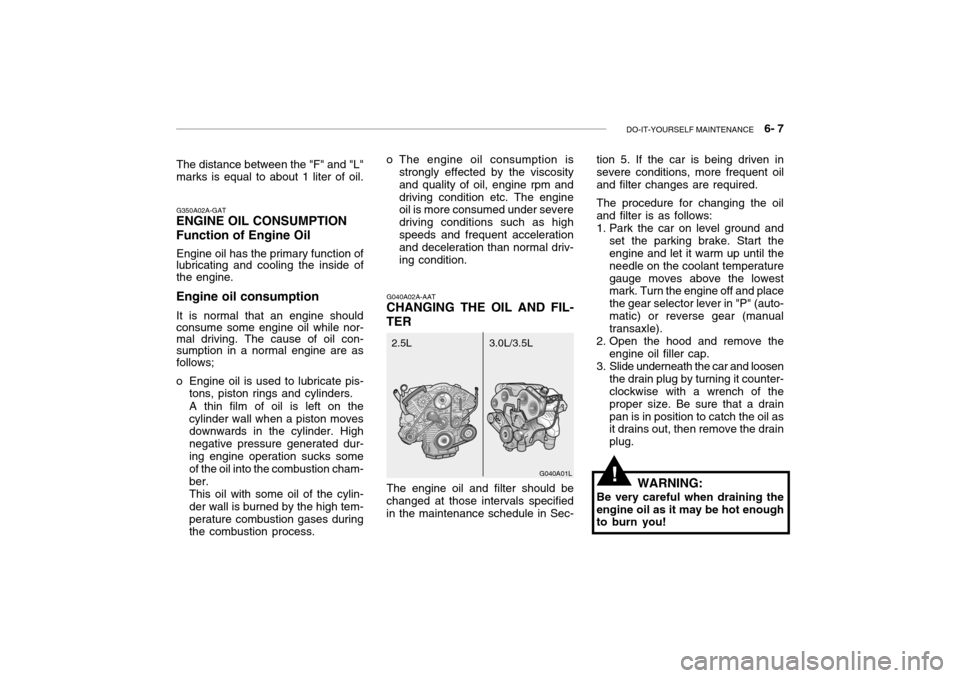
CHANGING THE OIL AND FIL- TER tion 5. If the car is being driven in severe conditions, more frequent oil and filter changes are required. The procedure for changing the oil and filter is as follows:
1. Park the car on level ground and
set the parking brake. Start the engine and let it warm up until the needle on the coolant temperaturegauge moves above the lowest mark. Turn the engine off and place the gear selector lever in "P" (auto-matic) or reverse gear (manual transaxle).
2. Open the hood and remove the engine oil filler cap.
3. Slide underneath the car and loosen the drain plug by turning it counter-clockwise with a wrench of the proper size. Be sure that a drainpan is in position to catch the oil as it drains out, then remove the drain plug.
G040A01L
3.0L/3.5L
2.5L
G350A02A-GAT
ENGINE OIL CONSUMPTION Function of Engine Oil
Engine oil has the primary function of lubricating and cooling the inside of the engine.
Engine oil consumption It is normal that an engine should consume some engine oil while nor- mal driving. The cause of oil con- sumption in a normal engine are as follows;
o Engine oil is used to lubricate pis- tons, piston rings and cylinders. A thin film of oil is left on the cylinder wall when a piston moves downwards in the cylinder. High negative pressure generated dur-ing engine operation sucks some of the oil into the combustion cham- ber.This oil with some oil of the cylin-der wall is burned by the high tem-perature combustion gases during the combustion process.
!
The distance between the "F" and "L" marks is equal to about 1 liter of oil.
WARNING:
Be very careful when draining the engine oil as it may be hot enough to burn you!
o The engine oil consumption is
strongly effected by the viscosity and quality of oil, engine rpm anddriving condition etc. The engine oil is more consumed under severe driving conditions such as highspeeds and frequent acceleration and deceleration than normal driv- ing condition.
The engine oil and filter should be
changed at those intervals specifiedin the maintenance schedule in Sec-
Page 190 of 235
6- 8 DO-IT-YOURSELF MAINTENANCE
!
4. When the oil has stopped draining,
replace the drain plug using a new gasket and retighten by turning itclockwise. Oil pan drain plug tightening torque : 3.5 ~4.0 kgf.m
5. Remove the oil filter by turning it counterclockwise with a oil filter wrench of the proper size. A cer- tain amount of oil will come out when you remove the filter. So besure to have your drain pan in place underneath it.
6. Install a new oil filter in accordance with the instructions on the carton or on the filter itself. Do not over-tighten. Oil filter tightening torque : 1.2 ~ 1.6 kgf.m Be sure that the mounting surface on the engine is clean and that theold gasket is removed completely. Lubricate the new gasket on the filter with clean engine oil beforeinstallation. 7. Remove the engine oil level dip-
stick.
8. Refill the crankcase with the rec- ommended engine oil. Refer tothe specification in chapter 9 forengine oil capacity.
G050A01A-AAT
CHECKING AND CHANGING THE ENGINE COOLANT
WARNING:
Do not remove the radiator cap
when the engine is hot. When the engine is hot, the engine coolant is under pressure and may eruptthrough the opening if the cap is removed. You could be seriously burned if you do not observe thisprecaution. Do not remove the ra- diator cap until the radiator is cool to the touch.
!
!
WARNING:
Used motor oil may cause irrita- tion or cancer of the skin if left incontact with the skin for prolonged periods of time. Wash your hands thoroughly with soap and warmwater as soon as possible after handling used oil.
CAUTION
Slowly pour the recommended oil
using by a tunnel. Do not overfill not to damage engine.
9. Start the engine and check to be sure no oil is leaking from the drain plug or oil filter.
10.Shut off the engine and recheck
the oil level.
NOTE: Always dispose of used engine oil
in an environmentally acceptable manner. It is suggested that it be placed in a sealed container andtaken to a service station for recla- mation. Do not pour the oil on the ground or put it in with the house-hold trash.
Page 191 of 235
DO-IT-YOURSELF MAINTENANCE 6- 9
G050D02A-AAT To Change the Engine Coolant The engine coolant should be changed at those intervals specified in the ve- hicle maintenance schedule in Sec-tion 5.
CAUTION:
Engine coolant can damage thefinish of your car. If you spill en- gine coolant on the car, wash it off thoroughly with clean water.
1. Park the car on level ground, set the parking brake and remove the radiator cap when cool.
2. Be sure your drain receptacle is in place. Open the drain cock on theradiator. Allow all the engine coolant to drain from the cooling system,then securely close the drain cock.
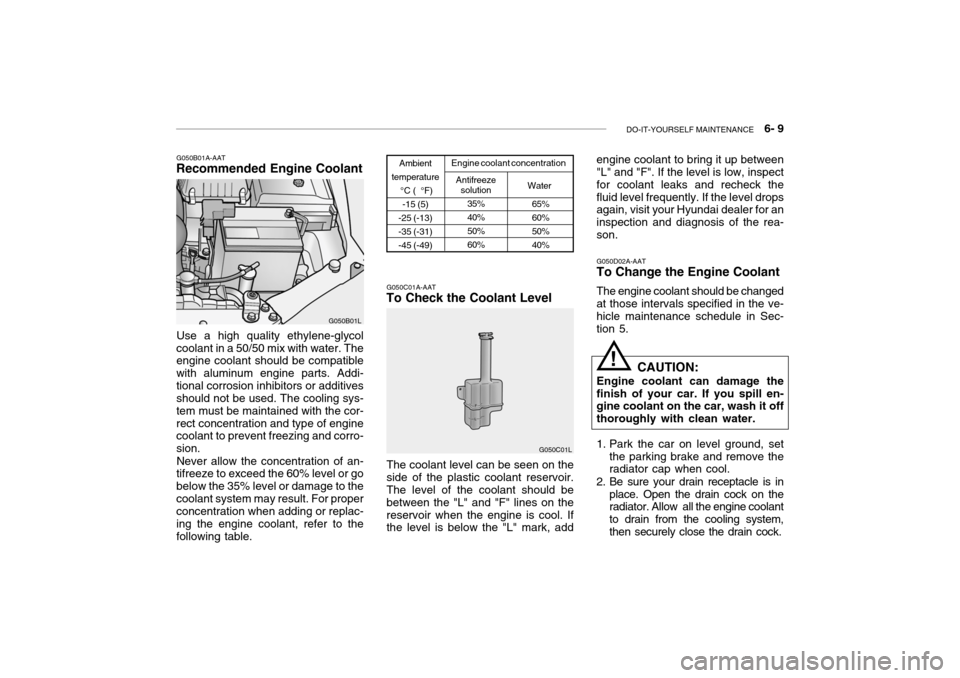
Use a high quality ethylene-glycol
coolant in a 50/50 mix with water. The engine coolant should be compatible with aluminum engine parts. Addi-tional corrosion inhibitors or additives should not be used. The cooling sys- tem must be maintained with the cor-rect concentration and type of engine coolant to prevent freezing and corro- sion.
Never allow the concentration of an-
tifreeze to exceed the 60% level or gobelow the 35% level or damage to thecoolant system may result. For proper concentration when adding or replac- ing the engine coolant, refer to thefollowing table.
Ambient
temperature °C ( °F)-15 (5)
-25 (-13) -35 (-31)-45 (-49) Engine coolant concentration
Antifreeze solution
Water
G050C01A-AAT
To Check the Coolant Level
The coolant level can be seen on the side of the plastic coolant reservoir. The level of the coolant should be between the "L" and "F" lines on thereservoir when the engine is cool. If the level is below the "L" mark, add G050C01L
65% 60%50%40%
35%40%50%60%
G050B01A-AAT
Recommended Engine Coolant
G050B01L engine coolant to bring it up between "L" and "F". If the level is low, inspect for coolant leaks and recheck thefluid level frequently. If the level drops again, visit your Hyundai dealer for an inspection and diagnosis of the rea-son.
!