2004 Hyundai Coupe lights
[x] Cancel search: lightsPage 263 of 389
1
FEATURES OF YOUR HYUNDAI
83
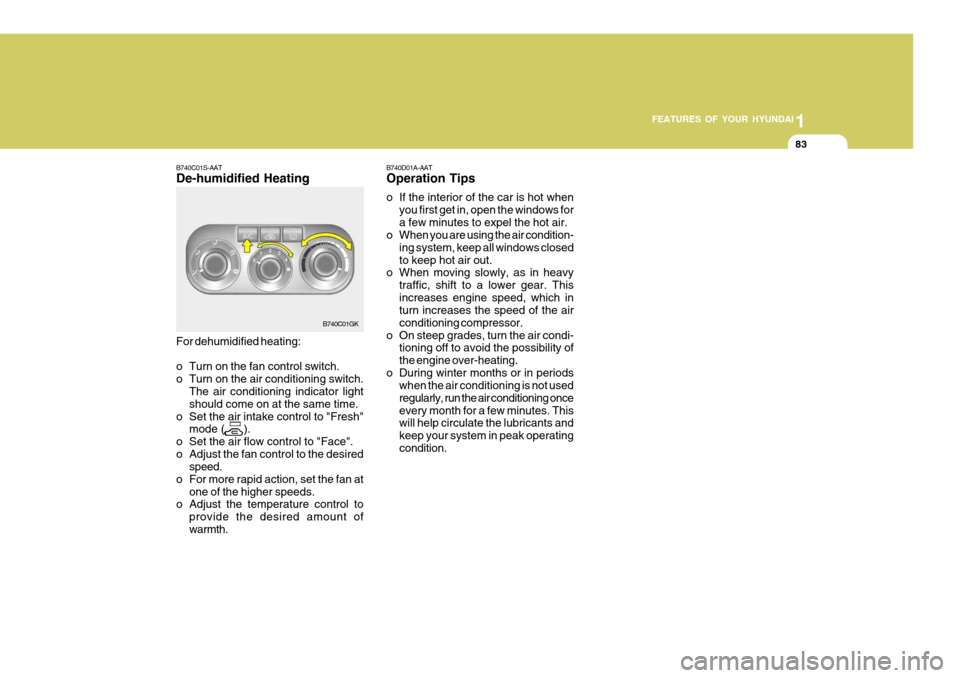
B740C01S-AAT De-humidified Heating For dehumidified heating:
o Turn on the fan control switch.
o Turn on the air conditioning switch.
The air conditioning indicator lightshould come on at the same time.
o Set the air intake control to "Fresh" mode ( ).
o Set the air flow control to "Face".
o Adjust the fan control to the desired speed.
o For more rapid action, set the fan at
one of the higher speeds.
o Adjust the temperature control to
provide the desired amount ofwarmth. B740D01A-AAT Operation Tips
o If the interior of the car is hot when
you first get in, open the windows for a few minutes to expel the hot air.
o When you are using the air condition-
ing system, keep all windows closedto keep hot air out.
o When moving slowly, as in heavy
traffic, shift to a lower gear. Thisincreases engine speed, which in turn increases the speed of the air conditioning compressor.
o On steep grades, turn the air condi- tioning off to avoid the possibility ofthe engine over-heating.
o During winter months or in periods when the air conditioning is not usedregularly, run the air conditioning onceevery month for a few minutes. This will help circulate the lubricants and keep your system in peak operatingcondition.
B740C01GK
Page 279 of 389
2
DRIVING YOUR HYUNDAI
3TO START THE ENGINEBEFORE STARTING THE EN- GINE
SC030A1-E Before you start the engine, you should always:
1. Look around the vehicle to be sure
there are no flat tires, puddles of oil or water or other indications of pos- sible trouble.
2. After entering the car, check to be sure the parking brake is engaged.
3. Check that all windows, and lights
are clean.
4. Check that the interior and exterior mirrors are clean and in position.
5. Check your seat, seatback and head restraint to be sure they are intheir proper positions.
6. Close all the doors.
7. Fasten your seat belt and be sure that all other occupants have fas-tened theirs.
8. Turn off all lights and accessories that are not needed.
9. When you turn the ignition switch to "ON' check that all appropriate warning lights are operating and that you have sufficient fuel.
10.Check the operation of warning lights and all bulbs when key is inthe "ON" position. SC040A1-F COMBINATION IGNITION SWITCH AND STEERING LOCK
o If your Hyundai is equipped with a
manual transaxle, place the shift lever in neutral and depress the clutch pedal fully.
o If your Hyundai has an automatic
transaxle, place the shift lever in "P"(park).
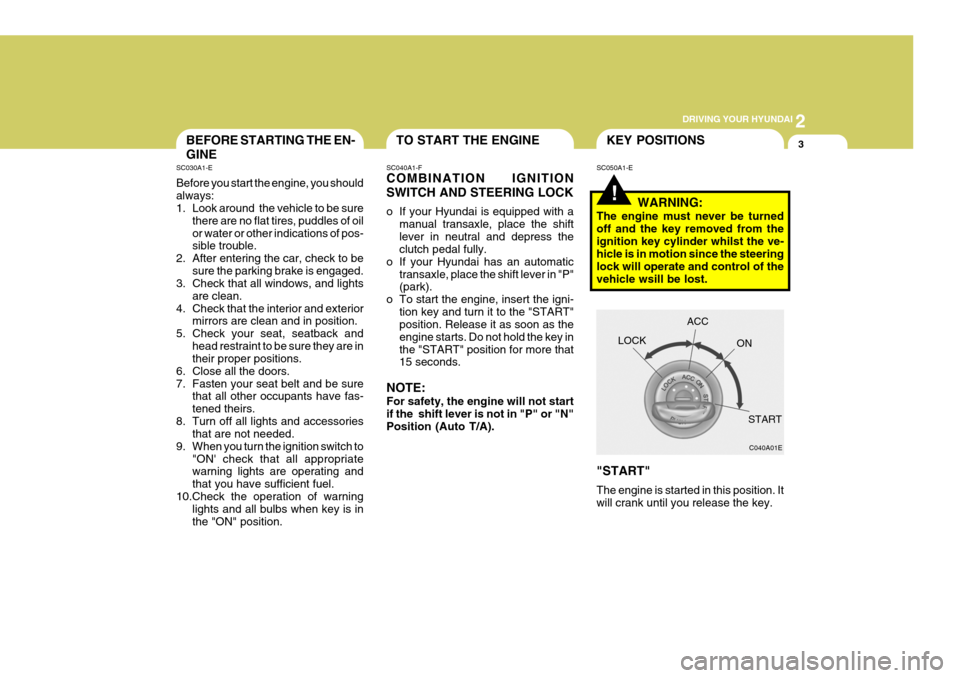
o To start the engine, insert the igni- tion key and turn it to the "START"position. Release it as soon as the engine starts. Do not hold the key inthe "START" position for more that 15 seconds.
NOTE: For safety, the engine will not start if the shift lever is not in "P" or "N" Position (Auto T/A).
!
SC050A1-E KEY POSITIONS
WARNING:
The engine must never be turned off and the key removed from theignition key cylinder whilst the ve- hicle is in motion since the steering lock will operate and control of thevehicle wsill be lost. "START" The engine is started in this position. It will crank until you release the key. LOCK
C040A01E
ACC
ON
START
Page 284 of 389
2DRIVING YOUR HYUNDAI
8
NOTE:
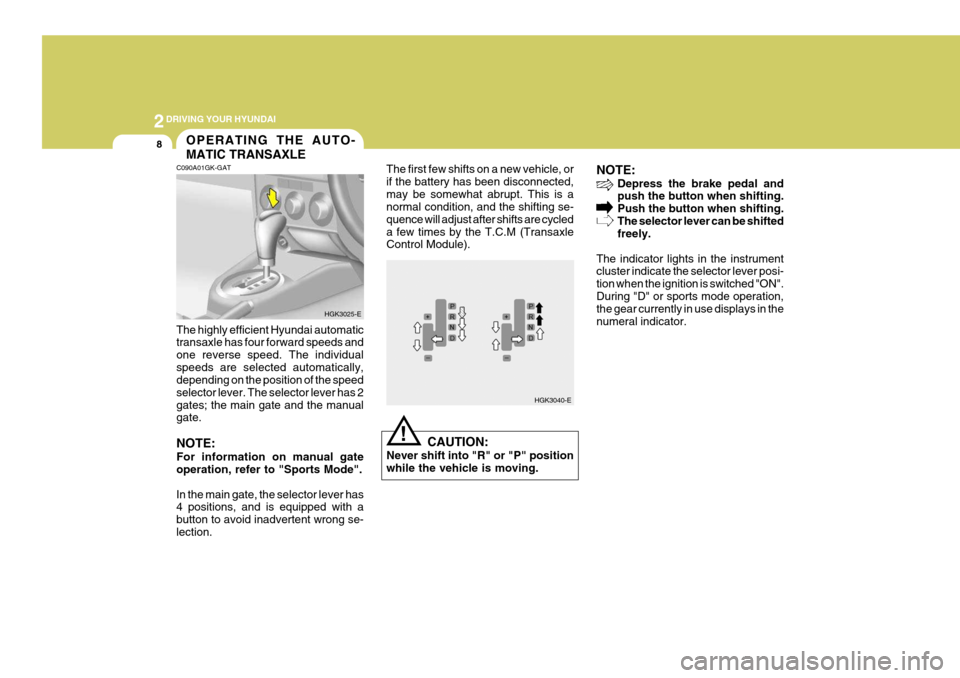
Depress the brake pedal and push the button when shifting. Push the button when shifting.The selector lever can be shifted freely.
The indicator lights in the instrumentcluster indicate the selector lever posi- tion when the ignition is switched "ON".During "D" or sports mode operation, the gear currently in use displays in the numeral indicator.
HGK3040-E
!
C090A01GK-GAT OPERATING THE AUTO- MATIC TRANSAXLE
The highly efficient Hyundai automatic transaxle has four forward speeds and one reverse speed. The individualspeeds are selected automatically, depending on the position of the speed selector lever. The selector lever has 2gates; the main gate and the manual gate. NOTE: For information on manual gate operation, refer to "Sports Mode". In the main gate, the selector lever has 4 positions, and is equipped with a button to avoid inadvertent wrong se-lection. The first few shifts on a new vehicle, orif the battery has been disconnected,may be somewhat abrupt. This is a normal condition, and the shifting se- quence will adjust after shifts are cycleda few times by the T.C.M (Transaxle Control Module).
CAUTION:
Never shift into "R" or "P" positionwhile the vehicle is moving.
HGK3025-E
Page 290 of 389
2DRIVING YOUR HYUNDAI
14
SC150A1-F You can save fuel and get more miles from your car if you follow these sug- gestions:
o Drive smoothly. Accelerate at a
moderate rate. Don't make "jack- rabbit" starts or full-throttle shiftsand maintain a steady cruising speed. Don't race between stop- lights. Try to adjust your speed tothat of the other traffic so you don't have to change speeds unneces- sarily.Avoid heavy traffic whenever pos- sible. Al-ways maintain a safe dis- tance from other vehicles so youcan avoid unnecessary brak-ing. This also reduces brake wear.
o Drive at a moderate speed. The faster you drive, the more fuel yourcar uses. Driving at a moderate speed, especially on the highway, isone of the most effective ways to reduce fuel consumption.
DRIVING FOR ECONOMY
4) When moving out of the mud or fresh snow, pressing the accel- erator pedal may not cause the engine speed to increase due to ESP operation.
C310D01LZ-AAT Indicators and Warning The indicators should illuminate when the ignition key is turned to ON orSTART but should go out after three seconds. If the indicators do not illuminate, orthe ESP or ESP-OFF indicator does not go out after 3 seconds, have it checked by Hyundai authorised re-pairer. Should there be any unusual condi- tions in the device while driving, ESP- OFF indicator illuminates as a warn- ing.If ESP-OFF indicator illuminates, pull your car to a safe place and stop the engine.Then, start the engine again to check if the ESP-OFF indicator goes out. If the indicator remains lit even after the engine has been started, haveyour car checked by an Hyundai authorised repairer. NOTE:
1) When the ESP-OFF indicator il-
luminates, electronic stability program is automatically deacti- vated for safety.
2) This warning function is not pro- vided when the driver selects theESP-OFF mode.
Page 297 of 389
2
DRIVING YOUR HYUNDAI
21
!WARNING:
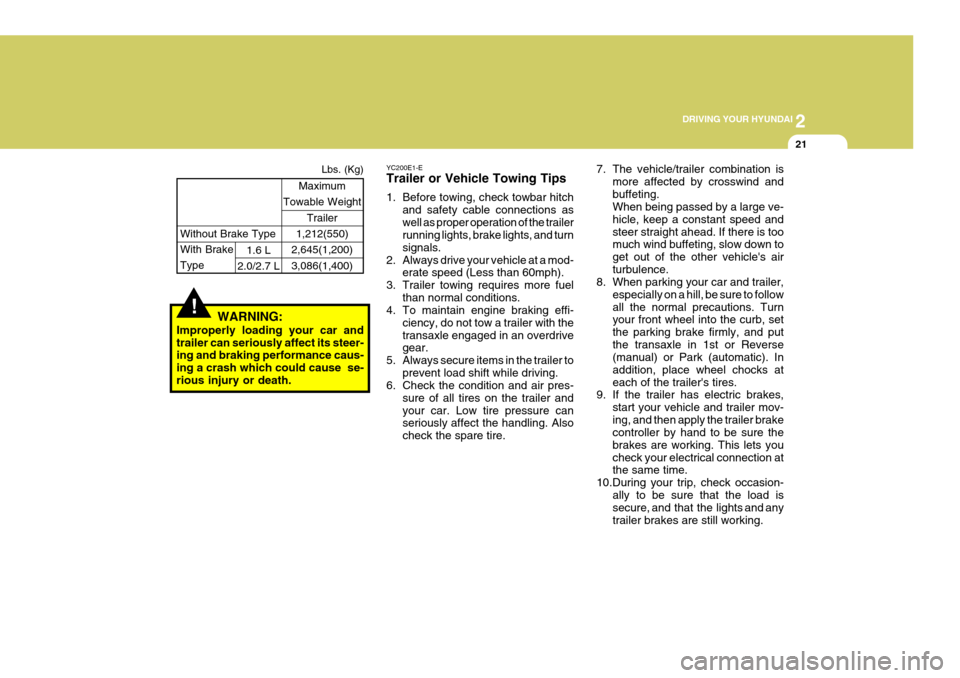
Improperly loading your car and trailer can seriously affect its steer- ing and braking performance caus- ing a crash which could cause se-rious injury or death. Without Brake Type
Maximum
Towable Weight
Trailer
1,212(550)
2,645(1,200) 3,086(1,400)
With Brake Type1.6 L
2.0/2.7 L Lbs. (Kg)
7. The vehicle/trailer combination is
more affected by crosswind and buffeting. When being passed by a large ve- hicle, keep a constant speed andsteer straight ahead. If there is too much wind buffeting, slow down to get out of the other vehicle's airturbulence.
8. When parking your car and trailer,
especially on a hill, be sure to followall the normal precautions. Turn your front wheel into the curb, set the parking brake firmly, and putthe transaxle in 1st or Reverse (manual) or Park (automatic). In addition, place wheel chocks ateach of the trailer's tires.
9. If the trailer has electric brakes,
start your vehicle and trailer mov-ing, and then apply the trailer brake controller by hand to be sure the brakes are working. This lets youcheck your electrical connection at the same time.
10.During your trip, check occasion- ally to be sure that the load issecure, and that the lights and any trailer brakes are still working.
YC200E1-E Trailer or Vehicle Towing Tips
1. Before towing, check towbar hitch
and safety cable connections as well as proper operation of the trailer running lights, brake lights, and turn signals.
2. Always drive your vehicle at a mod- erate speed (Less than 60mph).
3. Trailer towing requires more fuel than normal conditions.
4. To maintain engine braking effi-
ciency, do not tow a trailer with thetransaxle engaged in an overdrive gear.
5. Always secure items in the trailer to prevent load shift while driving.
6. Check the condition and air pres-
sure of all tires on the trailer and your car. Low tire pressure can seriously affect the handling. Also check the spare tire.
Page 301 of 389

3
IN CASE OF EMERGENCY
3
!
!
D010C01A-AAT If Engine Turns Over Normally but Does Not Start
1. Check fuel level.
2. With the key in the off position,
Check all connectors at ignition coils and spark plugs. Reconnect any that may be disconnected or loose.
3. Check the fuel line in the engine room.
4. If engine still refuses to start, call a Hyundai dealer or seek other quali- fied assistance.
D010D01A-AAT If Engine Stalls While Driving
1. Reduce your speed gradually, keep- ing a straight line. Move cautiously off the road to a safe place.
2. Turn on your emergency flashers.
3. Try to start the engine again. If your vehicle will not start, contact aHyundai dealer or seek other quali-fied assistance. SD030A2-E
CAUTION:
Personal injury and damage to thevehicle may occur if jump startingis not performed correctly. If any doubt exists as to how this opera- tion should be performed, seek as-sistance from qualified personnel.
JUMP STARTING
WARNING:
Motor vehicle batteries contain sulphuric acid and emit hydrogen gas. Protective clothing should beworn and care exercised to prevent the acid from coming into contact with skin or clothing and the ve-hicle. Naked lights should not be permitted in the vicinity of the bat- tery. Care should be exercised toprevent sparks occurring during connection. If acid accidentally comes into contact with skin oreyes, the affected area should im- mediately be flushed with copious amounts of water and medical as-sistance sought.
1.6L/2.0L
HGK4001
HGK4002
Dis- chargedbattery
2.7L Booster battery
Dis- chargedbattery
Booster battery
Page 356 of 389
6OWNER MAINTENANCE
30
o If battery electrolyte is spilled onto
skin or into eyes, the effected area must be flushed with copious amounts of water and medical assis-tance sought.
o If battery electrolyte is ingested, copious amounts of water or milkfollowed by an ant-acid (raw egg ormilk of magnesia) must be drunk. Vomiting should not be induced and medical assistance must besought.
o Batteries must only be charged in well venti-lated areas from which naked lights or sources of sparks are excluded.
o Ensure that children, pets or other unautho-rized persons are keptaway from batteries.
o Do not allow anything to bridge the
positive (+) and negative (-) termi-nals of the battery.
o Never invert the battery.
The battery fitted during production isof the "Maintenance Free" type.
ELECTRIC COOLING FANS
!
YG210A1-E
WARNING:
The cooling fan is controlled by engine coolant temperature and may sometimes operate even whenthe engine is not running. Do not touch the radiator fan until it is completely stopped.As the coolant temperature de-creases the fan will automaticallyshut off. This is a normal condi- tion.
Checking Engine Cooling Fan The engine cooling fan should auto- matically come on if the engine cool-ant temperature is high.
Checking Condenser Cooling Fan The condenser cooling fan (in front of the condenser) should come on auto- matically whenever the air conditioneris in operation.
POWER STEERING HOSES
YG220A1-E It is suggested that you check the power steering hose connections for fluid leakage at those intervals speci- fied in the vehicle maintenance sched-ule in Section 5. The power steering hoses should be replaced if there are severe surface cracking, pulling, scuff-ing or worn spots. Deterioration of the hoses could cause premature failure. NOTE: The power steering pump may be noisy when the engine is firststarted in the extreme cold (-4°F). This noise is not abnormal and will stop as the engine warms up.If the power steering pump contin- ues to be noisy after the engine has warmed up, have it inspectedby your Authorized Hyundai Dealer.
Page 358 of 389
6OWNER MAINTENANCE
32
G290B01GK-EAT
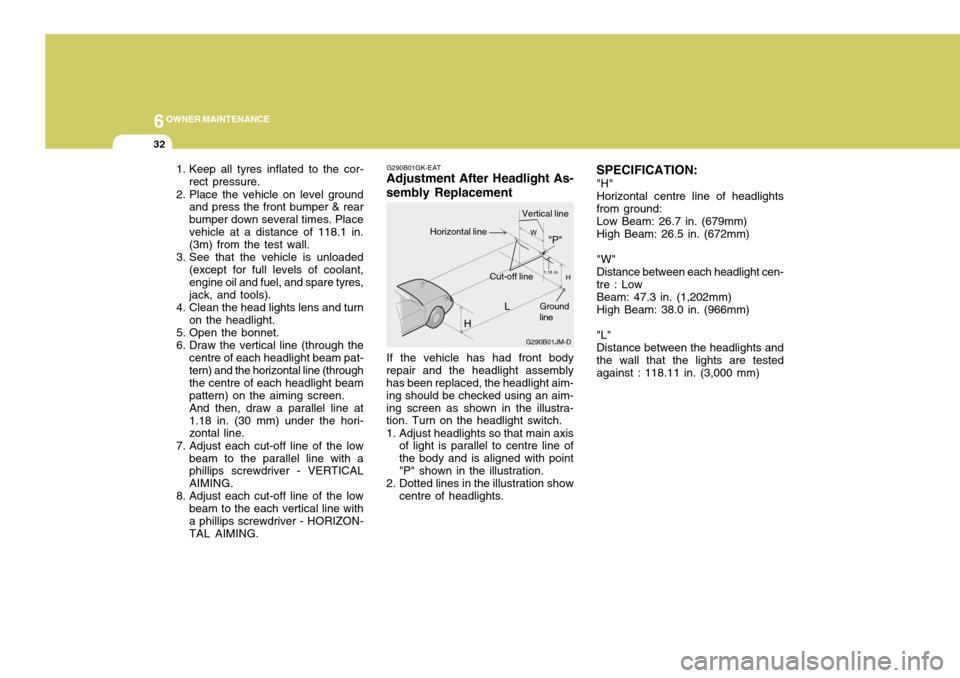
Adjustment After Headlight As- sembly Replacement
If the vehicle has had front body
repair and the headlight assembly has been replaced, the headlight aim- ing should be checked using an aim-ing screen as shown in the illustra- tion. Turn on the headlight switch.
1. Adjust headlights so that main axis of light is parallel to centre line of the body and is aligned with point"P" shown in the illustration.
2. Dotted lines in the illustration show centre of headlights. SPECIFICATION:
"H" Horizontal centre line of headlights from ground: Low Beam: 26.7 in. (679mm) High Beam: 26.5 in. (672mm) "W" Distance between each headlight cen- tre : Low Beam: 47.3 in. (1,202mm) High Beam: 38.0 in. (966mm) "L" Distance between the headlights and the wall that the lights are tested against : 118.11 in. (3,000 mm)
1. Keep all tyres inflated to the cor-
rect pressure.
2. Place the vehicle on level ground and press the front bumper & rearbumper down several times. Placevehicle at a distance of 118.1 in. (3m) from the test wall.
3. See that the vehicle is unloaded (except for full levels of coolant, engine oil and fuel, and spare tyres,jack, and tools).
4. Clean the head lights lens and turn on the headlight.
5. Open the bonnet.
6. Draw the vertical line (through the centre of each headlight beam pat- tern) and the horizontal line (through the centre of each headlight beampattern) on the aiming screen.And then, draw a parallel line at1.18 in. (30 mm) under the hori- zontal line.
7. Adjust each cut-off line of the low beam to the parallel line with aphillips screwdriver - VERTICAL AIMING.
8. Adjust each cut-off line of the low beam to the each vertical line witha phillips screwdriver - HORIZON- TAL AIMING. L
G290B01JM-D
W
H
H Cut-off line"P"
Vertical lineHorizontal line
Ground line
1.18 in.