2004 Hyundai Coupe heating
[x] Cancel search: heatingPage 282 of 389
2DRIVING YOUR HYUNDAI
6
!
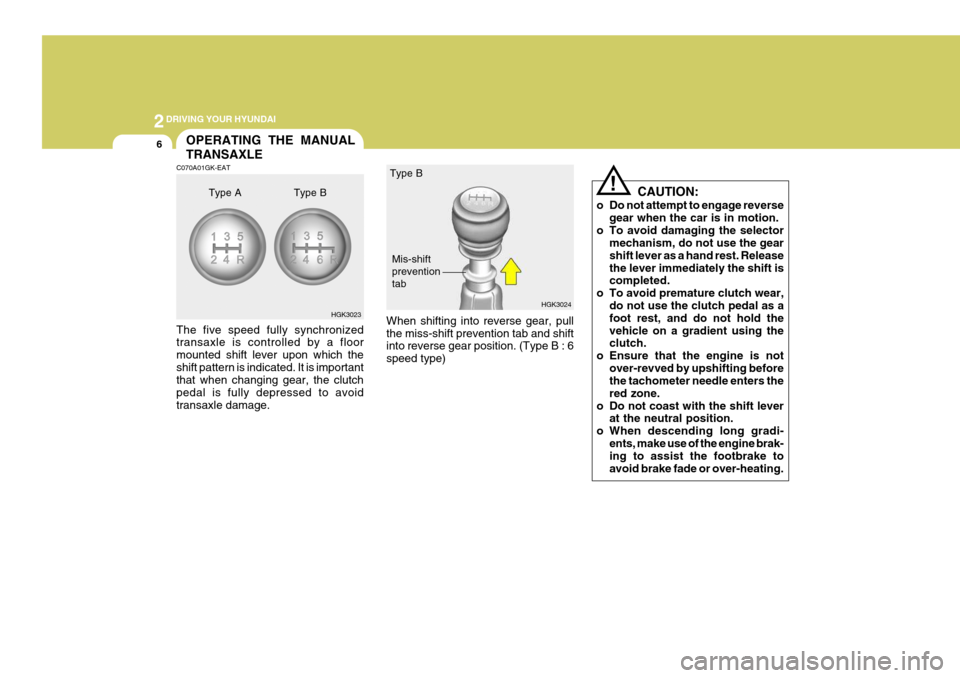
When shifting into reverse gear, pull the miss-shift prevention tab and shift into reverse gear position. (Type B : 6 speed type) HGK3024
Type B
Mis-shift preventiontab
OPERATING THE MANUAL TRANSAXLE
C070A01GK-EAT The five speed fully synchronized transaxle is controlled by a floor mounted shift lever upon which theshift pattern is indicated. It is important that when changing gear, the clutch pedal is fully depressed to avoidtransaxle damage. HGK3023
Type A Type B
CAUTION:
o Do not attempt to engage reverse gear when the car is in motion.
o To avoid damaging the selector mechanism, do not use the gearshift lever as a hand rest. Releasethe lever immediately the shift is completed.
o To avoid premature clutch wear,
do not use the clutch pedal as afoot rest, and do not hold the vehicle on a gradient using the clutch.
o Ensure that the engine is not over-revved by upshifting beforethe tachometer needle enters the red zone.
o Do not coast with the shift lever at the neutral position.
o When descending long gradi- ents, make use of the engine brak- ing to assist the footbrake to avoid brake fade or over-heating.
Page 298 of 389
2DRIVING YOUR HYUNDAI
22
11.Avoid jerky starts, sudden accel-eration or sudden stops.
12.Avoid sharp turns and rapid lane changes.
13.Avoid holding the brake pedal down
too long or too frequently. This could cause the brakes to overheat, re- sulting in reduced braking efficiency.
14.When going down a hill, shift into a lower gear and use the engine brak-ing effect.When ascending a long grade, downshift the transaxle to a lower gear and reduce speed to reducechances of engine overloading and/ or overheating.
15.If you have to stop while going uphill, do not hold the vehicle inplace by pressing on the accelera- tor. This can cause the automatictransaxle to overheat. Use the park- ing brake or footbrake.
NOTE: When towing check transaxle fluid more frequently. CAUTION:
If overheating should occur whentowing, (temperature gauge readsnear red zone), taking the following action may reduce or eliminate the problem.
1. Turn off the air conditioner.
2. Reduce highway speed.
3. Select a lower gear when going uphill.
4. While in stop and go traffic, place the gear selection in park or neu- tral and idle the engine at a higher speed.
!
Page 302 of 389

3 IN CASE OF EMERGENCY
4
7. Swithc "ON" the main beam
headlamps before carefully remov- ing the jumper cables have been removed, switch "OFF" the main beam geadlamps. SD040A2-E If the temperature gauge indicates overheating:
1. Pull off the road and stop as soon as
it is safe to do so.
2. Place the gear selector lever in "P"
(automatic), or neutral (manual transaxle) and set the parking brake. If the air conditioning is on, turn it off.
3. If coolant is running out under the car or steam is coming out fromunder the bonnet stop the engine. Do not open the bonnet until thecoolant has stopped running or the steaming has stopped. If there is no visible loss of coolant and no steam,leave the engine running and check to be sure the engine cooling fan is operating.If the fan is not running, turn the engine off.
4. Check to see if the water pump drive belt is missing. If it is not missing,check to see that it is tight. If the drive belt seems to be satisfac-tory,check for coolant leaking from the radiator, hoses or under the car. (If the air conditioning had been in use,it is normal for cold water to be draining from it).
IF THE ENGINE OVERHEATS
1. Ensure that the booster battery is 12 volt type. If the booster battery is installed in another vehicle, ensure that the two vehicles are not touch- ing.
2. Turn off all unnecessary electrical equipment in both vehicles.
3. Ensure that the engine of the ve- hicle providing the jump start is run- ning prior to connection of the jump cables.
4. Connect the red jump cable to the positive (+) terminal of the boosterbattery and the other end to thepositive (+) terminal of the dis- charged battery.
5. Attach the black jump cable to the negative (-) terminal of thebooster battery, and the other end to a ground point within the enginecompartment of the vehicle with the flat battery. Do not connect to the negative battery terminal of the flatbattery since sparks may be gener- ated with the subsequent risk of explosion.
6. Raise the booster vehicle engine speed to 2,000 r.p.m. and start theengine of the vehicle with the flatbattery. CAUTION:
If the jump cable is incorrectly in-stalled, damage to the vehicle elec-trical system may occur, in particu- lar the electronic components such as the Fuel Injection system com- puter and the Automatic Transaxle computer. The battery must neverbe disconnected whilst the engine is running.
!
Page 303 of 389
3
IN CASE OF EMERGENCY
5
!
!WARNING:
Whilst the engine is running, keep hands and clothing away from mov- ing parts such as the fan and drive belts to prevent injury.
5. If the water pump drive belt is bro- ken or coolant is leaking out, stop the engine immediately and call the nearest Hyundai dealer for assis-tance.
WARNING:
Do not remove the radiator cap when the engine is hot since steam and boiling water may be ejected fromthe radiator resulting in burns or scalding.
!
6. If the cause of the overheating can- not be found, wait until the engine temperature has returned to nor- mal. Then, if coolant has been lost, carefully add coolant to the reser-voir (page 6-11) to bring the fluid level in the reservoir up to the base of the radiator fill opening. Fill thecoolant expansion tank to the half- way mark.
7. Proceed with caution until it is es- tablished that the engine is operat-ing normally. If the engine over- heats repeatedly, the advice of aHyundai dealer should be sought.
CAUTION:
Serious loss of coolant indicatesthere is a leak in the cooling systemand this should be checked as soon as possible by a Hyundai dealer.D040A01GK-EAT TEMPORARY SPARE TYRE The following instructions for the tem- porary spare tyre should be observed:
1. Check inflation pressure as soon as practical after installing the spare tyre, and adjust to the specified pressure. The tyre pressure should be periodically checked and main-tained at the specified pressure while the tyre is stored.
2. The spare tyre should only be used temporarily and should be returnedto the luggage compartment as soon as the original tyre can be repairedor replaced.
SPARE TYRE
Tyre Size
Inflation Pressure T125/70 R16
420 kPa (60 psi)
Spare Tyre Pressure
3. Continuous use at speeds of over 50 mph (80 km/h) is not recom- mended.
4. As the temporary spare tyre is spe-
cifically designed for your car, itshould not be used on any other vehicle.
Page 316 of 389
4
CORROSION PREVENTION AND APPEARANCE CARE
5
4
APPEARANCE CARE
5INTERIOR VALETING
JE100A1-E Seat Belts Seat belts should be cleaned only with a mild soap solution. Strong deter- gents, solvens or bleaches may dam- age the belt webbing and thereforereduce the effectiveness of the belt. Belts which display signs of fraying, wear or cut should be replaced.
JE110A1-E The soft trim and carpets should be maintained with the regular use of a vacuum cleaner. Heavy soiling should be removed with a dry cleaning agentrecommended for this purpose follow- ing the instructions of the product manufacturer. Paint thinner, solventsor other such cleaning materials should not be used since damage to the up- holstery may result.
JE120A1-E Windows A proprietary glass cleaner should be used to clean the inside of the win-dows. However, the rear heated windscreen must only be cleaned us- ing a light horizontal cleaning action.Care should be exercised to avoid the use of abrasive cleaners or contact with items of jewellery which may dam-age the heating elements.
Fine leather needs care. This care, aswith all fine things, need not be elabo-rated, but should include cleaning when necessary. Washing leather thoroughly with soap and water will keep yourleather lustrous, beautiful and ensure you have many years of wear. Take a piece of cheese cloth and usingany mild soap and lukewarm water, work up a good lather. Thoroughly wash the leather. Wipe clean with aslightly damp cloth and dry with soft cloth. Do this as often as the leather becomes soiled.During tanning operations, sufficient oils are incorporated through process- ing that none need be applied duringthe life of the leather. Oil applied to the finished surface will in no way help the leather and may do more harm thangood. Varnished and furniture polishes should NEVER be used under any conditions.
YE010A1-E To Clean Leather Upholstery (Not all models) In the normal course of use, leather upholstered surfaces will, like any material, pick-up dust and dirt. This dust and dirt MUST be cleaned off or itmay work into the surface of the leather, causing damage.
Page 336 of 389
6OWNER MAINTENANCE
10
SG050B1-E
Coolant recommendations
Only ethylene glycol based coolant with a corrosion inhibitor suited to aluminium alloy engine components should be used in the cooling system.No further additives or inhibitors should be used. The coolant specific gravity should be checked as pre-scribed in the maintenance schedule to ensure adequate frost and corro- sion protection. In addition, the en-gine coolant must be replaced at the specified interval since the corrosion inhibitor properties deteriorate withtime.It is important to note that whilst anincrease in the concentration of anti freeze gives an increase in the level of frost protection, a solution which isin excess of 65% anti freeze will result in reduced frost protection and engine overheating. Therefore therecommended concentration of 50% should not be exceeded for general use. The use of methanol based anti freeze compounds may result in engine over- heating and will invalidate the vehiclewarranty.
!
ENGINE COOLANT CHECK- ING AND REPLACING
SG050A1-E
WARNING:
Do not remove the radiator cap
when the engine is hot, since the system is pressurized and coolant may be ejected from the radiator resulting in scalding. NOTE: It is imperative that vehicles fitted
with an air conditioning system have a coolant concentration of the recommended strength at all times. The use of the air condition-ing system when the cooling sys- tem is filled with water only will result in the heater matrix freezingand subsequently bursting.
Page 376 of 389
8
CONSUMER INFORMATION
3
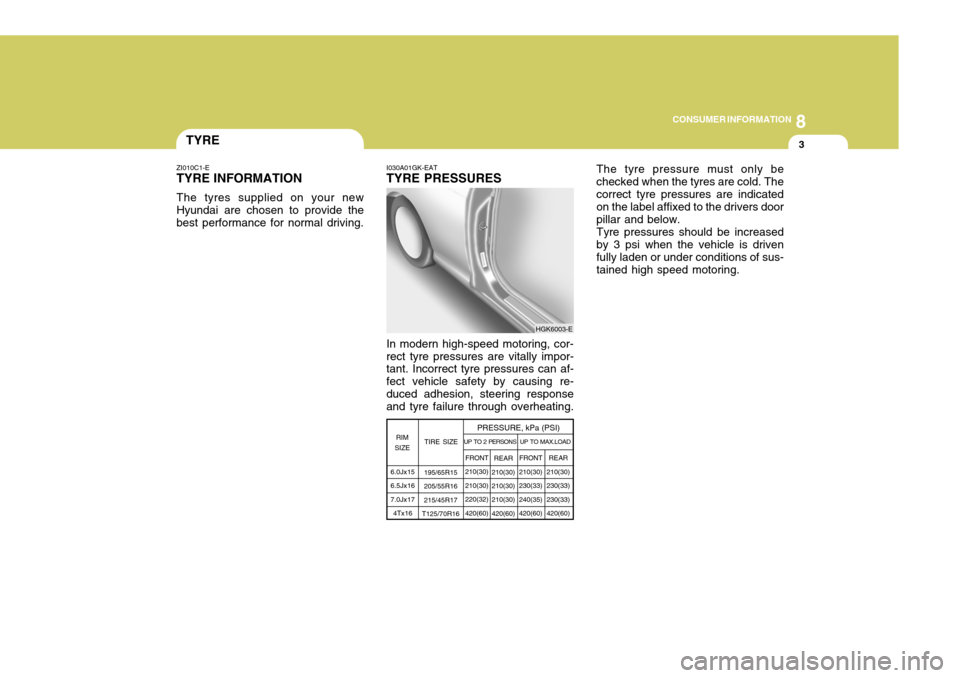
I030A01GK-EAT TYRE PRESSURES In modern high-speed motoring, cor- rect tyre pressures are vitally impor- tant. Incorrect tyre pressures can af- fect vehicle safety by causing re-duced adhesion, steering response and tyre failure through overheating. The tyre pressure must only be checked when the tyres are cold. Thecorrect tyre pressures are indicated on the label affixed to the drivers door pillar and below.
Tyre pressures should be increased
by 3 psi when the vehicle is drivenfully laden or under conditions of sus-tained high speed motoring.
6.0Jx15 6.5Jx167.0Jx17 4Tx16 TIRE SIZE
RIM
SIZE PRESSURE, kPa (PSI)
REAR
210(30) 210(30) 210(30)420(60) FRONT
210(30)230(33)240(35) 420(60)
UP TO 2 PERSONS UP TO M
AX.LOAD
REAR
210(30) 230(33)230(33) 420(60)
FRONT
210(30) 210(30)220(32)420(60)
195/65R15 205/55R16215/45R17
T125/70R16
HGK6003-E
TYRE
ZI010C1-E TYRE INFORMATION The tyres supplied on your new Hyundai are chosen to provide the best performance for normal driving.
Page 387 of 389

10
INDEX
3
F Folding rear seat ....................................................... 1-17
Front ashtray ............................................................. 1-57
Front door edge warning lamp ................................. 1-65
Front fog light switch ................................................ 1-54
Front seat adjustment ............................................... 1-12
Fuel economy ............................................................. 2-5
Fuel gauge ................................................................ 1-44
Fuel recommendations ................................................ 1-2
Fuse panel description .............................................. 6-41
Fusible links .............................................................. 6-28
GGlove box .................................................................. 1-62
H Hatchback door ......................................................... 1-67
Rear window wiper and washer ............................... 1-53
Hazard warning system ............................................ 1-55
Headlight aiming adjustment..................................... 6-31
Headlight leveling device syst em .............................1-58
Head restraint adjustment .................... ..................... 1-13
Heated rear window.................................................. 1-55
Heating and cooling control ...................................... 1-75
Rotary type ................................................ 1-76 ~ 1-83
Automatic type ........................................... 1-84 ~ 1-91
Height adjustable front seat shoulder belt ................1-20
Horn .......................................................................... 1-69I
If the engine cannot be cranked
................................ 3-2
If the engine overheats ............................................... 3-4
If the engine will not start ........................................... 3-2
If your vehicle must be towed ..................................3-12
Immobilizer system ..................................................... 1-4
Individual circuit fuses ............................................... 6-28
Instrument cluster and indicatorlight......................... 1-38
Instrument panel illumination control ........................1-37
In the event of a puncture .......................................... 3-6 J
Jump starting .............................................................. 3-3
K Key positions ............................................................... 2-3
Keys ............................................................................ 1-4 L Lighting switch .......................................................... 1-50
Luggage net .............................................................. 1-70
Lumbar support adj ustment...................................... 1-14
M Maintenance and servicing requirements ...................5-2
Maintenance under severe usage conditions ............. 5-6
Manual transaxle lubricant .......... .............................. 6-18
Manual transaxle ......................................................... 2-6