2004 Hyundai Coupe oil temperature
[x] Cancel search: oil temperaturePage 138 of 389

DO-IT-YOURSELF MAINTENANCE
6-6 G040A02GK-GAT
CHANGING THE OIL AND FILTER
The engine oil and filter should be changed at those intervals specified in the maintenanceschedule in Section 5. If the car is being drivenin severe conditions, more frequent oil and filterchanges are required. The procedure for changing the oil and filter is as follows:
1. Park the car on level ground and set the parking brake. Start the engine and let itwarm up until the needle on the coolanttemperature gauge moves above the lowestmark. Turn the engine off and place the gearselector lever in "P" (automatic) or reversegear (manual transaxle).
2. Open the hood and remove the engine oil filler cap.
G040A01GK 3. Slide underneath the car and loosen the
drain plug by turning it counterclockwise with a wrench of the proper size. Be surethat a drain pan is in position to catch the oilas it drains out, then remove the drain plug.
WARNING: Be very careful when draining the engine oil as it may be hot enough to burn you!
4. When the oil has stopped draining, replace the drain plug using a new washer and retighten by turning it clockwise. Tightening torque :
4.5 ~ 4.0 kgf.m (1.6/2.0L) 4.5 ~ 3.5 kgf.m (2.7L)
5. Remove the oil filter by turning it counter- clockwise with a oil filter wrench of the proper size. A certain amount of oil willcome out when you remove the filter. So besure to have your drain pan in place under-neath it.
6. Install a new oil filter in accordance with the instructions on the carton or on the filteritself. Do not over-tighten. Tightening torque: 1.2 ~ 1.6 kgf.m.Be sure that the mounting surface on the engine is clean and that the old gasket isremoved completely. Lubricate the new gas-ket on the filter with clean engine oil beforeinstallation.
DOHC
G350A01A-GAT
ENGINE OIL CONSUMPTION Function of Engine Oil
Engine oil has the primary function of lubricat-
ing and cooling the inside of the engine. Engine oil consumption
It is normal that an engine should consume
some engine oil while normal driving. The cause of oil consumption in a normal engine are asfollows;
o Engine oil is used to lubricate pistons, piston rings and cylinders.
o A thin film of oil is left on the cylinder wall when a piston moves downwards in the cylinder. High negative pressure generatedduring engine operation sucks some of theoil into the combustion chamber. This oil with some oil of the cylinder wall is burned by the high temperature combustiongases during the combustion process.
o The engine oil consumption is strongly ef- fected by the viscosity and quality of oil,engine rpm and driving condition etc. Moreengine oil may be consumed under severedriving conditions such as high speeds, fre-quent acceleration and deceleration, com-pared to normal driving condition. V6
Page 139 of 389

DO-IT-YOURSELF MAINTENANCE 6-7
-15 (5)
-25 (-13) -35 (-31)-45 (-49)
G050A01A-AAT
CHECKING AND CHANGING THE EN- GINE COOLANT
WARNING: Do not remove the radiator cap when the
engine is hot. When the engine is hot, the engine coolant is under pressure and mayerupt through the opening if the cap isremoved. You could be seriously burned ifyou do not observe this precaution. Do notremove the radiator cap until the radiator iscool to the touch. G050B01A-AAT
Recommended Engine Coolant
Use a high quality ethylene-glycol coolant in a
50/50 mix with water. The engine coolant shouldbe compatible with aluminum engine parts.Additional corrosion inhibitors or additives shouldnot be used. The cooling system must be main-tained with the correct concentration and typeof engine coolant to prevent freezing and corro-sion. Never allow the concentration of anti-freeze to exceed the 60% level or go below the35% level, or damage to the cooling systemmay result. For proper concentration when add-ing or replacing the engine coolant, refer to thefollowing table.
HGK187
35% 40%50%60%
G050C01A-AAT
To Check the Coolant Level The coolant level can be seen on the side of the plastic coolant reservoir. The level of the cool-ant should be between the "LOW" and "FULL"lines on the reservoir when the engine is cool.If the level is below the "LOW" mark, addengine coolant to bring it up between "LOW"and "FULL". If the level is low, inspect forcoolant leaks and recheck the fluid level fre-quently. If the level drops again, visit yourHyundai dealer for an inspection and diagnosisof the reason.
7. Refill the crankcase with the recommended
engine oil. Refer to the specification in chap-ter 9 for engine oil capacity.
8. Start the engine and check to be sure no oil is leaking from the drain plug or oil filter.
9. Shut off the engine and recheck the oil level.
NOTE:Always dispose of used engine oil in an
environmentally acceptable manner. It is sug-gested that it be placed in a sealed containerand taken to a service station for maybereclaimation. Do not pour the oil on theground or put it in with the household trash.
WARNING: Used motor oil may cause irritation or can-
cer of the skin if left in contact with the skin for prolonged periods of time. Wash yourhands thoroughly with soap and warm wa-ter as soon as possible after handling usedoil.
Ambient
temperature °C ( °F) Engine Coolant concentration
Antifreezesolution Water
65% 60%50%40%
Page 144 of 389

DO-IT-YOURSELF MAINTENANCE
6-12 G110D02Y-AAT
To Check the Transaxle Fluid Level
HGK174
Park the car on level ground with the parking brake engaged. When the transaxle fluid levelis checked, the transaxle fluid should be atnormal operating temperature and the engineidling.
G110C02Y-GAT
Transaxle Fluid Capacity
The fluid capacity of the automatic transaxle is 7.8 liters (8.2 U.S. quarts). WARNING: The transaxle fluid level should be checked when the engine is at normal operating tem-perature. This means that the engine, radia-tor, exhaust system etc., are very hot. Exer-cise great care not to burn yourself duringthis procedure.
G100B02A-AAT
To Check the Manual Transaxle Fluid Level
SSA6100B
Park the car on level ground with the engine off.
1. Using a wrench of the correct size, loosen the oil filler plug by turning it counterclock- wise and remove it with your fingers.
2. Use your finger or suitable tool to feel inside the hole. The oil level should be at its bottomedge. If it is not, check for leaks beforeadding oil. To refill the transaxle or bring theoil level up,add oil slowly until it reaches theproper level. Do not overfill.
3. Replace the plug and washer, screw it in with your fingers and then tighten securelywith the wrench. G110A02A-AAT CHECKING THE TRANSAXLE FLUID (AUTOMATIC) Transaxle fluid in the automatic transaxle should be checked at those intervals specified in thevehicle maintenance schedule in Section 5. NOTE: Basically automatic transaxle fluid is red color. As driving distance increases, thefluid color turns darkish red gradually. It isnormal condition and you should not usefluid color as a criterion for replacing thetransaxle fluid. You must replace the automatic transaxle fluid in accordance with intervals specifiedin the vehicle maintenances schedule insection 5. G110B03A-AAT
Recommended Fluid
Your Hyundai automatic transaxle is specially
designed to operate with DIAMOND ATF SP-III or SK ATF SP-III. Damage caused by anonspecified fluid is not covered by your newvehicle limited warranty.
Page 151 of 389

DO-IT-YOURSELF MAINTENANCE 6-19
CAUTION: A burned-out fuse indicates that there is a
problem in the electrical circuit. If you re- place a fuse and it blows as soon as theaccessory is turned on, the problem is seri-ous and should be referred to a Hyundaidealer for diagnosis and repair. Never re-place a fuse with anything except a fusewith the same or a lower amperage rating. Ahigher capacity fuse could cause damageand create a fire hazard.
NOTE: See page 6-23 for the fuse panel descrip-
tions.
Burned out
G200B03YGood G210A01A-AAT
CHECKING THE BATTERY
WARNING: Batteries can be dangerous! When working
with batteries, carefully observe the follow- ing precautions to avoid serious injuries.
The fluid in the battery contains a strong solu-
tion of sulfuric acid, which is poisonous andhighly corrosive. Be careful not to spill it onyourself or the car. If you do spill battery fluid onyourself, immediately do the following:
o If battery fluid is on your skin, flush the affected areas with water for at least 15 minutes and then seek medical assistance.
o If battery fluid is in your eyes, rinse out your eyes with water and get medical assistanceas soon as possible. While you are beingdriven to get medical assistance, continueto rinse your eyes by using a sponge or softcloth saturated with water.
o If you swallow battery fluid, drink a large quantity of water or milk followed by milk ofmagnesia, eat a raw egg or drink vegetableoil. Get medical assistance as soon aspossible.
While batteries are being charged (either by a
battery charger or by the vehicle's alternator),they produce explosive gases. Always observethese warnings to prevent injuries from occur-ring: G210B01A-AAT
Checking the Battery Keep the battery clean. Any evidence of corro-
sion around the battery posts or terminals shouldbe removed using a solution of household bak-ing soda and warm water. After the batteryterminals are dry, cover them with a light coat-ing of grease.
G220A01A-AAT
CHECKING ELECTRIC COOLING FANS WARNING: The cooling fan is controlled by engine cool-
ant temperature and may sometimes oper- ate even when the engine is not running.Use extreme caution when working near theblades of the coolant fan, so that you are notinjured by a rotating fan blade. As the cool-ant temperature decreases the fan will auto-matically shut off. This is a normal condi-tion.
G220B01A-AAT
Checking Engine Cooling Fan The engine coolant fan should come on auto-
matically if the engine coolant temperature ishigh.
o Charge batteries only in a well ventilated
area.
o Do not permit flames, sparks or smoking in the area.
o Keep children away from the area.
Page 167 of 389

INDEX
10-2
Driving
Economical driving ....................................................................... 2-11
Smooth cornering ......................................................................... 2-11
Winter driving ................................................................................ 2-11
E Emissions Control Systems ................................................................ 7-1
Engine Before starting the engine .............................................................. 2-2
Changing the oil and filter .............................................................. 6-6
Compartment .................................................................................. 6-1
Coolant ........................................................................................... 6-7
Coolant temperature gauge .......................................................... 1-29
If the engine overheats ................................................................... 3-2
Number ........................................................................................... 8-1
Oil .................................................................................................. 6-4 Oil consumption .............................................................................. 6-6
Starting ........................................................................................... 2-3
Engine Exhaust Can Be Dangerous ................................................... 2-1
FFog Li ght ........................................................................................... 1-43
Front Seats Adjustable front seats ..................................................................... 1-8
Adjustable headrests ...................................................................... 1-8Adjusting seat forward and rearward ............................................. 1-8
Adjusting seatback angle ...................... ......................................... 1-8
Lumbar support control ............... ................................................... 1-9
Seat cushion height adjustment ..................................................... 1-9
Seat warm er ................................................................................... 1-9
Fuel
Capacity .......................................................................................... 9-1
Gauge ........................................................................................... 1-28
Recommendations .......................................................................... 1-1 Fuel Filler Lid
Remote release ............................................................................ 1-45
Fuse Panel Description .......................................................... 6-23 ~ 6-24
Fuses ................................................................................................ 6-17
GGeneral Everyday Checks .................................................................. 6-4
Glove box .......................................................................................... 1-41
HHazard Warn ing System ................................................................... 1-36
Headlight Bulb ................................................................................... 6-20
Headlight Leveling Device System ................................................... 1-38
Heating and Cooling Control Rotary type ........................................................................ 1-51 ~ 1-56
Automatic type ................................................................... 1-57 ~ 1-62
High-mounted rear stoplight .............................................................. 1-44
Hood Release ................................................................................... 1-44
Horn ................................................................................................ 1-47
IIgnition Switch ..................................................................................... 2-2
Immobilizer System ............................................................................. 1-2
Infinity Sound System (B260) ........................................................... 1-80
Anti-Theft Device .......................................................................... 1-81
General operation ......................................................................... 1-81
Radio operation ............................................................................ 1-82
CD operation ................................................................................ 1-83
Instrument Cluster and Indicator ....................................................... 1-26
Instrument Panel Light Control (Rheostat) .......................................1-37
Instruments and Controls .................................................................. 1-25
Intermittent Wiper .............................................................................. 1-35
Page 219 of 389

1
CONTROLS AND EQUIPMENT
39
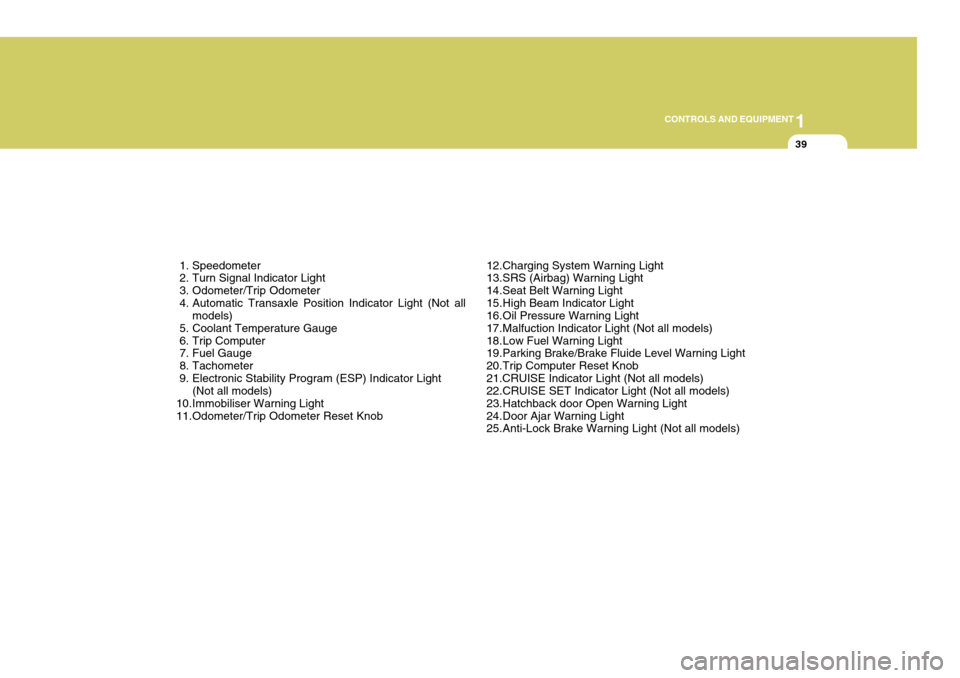
1. Speedometer
2. Turn Signal Indicator Light
3. Odometer/Trip Odometer
4. Automatic Transaxle Position Indicator Light (Not all models)
5. Coolant Temperature Gauge
6. Trip Computer
7. Fuel Gauge
8. Tachometer
9. Electronic Stability Program (ESP) Indicator Light (Not all models)
10.Immobiliser Warning Light
11.Odometer/Trip Odometer Reset Knob 12.Charging System Warning Light
13.SRS (Airbag) Warning Light
14.Seat Belt Warning Light
15.High Beam Indicator Light
16.Oil Pressure Warning Light
17.Malfuction Indicator Light (Not all models)
18.Low Fuel Warning Light
19.Parking Brake/Brake Fluide Level Warning Light
20.Trip Computer Reset Knob21.CRUISE Indicator Light (Not all models)
22.CRUISE SET Indicator Light (Not all models)
23.Hatchback door Open Warning Light
24.Door Ajar Warning Light
25.Anti-Lock Brake Warning Light (Not all models)
Page 276 of 389

1FEATURES OF YOUR HYUNDAI
96ANTENNA
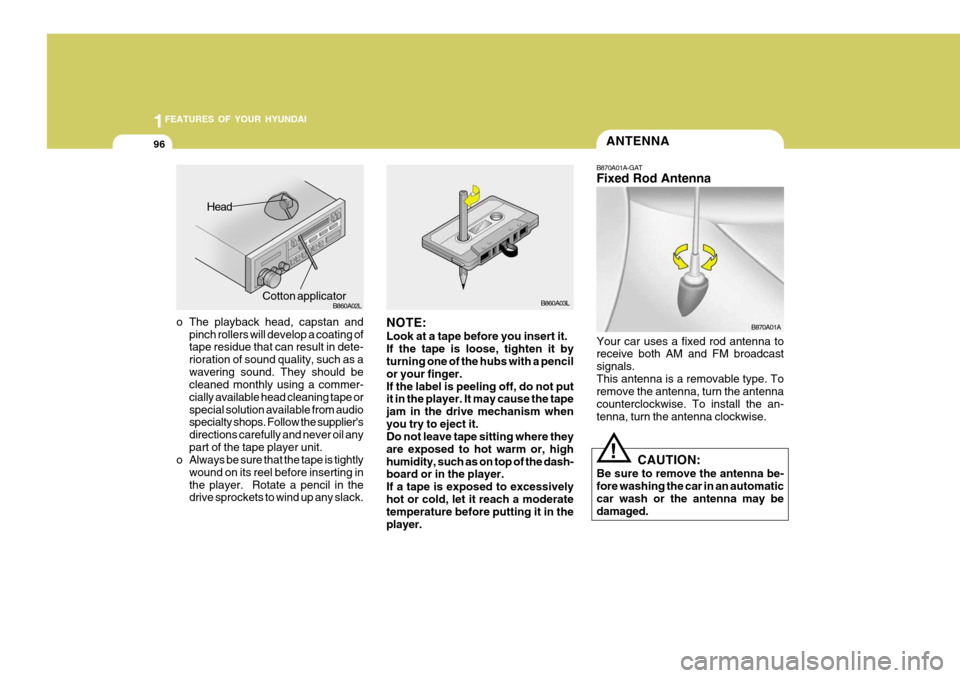
o The playback head, capstan and pinch rollers will develop a coating of tape residue that can result in dete- rioration of sound quality, such as awavering sound. They should be cleaned monthly using a commer- cially available head cleaning tape orspecial solution available from audio specialty shops. Follow the supplier's directions carefully and never oil anypart of the tape player unit.
o Always be sure that the tape is tightly
wound on its reel before inserting inthe player. Rotate a pencil in the drive sprockets to wind up any slack. B860A03L
NOTE: Look at a tape before you insert it. If the tape is loose, tighten it by turning one of the hubs with a pencil or your finger.If the label is peeling off, do not put it in the player. It may cause the tape jam in the drive mechanism whenyou try to eject it. Do not leave tape sitting where they are exposed to hot warm or, highhumidity, such as on top of the dash- board or in the player. If a tape is exposed to excessivelyhot or cold, let it reach a moderate temperature before putting it in the player. B870A01A
!
Head
Cotton applicator B860A02L
B870A01A-GAT Fixed Rod Antenna Your car uses a fixed rod antenna to receive both AM and FM broadcast signals.This antenna is a removable type. To remove the antenna, turn the antenna counterclockwise. To install the an-tenna, turn the antenna clockwise.
CAUTION:
Be sure to remove the antenna be- fore washing the car in an automatic car wash or the antenna may bedamaged.
Page 303 of 389

3
IN CASE OF EMERGENCY
5
!
!WARNING:
Whilst the engine is running, keep hands and clothing away from mov- ing parts such as the fan and drive belts to prevent injury.
5. If the water pump drive belt is bro- ken or coolant is leaking out, stop the engine immediately and call the nearest Hyundai dealer for assis-tance.
WARNING:
Do not remove the radiator cap when the engine is hot since steam and boiling water may be ejected fromthe radiator resulting in burns or scalding.
!
6. If the cause of the overheating can- not be found, wait until the engine temperature has returned to nor- mal. Then, if coolant has been lost, carefully add coolant to the reser-voir (page 6-11) to bring the fluid level in the reservoir up to the base of the radiator fill opening. Fill thecoolant expansion tank to the half- way mark.
7. Proceed with caution until it is es- tablished that the engine is operat-ing normally. If the engine over- heats repeatedly, the advice of aHyundai dealer should be sought.
CAUTION:
Serious loss of coolant indicatesthere is a leak in the cooling systemand this should be checked as soon as possible by a Hyundai dealer.D040A01GK-EAT TEMPORARY SPARE TYRE The following instructions for the tem- porary spare tyre should be observed:
1. Check inflation pressure as soon as practical after installing the spare tyre, and adjust to the specified pressure. The tyre pressure should be periodically checked and main-tained at the specified pressure while the tyre is stored.
2. The spare tyre should only be used temporarily and should be returnedto the luggage compartment as soon as the original tyre can be repairedor replaced.
SPARE TYRE
Tyre Size
Inflation Pressure T125/70 R16
420 kPa (60 psi)
Spare Tyre Pressure
3. Continuous use at speeds of over 50 mph (80 km/h) is not recom- mended.
4. As the temporary spare tyre is spe-
cifically designed for your car, itshould not be used on any other vehicle.