2004 Hyundai Coupe headlight aiming
[x] Cancel search: headlight aimingPage 153 of 389

DO-IT-YOURSELF MAINTENANCE 6-21
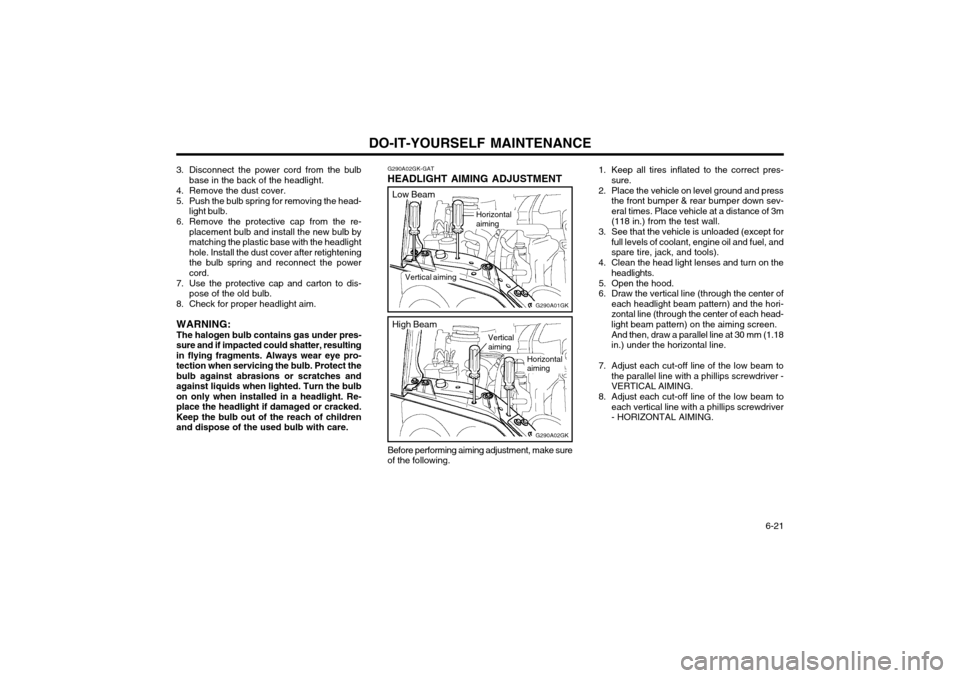
G290A02GK-GAT
HEADLIGHT AIMING ADJUSTMENT
Horizontal aiming
G290A01GK
Vertical aiming
3. Disconnect the power cord from the bulb
base in the back of the headlight.
4. Remove the dust cover.
5. Push the bulb spring for removing the head- light bulb.
6. Remove the protective cap from the re- placement bulb and install the new bulb by matching the plastic base with the headlighthole. Install the dust cover after retighteningthe bulb spring and reconnect the powercord.
7. Use the protective cap and carton to dis- pose of the old bulb.
8. Check for proper headlight aim.
WARNING: The halogen bulb contains gas under pres-
sure and if impacted could shatter, resulting in flying fragments. Always wear eye pro-tection when servicing the bulb. Protect thebulb against abrasions or scratches andagainst liquids when lighted. Turn the bulbon only when installed in a headlight. Re-place the headlight if damaged or cracked.Keep the bulb out of the reach of childrenand dispose of the used bulb with care.
Before performing aiming adjustment, make sure
of the following.
Low Beam
G290A02GK
Vertical aiming
High Beam
Horizontal aiming1. Keep all tires inflated to the correct pres-
sure.
2. Place the vehicle on level ground and press the front bumper & rear bumper down sev- eral times. Place vehicle at a distance of 3m(118 in.) from the test wall.
3. See that the vehicle is unloaded (except for full levels of coolant, engine oil and fuel, andspare tire, jack, and tools).
4. Clean the head light lenses and turn on the headlights.
5. Open the hood.
6. Draw the vertical line (through the center of each headlight beam pattern) and the hori-zontal line (through the center of each head-light beam pattern) on the aiming screen. And then, draw a parallel line at 30 mm (1.18 in.) under the horizontal line.
7. Adjust each cut-off line of the low beam to the parallel line with a phillips screwdriver -VERTICAL AIMING.
8. Adjust each cut-off line of the low beam to each vertical line with a phillips screwdriver- HORIZONTAL AIMING.
Page 154 of 389

DO-IT-YOURSELF MAINTENANCE
6-22 SPECIFICATION:
"H" Horizontal center line of headlights from ground:Low Beam: 679mm (26.7 in.)High Beam: 672mm (26.5 in.) "W" Distance between each headlight center :Low Beam: 1,202mm (47.3 in.)High Beam: 966mm (38.0 in.) "L" Distance between the headlights and the wall
that the lights are tested against : 3,000 mm (118 in.)
G290B01GK-GAT
Adjustment After Headlight Assembly Replacement
G290B02Y
Vertical line
Cut-off line Ground line
Horizontal line
LW
H
H "P"30 mm ( 1.18 in.)
If the vehicle has had front body repair and the
headlight assembly has been replaced, the headlight aiming should be checked using anaiming screen as shown in the illustration. Turnon the headlight switch.
1. Adjust headlights so that main axis of light is parallel to center line of the body and isaligned with point "P" shown in the illustra-tion.
2. Dotted lines in the illustration show the cen- ter of headlights.
Page 327 of 389

6
Engine Compartment ................................................... 6-2
Daily Operating Checks ............................................... 6-5
Engine Oil .................................................................... 6-5
Engine Oil and Filter Replacement ............................. 6-8
Engine Coolant Checking and Replacing .................6-10
Spark Plugs ................................................................ 6-12
Changing the Air Cleaner Filter ................................ 6-15
Manual Transaxle Lubricant ...................................... 6-18
Automatic Transaxle Lubricant .................................. 6-19
Brake System Checking ............................................ 6-21
Air Conditioning System Maintenance ...................... 6-23
Changing the Pollen Filter ......................................... 6-25
Checking Engine Drive Belts ..................................... 6-27
Fusible Links .............................................................. 6-28
Battery Maintenance .................................................. 6-29
Power Steering Hoses ............................................... 6-30
Headlight Aiming Adjustment .................................... 6-31
Replacing Light Bulbs ................................................ 6-33
Bulb Wattage ............................................................. 6-40
Fuse Panel Description ............................................. 6-41
OWNER MAINTENANCE
6
Page 357 of 389

6
OWNER MAINTENANCE
31
HGK5011
G230A03A-EAT
Power Steering Fluid Level Fluid Recommendation
Only automatic transaxle fluid meet-
ing the specification of PSF-3 or ATF DEXRON 2 should be used in thepower steering system.
The power steering fluid level should
be checked regularly.
To check the power steering fluid
level, be sure the ignition is "OFF",then check to make certain that thepower steering fluid level is between the "MAX" and "MIN" level markings on the fluid reservoir.
NOTE: Do not check whilst the engine is
running. Do not start when power steering fluid reservoir is empty.High Beam
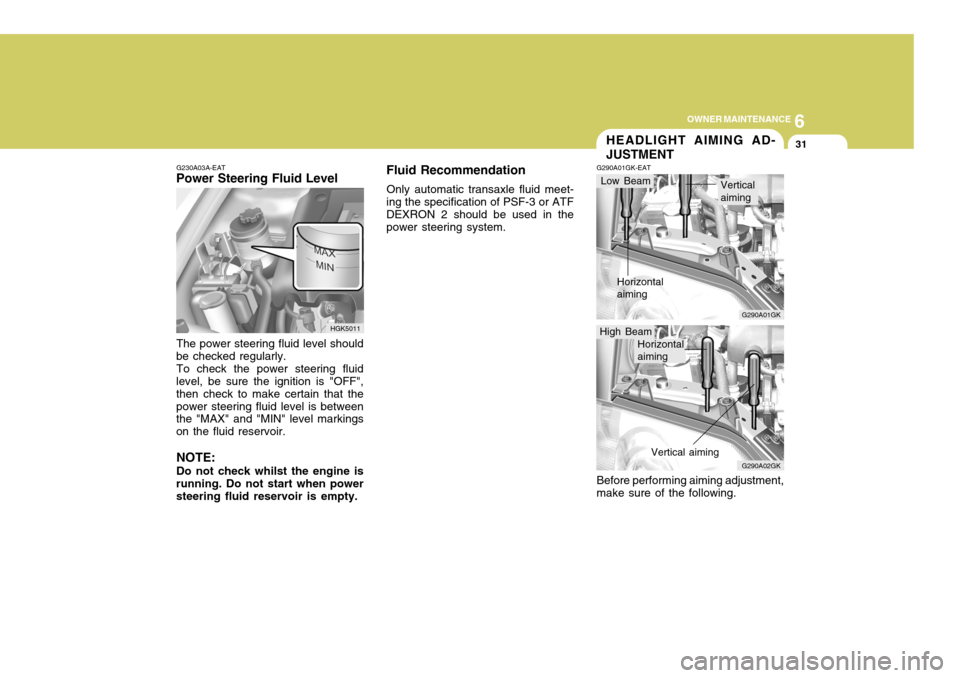
G290A01GK
G290A01GK-EAT HEADLIGHT AIMING AD- JUSTMENT
Before performing aiming adjustment, make sure of the following.
G290A02GK
Low Beam
Horizontal aiming Verticalaiming
Horizontal aiming Vertical aiming
Page 358 of 389

6OWNER MAINTENANCE
32
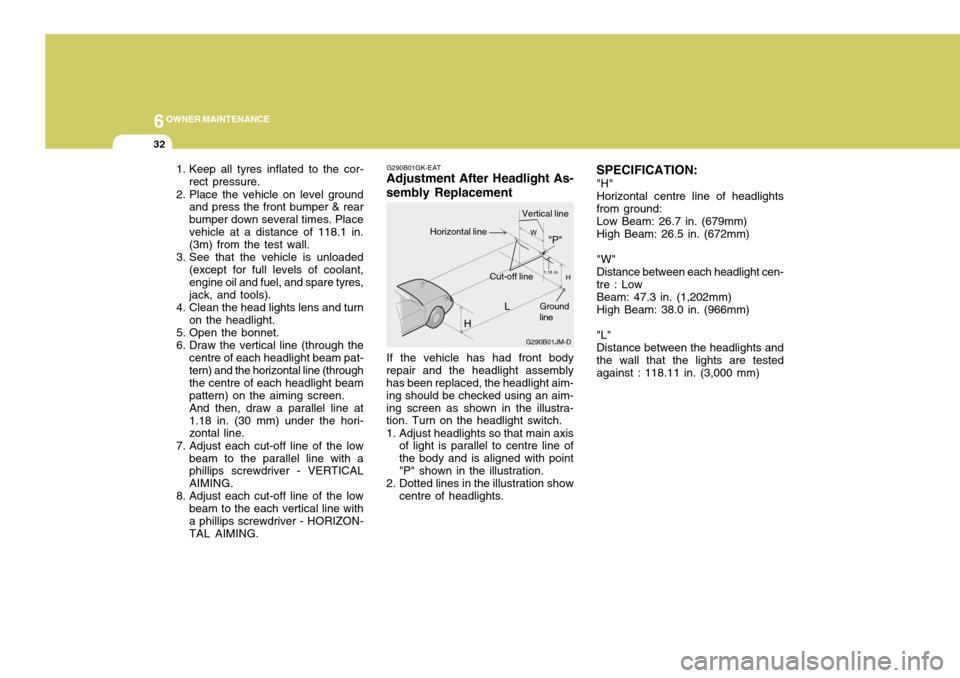
G290B01GK-EAT
Adjustment After Headlight As- sembly Replacement
If the vehicle has had front body
repair and the headlight assembly has been replaced, the headlight aim- ing should be checked using an aim-ing screen as shown in the illustra- tion. Turn on the headlight switch.
1. Adjust headlights so that main axis of light is parallel to centre line of the body and is aligned with point"P" shown in the illustration.
2. Dotted lines in the illustration show centre of headlights. SPECIFICATION:
"H" Horizontal centre line of headlights from ground: Low Beam: 26.7 in. (679mm) High Beam: 26.5 in. (672mm) "W" Distance between each headlight cen- tre : Low Beam: 47.3 in. (1,202mm) High Beam: 38.0 in. (966mm) "L" Distance between the headlights and the wall that the lights are tested against : 118.11 in. (3,000 mm)
1. Keep all tyres inflated to the cor-
rect pressure.
2. Place the vehicle on level ground and press the front bumper & rearbumper down several times. Placevehicle at a distance of 118.1 in. (3m) from the test wall.
3. See that the vehicle is unloaded (except for full levels of coolant, engine oil and fuel, and spare tyres,jack, and tools).
4. Clean the head lights lens and turn on the headlight.
5. Open the bonnet.
6. Draw the vertical line (through the centre of each headlight beam pat- tern) and the horizontal line (through the centre of each headlight beampattern) on the aiming screen.And then, draw a parallel line at1.18 in. (30 mm) under the hori- zontal line.
7. Adjust each cut-off line of the low beam to the parallel line with aphillips screwdriver - VERTICAL AIMING.
8. Adjust each cut-off line of the low beam to the each vertical line witha phillips screwdriver - HORIZON- TAL AIMING. L
G290B01JM-D
W
H
H Cut-off line"P"
Vertical lineHorizontal line
Ground line
1.18 in.
Page 387 of 389

10
INDEX
3
F Folding rear seat ....................................................... 1-17
Front ashtray ............................................................. 1-57
Front door edge warning lamp ................................. 1-65
Front fog light switch ................................................ 1-54
Front seat adjustment ............................................... 1-12
Fuel economy ............................................................. 2-5
Fuel gauge ................................................................ 1-44
Fuel recommendations ................................................ 1-2
Fuse panel description .............................................. 6-41
Fusible links .............................................................. 6-28
GGlove box .................................................................. 1-62
H Hatchback door ......................................................... 1-67
Rear window wiper and washer ............................... 1-53
Hazard warning system ............................................ 1-55
Headlight aiming adjustment..................................... 6-31
Headlight leveling device syst em .............................1-58
Head restraint adjustment .................... ..................... 1-13
Heated rear window.................................................. 1-55
Heating and cooling control ...................................... 1-75
Rotary type ................................................ 1-76 ~ 1-83
Automatic type ........................................... 1-84 ~ 1-91
Height adjustable front seat shoulder belt ................1-20
Horn .......................................................................... 1-69I
If the engine cannot be cranked
................................ 3-2
If the engine overheats ............................................... 3-4
If the engine will not start ........................................... 3-2
If your vehicle must be towed ..................................3-12
Immobilizer system ..................................................... 1-4
Individual circuit fuses ............................................... 6-28
Instrument cluster and indicatorlight......................... 1-38
Instrument panel illumination control ........................1-37
In the event of a puncture .......................................... 3-6 J
Jump starting .............................................................. 3-3
K Key positions ............................................................... 2-3
Keys ............................................................................ 1-4 L Lighting switch .......................................................... 1-50
Luggage net .............................................................. 1-70
Lumbar support adj ustment...................................... 1-14
M Maintenance and servicing requirements ...................5-2
Maintenance under severe usage conditions ............. 5-6
Manual transaxle lubricant .......... .............................. 6-18
Manual transaxle ......................................................... 2-6