Page 214 of 296

Unscrew and remove the engine oil
fill cap on top of the valve cover.
Pour in the oil slowly and caref ully so
you do not spill. Clean up any spills
immediately. Spilled oil could
damage components in the engine
compartment.
Install the engine oil f ill cap and
tighten it securely. Wait a f ew
minutes and recheck the oil level. Do
not f ill above the upper mark; you
could damage the engine.Oil is a major contributor to your
engine’s perf ormance and longevity.
Always use a premium-grade 5W-20
detergent oil displaying the API
Certif ication Seal. This seal indicates
the oil is energy conserving, and that
it meets the American Petroleum
Institute’s latest requirements.
Honda Motor Oil is the pref erred
5W-20 lubricant f or your vehicle. It is
highly recommended that you use
Honda Motor Oil in your vehicle f or
optimum engine protection. Make
sure the API Certif ication Seal says
‘‘For Gasoline Engines’’.
The oil viscosity or weight is
provided on the container’s label.
5W-20 oil is f ormulated f or year-
round protection of your Honda to
improve cold weather starting and
f uel economy.
A dding Engine Oil
Maint enance
Recommended Engine Oil
211
ENGINE OIL FILL CAP
Ambient Temperature
API CERTIFICATION SEAL
Page 216 of 296
 is required.Refill the engine with the recom-
mended oil.
Engine oil change capacity
(includ")
Remove the oil f ilter and let the
remaining oil drain. A special
wrench (available from your
Honda dealer) is required.Refill the engine with the recom-
mended oil.
Engine oil change capacity
(including f ilter):
Replace the engine oil f ill cap.
Start the engine. The oil pressure
indicator light should go out within
5 seconds. If it does not, turn of f
the engine and check your work.
Let the engine run f or several
minutes, then check the drain bolt
and oil f ilter f or leaks.
Turn of f the engine and let it sit
f or several minutes, then check
the oil level on the dipstick. If
necessary, add more oil.
Install a new oil f ilter according to
the instructions that come with it.
Put a new washer on the drain bolt,
then reinstall the drain bolt.
Tighten it to: 9. 8. 7. 6.
4.
5. 3.
Changing the Oil and Filter
Maint enance213
NOTICE:OIL FILTER
4.6 US qt (4.4)
29 lbf·ft (39 N·m , 4.0 kgf·m) Improper disposal of engine
oil can be harmf ul to the environment.
If you change your own oil, please
dispose of the used oil properly. Put it
in a sealed container and take it to a
recycling center. Do not discard it in a
trash bin or dump it on the ground.
Page 233 of 296

To saf ely operate your vehicle, your
tires must be the proper type and
size, in good condition with adequate
tread, and correctly inf lated.
The f ollowing pages give more
detailed inf ormation on how to take
care of your tires and what to do
when they need to be replaced.Keeping the tires properly inf lated
provides the best combination of
handling, tread lif e, and riding
comf ort.
We recommend that you visually
check your tires every day. If you
think a tire might be low, check it
immediately with a tire gauge.Use a gauge to measure the air
pressure at least once a month. Even
tires that are in good condition may
lose one to two psi (10 to 20 kPa, 0.1
to 0.2 kgf /cm ) per month.
Remember to check the spare tire at
thesametime.
Check the pressure in the tires when
they are cold. This means the vehicle
has been parked f or at least three
hours, or driven less than 1 mile (1.6
km).
Underinf lated tires wear unevenly,
adversely affect handling and fuel
economy, and are more likely to
fail from being overheated.
Overinf lated tires can make your
vehicleridemoreharshly,are
more prone to damage f rom road
hazards, and wear unevenly. Add or release air, if needed, to
match the recommended cold tire
pressures on page .231
Tires
Maint enance
Inf lation
230
Using tires that are excessively
worn or improperly inflated can
cause a crash in which you can
be seriously hurt or killed.
Follow all instructions in this
owner’s manual regarding tire
inflation and maintenance.
Page 234 of 296
![HONDA ODYSSEY 2004 RB1-RB2 / 3.G Owners Manual If you check the pressure when the
tires are hot [driven f or several miles
(kilometers)], you will see readings 4
to6psi(30to40kPa,0.3to0.4
kgf /cm ) higher than the cold
reading. This is normal; do](/manual-img/13/5968/w960_5968-233.png "HONDA ODYSSEY 2004 RB1-RB2 / 3.G Owners Manual If you check the pressure when the
tires are hot [driven f or several miles
(kilometers)], you will see readings 4
to6psi(30to40kPa,0.3to0.4
kgf /cm ) higher than the cold
reading. This is normal; do")
If you check the pressure when the
tires are hot [driven f or several miles
(kilometers)], you will see readings 4
to6psi(30to40kPa,0.3to0.4
kgf /cm ) higher than the cold
reading. This is normal; do not
release air to match the cold
pressure.Thecompactsparetirepressureis:
For convenience, the recommended
tire sizes and cold air pressures are
on a label on the driver’s doorjamb.
For additional technical inf ormation,
see page .
Tire pressure f or high speed driving
is the same as f or normal driving.Every time you check inf lation, you
should also examine the tires for
damage, f oreign objects, and wear.
Youshouldlookfor:
Bumps or bulges in the tread or
side of the tire. Replace the tire if
youfindeitherortheseconditions.
Cuts, splits, or cracks in the side
of the tire. Replace the tire if you
can see f abric or cord.
Excessive tread wear.
Tubeless tires have some ability to
self -seal if they are punctured. You
should look closely f or punctures if a
tire starts losing pressure.
Youshouldgetyourowntire
pressure gauge and use it whenever
you check your tire pressures. This
will make it easier f or you to tell if a
pressure loss is due to a tire problem
and not due to a variation between
gauges. 270
CONT INUED
Tire Size Cold Tire Pressure
for Normal Driving
Tires
Maint enance
Tire Inspection
231
60 psi (420 kPa , 4.2 kgf/cm)
225/60R16 98T 36 psi (250 kPa , 2.5 kgf/cm
)
Page 238 of 296

�µ
Check the condition of the battery
monthlybylookingatthetest
indicator window. The label on the
battery explains the test indicator’s
colors. Check the terminals f or corrosion (a
white or yellowish powder). To
remove it, cover the terminals with a
solution of baking soda and water. It
will bubble up and turn brown. When
this stops, wash it of f with plain
water. Dry off the battery with a
cloth or paper towel. Coat the
terminals with grease to help prevent
f uture corrosion.
If additional battery maintenance is
needed, see your Honda dealer or a
qualif ied technician.
Battery posts,
terminals, and related accessories
contain lead and lead compounds. If you need to connect the battery to
a charger, disconnect both cables to
prevent damaging your vehicle’s
electrical system. Always disconnect
the negative ( ) cable first, and
reconnect it last.
Maint enance
WARNING:
Wash your hands af ter handling.
Checking the Battery
235
TEST INDICATOR WINDOW
The battery gives off explosive
hydrogen gas during normal
operation.
A spark or flame can cause the
battery to explode with enough
force to kill or seriously hurt you.
Wear protective clothing and a
face shield, or have a skilled
mechanic do the battery
maintenance.
Page 243 of 296
Thetoolsandjackarebehinda
cover in the cargo area on the
driver’s side. Remove the cover by
turning the handle
counterclockwise, then pulling out
the cover.Take the tools out of the storage
compartment.
Turn the jack’s end bracket
counterclockwise to loosen it, then
remove the jack.The spare tire is stored under the
f loor between the f irst and second
row of seats. If the f ront seats are
adjusted to the rear-most position,
move the seats forward slightly
and adjust the seat-backs to an
upright position (see page ).
Lift up the center table (see page
).
Open the tailgate. Remove the
cargo net.
3.
4. 5.
6.7.
105 89
Changing a Flat T ire
T aking Care of t he Unexpect ed240
COVER
Page 252 of 296
�µ
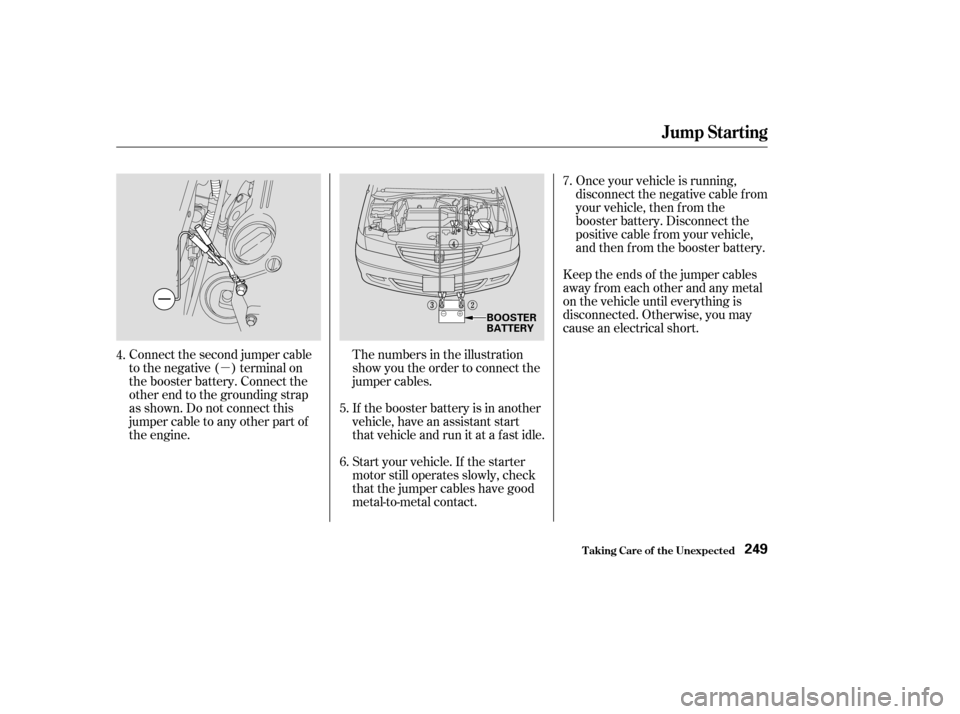
Connect the second jumper cable
to the negative ( ) terminal on
the booster battery. Connect the
other end to the grounding strap
as shown. Do not connect this
jumper cable to any other part of
the engine.The numbers in the illustration
show you the order to connect the
jumper cables.
If the booster battery is in another
vehicle, have an assistant start
that vehicle and run it at a fast idle.
Start your vehicle. If the starter
motor still operates slowly, check
that the jumper cables have good
metal-to-metal contact.Once your vehicle is running,
disconnect the negative cable f rom
your vehicle, then f rom the
booster battery. Disconnect the
positive cable f rom your vehicle,
and then from the booster battery.
Keep the ends of the jumper cables
away from each other and any metal
on the vehicle until everything is
disconnected. Otherwise, you may
cause an electrical short.
4.
6.7.
5.
Jump Starting
T aking Care of t he Unexpect ed249
BOOSTER
BATTERY
Page 255 of 296

This indicator should never
come on when the engine is
running. If it starts f lashing or stays
on, the oil pressure has dropped very
low or lost pressure. Serious engine
damage is possible and you should
take immediate action. Saf ely pull of f the road, and shut
of f the engine. Turn on the hazard
warning indicators.
Let the vehicle sit f or a minute.
Open the hood, and check the oil
level (see page ). An engine
very low on oil can lose pressure
during cornering and other driving
maneuvers.
If necessary, add oil to bring the
level back to the full mark on the
dipstick (see page ).
Start the engine, and watch the oil
pressure indicator. If it does not go
out within 10 seconds, turn of f the
engine. There is a mechanical
problem that needs to be repaired
bef ore you can continue driving.
(See
on page
). Immediately turn of f all electrical
accessories. Try not to use other
electrically operated controls such as
the power windows. Keep the engine
running; starting the engine will
discharge the battery rapidly.
Go to a Honda dealer or a service
station where you can get technical
assistance.
If the charging system
indicator comes on brightly
when the engine is running, the
battery is not being charged.
1.
2.
3.
4.
211
171
255
L ow Oil Pressure Indicator, Charging System Indicator
L ow Oil Pressure Indicator
Emergency T owingCharging System Indicator
T aking Care of t he Unexpect ed252
NOTICE:
Running the engine with low
oil pressure can cause serious
mechanical damage almost immediately.
Turn of f the engine as soon as you can
saf ely get the vehicle stopped.