Page 92 of 296
�µ
To adjust the bucket seats in the
second row, pull up the lever on the
front of the seat bottom.
The EX and EX-L models have a
power adjustable driver’s seat. All
other models have manual driver’s
seat adjustments.
The f ront passenger’s seat, and the
seats in the second and third rows
adjust manually.
Make all seat adjustments bef ore
you start driving.
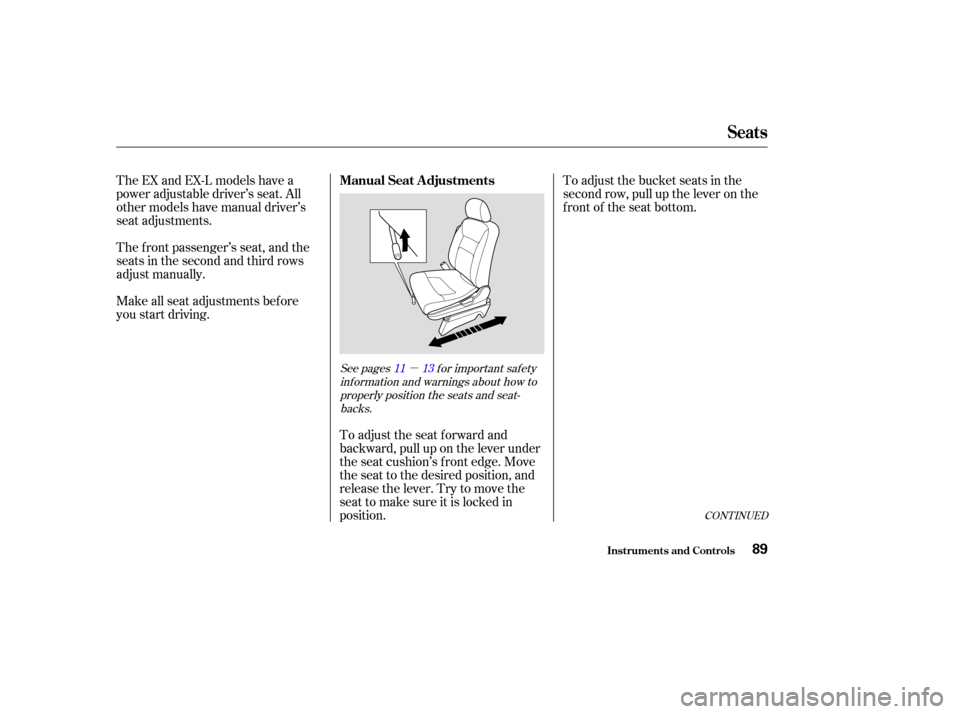
To adjust the seat forward and
backward, pull up on the lever under
the seat cushion’s f ront edge. Move
the seat to the desired position, and
releasethelever.Trytomovethe
seat to make sure it is locked in
position.
CONT INUED
See pages f or important saf etyinf ormation and warnings about how toproperly position the seats and seat-backs. 11 13
Seats
Inst rument s and Cont rols
Manual Seat Adjustments
89
Page 94 of 296
�µ
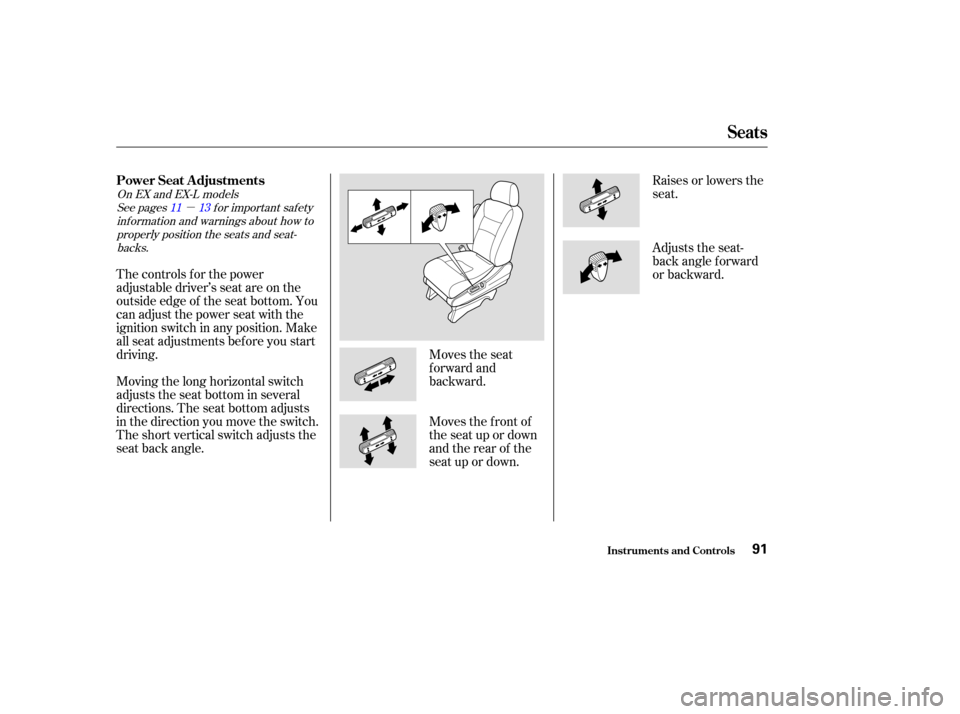
Moves the seat
forward and
backward.Raises or lowers the
seat.
The controls f or the power
adjustable driver’s seat are on the
outside edge of the seat bottom. You
can adjust the power seat with the
ignition switch in any position. Make
all seat adjustments bef ore you start
driving.
Moving the long horizontal switch
adjusts the seat bottom in several
directions. The seat bottom adjusts
in the direction you move the switch.
The short vertical switch adjusts the
seat back angle. Moves the f ront of
the seat up or down
and the rear of the
seat up or down.Adjusts the seat-
back angle f orward
or backward.
See pages f or important saf ety
inf ormation and warnings about how toproperly position the seats and seat-backs.
On EX and EX-L models
11 13
Seats
Inst rument s and Cont rols
Power Seat A djustments
91
Page 102 of 296
Your vehicle’s f ront windows are
electrically-powered. Turn the
ignition switch to ON (II) to raise or
lower either window.
Therearwindowsarealso
electrically-powered (see page ).
Each f ront door has a switch that
controls its window. To open the
window, push the switch down and
hold it. Release the switch when you
want the window to stop. Close the
window by pulling back on the
switch and holding it.The driver’s door armrest has a
master power window control panel.
To open the f ront passenger’s
window, push down on the switch
and hold it down until the window
reaches the desired position. To
close the window, pull back on the
window switch. Release the switch
when the window gets to the position
you want.
101
CONT INUED
Power Windows
Inst rument s and Cont rols99
MAIN SWITCH
DRIVER’S WINDOW
SWITCH
Closing a power window on
someone’s hands or fingers can
cause serious injury.
Make sure your passengers are
away from the windows before
closing them.
Page 103 of 296

�µ�µ
To open the driver’s
window f ully, push the window
switch f irmly down, then release it.
The window automatically goes
down all the way. To stop the
window f rom going all the way down,
pull back on the window switch
brief ly.
To close the driver’s window f ully,
pull back the window switch f irmly,
then release it. The window
automatically goes all the way up. To
stop the window f rom going all the
way up, push down on the window
switch brief ly.
To open or close the driver’s window
partially, push down or pull back on
the window switch lightly and hold it.
The window will stop when you
release the switch. If the MAIN switch is off, the front
passenger’s window cannot be raised
or lowered and the rear windows
cannot be opened or closed. Keep
the MAIN switch off when you have
children in the vehicle so they do not
injure themselves by operating the
windows unintentionally.
Auto reverse stops sensing when the
window is almost closed. You should
always check that all passengers and
objects are away from the window
bef ore closing it.If the driver’s
window runs into any obstacle while
it is closing automatically, it will
reverse direction, and then stop. To
close the window, remove the
obstacle, then use the window switch
again.
AUTO
Auto Reverse
Power Windows
Inst rument s and Cont rols100
Page 104 of 296

If your vehicle’s battery is
disconnected or goes dead, or the
driver’s window f use is removed, the
AUTO f unction will be disabled. The
power window system needs to be
reset af ter reconnecting the battery
or installing the f use.Start the engine. Push down and
hold the driver’s window switch
until the window is f ully open.
Pull and hold the driver’s window
switch to close the window
completely, then hold the switch
f or a second or two more.
If the power windows do not operate
properly af ter resetting, have your
vehicle checked by a Honda dealer. The power window system has a key-
of f delay f unction. The windows will
stilloperateforupto10minutes
after you turn off the ignition.
Opening either f ront door cancels
the delay function. You must turn
the ignition switch to ON (II) again
bef ore you can operate the windows.
Youcanopenorcloseeachrear
window with the switches on the
driver’s door armrest. The right
switch controls the passenger’s side
rear window, and the left switch
controls the driver’s side window. To
open the window, push the switch
downandholdit.Releasetheswitch
when you want the window to stop.
Close the window by pulling back on
the switch and holding it.
1.
2.
Power Windows
Inst rument s and Cont rols101
REAR WINDOW SWITCHES
Page 105 of 296
Keeptheinsideandoutsidemirrors
clean and adjusted f or best visibility.
Be sure to adjust the mirrors bef ore
you start driving.
The inside mirror has day and night
positions. The night position reduces
glare f rom headlights behind you.
Flip the tab on the bottom edge of
the mirror to select the day or night
position.Turn the ignition switch to ON (II).
Move the selector switch to L
(driver’s side) or R (passenger’s
side).
Push the appropriate edge of the
adjustment switch to move the
mirrorright,left,up,ordown.
When you f inish, move the
selector switch to the center (off)
position. This turns of f the
adjustment switch to keep your
settings.
1.
2.
3.
4.
Mirrors
Inst rument s and Cont rols
Adjusting the Power Mirrors
102
TAB SELECTOR SWITCH
ADJUSTMENT SWITCH
Page 106 of 296
The outside mirrors are heated to
remove fog and frost. With the
ignition switch in the ON (II)
position, turn on the heaters by
pressing the button. The indicator in
the button comes on as a reminder.
Press the button again to turn the
heaters off.To apply the parking brake, push the
parking brake pedal down with your
f oot. To release the parking brake,
push on the pedal again. The parking
brake indicator on the instrument
panel should go out when the
parking brake is f ully released with
the engine running (see page ).
60
Canadian Models
Mirrors, Parking Brake
Inst rument s and Cont rols
Power Mirror Heaters Parking Brake
103
NOTICE:
HEATED MIRROR BUTTON
PARKING BRAKE PEDAL
Driving the vehicle with the
parking brake applied can damage the
rear brakes and axles.
Page 107 of 296
�Î
�Î
Interior Convenience Items
Inst rument s and Cont rols104
BEVERAGE HOLDERCLOCK
VANITY
MIRROR
CENTER
POCKET
STORAGE
BOX
ACCESSORY
POWER
SOCKET
ACCESSORY
POWER
SOCKET
REAR
COMPARTMENT
COAT HOOK
BEVERAGE
HOLDERCENTER
TABLE SUNGLASSES
HOLDER
GLOVE BOX
BEVERAGE HOLDER,
COIN HOLDER
SUN VISOR
: EX and EX-L models only
 to raise or
lower either window.
Therearwindowsarealso
electrically-powered (see page ).
Each f ront door")


position, turn on the heaters by
pressing the button. The indicator in
the button comes on as a reminder")
