Page 239 of 296
, there are several things you
should do to prepare it f or storage.
Proper preparation helps prevent
deterioration and ma")
If you need to park your vehicle f or
an extended period (more than one
month), there are several things you
should do to prepare it f or storage.
Proper preparation helps prevent
deterioration and makes it easier to
get your vehicle back on the road. If
possible, store your vehicle indoors.Fill the f uel tank.
Change the engine oil and f ilter.
Wash and dry the exterior
completely.
Cleantheinterior.Makesurethe
carpeting, floor mats, etc. are
completely dry.
Leave the parking brake off. Put
the transmission in Park. Block the rear wheels.
If the vehicle is to be stored f or a
longer period, it should be
supported on jackstands so the
tires are of f the ground.
Leave one window open slightly (if
the vehicle is being stored
indoors).
Disconnect the battery.
Support the f ront and rear wiper
blade arms with a f olded towel or
ragsotheydonottouchthe
windshield.
To minimize sticking, apply a
silicone spray lubricant to all door
and tailgate seals. Also, apply a
vehiclebodywaxtothepainted
surfaces that mate with the door
and tailgate seals.Cover the vehicle with a
‘‘breathable’’ cover, one made
f rom a porous material such as
cotton. Non-porous materials, such
as plastic sheeting, trap moisture,
which can damage the paint.
If possible, periodically run the
engine until it reaches f ull
operating temperature (the
cooling f ans cycle on and of f
twice). Pref erably, do this once a
month.
If you store your vehicle f or 1 year or
longer, have your Honda dealer
perf orm the inspections called f or in
the 2 years/30,000 miles (48,000 km)
maintenance schedule (Normal
Conditions) as soon as you take it
out of storage (see page ). The
replacements called f or in the
maintenance schedule are not
needed unless the vehicle has
actually reached that time or mileage. 205
Vehicle Storage
Maint enance236
Page 242 of 296
CONT INUED
If you have a f lat tire while driving,
stop in a saf e place to change it.
Drive slowly along the shoulder until
you get to an exit or an area that is
far away from the traffic lanes.Park the vehicle on f irm, level, and
non-slippery ground. Put the
transmission in Park. Apply the
parking brake. If you are towing a
trailer, unhitch the trailer.Turn on the hazard warning lights,
and turn the ignition switch to
LOCK (0). Have all the
passengers get out of the vehicle
while you change the tire.
2.
1.
Changing a Flat T ire
T aking Care of t he Unexpect ed239
JACK VINYL BAG
SPARE TIRE
TOOLS
The vehicle can easily roll off
the jack, seriously injuring
anyone underneath.
Follow the directions for
changing a tire exactly, and
never get under the vehicle
when it is supported only by the
jack.
Page 243 of 296
Thetoolsandjackarebehinda
cover in the cargo area on the
driver’s side. Remove the cover by
turning the handle
counterclockwise, then pulling out
the cover.Take the tools out of the storage
compartment.
Turn the jack’s end bracket
counterclockwise to loosen it, then
remove the jack.The spare tire is stored under the
f loor between the f irst and second
row of seats. If the f ront seats are
adjusted to the rear-most position,
move the seats forward slightly
and adjust the seat-backs to an
upright position (see page ).
Lift up the center table (see page
).
Open the tailgate. Remove the
cargo net.
3.
4. 5.
6.7.
105 89
Changing a Flat T ire
T aking Care of t he Unexpect ed240
COVER
Page 245 of 296
�Ú
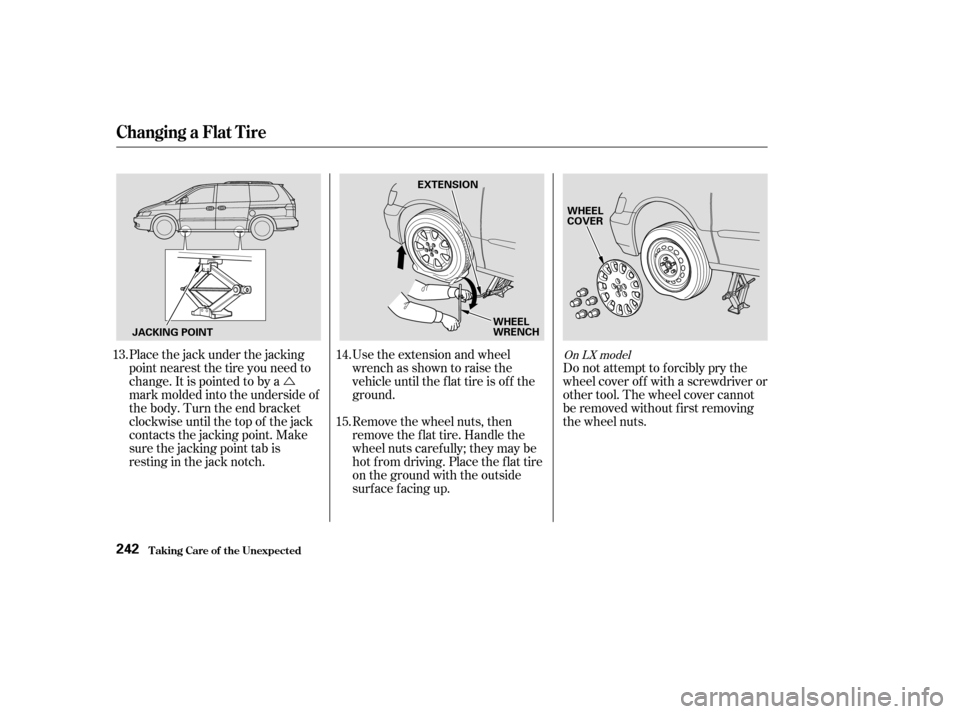
Place the jack under the jacking
point nearest the tire you need to
change. It is pointed to by a
mark molded into the underside of
the body. Turn the end bracket
clockwise until the top of the jack
contacts the jacking point. Make
sure the jacking point tab is
restinginthejacknotch. Use the extension and wheel
wrench as shown to raise the
vehicle until the f lat tire is of f the
ground.
Do not attempt to forcibly pry the
wheel cover of f with a screwdriver or
other tool. The wheel cover cannot
be removed without f irst removing
the wheel nuts.
Remove the wheel nuts, then
remove the f lat tire. Handle the
wheel nuts caref ully; they may be
hot f rom driving. Place the flat tire
on the ground with the outside
surface facing up.
13.
14.
15.
On LX model
Changing a Flat T ire
T aking Care of t he Unexpect ed242
JACKING POINT EXTENSION
WHEEL
WRENCHWHEEL
COVER
Page 248 of 296
Adjust the seat-back of the third
seat to the upright position (see
page ). Install the bracket and
the bracket mounting bolt to the
attachment point as shown, and
tighten the bolt. Make sure the
bracket is securely locked.Install the flat tire on the bracket
with the inside of the wheel facing
toward you. Put the tire mounting
wing bolt in the attachment point
through one of the f ive wheel nut
holes and the bracket as shown.
Poke holes in the vinyl bag. Secure
the f lat tire by tightening the wing
bolt.When the third seat is f olded, the
f lat tire is secured to the f loor on
topof thefoldedseat.Pullupthe
carpet on the attachment point and
remove the plastic screw as
described in the previous
procedure.
Remove the wing bolt from the
bracket that is attached to the
spare tire lid.
23.
90Storing the Flat Tire on the Floor
CONT INUED
Changing a Flat T ire
T aking Care of t he Unexpect ed245
BRACKET
TIRE MOUNTING WING BOLT
Page 249 of 296

Place the flat tire face down on the
attachment point. Put the tire
mountingwingboltinthe
attachment point through one of
the f ive wheel nut holes as shown.
Poke holes in the vinyl bag. Secure
the f lat tire by tightening the wing
bolt.Store the jack in its holder. Turn
the jack’s end bracket clockwise to
lock it in place. Store the tools.
Replace the cover.
Close the tailgate.
Store the plastic screw in the spare
tire well.
Store the wheel cover in the spare
tire well. Make sure it will not get
scratched or damaged.
Storethesparetirebasketinthe
spare tire well.
Unclip the hook f rom the seat
back handle on the driver’s seat,
and lower the f loor lid and the
carpet.
Make sure to adjust the f ront
seats properly bef ore you start
driving (see page ).
24.
25.
26.
27.
89
On LX modelOn EX and EX-L models
Changing a Flat T ire
T aking Care of t he Unexpect ed246
TIRE MOUNTING WING BOLT
ATTACHMENT POINT
Loose items can fly around the
interiorinacrashandcould
seriously injure the occupants.
Store the wheel, jack, and tools
securely before driving.
Page 250 of 296
:You hear nothing, or almost
nothing. The engine’s starter
m")
CONT INUED
Diagnosing why your engine won’t
start f alls into two areas, depending
on what you hear when you turn the
key to START (III):You hear nothing, or almost
nothing. The engine’s starter
motor does not operate at all, or
operates very slowly.
You can hear the starter motor
operating normally, or the starter
motor sounds like it is spinning
f aster than normal, but the engine
does not start up and run.
When you turn the ignition switch to
START (III), you do not hear the
normal noise of the engine trying to
start. You may hear a clicking sound
or series of clicks, or nothing at all.
Check these things: Check the transmission interlock.
The transmission must be in Park
orNeutralorthestarterwillnot
operate.
Turn the ignition switch to ON (II).
Turn on the headlights and check
their brightness. If the headlights
are very dim or don’t light at all,
the battery is discharged. See
on page .
Turn the ignition switch to START
(III). If the headlights do not dim,
check the condition of the f uses. If
thefusesareOK,thereis
probably something wrong with
the electrical circuit f or the
ignition switch or starter motor.
You will need a qualif ied
technician to determine the
problem (see
on page ). If the headlights dim noticeably or
go out when you try to start the
engine, either the battery is
discharged or the connections are
corroded. Check the condition of the
battery and terminal connections
(see page ). You can then try
jump starting the vehicle from a
booster battery (see page ).
In this case, the starter motor’s
speed sounds normal, or even f aster
than normal, when you turn the
ignition switch to START (III), but
the engine does not run.
Are you using the proper starting
procedure? Ref er to on page .
255 248
235
248
183
If theEngineWon’tStart
T aking Care of t he Unexpect ed
Nothing Happens or the Starter
Motor Operates Very Slowly Jump Starting
Emergency T owing T he Starter Operates Normally
Starting the
Engine
247
Page 254 of 296

Look f or any obvious coolant leaks,
such as a split radiator hose.
Everything is still extremely hot,
so use caution. If you f ind a leak, it
must be repaired bef ore you
continue driving (seeon page ).
If you don’t f ind an obvious leak,
check the coolant level in the
radiator reserve tank. Add coolant
if the level is below the MIN mark.
If there was no coolant in the
reserve tank, you may need to add
coolant to the radiator. Let the
engine cool down until the pointer
reaches the middle of the tempera-
ture gauge, or lower, bef ore check-
ing the radiator. Using gloves or a large heavy
cloth, turn the radiator cap
counterclockwise without pushing
down to the first stop. After the
pressure releases, push down on
the cap and turn it until it comes
off.
If the temperature stays normal,
check the coolant level in the
radiator reserve tank. If it has
gone down, add coolant to the
MAX mark. Put the cap back on
tightly. Put the radiator cap back on
tightly. Run the engine and watch
the temperature gauge. If it goes
back to the red mark, the engine
needs repair (seeon page ).
Start the engine, and set the
temperature control dial to
maximum (climate control to
FULL AUTO at 90°F/32°C). Add
coolant to the radiator up to the
base of the f iller neck. If you do
not have the proper coolant
mixture available, you can add
plain water. Remember to have
the cooling system drained and
ref illed with the proper mixture as
soon as you can.
5.
6.
7.
8.9.
255
10.
11.255
Emergency
Towing
Emergency
Towing
If theEngineOverheats
T aking Care of t he Unexpect ed251
Removing the radiator cap
while the engine is hot can
cause the coolant to spray out,
seriously scalding you.
Always let the engine and
radiator cool down before
removing the radiator cap.


. Install the bracket and
the bracket mounting bolt to the
attachment point as shown, and
tighten the bolt. Make sure the
brac")