Page 63 of 221
The knob on the instrument panel
controls the brightness of the instru-
ment panel lights. Turn the knob to
adjust the brightness.There are six brightness levels.
When you turn the knob, the
odometer/trip meter display
changes to circles that show you the
current level. You will hear a tone
when you reach the maximum or
minimum brightness.Adjust the brightness to the desired
level with the headlight switch of f ,
and also with the headlight switch on.
To reduce glare at night, the
instrument panel illumination dims
when you turn the light switch to
or . Turning the Select/
Reset knob f ully to the right will
return the instrument panel to the
brightness adjusted with the
headlight switch of f and a tone willsound.OnLX,USEX,andCanadianSimodels
Instrument Panel Brightness
Inst rument s and Cont rols64
SELECT/RESET KNOB
DX models KNOB LX, U.S. EX, and Canadian
Si models
�����—�����—�����y�
�������������y���
�(�����������y���������y
Page 64 of 221

Make sure the rear window is clear
and you have good visibility bef ore
starting to drive.
The def ogger and antenna wires on
the inside of the rear window can be
accidentally damaged. When
cleaning the glass, always wipe side
to side.
Push the button between the center
vents to turn on the hazard warning
lights (f our-way f lashers). This
causes all f our outside turn signals
and both indicators in the instrument
panel to f lash. Use the hazard
warning lights if you need to park in
a dangerous area near heavy traffic,
or if your vehicle is disabled. The rear window def ogger will clear
fog, frost, and thin ice from the
window. Push the def ogger button to
turn it on and of f . The light in the
button lights to show the def ogger is
on. If you do not turn it of f , the
def ogger will shut itself of f af ter
about15minutes.Italsoshutsoff
when you turn of f the ignition. You
have to turn it on again when you
restart the vehicle.
Hazard Warning L ight, Rear Window Def ogger
Hazard Warning Light Rear Window Def ogger
Inst rument s and Cont rols65
�����—�����—�����y�
�������������y���
�(�����������y���������y
Page 68 of 221

�µ
�µ
�µ
�µ
The ignition switch has f our
positions: LOCK (0), ACCESSORY
(I), ON (II), and START (III). If the f ront wheels are turned, the
anti-thef t lock may make it dif f icult
to turn the key. Firmly turn the
steering wheel to the lef t or right as
you turn the key.
You can
operate the audio system and the
accessory power sockets in this
position.
This is the normal key
position when driving. Several of the
lights on the instrument panel come
on as a test when you turn the
ignition switch f rom ACCESSORY toON.
Use this position
only to start the engine. The switch
returns to ON (II) when you let go of
the key. You will hear a reminder beeper if
you leave the key in the ignition
switch in the LOCK (0) or
ACCESSORY (I) position and open
the driver’s door. Remove the key to
turn of f the beeper.
You can insert or
remove the key only in this position.
To turn the key, you must push the
key in slightly. If your vehicle has an
automatic transmission, the shif t
lever must also be in park. If your vehicle has an automatic
transmission, the shif t lever must be
in Park bef ore you can remove the
key f rom the ignition switch.
Ignition Switch
Inst rument s and Cont rols
A CCESSORY (I)
ON (II)
ST A RT (III)
LOCK (0)
69
Removing the key from the
ignition switch while driving
locks the steering. This can
cause you to lose control.
Remove the key from the
ignition switch only whenparked.
�����—�����—�����y�
�������������y���
�(�����������y���������y
Page 71 of 221

�µ
�µ
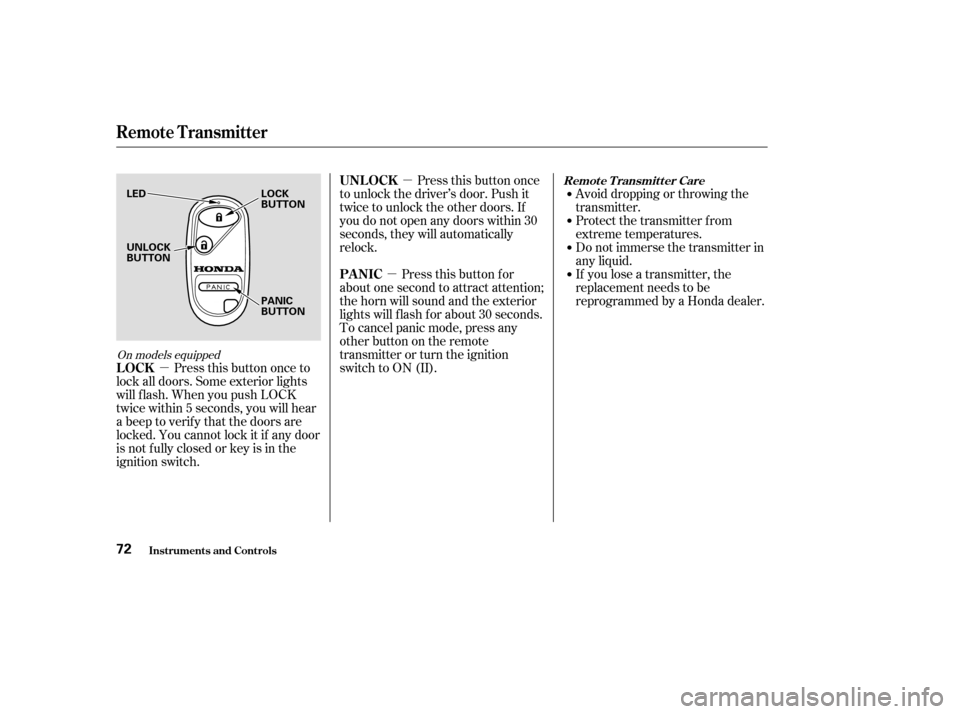
�µ Press this button once
to unlock the driver’s door. Push it
twice to unlock the other doors. If
you do not open any doors within 30
seconds, they will automatically
relock.
Pressthisbuttonfor
about one second to attract attention;
thehornwillsoundandtheexterior
lights will f lash f or about 30 seconds.
To cancel panic mode, press any
other button on the remote
transmitter or turn the ignition
switch to ON (II). Avoid dropping or throwing the
transmitter.
Protect the transmitter from
extreme temperatures.
Do not immerse the transmitter in
any liquid.
If you lose a transmitter, the
replacement needs to be
reprogrammed by a Honda dealer.
Press this button once to
lock all doors. Some exterior lights
will f lash. When you push LOCK
twice within 5 seconds, you will hear
a beep to verify that the doors are
locked. You cannot lock it if any door
is not f ully closed or key is in the
ignition switch.
On models equipped
Remote Transmitter
Inst rument s and Cont rols
UNL OCK
PA NIC
LOCKRemote Transmitter Care
72
UNLOCK
BUTTON
LED LOCK
BUTTON
PANIC
BUTTON
�����—�����—�����y�
�������������y���
�(�����������y���������y
Page 79 of 221

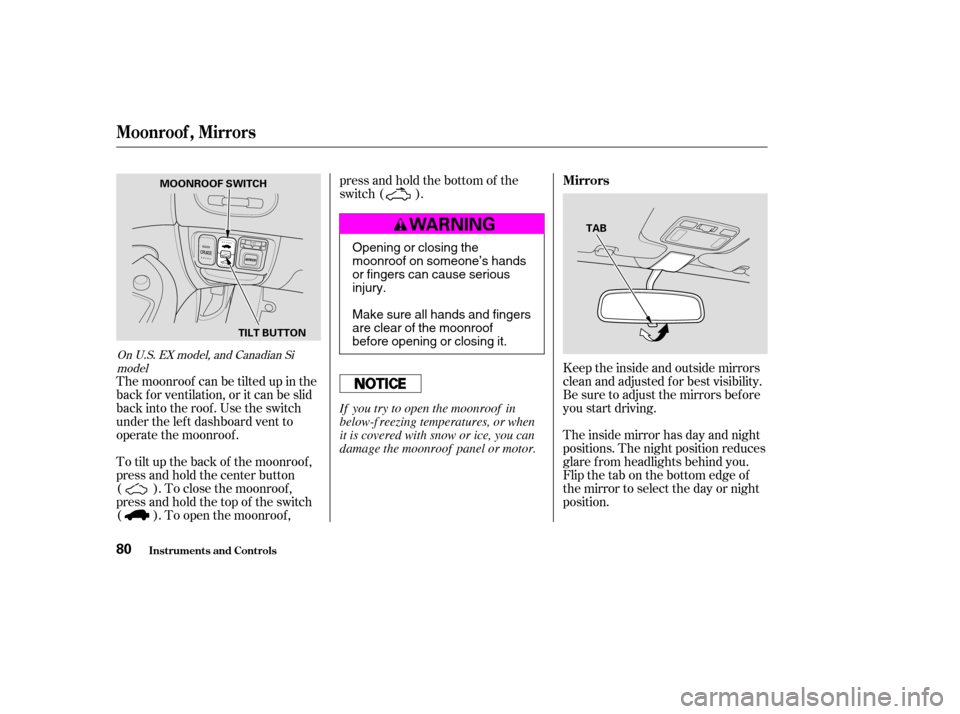
The moonroof can be tilted up in the
back f or ventilation, or it can be slid
back into the roof. Use the switch
under the lef t dashboard vent to
operate the moonroof .
To tilt up the back of the moonroof ,
press and hold the center button
( ). To close the moonroof ,
press and hold the top of the switch
( ). To open the moonroof ,press and hold the bottom of the
switch ( ).
Keeptheinsideandoutsidemirrors
clean and adjusted f or best visibility.
Be sure to adjust the mirrors bef ore
you start driving.
The inside mirror has day and night
positions. The night position reduces
glare f rom headlights behind you.
Flip the tab on the bottom edge of
the mirror to select the day or night
position.
On U.S. EX model, and Canadian Simodel
Moonroof , Mirrors
Inst rument s and Cont rols
Mirrors
80
TAB
MOONROOF SWITCH
TILT BUTTON
Opening or closing the
moonroof on someone’s hands
or fingers can cause seriousinjury.
Make sure all hands and fingers
are clear of the moonroof
before opening or closing it.
If you try to open the moonroof in
below-f reezing temperatures, or when
it is covered with snow or ice, you can
damage the moonroof panel or motor.
�����—�����—�����y�
���������
���y���
�(�����������y���������y
Page 82 of 221
The ceiling light has a three-position
switch; ON, Door Activated, and
OFF.
In the Door Activated (center)
position, the light comes on when
you:Open any door.
Remove the key from the ignition.
If you do not open a door, the light
f ades out in about 10 seconds.
Unlock the doors with the key or
remote transmitter. The f ront ceiling light also contains
two spotlights, Push the button next
to the light to turn it on and off.
Push on the spotlight lenses to turn
the light on and of f . The courtesy lights in the f ront
doors and around the ignition switch
come on when you open any door.
Af ter you close the door, the ignition
switch light stays on f or several
seconds.OnU.S.EXandCanadianSimodels
On LX models
Interior Lights
Inst rument s and Cont rols
Ceiling L ight Individual Interior L ights
83
FRONT
DOOR ACTIVATED
DOOR ACTIVATED
ON
OFF
OFF ON
�����—�����—�����y�
�������������y���
�(�����������y���������y
Page 93 of 221

�µ�µ
�µ
If you are
traveling far from home and can no
longer receive your preset stations,
you can use the Auto Select f eature
to find stations in the local area.
Press the A. SEL Button. ‘‘A.SEL’’
f lashes in the display, and the system
goes into scan mode f or several
seconds. It stores the f requencies of
six AM, and twelve FM stations in
the preset buttons.
You will see a ‘‘0’’ displayed af ter
pressing a preset button if Auto
Select cannot f ind a strong station
f or every preset button.
If you do not like the stations Auto
Select has stored, you can store
other f requencies on the preset
buttons. Use the TUNE, SEEK, or
SCAN functions to find stations, then
store them in the preset buttons as
described. press the
A. SEL button. This restores the
presets you originally set. These two
modes adjust the strength of the
sound coming f rom each speaker.
BAL adjusts the side-to-side strength,
while FAD adjusts the f ront-to-back
strength.
You can use the instrument panel
brightness control knob to adjust the
illumination of the audio system (see
page ). The audio system
illuminates when the parking lights
are on, even if the radio is of f .
Press the SOUND/MODE (TUNE)
knob repeatedly to display the Bass
(BAS), Treble (TRE), Fader (FAD),
and Balance (BAL) setting.
Eachmodeisshowninthedisplayas
it changes. Turn the SOUND/
MODE (TUNE) knob to adjust the
setting to your liking. When the level
reaches the center, you will see ‘‘C’’
in the display. The system will
automatically return the display to
the selected audio mode about f ive
seconds af ter you stop adjusting a
mode.
Use the TRE/BAS
modes to adjust the tone to your
liking. 64To turn of f Auto Select,
Playing the Radio
Comf ort and Convenience Feat ures
AUTO SELECT
Adjusting the SoundBalance/Fader
A udio System L ighting
Treble/Bass
94
�����—�����—�����y�
�������������y���
�(�����������y���������y
Page 116 of 221

Your dealer has Honda accessories
that allow you to personalize your
vehicle. These accessories have
been designed and approved f or your
vehicle, and are covered by warranty.When properly installed, cellular
phones, alarms, two-way radios, and
low-powered audio systems should
not interf ere with your vehicle’s
computer controlled systems, such
as the SRS and anti-lock brake
system.Bef ore installing any accessory:
Make sure the accessory does not
obscure any lights, or interf ere
with proper vehicle operation or
perf ormance.
Be sure electronic accessories do
not overload electrical circuits
(see page ) or interf ere with
proper operation.
Have the installer contact your
Honda dealer f or assistance bef ore
installing any electronic accessory.
Modif ying your vehicle, or installing
some non-Honda accessories, can
make your vehicle unsaf e. Bef ore
you make any modif ications or add
anyaccessories,besuretoreadthe
f ollowing inf ormation.
Although aftermarket accessories
may f it on your vehicle, they may not
meet f actory specif ications, and
could adversely af f ect your vehicle’s
handling and stability. (See
‘‘Modif ications’’ on page f or
additional information.)
118 186
A ccessories
Bef ore Driving
A ccessories and Modif ications
117
Improper accessories or
modifications can affect your
vehicle’s handling, stability, and
performance, and cause a
crash in which you can be hurt
or killed.
Follow all instructions in this
owner’s manual regarding
accessories and modifications.
�����—�����—�����y�
�������������y���
�(�����������y���
�����y