Page 80 of 221
Move the selector switch to L
(driver’s side) or R (passenger’s
side).Push the appropriate edge of the
adjustment switch to move the
mirrorright,left,up,ordown.
When you f inish, move the
selector switch to the center (off)
position. This turns of f the
adjustment switch so you can’t
move a mirror out of position by
accidentally bumping the switch.The outside mirrors are heated to re-
move fog and frost. With the ignition
switchON(II),turnontheheaters
by pressing the button. The light in
the button comes on as a reminder.
Press the button again to turn the
heaters of f .
3.
1. 2.
OnLXandEXmodelsintheU.S.,and
LXandSimodelsinCanada OnLXandSimodelsinCanada
Adjusting the Power Mirrors
Power Mirror Heaters
Mirrors
Inst rument s and Cont rols81
SELECTOR SWITCH
ADJUSTMENT SWITCH
�����—�����—�����y�
�������������y���
�(�����������y���������y
Page 89 of 221

The f low-through ventilation system
draws in outside air, circulates it
through the interior, then exhausts it
through vents near the rear side
panels.Turn the temperature control dial
all the way to the lef t.
Make sure the A/C is of f .
Select and Fresh Air mode.
Set the f an to the desired speed.
Select and Fresh Air mode.
Set the f an to the desired speed.
Adjust the warmth of the air with
the temperature control dial. Turn on the A/C by pressing the
button. The light in the button
comesonwhenafanspeedis
selected.
Make sure the temperature
control dial is all the way to the left.
Select .
If the outside air is humid, select
Recirculation mode. If the outside
air is dry, select Fresh Air mode.
Set the f an to the desired speed. you can
cool it down more rapidly by partially
opening the windows, turning on the
A/C, and setting the fan to
maximum speed in Fresh Air mode.
Air conditioning places an extra load
on the engine. Watch the engine
coolant temperature gauge (see page
). If it moves near the red zone,
turn of f the A/C until the gauge
reads normally.
The heater uses engine coolant to
warm the air. If the engine is cold, it
will be several minutes bef ore you
f eel warm air coming through the
system.
1. 2. 3.4.
1. 2. 3. 4. 5.
1. 2.3. 60
If the interior is very warm,
Vents, Heating, and A/C
Comf ort and Convenience Feat ures
Ventilation
Using the Heater
Using the A /C
90
�����—�����—�����y�
�������������y���
�(�����������y���������y
Page 90 of 221

Air conditioning, as it cools, removes
moisture from the air. When used in
combination with the heater, it
makes the interior warm and dry.Switch the f an on.
Turn on the air conditioning.
Select and Fresh Air mode.
Adjust the temperature control
dial to your pref erence.
This setting is suitable f or all driving
conditions whenever the outside
temperature is above 32°F (0°C). To remove f og f rom the inside of the
windows:
Set the f an to the desired speed.
Select , the system
automatically switches to Fresh
Air mode and turns on the A/C.
(The A/C indicator will not come
on in U.S. vehicles.)
Adjust the temperature control
dial so the airflow feels warm.
Select to help clear the
rear window. Select . The system
automatically switches to Fresh
Air mode and turns on the A/C.
(The A/C indicator will not come
on in U.S. vehicles.)
Select .
Set the f an and temperature
controls to maximum level.
When you switch to another mode
f rom , the A/C stays on.
Press the A/C button to turn it of f . To clear the windows f aster, you can
close the dashboard corner vents by
rotating the wheel below it. This will
send more warm air to the
windshield def roster vents. Once the
windshield is clear, select the Fresh
Air mode to avoid f ogging the
windows.
For you safety, make sure you have
a clear view through all the windows
bef ore driving.
1.2.3.4.
1. 2. 3.
1.2. 3. 4.
Vents, Heating, and A/C
Comf ort and Convenience Feat ures
Dehumidif y the Interior T o Def og and Def rost T o Remove Exterior Frost or Ice
From the Windows
91
�����—�����—�����y�
�����������
�y���
�(�����������y���������y
Page 177 of 221

�´�´ �µ
Although this seems like a simple
procedure, you should take several
precautions.
You cannot start a Honda with an
automatic transmission by pushing
or pulling it. Open the hood and check the
physical condition of the battery.
In very cold weather, check the
condition of the electrolyte. If it
seems slushy or like ice, do not try
jump starting until it thaws.
Turn of f all the electrical acces-
sories: heater, A/C, stereo system,
lights, etc. Put the transmission in
Neutral or Park, and set the
parking brake.
Connect one jumper cable to the
positive ( ) terminal on your
battery. Connect the other end to
the positive ( ) terminal on the
booster battery.
Connect the second jumper cable
to the negative ( ) terminal on
the booster battery. Connect the
other end to the grounding strap
as shown. Do not connect this
jumper cable to any other part of
the engine.
If the booster battery is in another
vehicle, have an assistant start
that vehicle and run it at a fast idle.
1. 2. 3.
4. 5.
Jump Starting
T aking Care of t he Unexpect ed
To Jump Start Your Vehicle:
178
NOTICE:
A battery can explode if you do
not follow the correct procedure,
seriously injuring anyonenearby.
Keep all sparks, open flames,
and smoking materials away
from the battery. If a battery sits in extreme
cold, the electrolyte inside can f reeze.
Attempting to jump start with a f rozen
battery can cause it to rupture.
�����—�����—�����y�
�������������y���
�(�����������y���
���
�y
Page 187 of 221
�µ
�µ
�µ
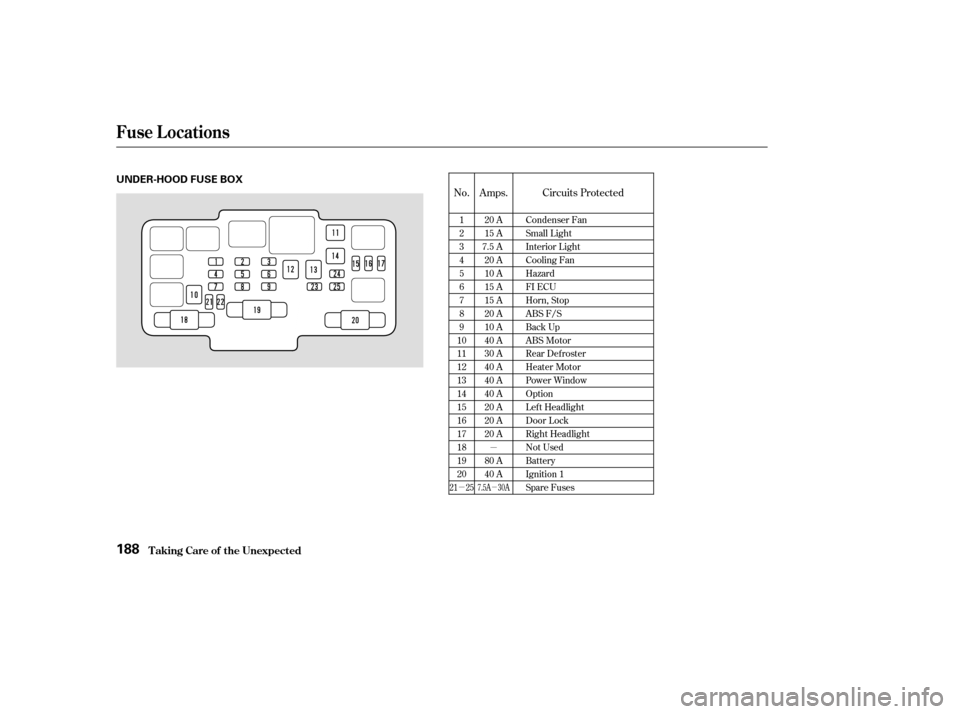
No. Amps. Circuits Protected
1 23456789
1011121314151617181920 20 A
15 A
7.5 A 20 A
10 A
15 A
15 A
20 A
10 A
40 A
30 A
40 A
40 A
40 A
20 A
20 A
20 A
80 A
40 A Condenser Fan
Small Light
Interior Light
Cooling Fan
Hazard
FI ECU
Horn, Stop
ABS F/S
Back Up
ABS Motor
Rear Defroster
Heater Motor
Power Window
Option
Lef t Headlight
Door Lock
Right Headlight
Not Used
Battery
Ignition 1
Spare Fuses
21 257.5A 30A
Fuse Locations
T aking Care of t he Unexpect ed188
UNDER-HOOD FUSE BOX
�����—�����—�����y�
�������������y���
�(�����������y���
���
�y
Page 188 of 221
�µ�µ �µ �µ �µ
�Î
�Î
�Î
No. Amps. Circuits ProtectedNo. Amps. Circuits Protected
On Canadian models
:
1 2345 15 A
20 A
10 A
10 A
Ignition Coil
LAF Heater
Daytime Running Lights
Alternator
Not Used 6789
10111213141516171819202122232425 7.5 A
20 A
7.5 A
7.5 A
7.5 A
7.5 A 10 A
10 A
15 A
15 A
7.5 A 20 A
20 A
20 A
20 A
20 A Power Window Relay
Moonroof
Accessory, Radio
Not Used
Meter
ABS
Daytime Running Lights
SRS
Remote Control Mirrors
Not Used
Not Used
Fuel Pump
Accessory Power Socket
Turn Signal Lights
Front Wiper
Not Used
Front Right Power Window
Front Left Power Window
Rear Lef t Power Window
Rear Right Power Window
Fuse Locations
T aking Care of t he Unexpect ed189
INTERIOR FUSE BOX
�����—�����—�����y�
�������������y���
�(�����������y���
�����y
 or R (passenger’s
side).Push the appropriate edge of the
adjustment switch to move the
mirrorright,left,up,ordown.
When you f inish, move the
selec")