Page 70 of 231
. This
causes all f our outside turn signals
and both indicators in the instrument
panel to f lash. U")
Push the button between the center
vents to turn on the hazard warning
lights (f our-way f lashers). This
causes all f our outside turn signals
and both indicators in the instrument
panel to f lash. Use the hazard
warning lights if you need to park in
a dangerous area near heavy traffic,
or if your vehicle is disabled.
The knob on the instrument panel
controls the brightness of the instru-
ment panel lights. Turn the knob to
adjust the brightness.
When you turn the knob, the
odometer/trip meter display
changes to circles that show you the
current level. You will hear a tone
when you reach the maximum or
minimum brightness. The display
returns to the odometer/trip meter values f ive seconds af ter you stop
adjusting the knob.
Adjust the brightness to the desired
level with the headlight switch of f ,
and also with the headlight switch on.
To reduce glare at night, the
instrument panel illumination dims
when you turn the light switch to
or . Turning the Select/
Reset knob f ully to the right will
return the instrument panel to the
brightness adjusted with the
headlight switch of f and a tone will
sound.
Instrument Panel Brightness
Hazard Warning Button
Instrument Panel Brightness, Hazard Warning Button
Inst rument s and Cont rols67
KNOB
Page 80 of 231
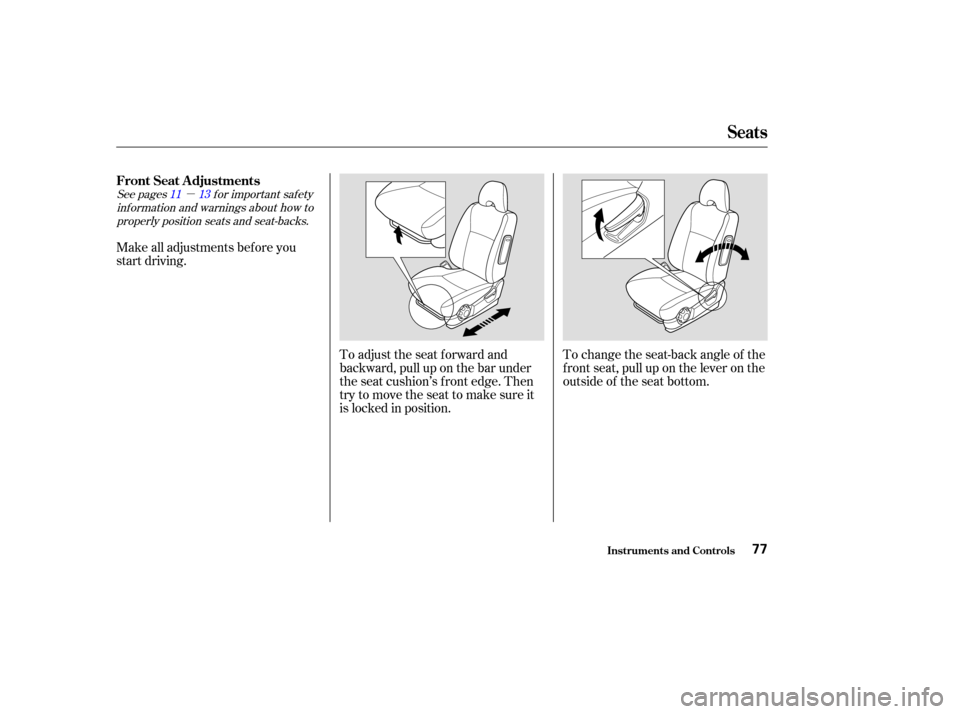
�µ
See pages f or important saf ety
inf ormation and warnings about how toproperly position seats and seat-backs. 11 13
Make all adjustments bef ore you
start driving.
To adjust the seat forward and
backward, pull up on the bar under
the seat cushion’s f ront edge. Then
trytomovetheseattomakesureit
is locked in position.To change the seat-back angle of the
f ront seat, pull up on the lever on the
outside of the seat bottom.
FrontSeatAdjustments
Seats
Inst rument s and Cont rols77
Page 81 of 231
See page f or important saf etyinf ormation and a warning about how toproperly position the head restraints. 14
The head restraints help protect you
and your passengers f rom whiplash
and other injuries. They are most
ef f ective when you adjust them so
the back of the occupant’s head rests
against the center of the restraint.
The head restraints in the f ront and
rear outboard seating positions
adjust f or height. You need both
hands to adjust the restraint. To
raise it, pull upward. To lower the
restraint, push the release button
sideways and push the restraint
down.
Your vehicle is equipped with head
restraints in the f ront seats and the
outboard seating positions in the
rear.
To adjust the height of the driver’s
seat, turn the dial on the outside of
the seat bottom. Driver’s Seat Height Adjustment Head Restraints
Seats
Inst rument s and Cont rols78
FRONT
RELEASE BUTTON
Page 178 of 231

�µ
Check the condition of the battery
monthlybylookingatthetest
indicator window. The label on the
battery explains the test indicator’s
colors. If additional battery maintenance is
needed, see your Honda dealer or a
qualif ied technician.
Battery posts,
terminals, and related accessories
contain lead and lead compounds. Check the terminals f or corrosion (a
white or yellowish powder). To
remove it, cover the terminals with a
solution of baking soda and water. It
will bubble up and turn brown. When
this stops, wash it of f with plain
water. Dry off the battery with a
cloth or paper towel. Coat the
terminals with grease to help prevent
f urther corrosion. If you need to connect the battery to
a charger, disconnect both cables to
prevent damaging your vehicle’s
electrical system. Always disconnect
the negative ( ) cable first, and
reconnect it last.
Maint enance
WARNING:
Wash your hands af ter handling.
Checking the Battery
175
TEST INDICATOR WINDOW
The battery gives off explosive
hydrogen gas during normal
operation.
A spark or flame can cause the
battery to explode with enough
force to kill or seriously hurt you.
Wear protective clothing and a
face shield, or have a skilled
mechanic do the battery
maintenance.
Page 182 of 231

If you have a f lat tire while driving,
stop in a saf e place to change it.
Drive slowly along the shoulder until
you get to an exit or an area to stop
that is far away from the traffic lanes.Open the trunk. Raise the trunk
f loor mat and the trunk f loor by
lif ting up on the back edge.
Take the tool kit out of the trunk.
Unscrew the wing bolt and take
the spare tire out of its well.
Turn on the hazard warning lights,
and turn the ignition switch to
LOCK (0). Have all the
passengers get out of the vehicle
while you change the tire. Park the vehicle on f irm, level and
non-slippery ground. Put the
transmission in Park (automatic)
or Reverse (manual). Apply the
parking brake.
5. 4. 3.
2. 1.
CONT INUED
Changing a Flat T ire
T aking Care of t he Unexpect ed179
SPARE TIRE TRUNK FLOOR
JACK
TOOL KIT
The vehicle can easily roll off
the jack, seriously injuring
anyone underneath.
Follow the directions for
changing a tire exactly, and
never get under the vehicle
when it is supported only by the
jack.
Page 193 of 231

The engine running generates the oil
pressure. When the Auto Idle Stop is
activated, the engine is stopped, the
oil pressure is dropped, and the low
oil pressure indicator does not light.
Start the engine, and watch the oil
pressure indicator. If it does not go
out within 10 seconds, turn of f the
engine. There is a mechanical
problem that needs to be repaired
bef ore you can continue driving.
(See on page
).
If necessary, add oil to bring the
level back to the full mark on the
dipstick (see page ). Let the vehicle sit f or a minute.
Open the hood, and check the oil
level (see page ). An engine
very low on oil can lose pressure
during cornering and other driving
maneuvers. Saf ely pull of f the road, and shut
of f the engine. Turn on the hazard
warning indicators.
This light should never
come on when the engine is
running. If it starts f lashing
or stays on, the oil pressure has
dropped very low or lost pressure.
Serious engine damage is possible
and you should take immediate
action. 1.
2.
3.
4.118
199 152
T aking Care of t he Unexpect ed
L ow Oil Pressure Indicator
Emergency T owing
190
NOTICE:
Running the engine with low
oil pressure can cause serious
mechanical damage almost immediately.
Turn of f the engine as soon as you can
saf ely get the vehicle stopped.
Page 209 of 231

�µ
Quality grades can be f ound where
applicable on the tire sidewall
between the tread shoulder and the
maximum section width. For
example:
All passenger car tires must conf orm
to Federal Saf ety Requirements in
addition to these grades. The treadwear grade is a compara-
tive rating based on the wear rate of
the tire when tested under controlled
conditions on a specif ied government
test course. For example, a tire
graded 150 would wear one and one-
half (1 1/
2) times as well on the
government course as a tire graded
100. The relative perf ormance of
tires depends upon the actual condi-
tions of their use, however, and may
depart signif icantly f rom the norm
due to variations in driving habits,
service practices and dif f erences in
road characteristics and climate. The traction grades, f rom highest to
lowest, are AA, A, B, and C. Those
grades represent the tire’s ability to
stop on wet pavement as measured
under controlled conditions on
specif ied government test surf aces
of asphalt and concrete. A tire
marked C may have poor traction
perf ormance.
Warning: The traction grade
assignedtothistireisbasedon
straight-ahead braking traction tests,
and does not include acceleration,
cornering, hydroplaning, or peak
traction characteristics.
The tires on your vehicle meet all
U.S. Federal Saf ety Requirements.
All tires are also graded f or
treadwear, traction, and temperature
perf ormance according to
Department of Transportation
(DOT) standards. The f ollowing
explains these gradings.
Unif orm T ire Quality Grading
T readwear 200
Traction AA
Temperature A Treadwear
Traction AA, A, B, C
T echnical Inf ormation
DOT T ire Quality Grading (U.S. Vehicles)
206
Page 210 of 231
, B, and C, representing the
tire’s resistance to the generation of
heat and its ability to dissipate heat
wh")
�µ�µ
�µ
�µ �µ
�µ
�µ
�µ
�µ
�µ
�µ
�µ
The temperature grades are A (the
highest), B, and C, representing the
tire’s resistance to the generation of
heat and its ability to dissipate heat
when tested under controlled
conditions on a specif ied indoor
laboratory test wheel. Sustained high
temperature can cause the material
of the tire to degenerate and reduce
tire life, and excessive temperature
can lead to sudden tire f ailure. The
grade C corresponds to a level of
perf ormance, which all passenger
vehicle tires must meet under the
Federal Motor Vehicle Saf ety
Standard No. 109. Grades B and A
represent higher levels of
perf ormance on the laboratory test
wheel than the minimum required by
law.
Warning: The temperature grade f or
this tire is established f or a tire that
is properly inf lated and not over-
loaded. Excessive speed, underinf la-
tion, or excessive loading, either separately or in combination, can
cause heat buildup and possible tire
f ailure.
Date of manuf acture. Tire type code. Manuf acturer’s
identification mark. This indicates that the tire
meets all requirements of
the U.S. Department of
Transportation.
Tire Identif ication Number (TIN) is
a group of numbers and letters that
look like the f ollowing example TIN.
Speed symbol (an
alphabetical code indicating
the maximum speed rating). Load index (a numerical code
associated with the maximum
load the tire can carry). Rim diameter in inches. Tire construction code (R
indicates radial).
Whenever tires are replaced, they
should be replaced with tires of the
same size. Following is an example
of tire size with an explanation of
what each component means. Aspect ratio (the tire’s section
height as a percentage of its
width). Tire width in millimeters. Vehicletype(Pindicates
passenger vehicle).
The tires that came on your vehicle
have a number of markings. Those
you should be aware of are described
below.
P
225
55 R
16
94
V
DOT
B97R
FW6X
2202
Temperature A,B,C
Tire Labeling
DOT T ire Quality Grading (U.S. Vehicles), T ire L abeling
T ire Ident if icat ion Number
Tire Size
T echnical Inf ormation207
DOT B97R FW6X 2202
P225/55R16 94V