2004 GMC CANYON change time
[x] Cancel search: change timePage 144 of 420
#(Air Conditioning):Your vehicle may have air
conditioning. Press this button to turn the air-conditioning
system on or off. An indicator light on the button will
come on to let you know the air conditioning is activated.
When the system is on, this setting cools and
dehumidi�es the air entering your vehicle.
The air conditioning will not function if the fan is
turned off.
You may notice a slight change in engine performance
when the air conditioning compressor shuts off and
turns on again. This is normal. The system is designed
to make adjustments to help with fuel economy while
still maintaining the selected temperature.
The air conditioning system removes moisture from the
air, so you may sometimes notice a small amount of
water dripping underneath your vehicle while idling
or after turning off the engine. This is normal.Defogging and Defrosting
Fog on the inside of windows is a result of high humidity
(moisture) condensing on the cool window glass.
This can be minimized if the climate control system is
used properly. There are two modes to clear fog or frost
from your windshield and side windows. Use the defog
mode to clear the windows of fog or moisture and warm
the passengers. Use the defrost mode to remove fog or
frost from the windshield more quickly. For best results,
clear all snow and ice from the windshield before
defrosting.
Turn the mode knob on the climate control panel
clockwise to select the defog or defrost modes.
/(Floor/Defog):This mode directs the air to the
windshield, the side window outlets, and to the
�oor outlets. When you select this mode, the system
runs the air conditioning compressor unless the outside
temperature is near freezing or below. Recirculation
is not available in this mode.
0(Defrost):This mode directs most of the air to the
windshield, and the side window outlets. When you
select this mode, the system runs the air conditioning
compressor unless the outside temperature is near, or
below freezing. Recirculation is not available in this
mode.
Do not drive the vehicle until all the windows are clear.
3-20
Page 163 of 420

Language
You can choose the language in which the DIC
information is displayed. Press the reset stem until
LANGUAGE is displayed. While LANGUAGE is on
the display, press and hold the reset stem until
the language changes from ENGLISH to the language
you desire. You can choose from English, Spanish,
or French.
DIC Warnings and Messages
Warning messages are displayed on the DIC to notify
the driver that the status of the vehicle has changed and
that some action may be needed by the driver to
correct the condition. More than one message may
appear at one time. They will appear one after the other.
The messages are displayed for three seconds each.
Some messages may not require immediate action
but you should press and release the trip odometer reset
stem to acknowledge that you received the message
and clear it from the display. Each message must
be acknowledged individually. Some messages cannot
be cleared from the display because they are more
urgent. These messages require action before they can
be removed from the DIC display. The following are
the possible messages that can be displayed and some
information about them.
AC (Air Conditioning) OFF
This message will be displayed when the engine coolant
temperature is too high and the air conditioning in
your vehicle needs to be turned off. See andEngine
Overheating on page 5-28andClimate Control System
on page 3-18for more information. It will be displayed
along with the ENG HOT message.
ABS (Anti-Lock Brake System)
This message will be displayed on the DIC if there is a
problem with your antilock brake system. Check your
antilock brake system as soon as possible and have
your vehicle serviced. SeeBrakes on page 5-38
andAnti-Lock Brake System Warning Light on
page 3-29for more information. Pressing the reset
stem to acknowledge this message and clear it from
the DIC display.
BATTERY
This message will be displayed when there is a problem
with your vehicle’s battery. SeeBattery on page 5-41
andBattery Warning Light on page 3-27for more
information.
3-39
Page 169 of 420
Setting Preset Stations
The six numbered pushbuttons let you return to your
favorite stations. You can set up to 18 stations
(six FM1, six FM2, and six AM) by performing the
following steps:
1. Turn the radio on.
2. Press AM FM to select FM1, FM2, or AM.
3. Tune in the desired station.
4. Press and hold one of the six numbered pushbuttons
until you hear a beep. Whenever you press that
numbered pushbutton, the station you set will return.
5. Repeat the steps for each pushbutton.
Setting the Tone (Bass/Treble)
AUDIO:To adjust bass and treble, press and release
AUDIO until BAS or TRE appears on the display.
Then press and hold the up or the down arrow to
increase or to decrease. If a station is weak or noisy,
you may want to decrease the treble.
To adjust bass or treble to the middle position, select
BAS or TRE. Then press and hold AUDIO for more than
two seconds until you hear a beep. B and a zero or T
and a zero will appear on the display.
To adjust both tone controls and both speaker controls
to the middle position, end out of audio by waiting
for the display to change to the time display. Then press
and hold AUDIO for more than two seconds until you
hear a beep. CEN will appear on the display.
3-45
Page 170 of 420
Adjusting the Speakers (Balance/Fade)
AUDIO:To adjust the balance between the right
and the left speakers, press and release AUDIO until
BAL appears on the display. Then press and hold the up
or the down arrow to move the sound toward the right
or the left speakers.
To adjust the fade between the front and the rear
speakers, press and release AUDIO until FAD appears
on the display. Then press and hold the up or the
down arrow to move the sound toward the front or the
rear speakers.
To adjust balance or fade to the middle position, select
BAL or FAD. Then press and hold AUDIO for more
than two seconds until you hear a beep. L and a zero
or F and a zero will appear on the display.
To adjust both tone controls and both speaker controls
to the middle position, end out of audio by waiting for
the display to change to the time display. Then press
and hold AUDIO for more than two seconds until
you hear a beep. CEN will appear on the display.
Fade may not be available if you have a regular cab model.
Radio Messages
CAL (Calibrated):Your audio system has been
calibrated for your vehicle from the factory. If CAL
appears on the display it means that your radio has not
been con�gured properly for your vehicle and must
be returned to the dealer for service.
LOC (Locked):This message is displayed when the
Theftlock
®system has locked up. Your vehicle must be
returned to the dealer for service.
3-46
Page 171 of 420
Radio with CD
Playing the Radio
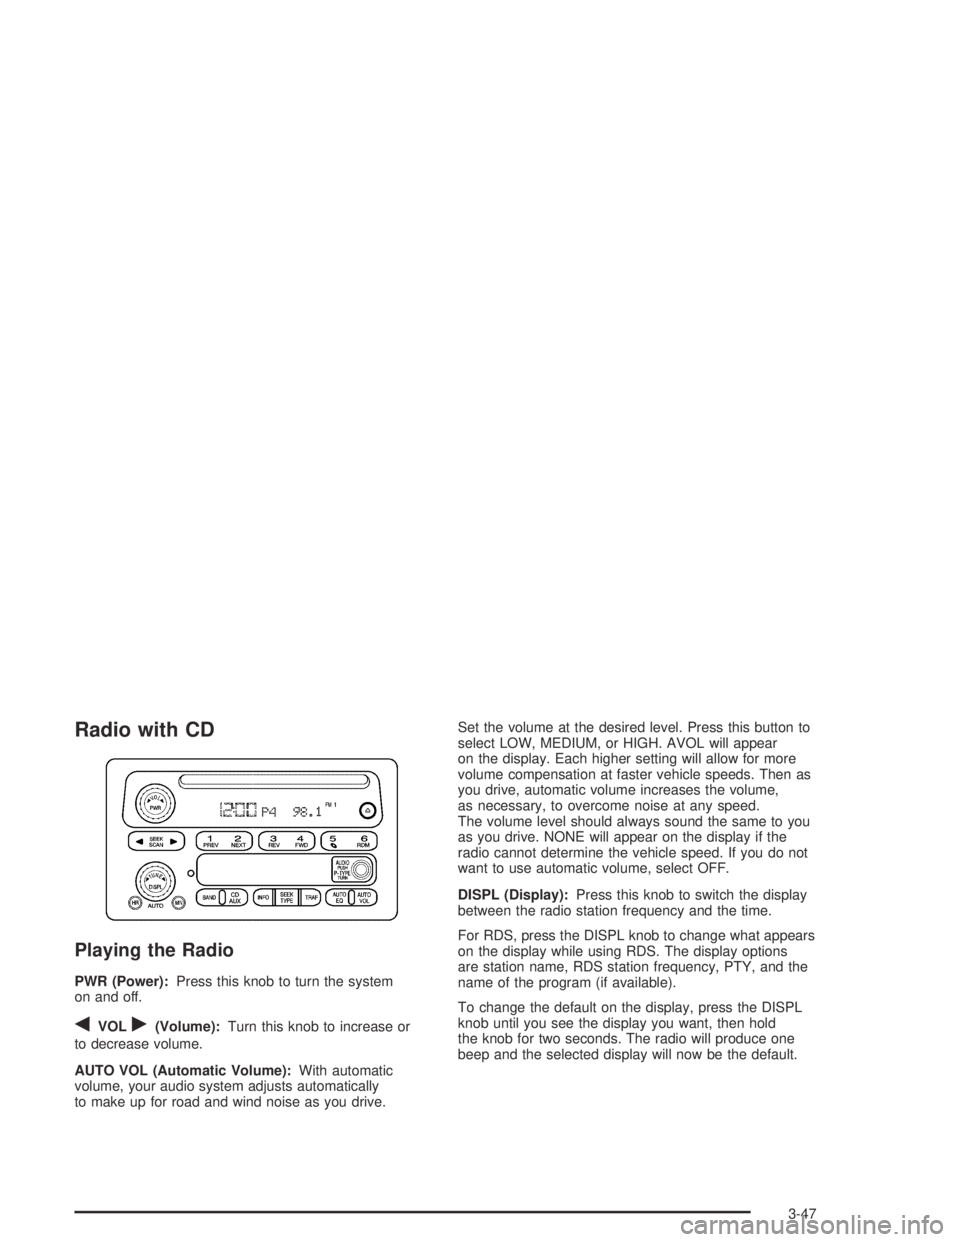
PWR (Power):Press this knob to turn the system
on and off.
qVOLr(Volume):Turn this knob to increase or
to decrease volume.
AUTO VOL (Automatic Volume):With automatic
volume, your audio system adjusts automatically
to make up for road and wind noise as you drive.Set the volume at the desired level. Press this button to
select LOW, MEDIUM, or HIGH. AVOL will appear
on the display. Each higher setting will allow for more
volume compensation at faster vehicle speeds. Then as
you drive, automatic volume increases the volume,
as necessary, to overcome noise at any speed.
The volume level should always sound the same to you
as you drive. NONE will appear on the display if the
radio cannot determine the vehicle speed. If you do not
want to use automatic volume, select OFF.
DISPL (Display):Press this knob to switch the display
between the radio station frequency and the time.
For RDS, press the DISPL knob to change what appears
on the display while using RDS. The display options
are station name, RDS station frequency, PTY, and the
name of the program (if available).
To change the default on the display, press the DISPL
knob until you see the display you want, then hold
the knob for two seconds. The radio will produce one
beep and the selected display will now be the default.
3-47
Page 179 of 420
qSCANr:Press and hold either SCAN arrow for
more than two seconds until SCAN appears on the
display and you hear a beep. Use this feature to listen
to 10 seconds of each track of the CD. Press either
SCAN arrow again, to stop scanning.
DISPL (Display):Press this knob to see how long the
current track has been playing. ET and the elapsed
time of the track will appear on the display. To change
the default on the display (track or elapsed time),
press this knob until you see the display you want, then
hold the knob for two seconds. The radio will produce
one beep and the selected display will now be the
default.
BAND:Press this button to listen to the radio when a
CD is playing. The inactive CD will remain safely
inside the radio for future listening.
CD AUX (Auxiliary):Press this button to play a CD
when listening to the radio. The CD symbol will appear
on the display when a CD is loaded.
Z(Eject):Press this button to stop a CD when it
is playing or to eject a CD when it is not playing.
Eject may be activated with either the ignition or radio
off. CDs may be loaded with the radio and ignition off
if this button is pressed �rst.
CD Messages
If the CD comes out, it could be for one of the following
reasons:
It is very hot. When the temperature returns to
normal, the CD should play.
You are driving on a very rough road. When the
road becomes smooth, the CD should play.
The CD is dirty, scratched, wet, or upside down.
The air is very humid. If so, wait about an hour
and try again.
There may have been a problem while burning
the CD.
The label may be caught in the CD player.
If the CD is not playing correctly, for any other reason,
try a known good CD.
If any error occurs repeatedly or if an error cannot be
corrected, contact your dealer. If your radio displays an
error message, write it down and provide it to your
dealer when reporting the problem.
3-55
Page 180 of 420
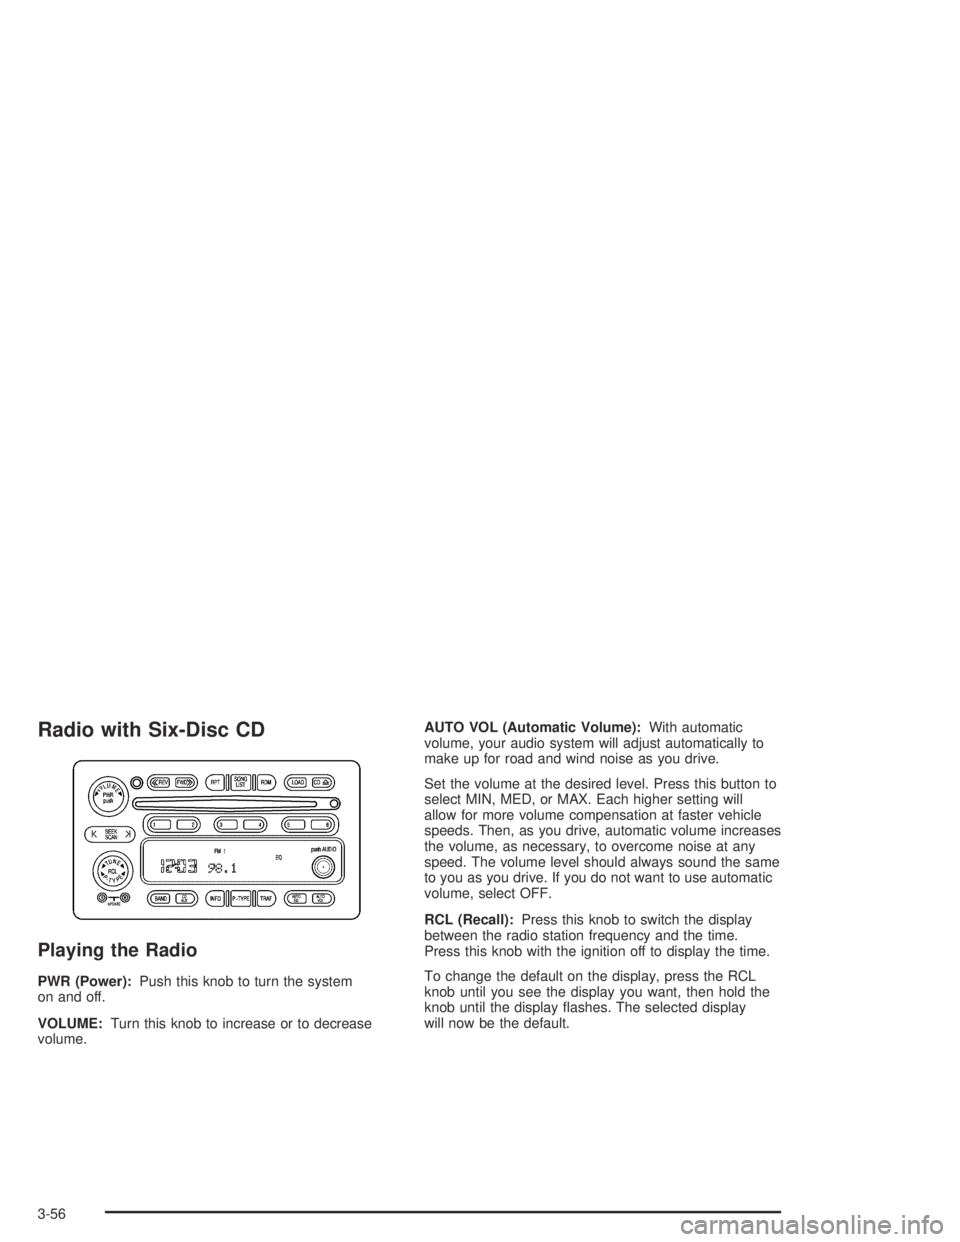
Radio with Six-Disc CD
Playing the Radio
PWR (Power):Push this knob to turn the system
on and off.
VOLUME:Turn this knob to increase or to decrease
volume.AUTO VOL (Automatic Volume):With automatic
volume, your audio system will adjust automatically to
make up for road and wind noise as you drive.
Set the volume at the desired level. Press this button to
select MIN, MED, or MAX. Each higher setting will
allow for more volume compensation at faster vehicle
speeds. Then, as you drive, automatic volume increases
the volume, as necessary, to overcome noise at any
speed. The volume level should always sound the same
to you as you drive. If you do not want to use automatic
volume, select OFF.
RCL (Recall):Press this knob to switch the display
between the radio station frequency and the time.
Press this knob with the ignition off to display the time.
To change the default on the display, press the RCL
knob until you see the display you want, then hold the
knob until the display �ashes. The selected display
will now be the default.
3-56
Page 189 of 420
To scan all loaded CDs, press and hold either SCAN
arrow for more than four seconds until CD SCAN
appears on the display and you hear a beep. Use this
feature to listen to 10 seconds of the �rst track of
each CD loaded. Press either SCAN arrow again,
to stop scanning.
RCL (Recall):Press this knob to see how long the
current track has been playing. To change the default
on the display (track or elapsed time), press this
knob until you see the display you want, then hold the
knob until the display �ashes. The selected display
will now be the default.
BAND:Press this button to play the radio when a
CD(s) is in the player. The inactive CD(s) will remain
safely inside the radio for future listening.
CD AUX (Auxiliary):Press this button to play a CD
when listening to the radio.Using Song List Mode
The six-disc CD changer has a feature called song list.
This feature is capable of saving 20 track selections.
To save tracks into the song list feature, perform
the following steps:
1. Turn the CD player on and load it with at least one
CD. See “LOAD CD” listed previously in this section
for more information.
2. Check to see that the CD changer is not in song list
mode. S-LIST should not appear in the display.
If S-LIST is present, press the SONG LIST button
to turn it off.
3. Select the desired CD by pressing the numbered
pushbutton and then use the SEEK SCAN right
arrow button to locate the track that you want
to save. The track will begin to play.
4. Press and hold the SONG LIST button for two or
more seconds to save the track into memory.
When SONG LIST is pressed a beep will be heard
immediately. After two seconds of continuously
pressing SONG LIST, two beeps will sound
to con�rm that the track has been saved.
5. Repeat Steps 3 and 4 for saving other selections.
S-LIST FULL will appear on the display, if you try
to save more than 20 selections.
3-65