2004 FORD SUPER DUTY run flat
[x] Cancel search: run flatPage 82 of 304

Replacing the batteries
The keyless entry keypad uses one coin-type three-volt lithium battery
(Service Part Number 3L2W-19G545–A). This replacement battery is only
available through your authorized dealer.
To replace the battery:
1. Use the largest flathead screwdriver that will insert into the slot on
the right side of the keypad. Gently twist the screwdriver to pry off the
top cover. Pull the cover off by pulling to the left and then up. The top
cover and the internal components of the keypad will come off the
vehicle and the back cover will remain mounted to the vehicle.
2. Remove the internal components of the keypad from the top cover
and place the top cover on a soft surface to avoid scratching the
decorative finish.Note:Donotremove the silicone rubber membrane
from the rest of the electronics.
3. Insert the screwdriver into one of the two slots on the metal battery
holder, located on either side of the (+) indicator. The battery will then
slide out enough to obtain with your fingers.
4. Remove the old battery from the
unit and replace it with a new
battery, ensuring that the (+)
indicator is properly aligned
properly and seated completely
inside the battery holder.
5. Replace the keypad internal
components back inside the top
cover.Note:Ensure the screwdriver
slot is located next to the 9•0
keypad.
6. Hold the top cover and the internal components together, align the
unit with the back cover mounted on the vehicle, and press the two
pieces together. Run your finger around the perimeter of the keypad to
ensure it is properly seated.
7. Press the 7•8 and the 9•0 controls simultaneously to lock the
vehicle and to verify the keypad is functioning properly.
Note:Replacement of the battery willnotcause the remote keyless
keypad to become deprogrammed from your vehicle. The remote keyless
keypad should operate normally after battery replacement.
2004 F250/350/450/550(f23)
Owners Guide (post-2002-fmt)
USA English(fus)
Locks and Security
82
Page 188 of 304

•The Total Accessory Reserve Capacity (TARC) is shown on the lower
right side of the vehicle’s Safety Certification Label. This applies to
Ford-completed vehicles of 10,000 lb. GVWR or less. This is the
weight of permanently-attached auxiliary equipment, such as
snowplow frame-mounting hardware, that can be added to the vehicle
and satisfy Ford compliance certification to FMVSS. Exceeding this
weight may require the auxiliary equipment installer additional safety
certification responsibility. The Front Accessory Reserve Capacity
(FARC) is added for customer convenience.
•Rear ballast weight behind the rear axle may be required to prevent
exceeding the FGAWR, and provide front-to-rear weight balance for
proper braking and steering.
•Front wheel toe may require re-adjustment to prevent premature
uneven tire wear. Specifications are found in the Ford Workshop
Manual.
•Headlight aim may require re-adjustment.
•The tire air pressures recommended for general driving are found on
the vehicle’s Safety Certification Label. The maximum cold inflation
pressure for the tire and associated load rating is imprinted on the tire
sidewall. Tire air pressure may require re-adjustment within these
pressure limits to accommodate the additional weight of the snowplow
installation.
•Federal and some local regulations require additional exterior lamps
for snowplow-equipped vehicles. Consult your dealer for additional
information.
Operating the vehicle with the snowplow attached
Do not use your vehicle for snow removal until it has been driven at
least 800 km (500 miles).
The attached snowplow blade restricts airflow to the radiator, and may
cause the engine to run at a higher temperature:
•If you are driving more than 24 km (15 miles) where outside air
temperatures are above freezing, then angle the plow blade to full left
or right to maximize airflow to the radiator.
•If you are driving less than 24 km (15 miles) at speeds up to 64 km/h
(40 mph) in cold weather you will not need to adjust blade position
Follow the severe duty schedule in your scheduled maintenance guide
for engine oil and transmission fluid change intervals.
2004 F250/350/450/550(f23)
Owners Guide (post-2002-fmt)
USA English(fus)
Driving
188
Page 253 of 304

•Adding certain accessories to your vehicle (for example bug
deflectors, rollbars/light bars, running boards, ski/luggage racks) may
reduce fuel economy.
•Using fuel blended with alcohol may lower fuel economy.
•Fuel economy may decrease with lower temperatures during the first
12–16 km (8–10 miles) of driving.
•Driving on flat terrain offers improved fuel economy as compared to
driving on hilly terrain.
•Transmissions give their best fuel economy when operated in the top
cruise gear and with steady pressure on the gas pedal.
•Four-wheel-drive operation (if equipped) is less fuel efficient than
two-wheel-drive operation.
•Close windows for high speed driving.
EPA window sticker
Every new vehicle should have the EPA window sticker. Contact your
dealer if the window sticker is not supplied with your vehicle. The EPA
window sticker should be your guide for the fuel economy comparisons
with other vehicles.
It is important to note the box in the lower left corner of the window
sticker. These numbers represent the Range of L/100 km (MPG)
expected on the vehicle under optimum conditions. Your fuel economy
may vary depending upon the method of operation and conditions.
EMISSION CONTROL SYSTEM
Your vehicle is equipped with various emission control components and a
catalytic converter which will enable your vehicle to comply with
applicable exhaust emission standards. To make sure that the catalytic
converter and other emission control components continue to work
properly:
•Use only the specified fuel listed.
•Avoid running out of fuel.
•Do not turn off the ignition while your vehicle is moving, especially at
high speeds.
•Have the items listed in your scheduled maintenance guide performed
according to the specified schedule.
The scheduled maintenance items listed in the scheduled maintenance
guide are essential to the life and performance of your vehicle and to its
emissions system.
2004 F250/350/450/550(f23)
Owners Guide (post-2002-fmt)
USA English(fus)
Maintenance and Specifications
253
Page 272 of 304

6. Visually inspect the tires to make sure there are no nails or other
objects embedded that could poke a hole in the tire and cause an air
leak.
7. Check the sidewalls to make sure there are no gouges, cuts, bulges or
other irregularities.
Tire inflation information
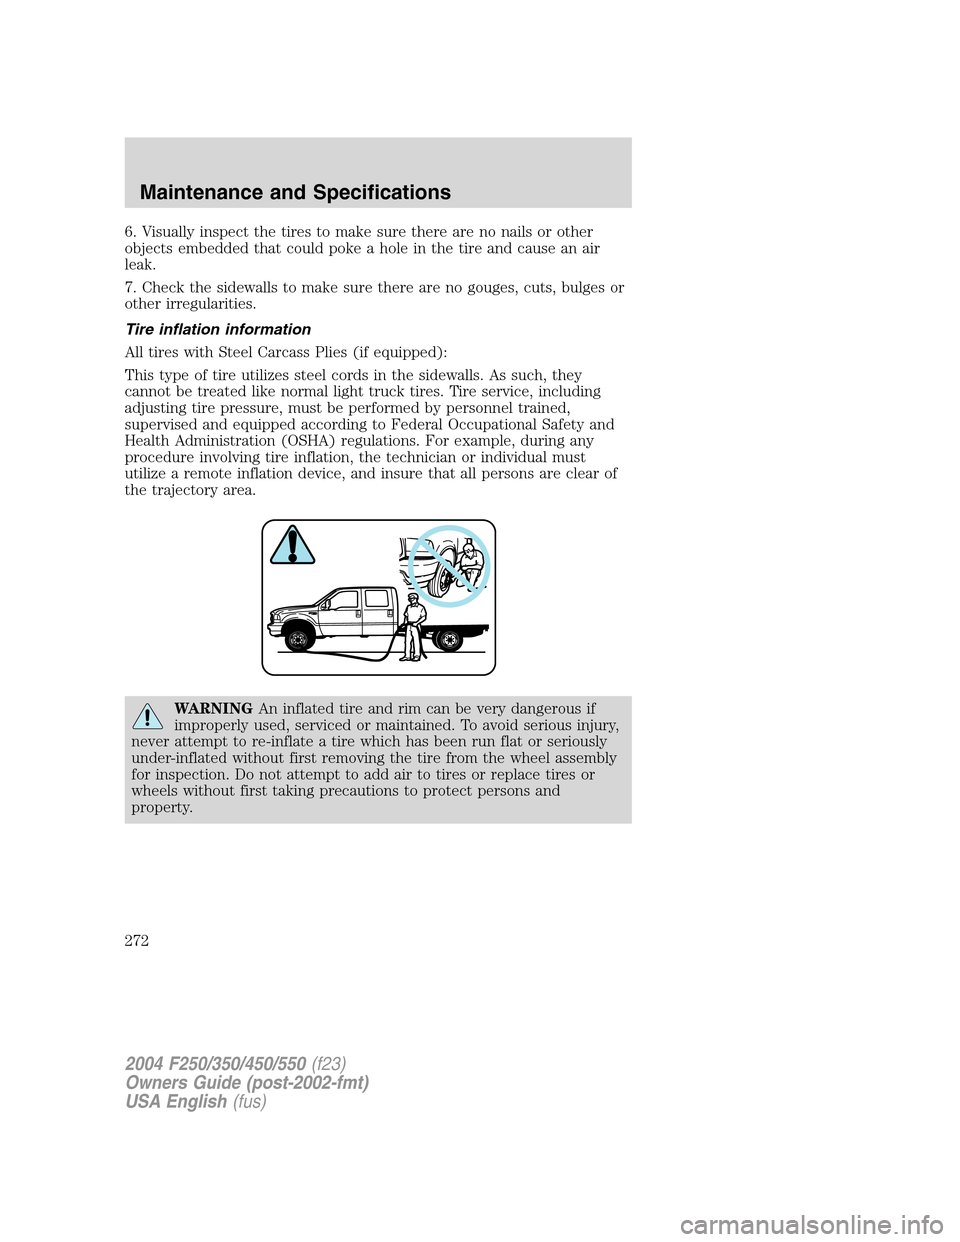
All tires with Steel Carcass Plies (if equipped):
This type of tire utilizes steel cords in the sidewalls. As such, they
cannot be treated like normal light truck tires. Tire service, including
adjusting tire pressure, must be performed by personnel trained,
supervised and equipped according to Federal Occupational Safety and
Health Administration (OSHA) regulations. For example, during any
procedure involving tire inflation, the technician or individual must
utilize a remote inflation device, and insure that all persons are clear of
the trajectory area.
WARNINGAn inflated tire and rim can be very dangerous if
improperly used, serviced or maintained. To avoid serious injury,
never attempt to re-inflate a tire which has been run flat or seriously
under-inflated without first removing the tire from the wheel assembly
for inspection. Do not attempt to add air to tires or replace tires or
wheels without first taking precautions to protect persons and
property.
2004 F250/350/450/550(f23)
Owners Guide (post-2002-fmt)
USA English(fus)
Maintenance and Specifications
272
Page 276 of 304

Safety practices
Driving habits have a great deal to do with your tire mileage and safety.
•Observe posted speed limits
•Avoid fast starts, stops and turns
•Avoid potholes and objects on the road
•Do not run over curbs or hit the tire against a curb when parking
If you vehicle is stuck in snow, mud, sand, etc.,do notrapidly spin the
tires; spinning the tires can tear the tire and cause an explosion. A tire
can explode in as little as three to five seconds.
Tire explosions can cause death, personal injury or property
damage. Do not allow anyone to stand near, or directly ahead or
behind the spinning tire.
Never spin the tires in excess of the 55 km/h (35 mph) point
indicated on the speedometer.
Highway hazards
No matter how carefully you drive there’s always the possibility that you
may eventually have a flat tire on the highway. Drive slowly to the
closest safe area out of traffic. This may further damage the flat tire, but
your safety is more important.
If you feel a sudden vibration or ride disturbance while driving or you
suspect your tire or vehicle has been damaged, immediately reduce your
speed. Drive with caution until you can safely pull off the road. Stop and
inspect the tire for damage. If the tire is under-inflated or damaged,
deflate it, remove wheel and replace it with your spare tire and wheel. If
you cannot detect a cause, have the vehicle towed to the nearest repair
facility or tire dealer to have the vehicle inspected.
SNOW TIRES AND CHAINS
Snow tires must be the same size and grade as the tires you
currently have on your vehicle.
Note:Do not use snow chains on front tires of Harley-Davidson vehicles.
2004 F250/350/450/550(f23)
Owners Guide (post-2002-fmt)
USA English(fus)
Maintenance and Specifications
276