Page 106 of 240

Parking brake
To set the parking
brake (1), pull the
parking brake handle
up as far as possible.
The BRAKE warning
lamp will illuminate and
will remain illuminated
until the parking brake
is released.
To release, press and hold the button (2), pull the
handle up slightly, then push the handle down.
Always set the parking brake fully and make
sure that the gearshift is securely latched in
P (Park) (automatic transmission) or in 1 (First)
(manual transmission).
If the parking brake is fully released, but the
brake warning lamp remains illuminated, the
brakes may not be working properly. See your
dealer or a qualified service technician.
STEERING
To prevent damage to the power steering system:
•Never hold the steering wheel at its furthest
turning points (until it stops) for more than a few
seconds when the engine is running.
•Do not operate the vehicle with a low power
steering pump fluid level (below the MIN mark on
the reservoir).
If the power steering system breaks down (or if the
engine is turned off), you can steer the vehicle
manually, but it takes more effort.
If the steering wanders or pulls, check for:
•an improperly inflated tire
12
P!
BRAKE
2004 Mustang(mus)
Owners Guide (post-2002-fmt)
USA English(fus)
Driving
106
Page 122 of 240

GETTING ROADSIDE ASSISTANCE
To fully assist you should you have a vehicle
concern, Ford Motor Company offers a
complimentary roadside assistance program. This
program is separate from the New Vehicle Limited
Warranty. The service is available:
•24–hours, seven days a week
•for the New Vehicle Limited Warranty period of
three years or 60,000 km (36,000 miles),
whichever occurs first on Ford and Mercury
vehicles, and four years or 80,000 km
(50,000 miles) on Lincoln vehicles.
Roadside assistance will cover:
•changing a flat tire
•jump-starts
•lock-out assistance
•limited fuel delivery
•towing of your disabled vehicle to the nearest
Ford Motor Company dealership, or your selling
dealer if within 56.3 km (35 miles) of the nearest
Ford Motor Company dealership (one tow per
disablement). Even non-warranty related tows,
like accidents or getting stuck in the mud or
snow, are covered (some exclusions apply, such as
impound towing or repossession).
Canadian customers refer to your Owner
Information Guide for information on:
•coverage period
•exact fuel amounts
•towing of your disabled vehicle
•emergency travel expense reimbursement
•travel planning benefits
2004 Mustang(mus)
Owners Guide (post-2002-fmt)
USA English(fus)
Roadside Emergencies
122
Page 130 of 240
Fuse/Relay
LocationFuse Amp
RatingPower Distribution Box
Description
13 30A* MACH 1000 left amplifiers
14 20A* Fuel pump
15 30A* MACH 1000 right amplifiers
16 20A* Horn
17 20A* ABS
18 30A* Power seats
19 10A* Intercooler pump (Cobra
only)
20 20A* Alternator
21—Not used
22—Not used
23—Not used
24 20A* A/C pressure
25—Not used
26 30A** PCM
27 20A** Daytime Running Lamps
(DRL) module, Foglamp
relay
28 25A CB Convertible top circuit
breaker
29—Not used
* Mini Fuses ** Maxi Fuses
CHANGING A FLAT TIRE
If you get a flat tire while driving:
•do not brake heavily.
•gradually decrease the vehicle’s speed.
•hold the steering wheel firmly.
•slowly move to a safe place on the side of the
road.
The use of tire sealants may damage your
tires.
Temporary spare tire information
Your vehicle may have a temporary spare tire which
is labeled as such. It is smaller than a regular tire
2004 Mustang(mus)
Owners Guide (post-2002-fmt)
USA English(fus)
Roadside Emergencies
130
Page 132 of 240

•handling, stability and braking performance
• comfort and noise
• ground clearance and parking at curbs
• Winter driving capability
How to change a flat tire
When one of the front wheels is off the
ground, the transmission alone will not
prevent the vehicle from moving or slipping off the
jack, even if the vehicle is in P (Park) (automatic
transmission) or R (Reverse) (manual
transmission).
To help prevent the vehicle from moving
when you change a tire, be sure the parking
brake is set, then block (in both directions) the
wheel that is diagonally opposite (other side and
end of the vehicle) to the tire being changed.
If the vehicle slips off the jack, you or
someone else could be seriously injured.
Do not attempt to change a tire on the side
of the vehicle close to moving traffic. Pull
far enough off the road to avoid the danger of
being hit when operating the jack or changing the
wheel.
Before changing the tire:
1. Park on a level surface.
2. Activate the hazard flashers.
3. Place the gearshift lever in P (Park) (automatic
transmission) or R (Reverse) (manual transmission).
4. Set the parking brake.
5. Turn off the ignition.
2004 Mustang (mus)
Owners Guide (post-2002-fmt)
USA English (fus)
Roadside Emergencies
132
Page 133 of 240
To change the tire:
Note:Passengers should not remain in the vehicle
when the vehicle is being jacked.
1. Block both the front
and rear of the wheel
diagonally opposite the
flat tire. For example,
if the left front tire is
flat, block the right rear wheel.
2. Remove the spare
tire, jack and lug
wrench.
3. Remove the center
ornament (if equipped)
from the wheel. Loosen
each wheel lug nut
one-half turn counter-
clockwise but do not
remove them until the
wheel is raised off the
ground.
4. Put the jack in the
jack notch next to the
tire you are changing.
Turn the jack handle
clockwise until the
wheel is completely off
the ground.
2004 Mustang (mus)
Owners Guide (post-2002-fmt)
USA English (fus)
Roadside Emergencies
133
Page 134 of 240

Never use the rear
differential as a
jacking point.
To lessen the risk of personal injury, do not
put any part of your body under the vehicle
while changing a tire. Do not start the engine
when your vehicle is on the jack. The jack is only
meant for changing the tire.
5. Remove the lug nuts with the lug wrench.
6. Replace the flat tire with the spare tire, making
sure the valve stem is facing outward. Reinstall lug
nuts until the wheel is snug against the hub. Do not
fully tighten the lug nuts until the wheel has been
lowered.
If you are using the temporary tire, the lug nut
washers will not appear to be flush with the rim. This
is normal only when using the temporary spare tire.
7. Lower the wheel by turning the jack handle
counterclockwise.
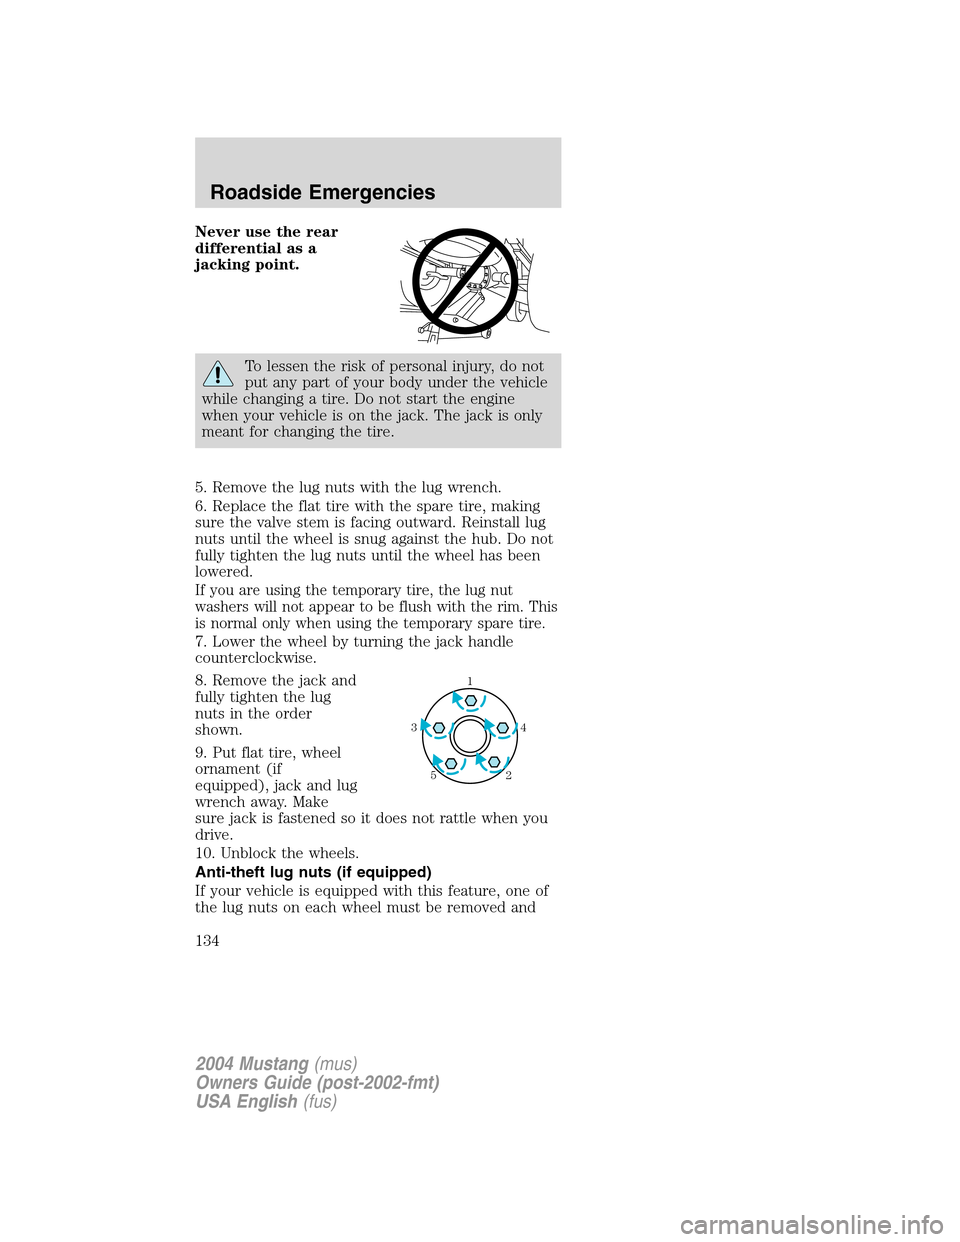
8. Remove the jack and
fully tighten the lug
nuts in the order
shown.
9. Put flat tire, wheel
ornament (if
equipped), jack and lug
wrench away. Make
sure jack is fastened so it does not rattle when you
drive.
10. Unblock the wheels.
Anti-theft lug nuts (if equipped)
If your vehicle is equipped with this feature, one of
the lug nuts on each wheel must be removed and
1
4
3
2
5
2004 Mustang (mus)
Owners Guide (post-2002-fmt)
USA English (fus)
Roadside Emergencies
134
Page 135 of 240

replaced with a special key. The key and registration
card are attached to the lug wrench and stored with
the spare tire. If you lose the key, send the
registration card to the manufacturer (not the
dealer) to get a replacement key. If the lug
wrench/lug nut key assembly is lost, see your
nearest Ford or Lincoln Mercury dealer who has
access to the master set of keys.Do not use an
impact wrench with the anti-theft key.
To remove the
anti-theft lug nut:
1. Insert the key over
the locking lug nut.
Make sure you hold the key square to the lug nut. If
you hold the key at an angle, you could damage the
key and the lug nut.
2. Place the lug nut wrench over the lug nut key and
apply pressure on the key with the wrench.
3. Turn the wrench in a counterclockwise direction
to remove the lug nut.
To install the anti-theft lug nut:
1. Insert the key over the locking lug nut.
2. Place the lug nut wrench over the lug nut key and
apply pressure on the key with the wrench.
3.
Install the lug nut by turning the wrench clockwise.
Wheel lug nut torque specifications
Retighten the lug nuts to the specified torque at
800 km (500 miles) after any wheel disturbance
(tire rotation, changing a flat tire, wheel removal,
etc.).
Bolt size Wheel lug nut torque*
Nm Lb-ft
1⁄2x 20 120-147 88-108
* Torque specifications are for nut and bolt threads free of
dirt and rust. Use only Ford recommended replacement
fasteners.
2004 Mustang (mus)
Owners Guide (post-2002-fmt)
USA English (fus)
Roadside Emergencies
135
Page 190 of 240
![FORD MUSTANG 2004 4.G Owners Manual •Sudden or hard accelerations may reduce fuel
economy.
•Slow down gradually.
•Driving at reasonable speeds (traveling at 88 km/h
[55 mph] uses 15% less fuel than traveling at
105 km/h [65 mph]). FORD MUSTANG 2004 4.G Owners Manual •Sudden or hard accelerations may reduce fuel
economy.
•Slow down gradually.
•Driving at reasonable speeds (traveling at 88 km/h
[55 mph] uses 15% less fuel than traveling at
105 km/h [65 mph]).](/manual-img/11/5213/w960_5213-189.png)
•Sudden or hard accelerations may reduce fuel
economy.
•Slow down gradually.
•Driving at reasonable speeds (traveling at 88 km/h
[55 mph] uses 15% less fuel than traveling at
105 km/h [65 mph]).
•Revving the engine before turning it off may
reduce fuel economy.
•Using the air conditioner or defroster may reduce
fuel economy.
•You may want to turn off the speed control in
hilly terrain if unnecessary shifting between third
and fourth gear occurs. Unnecessary shifting of
this type could result in reduced fuel economy.
•Warming up a vehicle on cold mornings is not
required and may reduce fuel economy.
•Resting your foot on the brake pedal while driving
may reduce fuel economy.
•Combine errands and minimize stop-and-go
driving.
Maintenance
•Keep tires properly inflated and use only
recommended size.
•Operating a vehicle with the wheels out of
alignment will reduce fuel economy.
•Use recommended engine oil. Refer toLubricant
specificationsin this chapter.
•Perform all regularly scheduled maintenance
items. Follow the recommended maintenance
schedule and owner maintenance checks found in
your vehicle scheduled maintenance guide.
Conditions
•Heavily loading a vehicle or towing a trailer may
reduce fuel economy at any speed.
•Carrying unnecessary weight may reduce fuel
economy (approximately 0.4 km/L [1 mpg] is lost
for every 180 kg [400 lb] of weight carried).
2004 Mustang(mus)
Owners Guide (post-2002-fmt)
USA English(fus)
Maintenance and Specifications
190