2004 FORD F150 center console
[x] Cancel search: center consolePage 33 of 280
To increase airflow to the outer instrument panel vents, close the vents
located in the middle of the instrument panel.
Do not place objects on top of the instrument panel as these
objects may become projectiles in a collision or sudden stop.
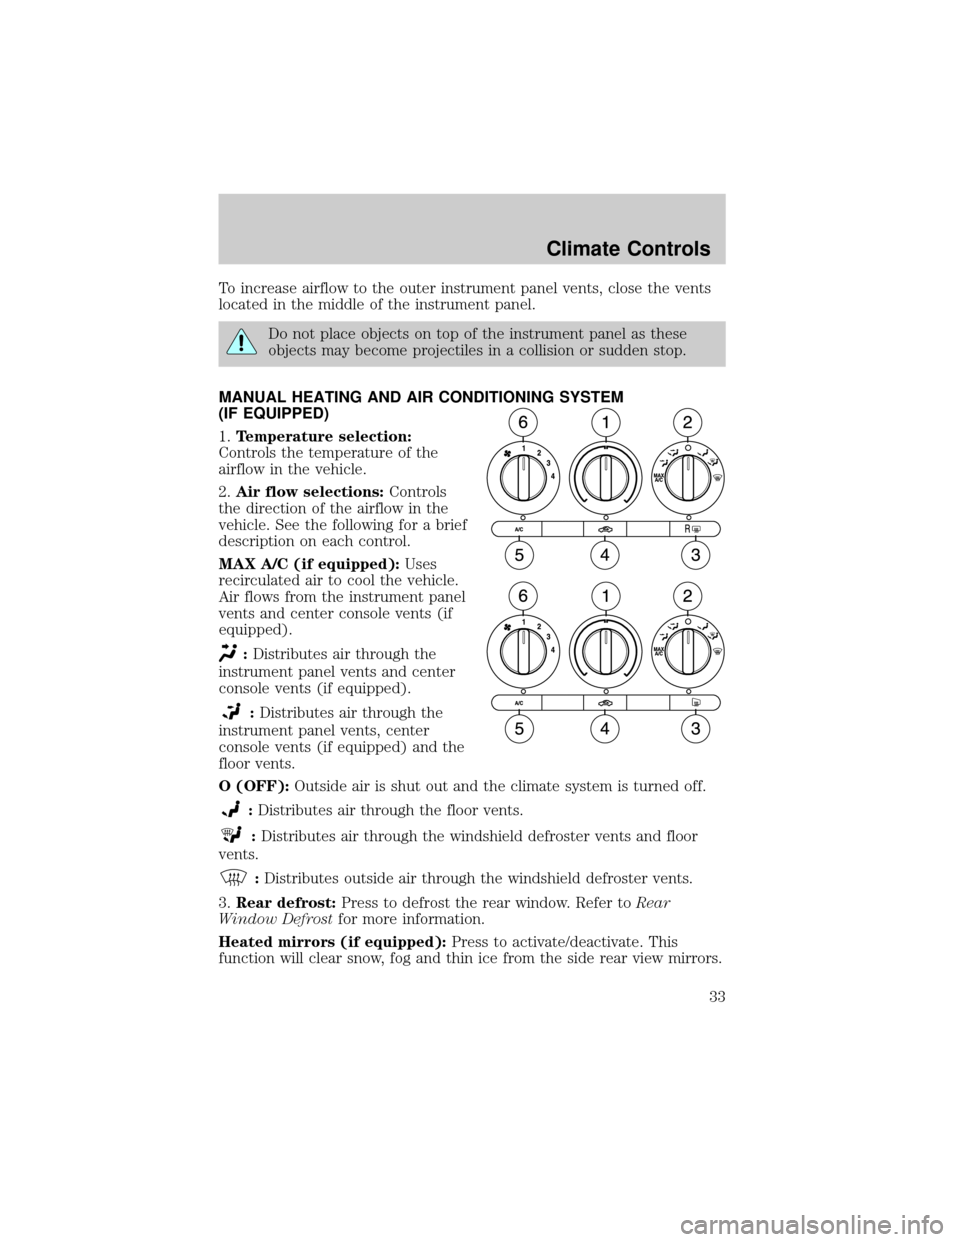
MANUAL HEATING AND AIR CONDITIONING SYSTEM
(IF EQUIPPED)
1.Temperature selection:
Controls the temperature of the
airflow in the vehicle.
2.Air flow selections:Controls
the direction of the airflow in the
vehicle. See the following for a brief
description on each control.
MAX A/C (if equipped):Uses
recirculated air to cool the vehicle.
Air flows from the instrument panel
vents and center console vents (if
equipped).
:Distributes air through the
instrument panel vents and center
console vents (if equipped).
:Distributes air through the
instrument panel vents, center
console vents (if equipped) and the
floor vents.
O (OFF):Outside air is shut out and the climate system is turned off.
:Distributes air through the floor vents.
:Distributes air through the windshield defroster vents and floor
vents.
:Distributes outside air through the windshield defroster vents.
3.Rear defrost:Press to defrost the rear window. Refer toRear
Window Defrostfor more information.
Heated mirrors (if equipped):Press to activate/deactivate. This
function will clear snow, fog and thin ice from the side rear view mirrors.
Climate Controls
33
Page 36 of 280
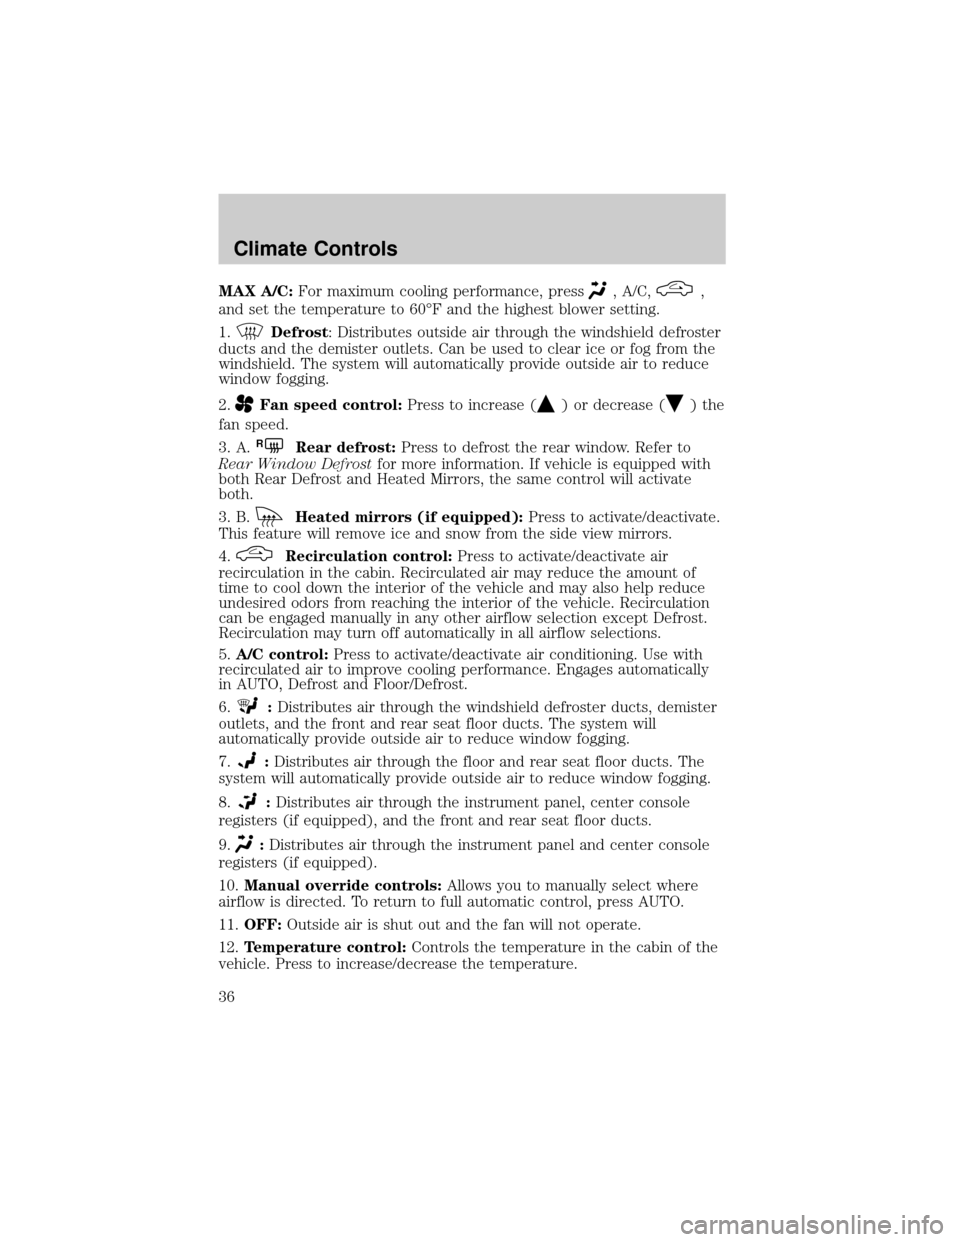
MAX A/C:For maximum cooling performance, press, A/C,,
and set the temperature to 60ÉF and the highest blower setting.
1.
Defrost: Distributes outside air through the windshield defroster
ducts and the demister outlets. Can be used to clear ice or fog from the
windshield. The system will automatically provide outside air to reduce
window fogging.
2.
Fan speed control:Press to increase () or decrease () the
fan speed.
3. A.
RRear defrost:Press to defrost the rear window. Refer to
Rear Window Defrostfor more information. If vehicle is equipped with
both Rear Defrost and Heated Mirrors, the same control will activate
both.
3. B.
Heated mirrors (if equipped):Press to activate/deactivate.
This feature will remove ice and snow from the side view mirrors.
4.
Recirculation control:Press to activate/deactivate air
recirculation in the cabin. Recirculated air may reduce the amount of
time to cool down the interior of the vehicle and may also help reduce
undesired odors from reaching the interior of the vehicle. Recirculation
can be engaged manually in any other airflow selection except Defrost.
Recirculation may turn off automatically in all airflow selections.
5.A/C control:Press to activate/deactivate air conditioning. Use with
recirculated air to improve cooling performance. Engages automatically
in AUTO, Defrost and Floor/Defrost.
6.
:Distributes air through the windshield defroster ducts, demister
outlets, and the front and rear seat floor ducts. The system will
automatically provide outside air to reduce window fogging.
7.
:Distributes air through the floor and rear seat floor ducts. The
system will automatically provide outside air to reduce window fogging.
8.
:Distributes air through the instrument panel, center console
registers (if equipped), and the front and rear seat floor ducts.
9.
:Distributes air through the instrument panel and center console
registers (if equipped).
10.Manual override controls:Allows you to manually select where
airflow is directed. To return to full automatic control, press AUTO.
11.OFF:Outside air is shut out and the fan will not operate.
12.Temperature control:Controls the temperature in the cabin of the
vehicle. Press to increase/decrease the temperature.
Climate Controls
36
Page 38 of 280
If your vehicle is equipped with a mini message center, refer toMini
message center electronic compass temperature displayin the Driver
Controls Chapter.
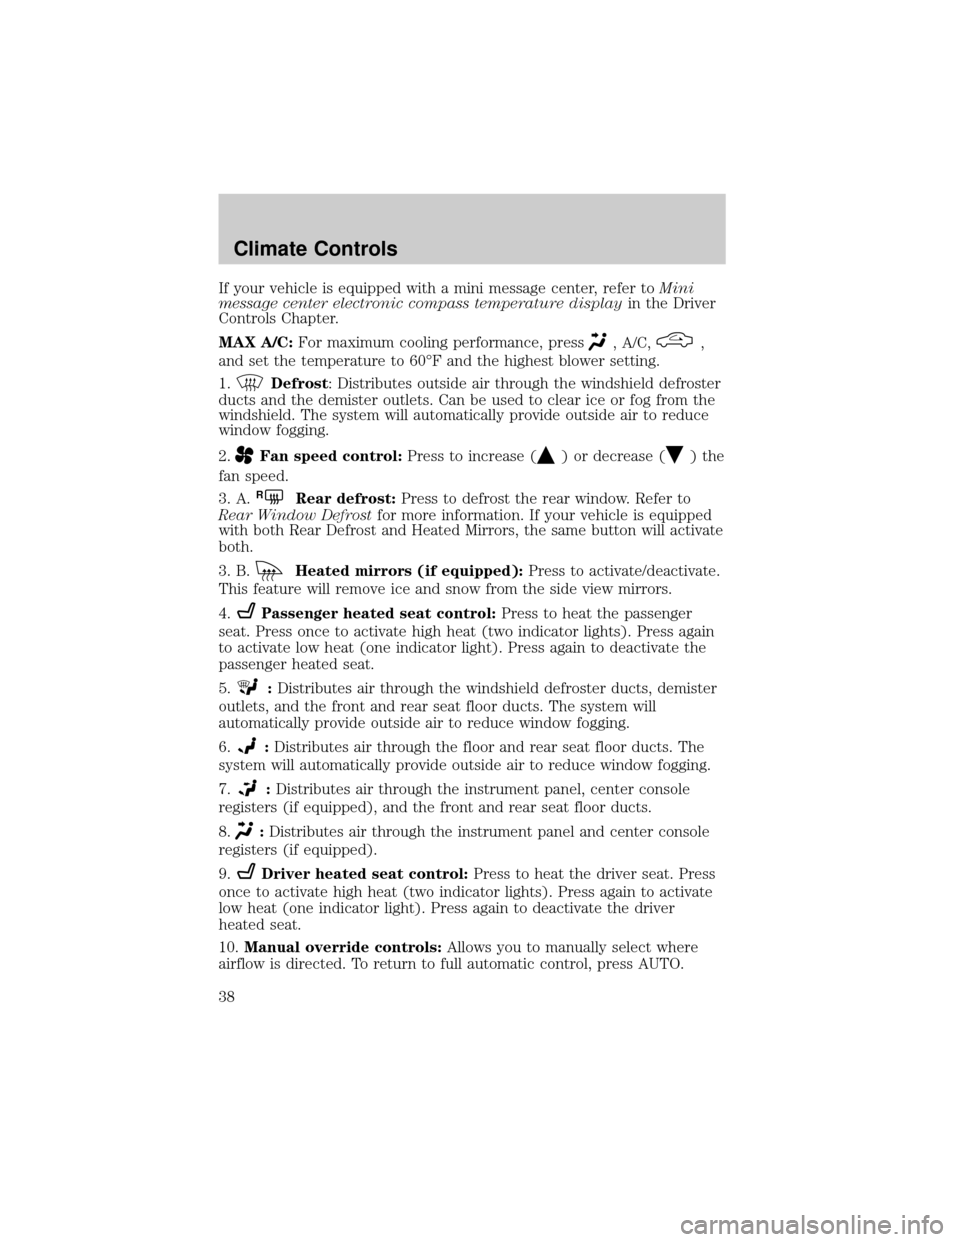
MAX A/C:For maximum cooling performance, press
, A/C,,
and set the temperature to 60ÉF and the highest blower setting.
1.
Defrost: Distributes outside air through the windshield defroster
ducts and the demister outlets. Can be used to clear ice or fog from the
windshield. The system will automatically provide outside air to reduce
window fogging.
2.
Fan speed control:Press to increase () or decrease () the
fan speed.
3. A.
RRear defrost:Press to defrost the rear window. Refer to
Rear Window Defrostfor more information. If your vehicle is equipped
with both Rear Defrost and Heated Mirrors, the same button will activate
both.
3. B.
Heated mirrors (if equipped):Press to activate/deactivate.
This feature will remove ice and snow from the side view mirrors.
4.
Passenger heated seat control:Press to heat the passenger
seat. Press once to activate high heat (two indicator lights). Press again
to activate low heat (one indicator light). Press again to deactivate the
passenger heated seat.
5.
:Distributes air through the windshield defroster ducts, demister
outlets, and the front and rear seat floor ducts. The system will
automatically provide outside air to reduce window fogging.
6.
:Distributes air through the floor and rear seat floor ducts. The
system will automatically provide outside air to reduce window fogging.
7.
:Distributes air through the instrument panel, center console
registers (if equipped), and the front and rear seat floor ducts.
8.
:Distributes air through the instrument panel and center console
registers (if equipped).
9.
Driver heated seat control:Press to heat the driver seat. Press
once to activate high heat (two indicator lights). Press again to activate
low heat (one indicator light). Press again to deactivate the driver
heated seat.
10.Manual override controls:Allows you to manually select where
airflow is directed. To return to full automatic control, press AUTO.
Climate Controls
38
Page 56 of 280
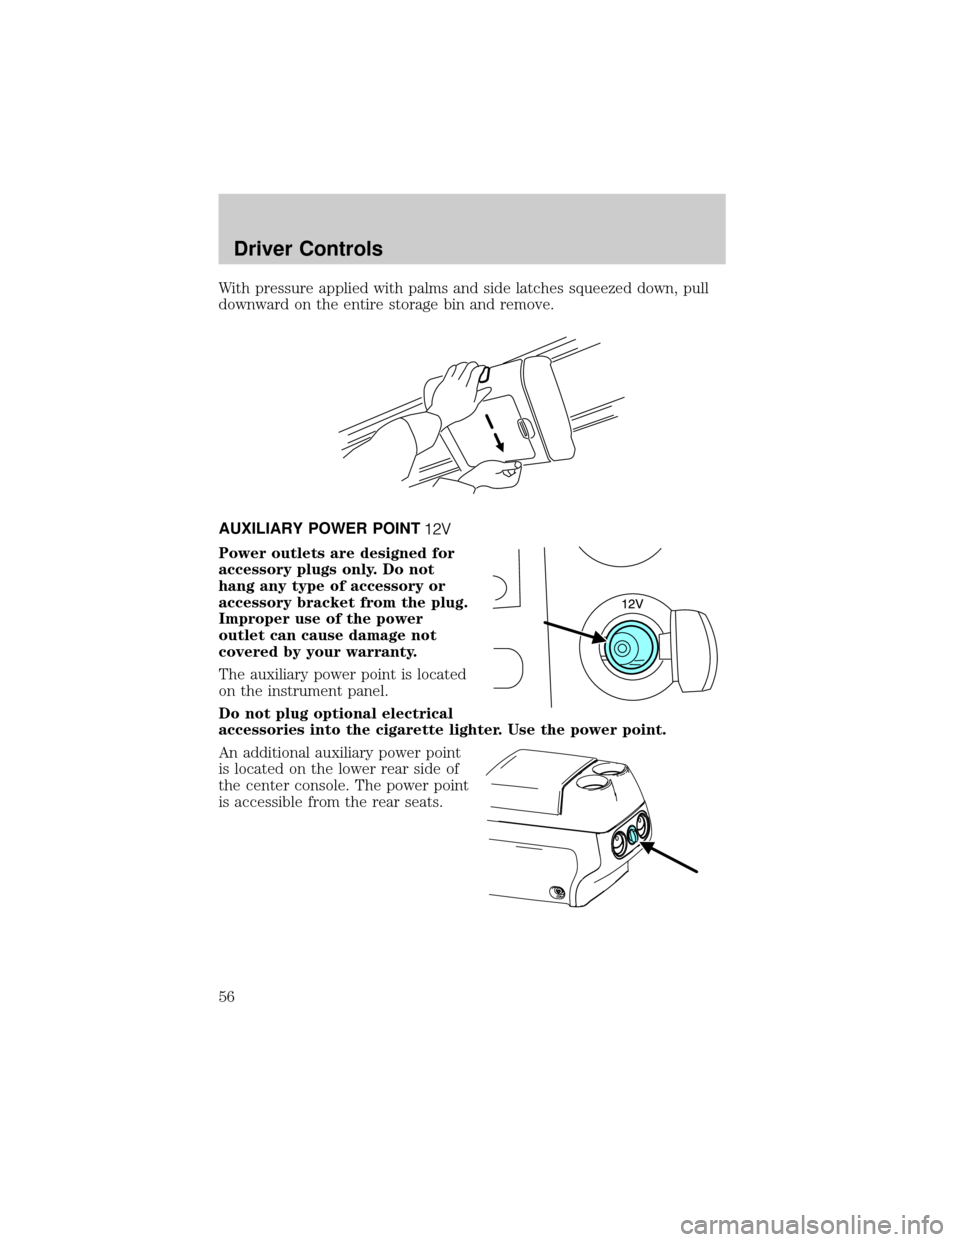
With pressure applied with palms and side latches squeezed down, pull
downward on the entire storage bin and remove.
AUXILIARY POWER POINT
Power outlets are designed for
accessory plugs only. Do not
hang any type of accessory or
accessory bracket from the plug.
Improper use of the power
outlet can cause damage not
covered by your warranty.
The auxiliary power point is located
on the instrument panel.
Do not plug optional electrical
accessories into the cigarette lighter. Use the power point.
An additional auxiliary power point
is located on the lower rear side of
the center console. The power point
is accessible from the rear seats.
Driver Controls
56
Page 57 of 280
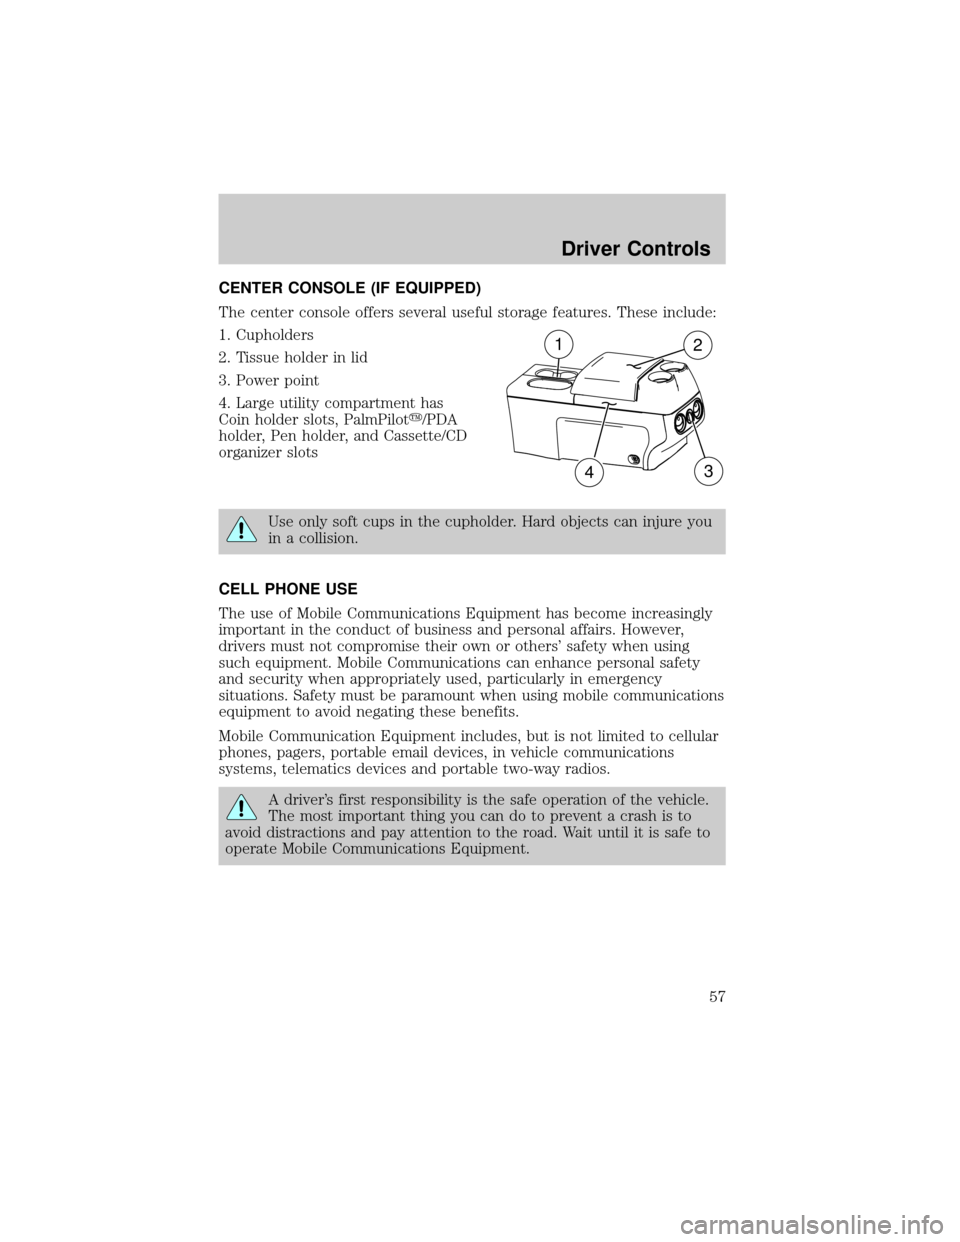
CENTER CONSOLE (IF EQUIPPED)
The center console offers several useful storage features. These include:
1. Cupholders
2. Tissue holder in lid
3. Power point
4. Large utility compartment has
Coin holder slots, PalmPiloty/PDA
holder, Pen holder, and Cassette/CD
organizer slots
Use only soft cups in the cupholder. Hard objects can injure you
in a collision.
CELL PHONE USE
The use of Mobile Communications Equipment has become increasingly
important in the conduct of business and personal affairs. However,
drivers must not compromise their own or others' safety when using
such equipment. Mobile Communications can enhance personal safety
and security when appropriately used, particularly in emergency
situations. Safety must be paramount when using mobile communications
equipment to avoid negating these benefits.
Mobile Communication Equipment includes, but is not limited to cellular
phones, pagers, portable email devices, in vehicle communications
systems, telematics devices and portable two-way radios.
A driver's first responsibility is the safe operation of the vehicle.
The most important thing you can do to prevent a crash is to
avoid distractions and pay attention to the road. Wait until it is safe to
operate Mobile Communications Equipment.
12
34
Driver Controls
57
Page 153 of 280
has blown or the vehicle's brakelamps are not operating properly. Refer
toFuses and relaysin theRoadside emergencieschapter.
If the fuse is not blown, perform the following procedure:
1. Apply the parking brake, turn the ignition to LOCK, then remove the
key.
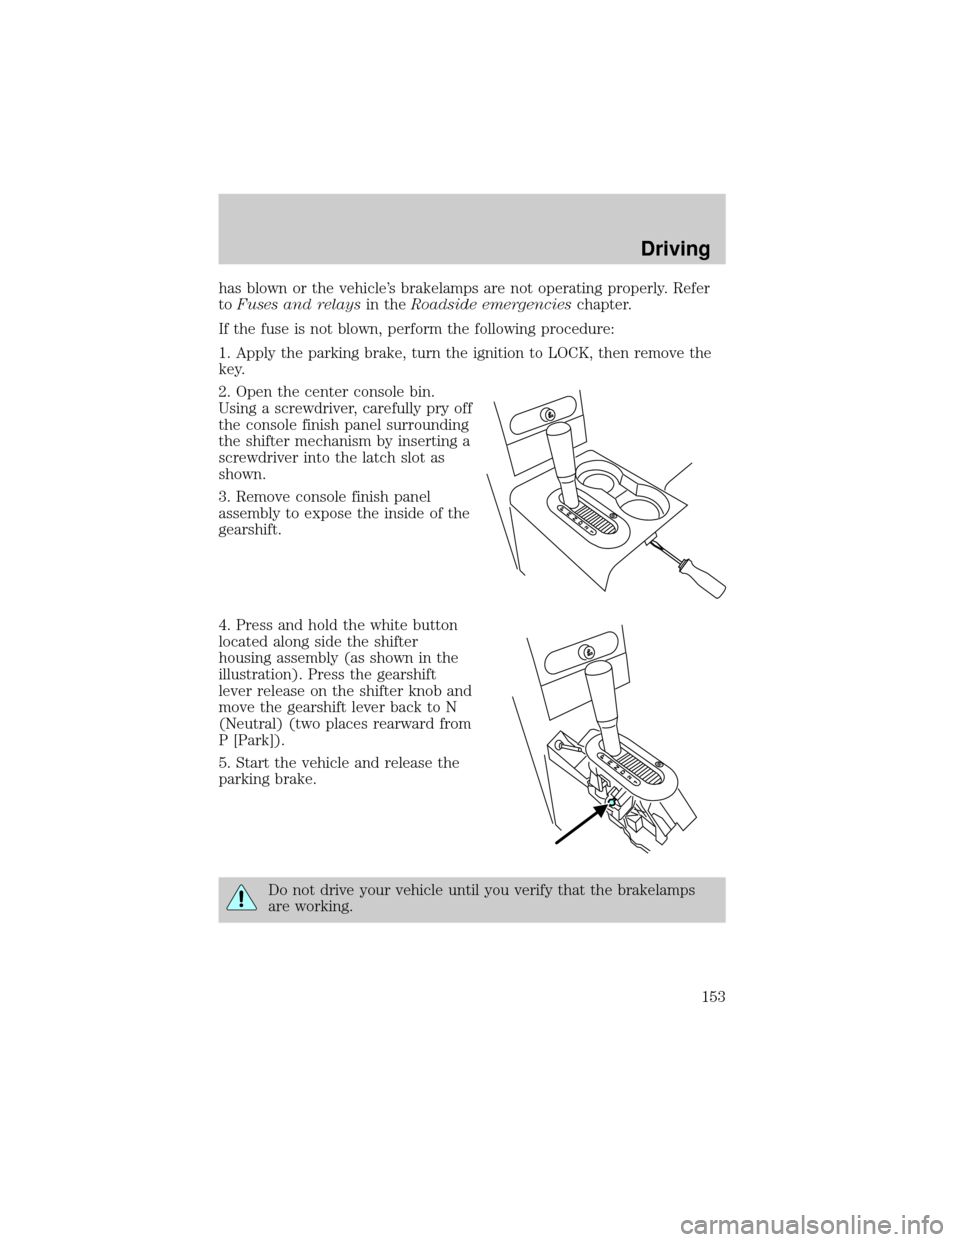
2. Open the center console bin.
Using a screwdriver, carefully pry off
the console finish panel surrounding
the shifter mechanism by inserting a
screwdriver into the latch slot as
shown.
3. Remove console finish panel
assembly to expose the inside of the
gearshift.
4. Press and hold the white button
located along side the shifter
housing assembly (as shown in the
illustration). Press the gearshift
lever release on the shifter knob and
move the gearshift lever back to N
(Neutral) (two places rearward from
P [Park]).
5. Start the vehicle and release the
parking brake.
Do not drive your vehicle until you verify that the brakelamps
are working.
Driving
153
Page 275 of 280

waxing .....................................216
wheels ......................................217
wiper blades ............................219
Climate control
(see Air conditioning or
Heating) ...........................32, 35, 37
Clock adjust
6-CD in dash .............................29
AM/FM Stereo ...........................20
AM/FM/CD .................................23
AM/FM/Tape/CD .......................26
Compass, electronic ..............78±79
calibration .................................79
set zone adjustment ...........71, 79
Console
overhead ..............................53±54
Controls
power seat .................................99
steering column ........................64
Coolant
checking and adding ..............231
refill capacities ................234, 257
specifications ..................261, 263
Cruise control
(see Speed control) ....................61
Customer Assistance ................186
Ford accessories for your
vehicle .....................................220
Ford Extended Service
Plan ..........................................209
Getting assistance outside
the U.S. and Canada ..............213
Getting roadside assistance ...186
Getting the service you
need .........................................207
Ordering additional owner's
literature .................................214
The Dispute Settlement
Board .......................................209Utilizing the
Mediation/Arbitration
Program ...................................212
D
Daytime running lamps
(see Lamps) ................................42
Dipstick
automatic transmission
fluid ..........................................248
engine oil .................................226
Doors
lubricant specifications ..........261
Driveline universal joint and
slip yoke ....................................251
Driving under special
conditions ..................157, 164, 167
sand .........................................166
snow and ice ...........................168
through water .................166, 170
E
Electronic message center .........70
Emergencies, roadside
jump-starting ..........................201
Emergency Flashers .................187
Emission control system ..........245
Engine ........................................263
cleaning ...................................217
coolant .....................................231
fail-safe coolant ......................235
idle speed control ...................229
lubrication
specifications ..................261, 263
refill capacities ........................257
service points ..................224±225
starting after a collision .........187
Engine block heater .................148
Index
275