Page 44 of 248

Replacing tail lamp/brake/turn lamp bulbs
The tail lamp, the brake lamp and the turn signal lamp bulbs are located
in the tail lamp assembly. Follow the same steps to replace either bulb.
1. Make sure headlamp switch is in
OFF position, then open the trunk
and remove plastic retainer to
expose the lamp assembly hardware.
2. Carefully pull the carpet away to
expose the plastic retainer.
3. Remove three nut and washer
assemblies and the lamp assembly
from the vehicle.
4. Remove the bulb socket by
rotating it counterclockwise, then
pulling it out of the lamp assembly.
5. Pull the bulb from the socket and
push in the new bulb.
6. Install the bulb socket into the
lamp assembly by rotating it
clockwise.
7. Install the lamp assembly on the
vehicle with three nut and washer
assemblies ensuring the washers on
the nuts are flush with the body to prevent water from entering the
trunk.
8. Install the plastic retainer and carefully push the carpet back in to
place.
2004 Crown Victoria(cro)
Owners Guide (post-2002-fmt)
USA English(fus)
Lights
44
Page 45 of 248
Replacing license plate lamp bulbs
1. Make sure headlamp switch is in
OFF position, then remove two
screws, grommets and the license
plate lamp assembly from the trunk
lid.
2. Carefully pull the bulb from the
socket and push in the new bulb.
3. Install the lamp assembly on
trunk lid with two grommets,
ensuring the grommets are pushed
all the way in to the trunk lid and secure with two screws.
Replacing backup lamp bulbs
1. Make sure headlamp switch is in
OFF position, then open trunk and
remove bulb socket from the trunk
lid by turning counterclockwise.
2. Pull the bulb straight out of the
socket and push in the new bulb.
3. Install the bulb socket in trunk lid
by turning clockwise.
2004 Crown Victoria(cro)
Owners Guide (post-2002-fmt)
USA English(fus)
Lights
45
Page 46 of 248
Replacing high-mount brakelamp bulbs
1. Make sure headlamp switch is in
OFF position, then remove two
screws from the lamp assembly.
2. Carefully lift the lamp assembly
up for access to the bulbs.
3. Carefully pull the bulb socket out
of the lamp assembly.
4. Pull the bulb straight out of the
socket and push in the new bulb.
To install, reverse the removal
procedure.
2004 Crown Victoria(cro)
Owners Guide (post-2002-fmt)
USA English(fus)
Lights
46
Page 47 of 248

MULTI-FUNCTION LEVER
Windshield wiper:Rotate the end
of the control away from you to
increase the speed of the wipers;
rotate towards you to decrease the
speed of the wipers.
Windshield washer:Push the end
of the stalk:
•briefly: causes a single swipe of
the wipers without washer fluid.
•a quick push and hold: the wipers
will swipe three times with
washer fluid.
•a long push and hold: the wipers and washer fluid will be activated for
up to ten seconds.
Windshield wiper/washer features
The exterior lamps will turn on with the ignition on, Headlamp control in
the Autolamp position and the windshield wipers are turned on.
The lights will remain on for 30 seconds after the wipers are turned off.
Changing the wiper blades
To make changing the wiper blades easy, turn the ignition to ACC, then
turn the wipers on. When the wipers reach the vertical position, turn the
ignition to LOCK.
2004 Crown Victoria(cro)
Owners Guide (post-2002-fmt)
USA English(fus)
Driver Controls
Driver Controls
47
Page 51 of 248
 have a magnetic north compass point that
varies slightly from the northerly direction on maps. A correct zone
setting will eliminate compass heading e")
Zone variation mode
Most geographic areas (zones) have a magnetic north compass point that
varies slightly from the northerly direction on maps. A correct zone
setting will eliminate compass heading error.
For optimum calibration, turn off all electrical accessories (heater/air
conditioning, wipers, etc.) and make sure all vehicle doors are shut.
To set the compass zone:
1. Press and release the MODE
button until the compass directional
heading is displayed.
2. Hold down the MODE button for
5 seconds to enter zone mode. The
display will read PRESS RESET TO
SET ZONE XX where XX is the
current zone.
3. Release the MODE button.
4. Repeatedly press and release the
RESET button to scroll through the
zones 1–15 until the desired zone is
displayed.
5. Press the MODE button to save
the new zone setting and return to
the compass normal mode.
Note:The compass exits the zone
setting mode and returns to its
previous setting after one minute of
no activity.
Note:If power is interrupted during the zone setting process, the
compass resets to the same zone it was set to before the zone change
process was started.
1 2 3
4
5
6 7 8 9 101112 13 14 15
2004 Crown Victoria(cro)
Owners Guide (post-2002-fmt)
USA English(fus)
Driver Controls
51
Page 56 of 248
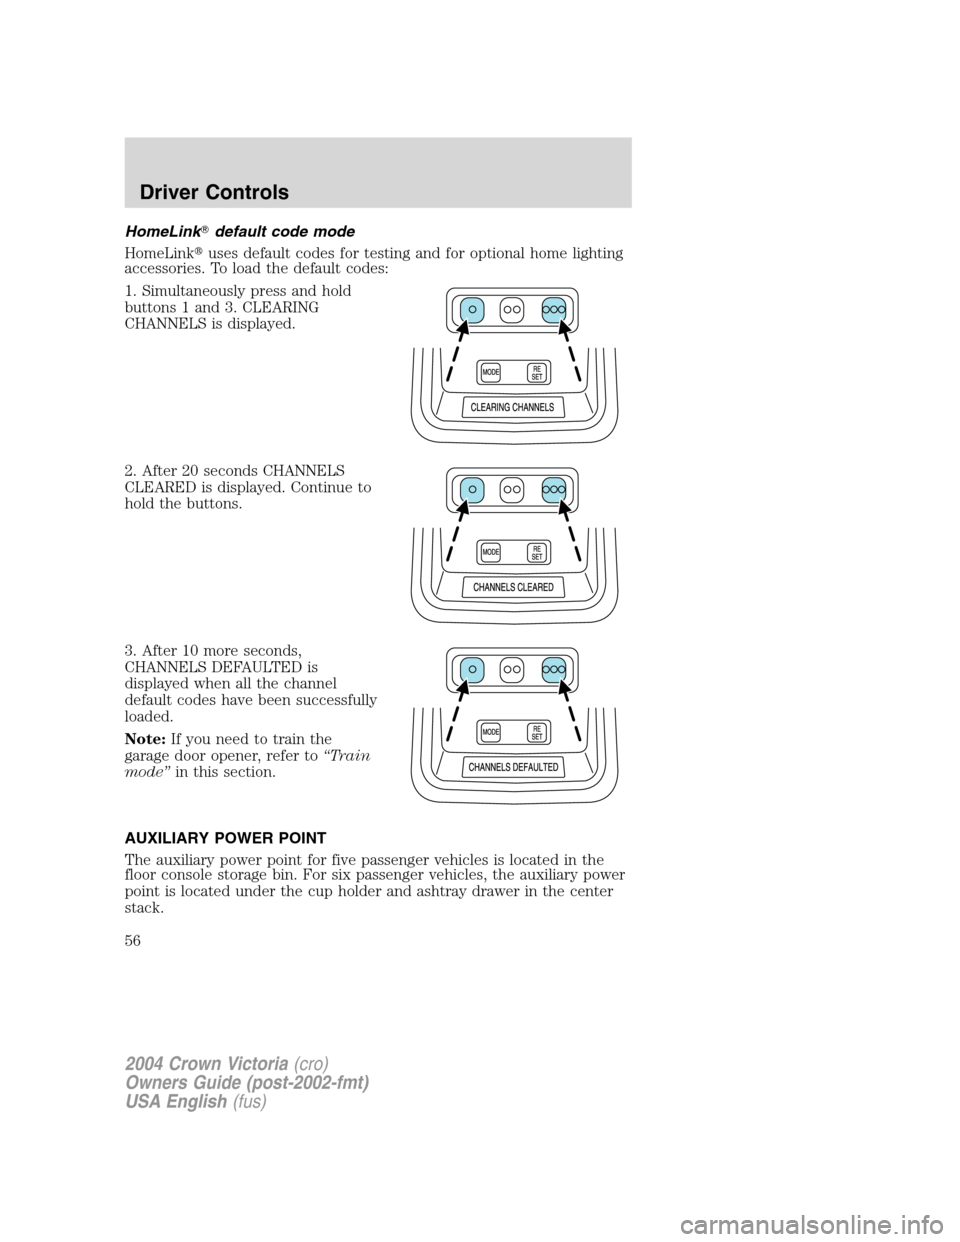
HomeLink�default code mode
HomeLink�uses default codes for testing and for optional home lighting
accessories. To load the default codes:
1. Simultaneously press and hold
buttons 1 and 3. CLEARING
CHANNELS is displayed.
2. After 20 seconds CHANNELS
CLEARED is displayed. Continue to
hold the buttons.
3. After 10 more seconds,
CHANNELS DEFAULTED is
displayed when all the channel
default codes have been successfully
loaded.
Note:If you need to train the
garage door opener, refer to“Train
mode”in this section.
AUXILIARY POWER POINT
The auxiliary power point for five passenger vehicles is located in the
floor console storage bin. For six passenger vehicles, the auxiliary power
point is located under the cup holder and ashtray drawer in the center
stack.
2004 Crown Victoria(cro)
Owners Guide (post-2002-fmt)
USA English(fus)
Driver Controls
56
Page 57 of 248

Do not plug optional electrical accessories into the cigarette lighter. Use
the power point.
Do not use the power point for operating the cigarette lighter element.
The Maximum power each power point can supply depends on the fuse
rating. For example: a 20A fuse should supply a maximum of 240 Watts,
a 15A fuse should supply a maximum of 180 Watts and a 10A fuse should
supply a maximum of 120 Watts. Exceeding these limits will result in a
blown fuse.
Always keep the power point caps closed when not being used.
Power outlets are designed for accessory plugs only. Do not hang
any type of accessory or accessory bracket from the plug.
Improper use of the power outlet can cause damage not covered
by your warranty.
POWER WINDOWS (IF EQUIPPED)
When closing the power
windows, you should verify
they are free of obstructions and
ensure that children and/or pets
are not in the proximity of the
window openings.
Press and hold the bottom part of the rocker switch to open the window.
Press and hold the top part of the rocker switch to close the window.
One touch down
Allows the driver’s window to open
fully without holding the control
down. Press completely down on
the bottom part of the rocker switch
and release quickly. Press the top
part of the rocker switch to stop.
2004 Crown Victoria(cro)
Owners Guide (post-2002-fmt)
USA English(fus)
Driver Controls
57
Page 59 of 248

Your vehicle is equipped w")
Fold-away mirrors
Pull the side mirrors in carefully
when driving through a narrow
space, like an automatic car wash.
Automatic dimming inside rear view mirror (if equipped)
Your vehicle is equipped with an
inside rear view mirror with an
auto-dimming function. The
electronic day/night mirror will
change from the normal state to the
non-glare state when bright lights
(glare) reach the mirror. When the mirror detects bright light from
behind the vehicle, it will automatically adjust (darken) to minimize
glare.
The mirror will automatically return to the normal state whenever the
vehicle is placed in R (Reverse)(when the mirror is on) to ensure a
bright clear view when backing up.
Do not block the sensor on the backside of the inside rear view mirror
since this may impair proper mirror performance.
Press the control to turn the mirror OFF or AUTO.
POWER ADJUSTABLE FOOT PEDALS (IF EQUIPPED)
The accelerator and brake pedal
should only be adjusted when the
vehicle is stopped and the gearshift
lever is in the P (Park) position.
Press and hold the rocker control to
adjust accelerator and brake pedal.
•Press the right side of the control to adjust the pedals toward you.
•Press the left side of the control to adjust the pedals away from you.
The adjustment allows for approximately 65 mm (2.5 inches) of
maximum travel.
OFF AUTO
2004 Crown Victoria(cro)
Owners Guide (post-2002-fmt)
USA English(fus)
Driver Controls
59