Page 170 of 426

AM/FM Selection
Press the AM/FM button to change from AM to FM. The
operating mode will be displayed next to the station
frequency. The display will show ST when a stereo
station is received.
To Set The Radio Push-Button Memory
When you are receiving a station that you wish to
commit to push-button memory, press the SET button.
SET 1 will show in the display window. Select the ª1±5º
button you wish to lock onto this station and press and
release that button. If a button is not selected within 5
seconds after pressing the SET button, the station will
continue to play but will not be locked into push-button
memory.
You may add a second station to each push-button by
repeating the above procedure with this exception: Press
the SET button twice and SET 2 will show in the display
window. Each button can be set for SET 1 and SET 2 inboth AM and FM. This allows a total of 10 AM and 10 FM
stations to be locked into push-button memory. The
stations stored in SET 2 memory can be selected by
pressing the push-button twice. Every time a preset
button is used a corresponding button number will be
displayed.Time
Press the TIME button to change the display between
radio frequency and time.
General Information
This radio complies with Part 15 of FCC rules and with
RSS-210 of Industry Canada. Operation is subject to the
following conditions:
1. This device may not cause harmful interference,
2. This device must accept any interference received,
including interference that may cause undesired opera-
tion.
170 UNDERSTANDING YOUR INSTRUMENT PANEL
Page 171 of 426

NOTE:Changes or modifications not expressively ap-
proved by the party responsible for compliance could
void the user's authority to operate the equipment.
CD Player Operation
NOTE:The ignition switch must be in the ON or ACC
position and the volume control ON before the CD player
will operate.
Inserting The Compact Disc
CAUTION!
This CD player will accept 43¤4inch (12 cm) discs
only. The use of other sized discs may damage the
CD player mechanism.
You may either insert or eject a disc with the radio OFF.If you insert a disc with the ignition ON and the radio
OFF, the display will show the time of day.
If the power is ON, the unit will switch from radio to CD
mode and begin to play when you insert the disc. The
display will show the track number and index time in
minutes and seconds. Play will begin at the start of track
one.
Seek
Press the top of the SEEK button for the next selection on
the CD. Press the bottom of the button to return to the
beginning of the current selection, or return to the
beginning of the previous selection if the CD is within the
first second of the current selection.
EJT Ð Eject
Press the EJT button and the disc will unload and move
to the entrance for easy removal. The unit will switch to
the radio mode.
UNDERSTANDING YOUR INSTRUMENT PANEL 171
4
Page 173 of 426

Mode Button
To activate the CD changer, press the MODE button until
CD information appears on the display.
Push-Button
While the CD changer is playing, press the NUMBER 1
push-button or the NUMBER 5 push-button to select a
disc numbered higher or lower than the one currently
being played.
Seek Button
Press the SEEK up or down to select another track on the
same disc. A SEEK symbol will appear on the display.
Fast Forward And Rewind Buttons
Press and hold the FF button for fast forward. Press and
hold the RW button for fast reverse.
The audio output can be heard when fast forward and
fast reverse are activated.
Random Play (RND)
Press the Random button to play the tracks on the
selected disc in random order for an interesting change of
pace.
Random can be cancelled by pressing the button a second
time or by ejecting the CD from the changer.
CD Diagnostic Indicators
When driving over a very rough road, the CD player may
skip momentarily. Skipping will not damage the disc or
the player, and play will resume automatically.
As a safeguard and to protect your CD player, one of the
following warning symbols may appear on your display.
A CD HOT symbol indicates the player is too hot.
CD HOT will pause the operation. Play can be resumed
when the operating temperature is corrected or another
MODE is selected.
UNDERSTANDING YOUR INSTRUMENT PANEL 173
4
Page 175 of 426

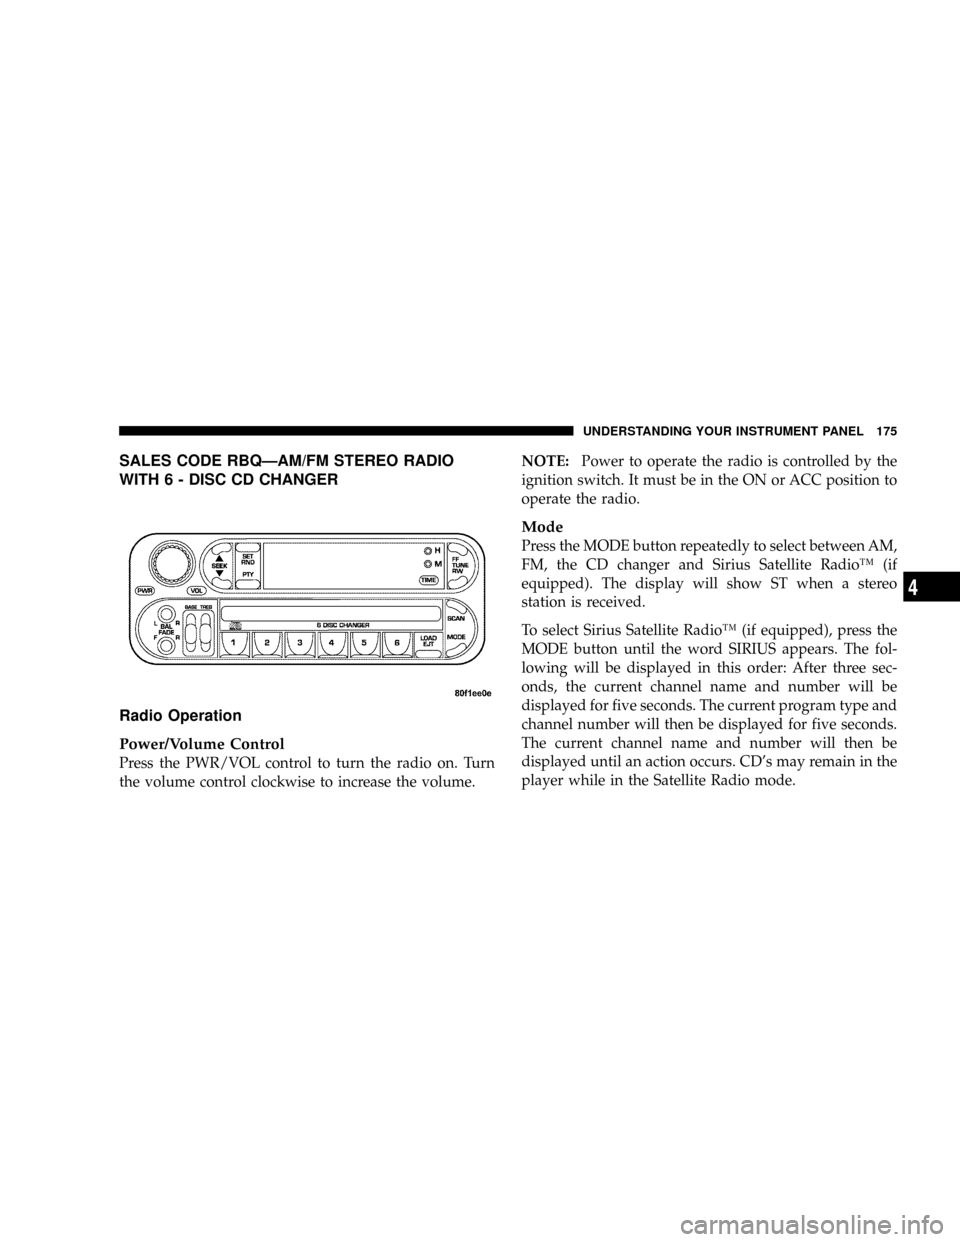
SALES CODE RBQÐAM/FM STEREO RADIO
WITH 6 - DISC CD CHANGER
Radio Operation
Power/Volume Control
Press the PWR/VOL control to turn the radio on. Turn
the volume control clockwise to increase the volume.NOTE:Power to operate the radio is controlled by the
ignition switch. It must be in the ON or ACC position to
operate the radio.
Mode
Press the MODE button repeatedly to select between AM,
FM, the CD changer and Sirius Satellite RadioŸ (if
equipped). The display will show ST when a stereo
station is received.
To select Sirius Satellite RadioŸ (if equipped), press the
MODE button until the word SIRIUS appears. The fol-
lowing will be displayed in this order: After three sec-
onds, the current channel name and number will be
displayed for five seconds. The current program type and
channel number will then be displayed for five seconds.
The current channel name and number will then be
displayed until an action occurs. CD's may remain in the
player while in the Satellite Radio mode.
UNDERSTANDING YOUR INSTRUMENT PANEL 175
4
Page 177 of 426

5 seconds after pressing the SET RND button, the station
will continue to play but will not be locked into push-
button memory.
You may add a second station to each push-button by
repeating the above procedure with this exception: Press
the SET button twice and SET 2 will show in the display
window. Each button can be set for SET 1 and SET 2 in
both AM and FM. This allows a total of 12 AM and 12 FM
stations to be locked into push-button memory. The
stations stored in SET 2 memory can be selected by
pressing the corresponding push-button twice. Every
time a preset button is used, a corresponding button
number will be displayed.
Time Button
Press the TIME button to change the display between
radio frequency and time.
General Information
This radio complies with Part 15 of FCC rules and with
RSS-210 of Industry Canada. Operation is subject to the
following conditions:
1. This device may not cause harmful interference,
2. This device must accept any interference received,
including interference that may cause undesired opera-
tion.
NOTE:Changes or modifications not expressively ap-
proved by the party responsible for compliance could
void the user's authority to operate the equipment.
CD Player Operation
NOTE:The ignition switch must be in the ON or ACC
position and the Power / Volume control pushed ON
before the CD player will operate.
UNDERSTANDING YOUR INSTRUMENT PANEL 177
4
Page 182 of 426

increase the volume and pressing the bottom of the
switch will decrease the volume. The center button of the
right hand control will allow you to change the mode.
The left hand control is a rocker type switch with a push
button in the center. The function of the left hand control
is different depending on which mode you are in.
The following describes the left hand control operation in
each mode.
Radio Operation
Pressing the top of the left side switch will SEEK up for
the next listenable station and pressing the bottom of the
switch will SEEK down for the next listenable station.
The button located in the center of the left hand control
will tune to the next pre-set station that you have
programmed in the radio pre-set push-buttons.
Tape Player
Pressing the top of the switch once will go to the next
selection on the cassette. Pressing the bottom of the
switch once will go to the beginning of the current
selection or to the beginning of the previous selection if it
is within the first 5 seconds of the current selection.
If you press the switch up or down twice it plays the
second selection, three times, it will play the third, etc.
The button in the center of the left hand switch has no
function in this mode.
CD Player
Pressing the top of the switch once will go to the next
track on the CD. Pressing the bottom of the switch once
will go to the beginning of the current track or to the
beginning of the previous track if it is within one second
after the current track begins to play.
182 UNDERSTANDING YOUR INSTRUMENT PANEL
Page 184 of 426

COMPACT DISC MAINTENANCE
To keep the compact discs in good condition, take the
following precautions:
1. Handle the disc by its edge; avoid touching the
surface.
2. If the disc is stained, clean the surface with a soft cloth,
wiping from center to edge.
3. Do not apply paper or tape to the disc; avoid scratch-
ing the disc.
4. Do not use solvents such as benzene, thinner, cleaners,
or antistatic sprays.
5. Store the disc in its case after playing.
6. Do not expose the disc to direct sunlight.
7. Do not store the disc where temperatures may become
too high.NOTE:If you experience difficulty in playing a particu-
lar disc, it may be damaged, oversized, or have theft
protection encoding. Try a known good disc before
considering disc player service.
RADIO OPERATION AND CELLULAR PHONES
Under certain conditions, the operation of a cellular
phone in your vehicle can cause erratic or noisy perfor-
mance from your radio. This condition may be lessened
or eliminated by relocating the cellular phone antenna.
This condition is not harmful to the radio. If your radio
performance does not satisfactorily ªclearº by the repo-
sitioning of the antenna, it is recommended that the radio
volume be turned down or off during cellular phone
operation.
184 UNDERSTANDING YOUR INSTRUMENT PANEL
Page 187 of 426
Temperature Control
The rotary knob at the center
of the control panel controls
the temperature of the inte-
rior air. You can choose your
degree of comfort by rotating
the knob. The coldest tem-
perature setting is to the ex-
treme left (blue region) and
the warmest setting is to the
extreme right (red region) of
the rotation.
Air ConditioningÐIf Equipped
Air Conditioning Operation
To turn on the Air Conditioning, set the fan
control at any speed and press the snowflake
button located at the right of the control panel.
Conditioned air will be directed through the
outlets selected by the mode control. A light in the
UNDERSTANDING YOUR INSTRUMENT PANEL 187
4