Page 159 of 397
INFORMATION CENTER Ð IF EQUIPPED
Turn Signal Indicators
The arrow will flash with the exterior turn signal
when the turn signal lever is operated.
If the vehicle electronics sense that the vehicle has
traveled about one mile with the turn signals on, a chime will sound to alert you to turn the signals off. If either
indicator flashes at a rapid rate, check for a defective
outside light bulb.
High Beam Light
This light shows that the headlights are on high
beam. Pull the turn signal lever towards the
steering wheel to switch the headlights from high or low
beam.
ELECTRONIC DIGITAL CLOCK
The clock and radio each use the display panel built into
the radio. A digital readout shows the time in hours and
minutes whenever the ignition switch is in the ON or
ACC position and the time button is pressed.
When the ignition switch is in the OFF position, or when
the radio frequency is being displayed, time keeping is
accurately maintained. UNDERSTANDING YOUR INSTRUMENT PANEL 159
4
Page 161 of 397
AM Reception
AM sound is based on wave amplitude, so AM reception
can be disrupted by such things as lightning, power lines
and neon signs.
FM Reception
Because FM transmission is based on frequency varia-
tions, interference that consists of amplitude variations
can be filtered out, leaving the reception relatively clear,
which is the major feature of FM radio.
NOTE: On vehicles so equipped the radio, steering
wheel radio controls and 6 disc CD/DVD changer if
equipped, will remain active for up to 45 seconds after
the ignition switch has been turned off. Opening a
vehicle front door will cancel this feature. SALES CODE RAZÐAM/ FM STEREO RADIO
WITH CASSETTE TAPE PLAYER, CD PLAYER
AND CD CHANGER CONTROLS Ð IF EQUIPPED
Operating Instructions Ð Radio
NOTE: Power to operate the radio is controlled by the
ignition switch. It must be in the ON or ACC position to
operate the radio. UNDERSTANDING YOUR INSTRUMENT PANEL 161
4
Page 195 of 397

NOTE: Follow the manufactures instructions for the
correct colors when connecting the RCA cables.
Operating Instructions Ð Video
Games/Camcorders
A video game unit or camcorder can be connected to the
rear audio/video system. Connect the cables to the RCA
jacks located on the front of the CD/DVD changer.
NOTE: To operate a video game unit a DC to AC
adapter may be required, plug the adapter into any
power outlet.
Follow the manufactures instructions for the correct
colors when connecting the RCA cables.
NOTE: MP3 player's, video game systems, camcorders
connected to the RCA jacks and CD's or DVD's inserted
into the CD/DVD changer can be heard through the
headphones. REMOTE SOUND SYSTEM CONTROLS Ð IF
EQUIPPED
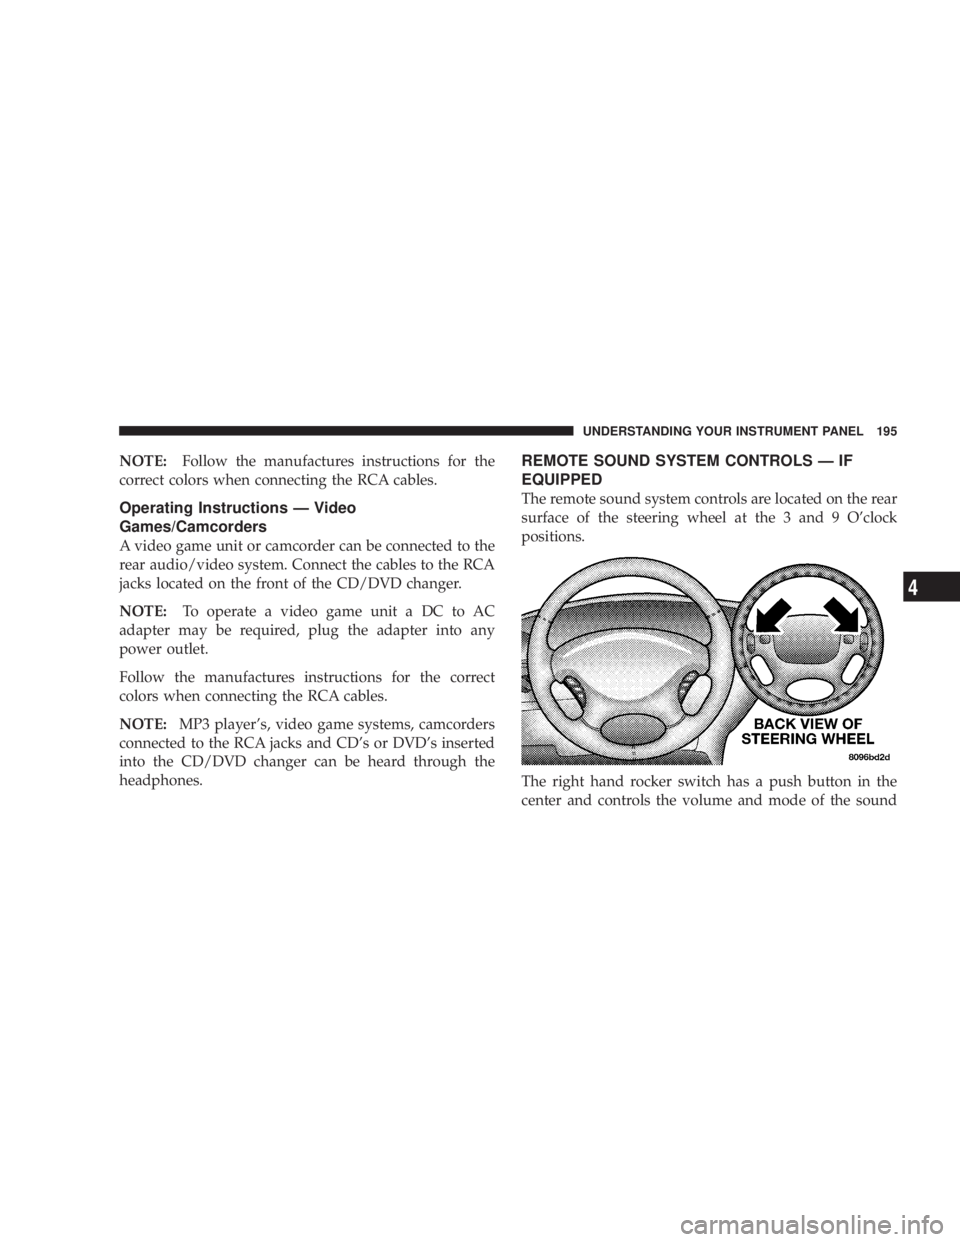
The remote sound system controls are located on the rear
surface of the steering wheel at the 3 and 9 O'clock
positions.
The right hand rocker switch has a push button in the
center and controls the volume and mode of the sound UNDERSTANDING YOUR INSTRUMENT PANEL 195
4
Page 201 of 397
Panel Mode
Air comes from the outlets in the instrument panel. Each
of these outlets can be individually adjusted to direct the
flow of air. Moving the air vane knob on the center
outlets down, will close off the air flow from the center outlets. The thumbwheel next to the outboard outlets can
be rotated to regulate or shut off the air flow from these
outlets.
Bi-Level Mode
Air comes from both the instrument panel outlets, floor
outlets and defrost. A slight amount of air is also directed
through the side window demister outlets. UNDERSTANDING YOUR INSTRUMENT PANEL 201
4
Page 211 of 397
Panel Mode
Air comes from the outlets in the instrument panel. Each
of these outlets can be individually adjusted to direct the
flow of air. Moving the air vane knob on the center
outlets down, will close off the air flow from the center outlets. The thumbwheel next to the outboard outlets can
be rotated to regulate or shut off the air flow from these
outlets.
Bi-Level Mode
Air comes from both the instrument panel outlets, floor
outlets and defrost. A slight amount of air is also directed
through the side window demister outlets. UNDERSTANDING YOUR INSTRUMENT PANEL 211
4
Page 223 of 397
STARTING AND OPERATINGCONTENTS m Starting Procedures .....................226
N 2.4L Engine .........................226
N 3.3L And 3.8L Engine ..................228
m Engine Block Heater Ð If Equipped .........230
m Automatic Transmission ..................231
N Brake/Transmission Interlock System .......232
N Automatic Transmission Ignition Interlock
System .............................232
N Four Speed Automatic Transmission ........232 m All Wheel Drive Ð If Equipped ............235
m Parking Brake .........................235
m Brake System ..........................237
N Anti-Lock Brake System Ð If Equipped .....237
m Power Steering ........................240
m Traction Control Ð If Equipped ............241
m Tire Safety Information ...................242
N Tire Markings ........................242
N Tire Identification Number (TIN) ..........2465
Page 224 of 397

N Tire Loading And Tire Pressure ...........247
m TiresÐGeneral Information ................251
N Tire Pressure .........................251
N Tire Inflation Pressures .................252
N Radial-Ply Tires ......................255
N Compact Spare Tire Ð If Equipped .........255
N Tire Spinning ........................256
N Tread Wear Indicators ..................256
N Replacement Tires .....................257
N Alignment And Balance .................258
m All Wheel Drive (AWD) Ð If Equipped .......259
m Tire Pressure Monitor System Ð If Equipped . . . 259
N 1,2,3, Or 4 Tire(s) Low Pressure ...........260 N 1,2,3, Or 4 Tire(s) High Pressure ...........260
N Service Tire Pressure System/See Owner's
Manual ............................260
N Tire Pressure Unavailable ................260
N Tire Pressure Now Available .............261
N Spare Tire In Use? Yes/No ...............261
N All 5 Tires With Car? Yes/No .............261
N General Information ...................263
m Tire Chains ...........................263
m Snow Tires ...........................264
m Tire Rotation Recommendations ............265
m Fuel Requirements ......................266
N Reformulated Gasoline .................266224 STARTING AND OPERATING
Page 235 of 397

transmission operating temperature exceeds acceptable
limits. This is done to prevent transmission damage due
to overheating.
ALL WHEEL DRIVE Ð IF EQUIPPED
This feature provides full time, on-demand, All Wheel
Drive (AWD). The system is automatic with no driver
inputs or additional driving skills required. Under nor-
mal driving conditions, the front wheels provide most of
the traction. If the front wheels begin to lose traction,
power is shifted automatically to the rear wheels. The
greater the front wheel traction loss, the greater the
power transfer to the rear wheels. CAUTION!All wheels must have the same size and type tires.
Unequal tire sizes must not be used. Unequal tire
size may cause failure of the power transfer unit
and/or the viscous coupling.
PARKING BRAKE
When the parking brake is applied with the ignition
switch on, the brake light in the instrument cluster will
turn on.
NOTE: This light only shows that the parking brake is
applied. It does not show the degree of brake application.
Before leaving the vehicle, make sure that the parking
brake is fully applied and place the gear selector in the STARTING AND OPERATING 235
5