Page 204 of 300

CAUTION!
Damage to the transmission may occur if the trans-
mission is shifted into Park (P) with the transfer case
in Neutral (N) and the engine RUNNING. With the
transfer case in Neutral (N) ensure that the engine is
OFF prior to shifting the transmission into Park (P).
Returning to Normal Operation
Use the following procedure to prepare your vehicle for
normal usage.
1. Bring vehicle to a complete stop.
2. Shut engine OFF.
3. Place ignition key in the ON position.
4. Depress brake pedal.
5. Shift automatic transmission to Neutral (N) or depress
clutch on manual transmission.6. Using the point of a ballpoint pen or similar object,
depress the recessed transfer case Neutral (N) button for
1 second.
7. After the Neutral (N) indicator light turns off release
the Neutral (N) button.
8. After the Neutral (N) button has been released the
transfer case will shift to the position identified by the
selector switch.
9. Shift automatic transmission into Drive (D), release
the clutch on manual transmission.
NOTE:Items 1 through 5 are requirements that must be
met prior to depressing the Neutral (N) selection button,
and must continue to be met until 1 second elapses and
the shift has been completed. If any of these requirements
(with the exception of 3 - key ON) are not met prior to
depressing the Neutral (N) button or are no longer met
during the 1 second time, then all of the mode position
indicator lights will flash continuously until all require-
ments are met or until the Neutral (N) button is released.
204 STARTING AND OPERATING
Page 205 of 300

NOTE:The ignition key must be ON for a shift to take
place and for the position indicator lights to be operable.
If the key is not ON, the shift will not take place and no
position indicator lights will be on or flashing.
NOTE:Flashing neutral (N) position indicator light
indicates that shift requirements have not been met.
WARNING!
You or others could be injured if you leave the
vehicle unattended with the transfer case in the
Neutral (N) position without first fully engaging the
parking brake. The transfer case Neutral (N) position
disengages both the front and rear driveshafts from
the powertrain and will allow the vehicle to move
despite the transmission position. The parking
brake should always be applied when the driver is
not in the vehicle.
CAUTION!
²Do not use a bumper mounted clamp-on tow bar
on your vehicle. The bumper face bar will be
damaged.
²Do not disconnect the rear driveshaft because
fluid will leak from the transfer case and damage
internal parts.
STARTING AND OPERATING 205
5
Page 213 of 300

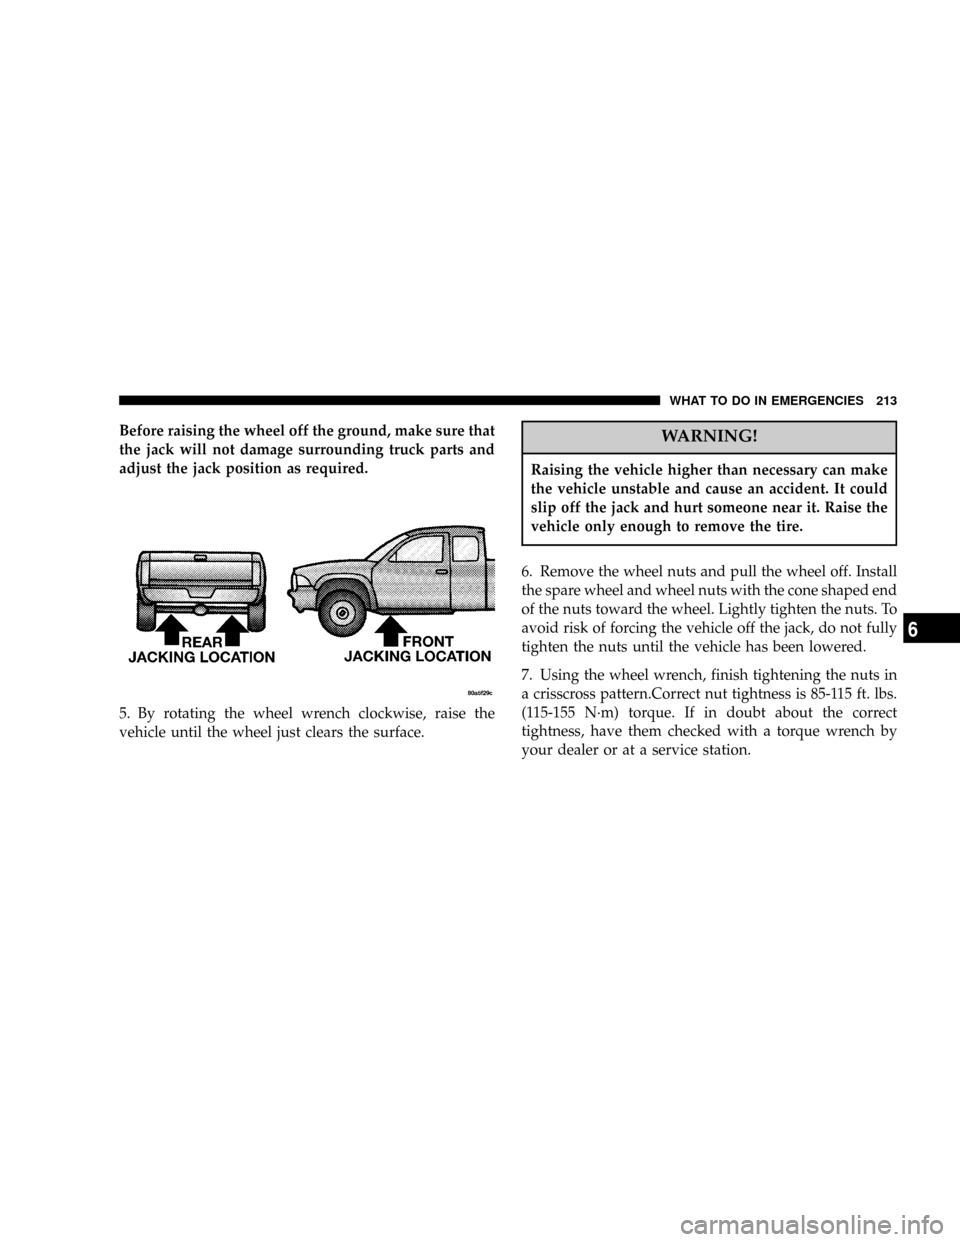
Before raising the wheel off the ground, make sure that
the jack will not damage surrounding truck parts and
adjust the jack position as required.
5. By rotating the wheel wrench clockwise, raise the
vehicle until the wheel just clears the surface.WARNING!
Raising the vehicle higher than necessary can make
the vehicle unstable and cause an accident. It could
slip off the jack and hurt someone near it. Raise the
vehicle only enough to remove the tire.
6. Remove the wheel nuts and pull the wheel off. Install
the spare wheel and wheel nuts with the cone shaped end
of the nuts toward the wheel. Lightly tighten the nuts. To
avoid risk of forcing the vehicle off the jack, do not fully
tighten the nuts until the vehicle has been lowered.
7. Using the wheel wrench, finish tightening the nuts in
a crisscross pattern.Correct nut tightness is 85-115 ft. lbs.
(115-155 N´m) torque. If in doubt about the correct
tightness, have them checked with a torque wrench by
your dealer or at a service station.
WHAT TO DO IN EMERGENCIES 213
6
Page 220 of 300

NWindshield Wiper Blades................235
NWindshield Washers...................236
NExhaust System......................236
NCooling System.......................237
NEmission Related Components............241
NBrake System........................243
NClutch Hydraulic System................245
NManual Transmission..................245
NAutomatic Transmission................245
NTransfer Case........................248
NAxles..............................248
NSelection Of Lubricating Grease...........248
NAppearance Care And Protection From
Corrosion...........................249
mPower Distribution Center...............252
mFuse Block...........................253
mVehicle Storage........................254
mReplacement Light Bulbs................254
mBulb Replacement......................255
NHeadlights..........................255
NParking/Turn Signal Lights..............256
NRear Side Marker, Tail Lights, Turn Signals
And Backup Lights Ð Replacement........256
NLicense Lights........................257
NCenter High-Mounted Stoplight...........257
NFog Lights..........................257
mFluids And Capacities...................258
mRecommended Fluids, Lubricants And
Genuine Parts
.........................259
NEngine.............................259
NChassis............................260
220 MAINTAINING YOUR VEHICLE
Page 223 of 300

ONBOARD DIAGNOSTIC SYSTEM Ð OBD II
Your vehicle is equipped with a sophisticated onboard
diagnostic system called OBD II. This system monitors
the performance of the emissions, engine, and automatic
transmission control systems. When these systems are
operating properly, your vehicle will provide excellent
performance and fuel economy, as well as engine emis-
sions well within current government regulations.
If any of these systems require service, the OBD II system
will turn on the ªMalfunction Indicator Light.º It will
also store diagnostic codes and other information to
assist your service technician in making repairs. Al-
though your vehicle will usually be drivable and not
need towing, see your dealer for service as soon as
possible.CAUTION!
²Prolonged driving with the ªMalfunction Indica-
tor Lightº on could cause further damage to the
emission control system. It could also affect fuel
economy and driveability. The vehicle must be
serviced before any emissions tests can be per-
formed.
²If the ªMalfunction Indicator Lightº is flashing
while the engine is running, severe catalytic con-
verter damage and power loss will soon occur.
Immediate service is required.
MAINTAINING YOUR VEHICLE 223
7
Page 224 of 300

EMISSIONS INSPECTION AND MAINTENANCE
PROGRAMS
In some localities, it may be a legal requirement to pass
an inspection of your vehicle's emissions control system.
Failure to pass could prevent vehicle registration.
For states which have an I/M (Inspection and
Maintenance) requirement, this check verifies the
following: the MIL (Malfunction Indicator Lamp)
is functioning and is not on when the engine is running,
and that the OBD (On Board Diagnostic) system is ready
for testing.
Normally, the OBD system will be ready. The OBD
system maynotbe ready if your vehicle was recently
serviced, if you recently had a dead battery, or a battery
replacement. If the OBD system should be determined
not ready for the I/M test, your vehicle may fail the test.
Your vehicle has a simple ignition key actuated test
which you can use prior to going to the test station. To
check if your vehicle's OBD system is ready, you must do
the following:
1. Insert your ignition key into the ignition switch.2. Turn the ignition to the ON position, but do not crank
or start the engine.
3. If you crank or start the engine, you will have to start
this test over.
4. As soon as you turn your key to the ON position, you
will see your MIL symbol come on as part of a normal
bulb check.
5. Approximately 15 seconds later, one of two things will
happen:
a. The MIL light will blink for approximately 5
seconds and then remain on until the first engine
crank or the key is turned off. This means that your
vehicle's OBD system isnot readyand you should
notproceed to the I/M station.
b. The MIL light will remain fully illuminated until
the first engine crank or the key is turned off. This
means that your vehicle's OBD system isreadyand
you can proceed to the I/M station.
If your OBD system isnot ready,you should see your
dealer or repair facility. If your vehicle was recently
224 MAINTAINING YOUR VEHICLE
Page 243 of 300

Brake System
Power Disc Brakes (Front)
Disc brakes do not require adjustment; however, several
hard stops during the break-in period are recommended
to seat the linings and wear off any foreign material.
Self-Adjusting Rear Brakes
To maintain the correct adjustment, you need only drive
your vehicle in reverse and apply the brakes. If further
adjustment is needed, drive forward about 20 feet (6
meters) before you repeat the reverse application. To
avoid poor braking, brake pull, or damage to brake
drums, the brake linings should be inspected as specified
in the Maintenance Schedule.
Brake Master Cylinders
The fluid level in the master cylinders should be checked
whenever the vehicle is serviced, or immediately if the
brake system warning light is on. If necessary, add fluid
to bring level to the full mark on the side of the reservoir
of the brake master cylinder. Be sure to clean the top of
the master cylinder area before removing the cap. With
disc brakes, fluid level can be expected to fall as the brakepads wear. Brake fluid level should be checked when
pads are replaced. If the brake fluid level is abnormally
low, check system for leaks.
Refer to Recommended Fluids, Lubricants and Genuine
Parts for correct fluid type.
MAINTAINING YOUR VEHICLE 243
7
Page 247 of 300

7. Check for leaks. Release parking brake.
To prevent dirt and water from entering the transmission
after checking or replenishing fluid, make certain that the
dipstick cap is properly reseated. It is normal for the
dipstick cap to spring back slightly from its fully seated
position, as long as its seal remains engaged in the
dipstick tube.
Automatic Transmission Fluid And Filter Change
To obtain best performance and long life for automatic
transmissions, the manufacturer recommends that they
be given regular maintenance service by an Authorized
Dodge Dealer or Service Center. It is important that the
transmission be adjusted periodically, the fluid be main-
tained at the correct level, and that it be drained and
refilled as specified.
It is important that proper lubricant is used in the
transmission. Refer to Recommended Fluids, Lubricants
and Genuine Parts for correct fluid type. It is important
that the transmission fluid be maintained at the pre-
scribed level using the recommended fluid.
CAUTION!
Using a transmission fluid other than the manufac-
turers recommended fluid may cause deterioration
in transmission shift quality and/or torque converter
shudder. Using a transmission fluid other than the
manufacturers recommended fluid will result in
more frequent fluid and filter changes. Refer to
Recommended Fluids, Lubricants and Genuine Parts
for correct fluid type.
Refer to the ªMaintenance Schedulesº section for the
proper service intervals for your type of driving.
If the transmission is disassembled for any reason, the
fluid and filter should be changed, and the bands ad-
justed (if equipped).
Special Additives
The manufacturer strongly recommends against the ad-
dition of any fluid additives to the transmission. Excep-
tion to this policy is the use of special dyes to aid in
detecting fluid leaks. The use of transmission sealers
should be avoided, since they may adversely affect seals.
MAINTAINING YOUR VEHICLE 247
7