2004 DAEWOO NUBIRA ESP
[x] Cancel search: ESPPage 2522 of 2643
2–2 PREPARATIONS OF BODYWORK NUBIRA/LACETTI
1. GENERAL DESCRIPTION
S Most monocoque bodies are composed as a single unit
by welding together pressed parts made of steel plates
which come in a variety of different shapes and sizes.
Each part is responsible for displaying a certain strength
and durability in order that it may play its role in meetingthe functions of the body as a whole.
S Damage to the exterior of the body can be inspected
visually, but where there has been an external impact,
it is necessary to inspect the extent of the damage. In
some cases, the deformation has spread beyond the ac-
tual areas which were in the collision and so this has to
be inspected closely.
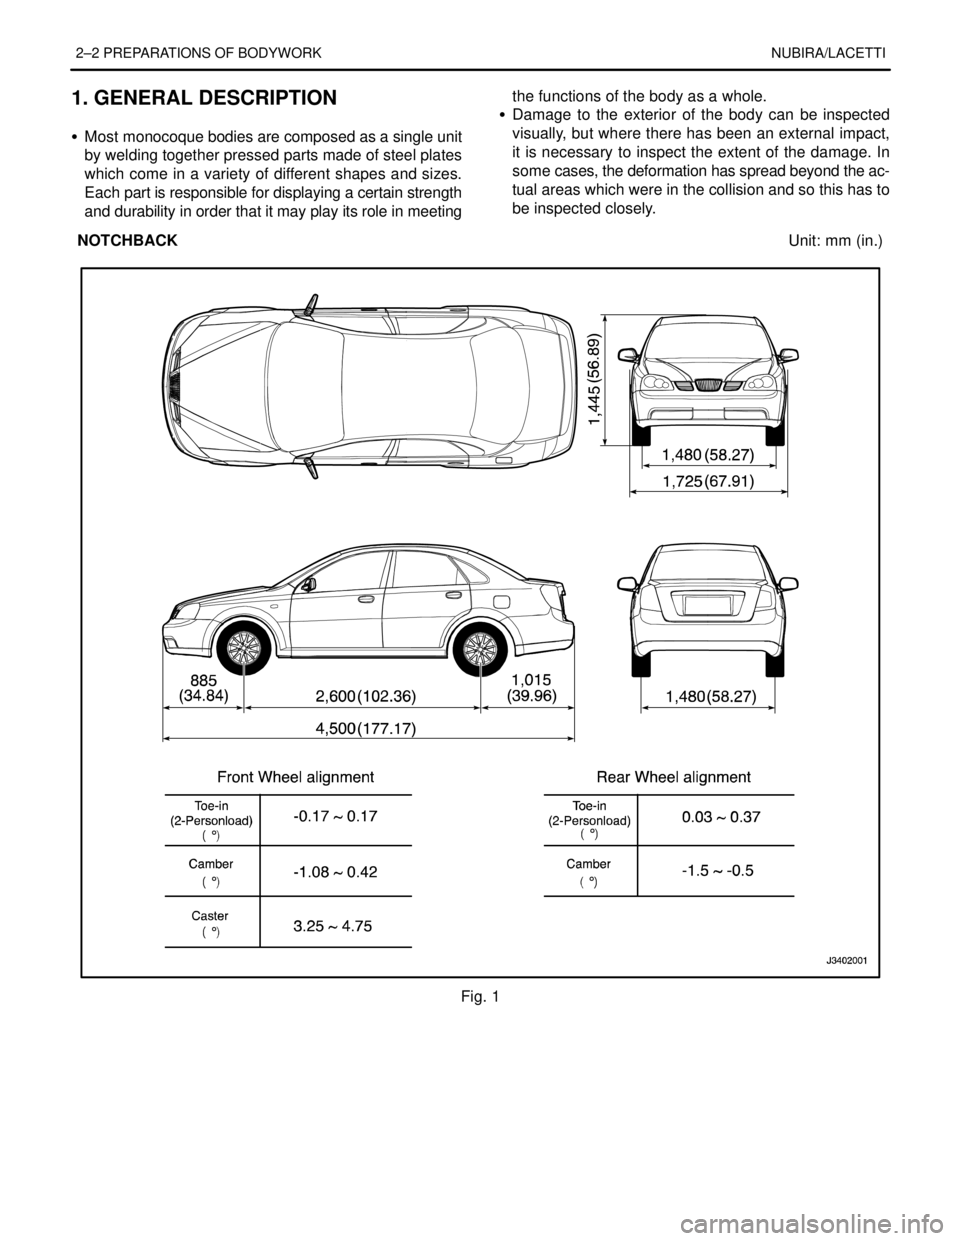
NOTCHBACKUnit: mm (in.)
Fig. 1
Page 2538 of 2643
4–4 FRONTNUBIRA/LACETTI
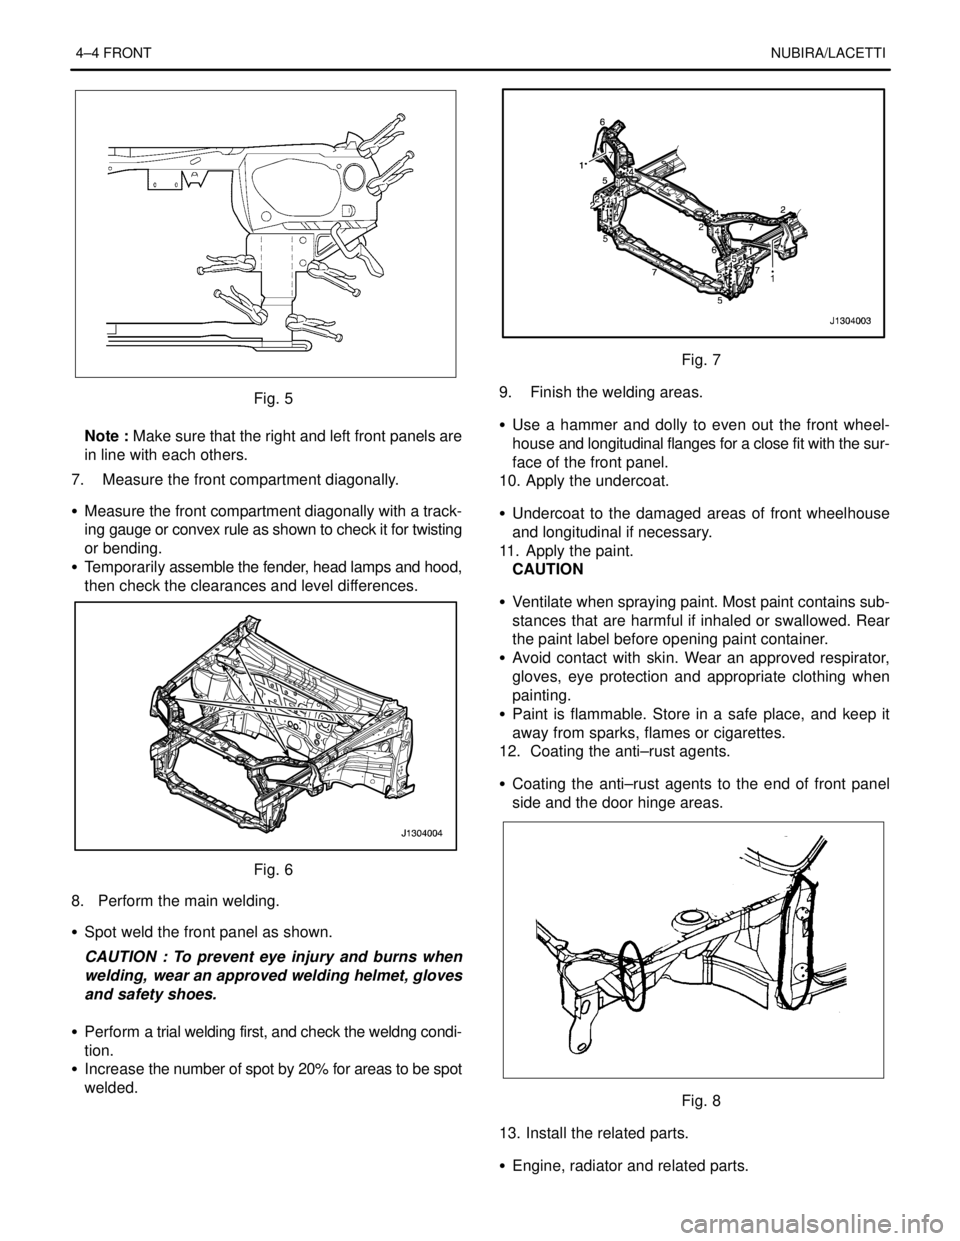
Fig. 5
Note : Make sure that the right and left front panels are
in line with each others.
7. Measure the front compartment diagonally.
S Measure the front compartment diagonally with a track-
ing gauge or convex rule as shown to check it for twisting
or bending.
S Temporarily assemble the fender, head lamps and hood,
then check the clearances and level differences.
Fig. 6
8. Perform the main welding.
S Spot weld the front panel as shown.
CAUTION : To prevent eye injury and burns when
welding, wear an approved welding helmet, gloves
and safety shoes.
S Perform a trial welding first, and check the weldng condi-
tion.
S Increase the number of spot by 20% for areas to be spot
welded.
Fig. 7
9. Finish the welding areas.
S Use a hammer and dolly to even out the front wheel-
house and longitudinal flanges for a close fit with the sur-
face of the front panel.
10. Apply the undercoat.
S Undercoat to the damaged areas of front wheelhouse
and longitudinal if necessary.
11. Apply the paint.
CAUTION
S Ventilate when spraying paint. Most paint contains sub-
stances that are harmful if inhaled or swallowed. Rear
the paint label before opening paint container.
S Avoid contact with skin. Wear an approved respirator,
gloves, eye protection and appropriate clothing when
painting.
S Paint is flammable. Store in a safe place, and keep it
away from sparks, flames or cigarettes.
12. Coating the anti–rust agents.
S Coating the anti–rust agents to the end of front panel
side and the door hinge areas.
Fig. 8
13. Install the related parts.
S Engine, radiator and related parts.
Page 2541 of 2643
NUBIRA/LACETTIFRONT 4–7
2–2. REPAIR PROCEDURE
1. Remove the related parts.
S Parts on passenger side of dash panel lower which are
especially flammable.
S Instrument panel, wiring harness, related parts and oth-
ers.
2. Roughly pull out and straighten the damaged area to
approximately the original shape.
S Attach the car to the frame straightener by tightening the
underbody clamps at the horizontal pinch weld points.
S Before cutting off the damaged sections, pull them out
so that they are restored to the original shape.
S Do not pull out more than necessary.
S Pull out and straighten the damaged areas of the rear
wheelhouse and dash panel lower, front filar and other
parts.
Note : Check the condition of the door and hinges.
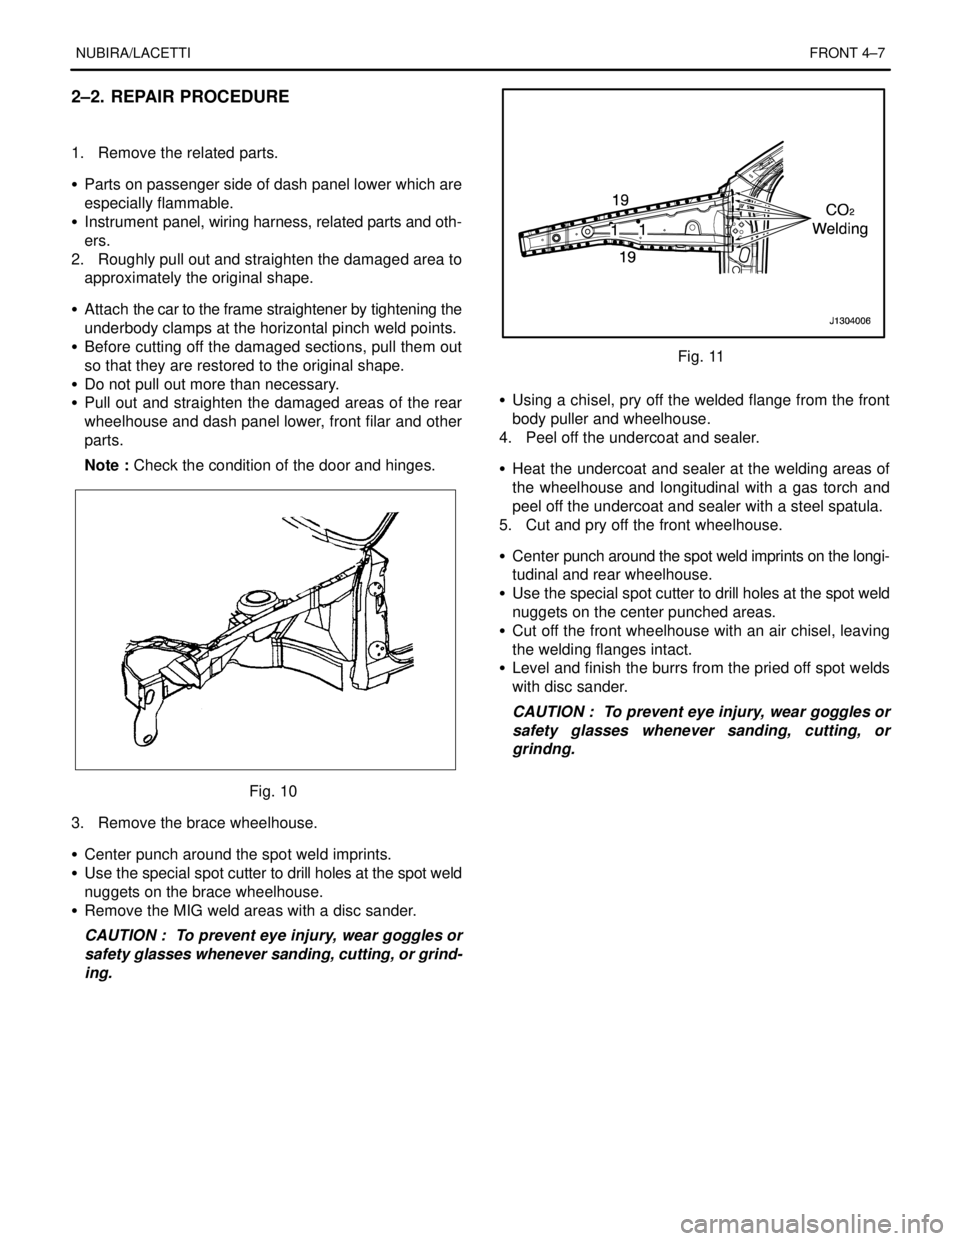
Fig. 10
3. Remove the brace wheelhouse.
S Center punch around the spot weld imprints.
S Use the special spot cutter to drill holes at the spot weld
nuggets on the brace wheelhouse.
S Remove the MIG weld areas with a disc sander.
CAUTION : To prevent eye injury, wear goggles or
safety glasses whenever sanding, cutting, or grind-
ing.
Fig. 11
S Using a chisel, pry off the welded flange from the front
body puller and wheelhouse.
4. Peel off the undercoat and sealer.
S Heat the undercoat and sealer at the welding areas of
the wheelhouse and longitudinal with a gas torch and
peel off the undercoat and sealer with a steel spatula.
5. Cut and pry off the front wheelhouse.
S Center punch around the spot weld imprints on the longi-
tudinal and rear wheelhouse.
S Use the special spot cutter to drill holes at the spot weld
nuggets on the center punched areas.
S Cut off the front wheelhouse with an air chisel, leaving
the welding flanges intact.
S Level and finish the burrs from the pried off spot welds
with disc sander.
CAUTION : To prevent eye injury, wear goggles or
safety glasses whenever sanding, cutting, or
grindng.
Page 2543 of 2643
NUBIRA/LACETTIFRONT 4–9
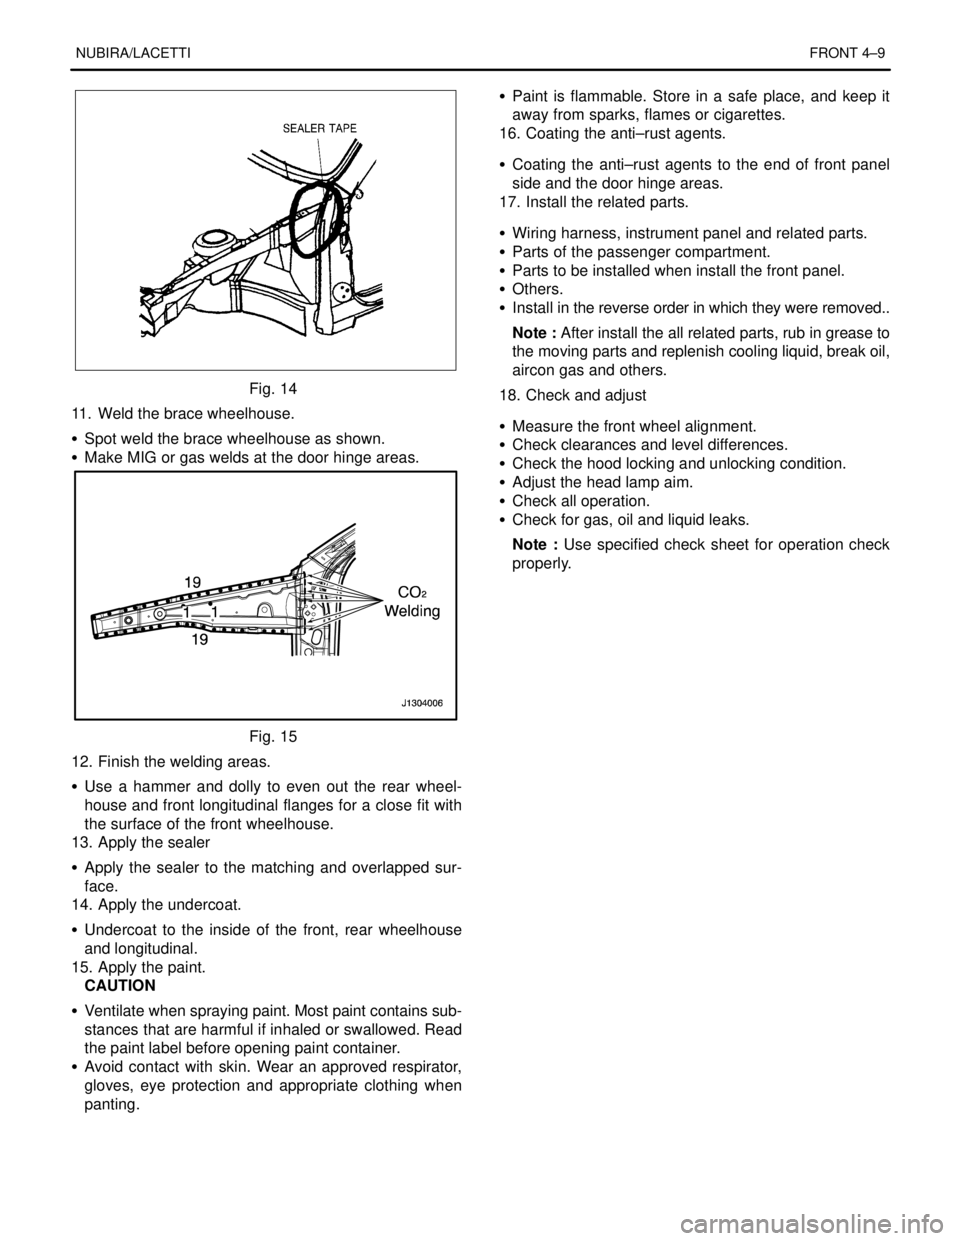
Fig. 14
11. Weld the brace wheelhouse.
S Spot weld the brace wheelhouse as shown.
S Make MIG or gas welds at the door hinge areas.
Fig. 15
12. Finish the welding areas.
S Use a hammer and dolly to even out the rear wheel-
house and front longitudinal flanges for a close fit with
the surface of the front wheelhouse.
13. Apply the sealer
S Apply the sealer to the matching and overlapped sur-
face.
14. Apply the undercoat.
S Undercoat to the inside of the front, rear wheelhouse
and longitudinal.
15. Apply the paint.
CAUTION
S Ventilate when spraying paint. Most paint contains sub-
stances that are harmful if inhaled or swallowed. Read
the paint label before opening paint container.
S Avoid contact with skin. Wear an approved respirator,
gloves, eye protection and appropriate clothing when
panting.S Paint is flammable. Store in a safe place, and keep it
away from sparks, flames or cigarettes.
16. Coating the anti–rust agents.
S Coating the anti–rust agents to the end of front panel
side and the door hinge areas.
17. Install the related parts.
S Wiring harness, instrument panel and related parts.
S Parts of the passenger compartment.
S Parts to be installed when install the front panel.
S Others.
S Install in the reverse order in which they were removed..
Note : After install the all related parts, rub in grease to
the moving parts and replenish cooling liquid, break oil,
aircon gas and others.
18. Check and adjust
S Measure the front wheel alignment.
S Check clearances and level differences.
S Check the hood locking and unlocking condition.
S Adjust the head lamp aim.
S Check all operation.
S Check for gas, oil and liquid leaks.
Note : Use specified check sheet for operation check
properly.
Page 2545 of 2643

NUBIRA/LACETTIFRONT 4–11
3–2. REPAIR PROCEDURE
1. Remove the related parts.
S Parts to be removed when removing the front panel and
front wheelhouse.
S Parts on passenger side of dash panel lower which are
especially flammable.
S Instrument panel, wiring harness, related parts and oth-
ers.
Note : Remove according to part damaged.
2. Roughly pull out and straighten the damaged area to
approximately the original shape.
S Attach the car to the frame straightener by tightening the
underbody clamps at the horizontal pinch weld points.
S Before cutting off the damaged sections, pull them out
so that they are restored to the original shape.
S Roughly cut off the front longitudinal according to the ex-
tent of damage before roughly pulling out the damage
makes repair of the related parts difficult.
S Do not pull out more than necessary.
Note : Check the condition of the door and hinges.
3. Peel off the undercoat and sealer.
S Heat the undercoat and sealer at the welding areas of
the damaged parts with a gas torch and peel off the un-
dercoat and sealer with a steel spatula.
CAUTION : Be careful not to burn the fittings inside
the passenger compartment when heating.
4. Cut and pry off the front longitudinal.
Note : It’s not necessary to separate the wheelhouse
from the front longitudinal if the wheelhouse is to be re-
placed also.
S Center punch around the spot weld imprints on the
wheelhouse and other related parts.
S Use the special spot cutter to drill holes at the spot weld
nuggets on the center punched areas.
S Cut off the front longitudinal with an air chisel, leaving the
welding flanges intact.
S Level and finish the burrs from the pried off spot welds
with a disc sander.
CAUTION : To prevent eye injury, wear goggles or
safety glasses whenever sanding, cutting, or grind-
ing.
Fig. 17
5. Mold damaged related parts.
S Fill any holes drilled by welding.
CAUTION : To prevent eye injury and burns when
welding, wear an approved welding helmet, gloves
and safety shoes.
S Reshape the wheelhouse and other damaged parts and
even out the welding flanges with a hammer and dolly.
Fig. 18
6. Cut the new front longitudinal to align it with body, then
set the wheelhouse and front panel.
S Cut the new front longitudinal with a hand saw and it will
be butt welded.
S Grind both sides of the welding section of the front longi-
tudinal and wheelhouse with a disc sander to remove the
paint and expose the steel plate.
CAUTION : To prevent eye injury, wear goggles or
safety glasses whenever sanding, cutting, or grind-
ing.
S Tighten the new front longitudinal against remaining
parts with the vise grips and pliers.
S Place a jack under the front longitudinal end and support
it, and measure the positions for correct setting.
S Set and clamp the front panel in place with the vise grips.
Page 2546 of 2643

4–12 FRONTNUBIRA/LACETTI
Note : Use of jigs is recommended for correct positions
and check that the both front longitudinal and wheel-
house are parallel.
S Tack weld the clamped section for temporary installa-
tion.
7. Perform the main welding.
S Weld as much as possible with the jig still mounted.
S Make MIG or gas welds at the butt joints at the front lon-
gitudinal, carefully.
Fig. 19
S Spot weld the wheelhouse with the front longitudinal
flange areas and front panel.
CAUTION : To prevent eye injury and burns when
welding, wear an approved welding helmet, gloves
and safety shoes.
S Perform a trial welding first, and check the welding con-
dition.
S Increase the number of spot by 20% for areas to be spot
welded.
Fig. 20
S Level the weld beads at the longitudinal butt joints area
with disc sander.
S Make the stiffener(Thickness: 2.8 mm Min., Width: 80
mm) according to the form of longitudinal butt joint areasand weld the stiffener at the longitudinal butt joint areas
with MIG welder.
Fig. 21
8. Finish the welding areas.
S Level the gas or MIG welded areas with disc sander.
S Use a hammer and dolly to even out the wheelhouse and
longitudinal flanges for a close fit.
9. Apply the sealer.
S Apply the sealer to the joint areas of the dash panel lower
and floor panel areas.
10. Apply the undercoat.
S Undercoat to the joint and overlapped areas of the front
floor, longitudinal under side and the inside of front, rear
wheelhouse.
11. Apply the paint.
CAUTION
S Ventilate when spraying paint. Most paint contains sub-
stances that are harmful if inhaled or swallowed. Read
the paint label before opening paint container.
S Avoid contact with skin. Wear an approved respirator,
gloves, eye protection and appropriate clothing when
painting.
S Paint is flammable. Store in a safe place, and keep it
away from sparks, flames or cigarettes.
12. Coating the anti–rust agents.
S Coating the anti–rust agents to the end of front panel
side and the front door hinge areas.
13. Install the related parts.
S Clean the passenger compartment.
S Wiring harness, instrument panel and related parts.
S Parts of the passenger compartment.
S Chassis components.
S Engine, radiator and related parts.
S Aircon condenser and related parts.
S Head lamps and fenders.
S Heed, radiator grill, and bumper.
S Others.
S Install in the reverse order in which they were removed.
Page 2551 of 2643
NUBIRA/LACETTIFRONT 4–17
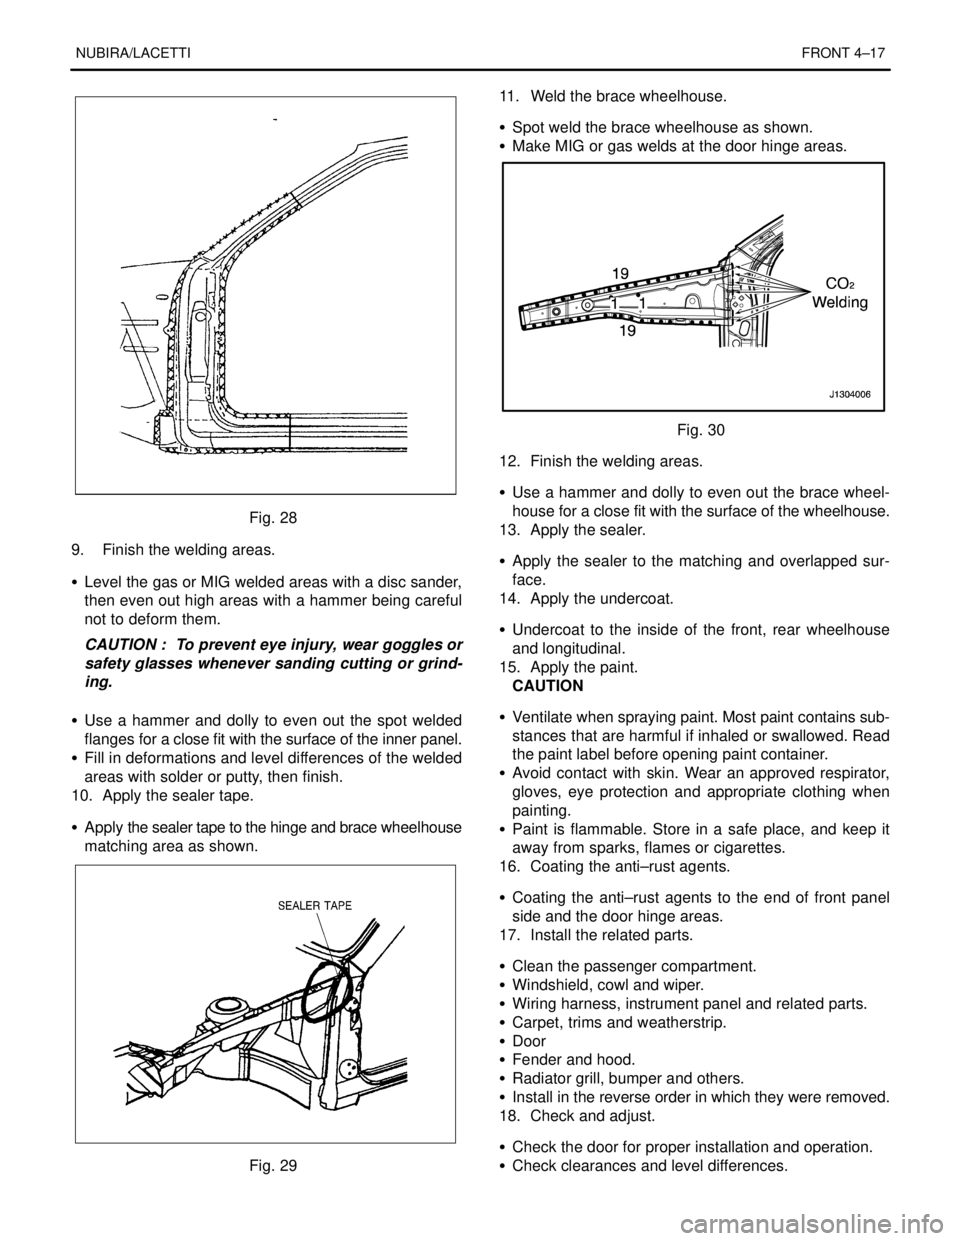
Fig. 28
9. Finish the welding areas.
S Level the gas or MIG welded areas with a disc sander,
then even out high areas with a hammer being careful
not to deform them.
CAUTION : To prevent eye injury, wear goggles or
safety glasses whenever sanding cutting or grind-
ing.
S Use a hammer and dolly to even out the spot welded
flanges for a close fit with the surface of the inner panel.
S Fill in deformations and level differences of the welded
areas with solder or putty, then finish.
10. Apply the sealer tape.
S Apply the sealer tape to the hinge and brace wheelhouse
matching area as shown.
Fig. 2911. Weld the brace wheelhouse.
S Spot weld the brace wheelhouse as shown.
S Make MIG or gas welds at the door hinge areas.
Fig. 30
12. Finish the welding areas.
S Use a hammer and dolly to even out the brace wheel-
house for a close fit with the surface of the wheelhouse.
13. Apply the sealer.
S Apply the sealer to the matching and overlapped sur-
face.
14. Apply the undercoat.
S Undercoat to the inside of the front, rear wheelhouse
and longitudinal.
15. Apply the paint.
CAUTION
S Ventilate when spraying paint. Most paint contains sub-
stances that are harmful if inhaled or swallowed. Read
the paint label before opening paint container.
S Avoid contact with skin. Wear an approved respirator,
gloves, eye protection and appropriate clothing when
painting.
S Paint is flammable. Store in a safe place, and keep it
away from sparks, flames or cigarettes.
16. Coating the anti–rust agents.
S Coating the anti–rust agents to the end of front panel
side and the door hinge areas.
17. Install the related parts.
S Clean the passenger compartment.
S Windshield, cowl and wiper.
S Wiring harness, instrument panel and related parts.
S Carpet, trims and weatherstrip.
S Door
S Fender and hood.
S Radiator grill, bumper and others.
S Install in the reverse order in which they were removed.
18. Check and adjust.
S Check the door for proper installation and operation.
S Check clearances and level differences.
Page 2557 of 2643
NUBIRA/LACETTI ROOF, BACK PANEL AND REAR FLOOR PANEL 5–5
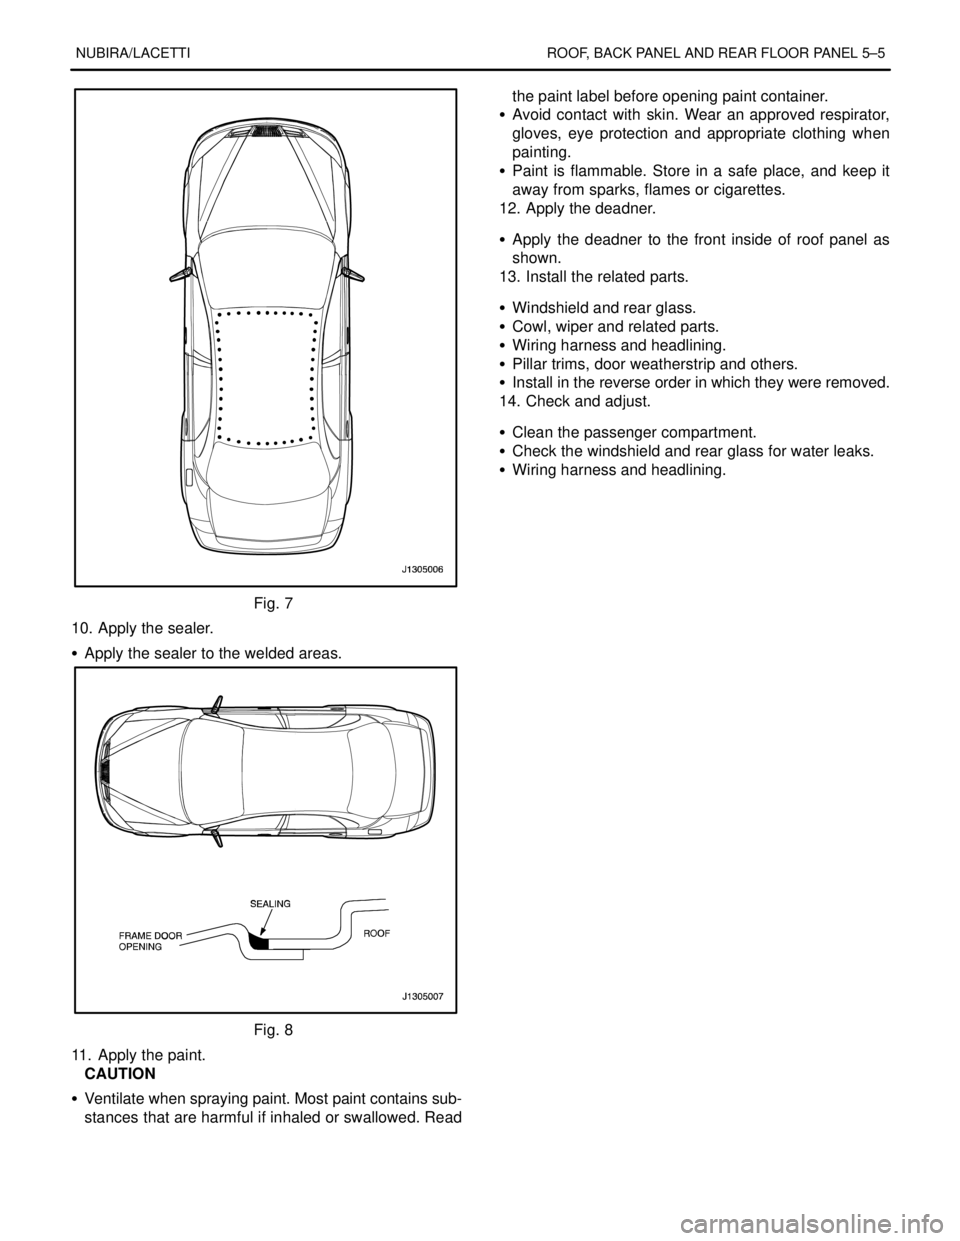
Fig. 7
10. Apply the sealer.
S Apply the sealer to the welded areas.
Fig. 8
11. Apply the paint.
CAUTION
S Ventilate when spraying paint. Most paint contains sub-
stances that are harmful if inhaled or swallowed. Readthe paint label before opening paint container.
S Avoid contact with skin. Wear an approved respirator,
gloves, eye protection and appropriate clothing when
painting.
S Paint is flammable. Store in a safe place, and keep it
away from sparks, flames or cigarettes.
12. Apply the deadner.
S Apply the deadner to the front inside of roof panel as
shown.
13. Install the related parts.
S Windshield and rear glass.
S Cowl, wiper and related parts.
S Wiring harness and headlining.
S Pillar trims, door weatherstrip and others.
S Install in the reverse order in which they were removed.
14. Check and adjust.
S Clean the passenger compartment.
S Check the windshield and rear glass for water leaks.
S Wiring harness and headlining.