Page 2581 of 2643

7–4 FENDER, HOOD, TAILGATE AND TRUNK LID NUBIRA/LACETTI
3. TAILGATE (HATCHBACK)
3–1. REPAIR PROCEDURE
1. Remove the related parts.
S Wiring harness.
S Rear wiper arm and motor.
S Rear window glass.
S Lock set, latch and others.
.
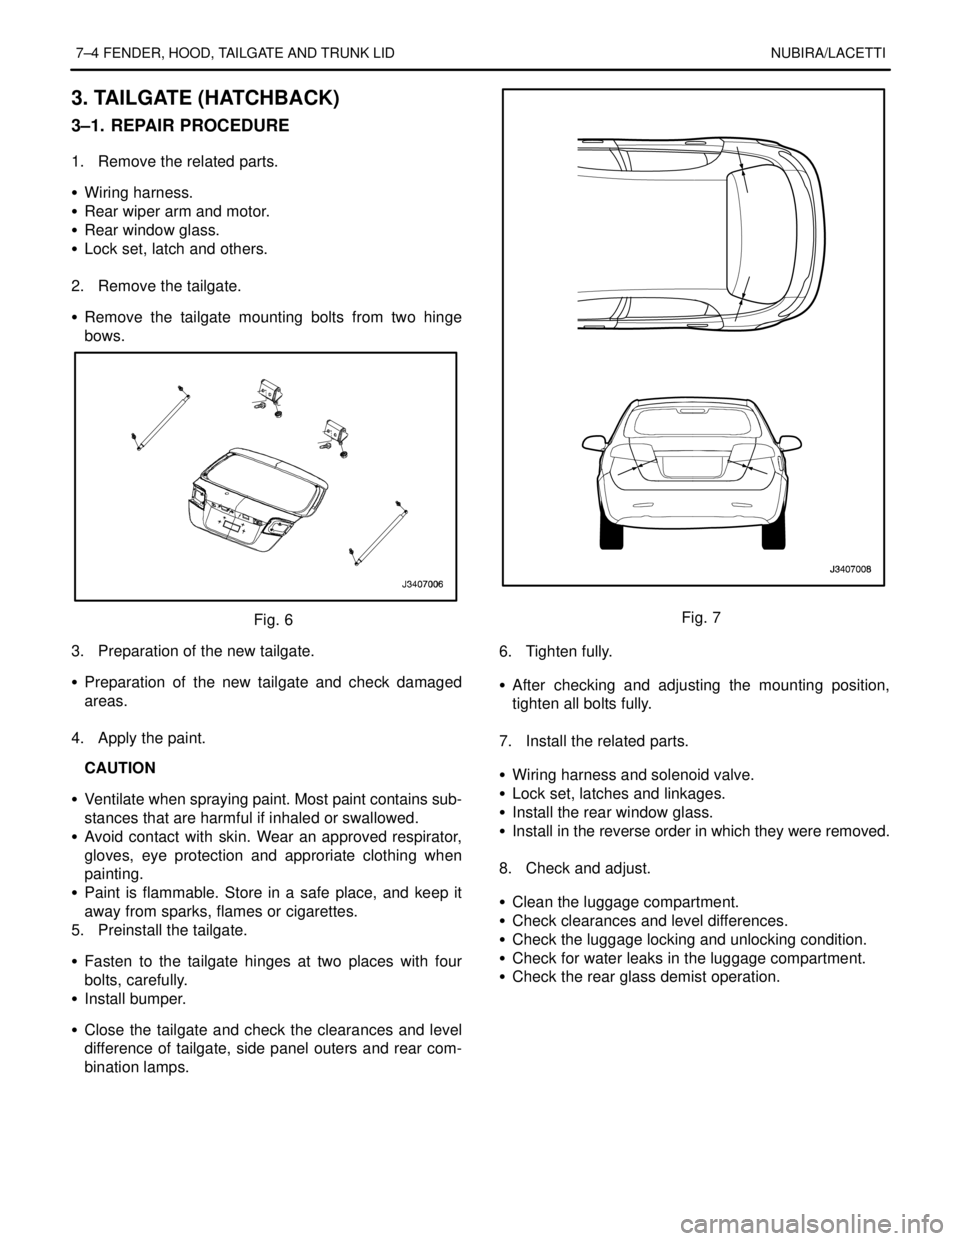
2. Remove the tailgate.
S Remove the tailgate mounting bolts from two hinge
bows.
Fig. 6
3. Preparation of the new tailgate.
S Preparation of the new tailgate and check damaged
areas.
.
4. Apply the paint.
CAUTION
S Ventilate when spraying paint. Most paint contains sub-
stances that are harmful if inhaled or swallowed.
S Avoid contact with skin. Wear an approved respirator,
gloves, eye protection and approriate clothing when
painting.
S Paint is flammable. Store in a safe place, and keep it
away from sparks, flames or cigarettes.
5. Preinstall the tailgate.
S Fasten to the tailgate hinges at two places with four
bolts, carefully.
S Install bumper.
S Close the tailgate and check the clearances and level
difference of tailgate, side panel outers and rear com-
bination lamps.Fig. 7
6. Tighten fully.
S After checking and adjusting the mounting position,
tighten all bolts fully.
.
7. Install the related parts.
S Wiring harness and solenoid valve.
S Lock set, latches and linkages.
S Install the rear window glass.
S Install in the reverse order in which they were removed.
.
8. Check and adjust.
S Clean the luggage compartment.
S Check clearances and level differences.
S Check the luggage locking and unlocking condition.
S Check for water leaks in the luggage compartment.
S Check the rear glass demist operation.
Page 2582 of 2643

NUBIRA/LACETTI FENDER, HOOD, TAILGATE AND TRUNK LID 7–5
4. TRUNK LID (NOTCHBACK)
4–1. REPAIR PROCEDURE
1. Remove the related parts.
S Wiring harness and solenoid valve.
S Lock set, latch set and others.
.
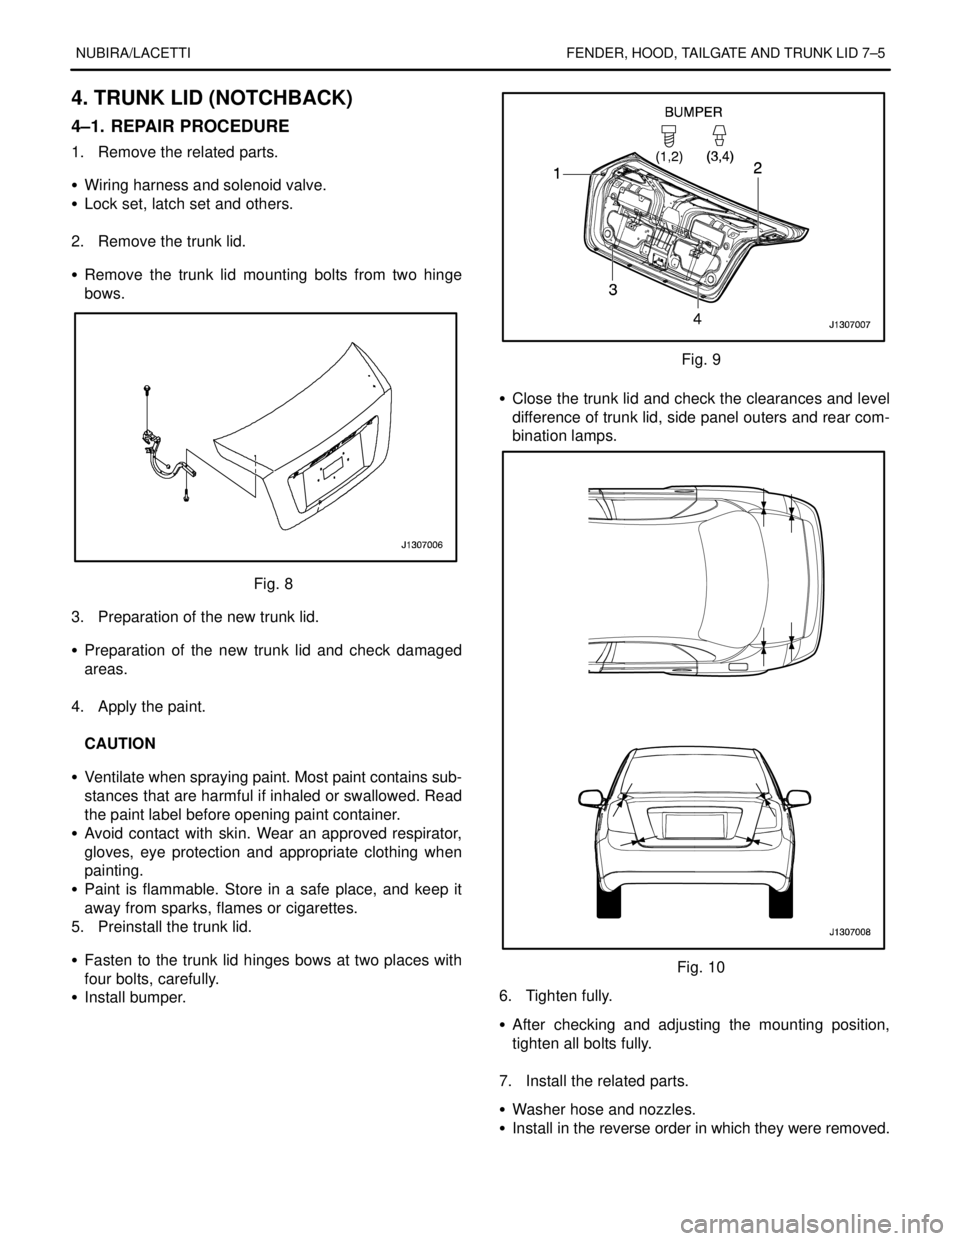
2. Remove the trunk lid.
S Remove the trunk lid mounting bolts from two hinge
bows.
Fig. 8
3. Preparation of the new trunk lid.
S Preparation of the new trunk lid and check damaged
areas.
.
4. Apply the paint.
.
CAUTION
S Ventilate when spraying paint. Most paint contains sub-
stances that are harmful if inhaled or swallowed. Read
the paint label before opening paint container.
S Avoid contact with skin. Wear an approved respirator,
gloves, eye protection and appropriate clothing when
painting.
S Paint is flammable. Store in a safe place, and keep it
away from sparks, flames or cigarettes.
5. Preinstall the trunk lid.
S Fasten to the trunk lid hinges bows at two places with
four bolts, carefully.
S Install bumper.
Fig. 9
S Close the trunk lid and check the clearances and level
difference of trunk lid, side panel outers and rear com-
bination lamps.
Fig. 10
6. Tighten fully.
S After checking and adjusting the mounting position,
tighten all bolts fully.
.
7. Install the related parts.
S Washer hose and nozzles.
S Install in the reverse order in which they were removed.
.
Page 2620 of 2643

10–2 RUST PREVENTIONNUBIRA/LACETTI
1. ZINC TREATED STEEL PLATE
REPAIR
Avoid puttying as much as possible when repairing a
new car. Use alternative methods as much as possible.
.
CAUTION
S Most paints contain substances that are harmful if in-
haled or swallowed. Read the paint label before openingthe container. Spray paint only in a well ventilated area.
S Cover spilled paint with sand, or wipe it up at once.
S Wear an approved respirator, gloves, eye protection and
appropriate clothing when painting. Avoid contact with
skin.
S If paint gets in your mouth or on your skin, rinse or wash
thoroughly with water. If paint gets in your eyes, flush
with water and get prompt medical attention.
S Paint is flammable. Store it in a safe place, and keep it
away from sparks, flames or cigarettes.
Operation
Tools/MaterialsProcedureRemarks
1. Prep the repair
area.Double–action sander, #80 sand-
paper.Sand the area with a double–action sander
and #80 sandpaper. Clean with wax and
grease remover..
2. Apply putty
Note : Putty can be
applied after priming
as described in step 4.
Epoxy–based putty.
S Mix the putty and hardener ac-
cording to the manufacturer’s di-
recctions.
S Polyester resin putty. Body filler.Apply in several thin coats if necessary. Try
to avoid leaving pinholes in the putty.
S Follow the manufacturer’s recommenda-
tions for preparaton.
.
3. Sand and clean
the puttied area.Double–action sander, orbital
sander, hand sanding file, #80,
#120, #240 sandpaper, wax and
grease remover, shop towels.Rough–sand the area with a double– action
sander and #80 sandpaper, then sand with
#120 sandpaper. Featheredge with #240
sandpaper. Clean with wax and grease re-
mover..
4. Coat with primer.
Note : Apply to bare
sheet metal and put-
tied area.
Epoxy–based primer and harden-
er, epoxy thinner.
S Mix and thin the primer accord-
ing to the manufacturer’s direc-
tions.
Apply 2–4 coats, allowing sufficient flash time
between coats.
Force dry at 60–70�C(140–158�F) for at
least 30 minutes.Spray to
a thick-
ness of
30–35
microns.
5. Sand and clean
the whole area.Double–action sander, #400
sandpaper, wax and greases re-
mover, shop towels.Sand the whole area to be repainted with a
double–action sander and #400 sandpaper.
Blow off with compressed air. Clean with wax
and grease remover..
6. Coat the whole
area to be repainted
with primer/ surfacer.
Polyester/urethane resin primer/
surfacer.
S Mix and thin the primer accord-
ing to the manufacturer’s direc-
tions.
Apply 2–4 coats, allowing sufficient flash time
between coats.
Force dry at 60–70�C(140–158�F) for at
least 30 minutes.Spray to
a thick-
ness of
30–35
microns.
7. Sand and clean
the whole area to be
repainted.Hand sanding file, double–action
sander, #240, #320, #400, #600
sandpaper, wax grease and re-
mover, shop towels.Sand the repair area by hand with #240
sandpaper until it’s level. Sand the whole
area to repainted with #320– 600 sandpaper.
Clean with wax and grease remover..
8. Top–coat the
whole area to re-
painted.
Acrylic urethane resin top coat
paint, hardener, and thinner.
S Mix and thin the paint according
to the manufacturer’s directions.
Apply 2–4 coats, allowing sufficient flash time
between coats.
Force dry at 60–70�C(140–158�F) for at
least 30 minutes.Spray to
a thick-
ness of
40–50
microns.
Page 2621 of 2643

NUBIRA/LACETTIRUST PREVENTION 10–3
2. RUST PREVENTIVE PROCEDURE
2–1. GENERAL INFORMATION
.
Corrosion starts immediately after the steel base con-
tacts the atmosphere. The condition is aggravated by
sea wind, road salt, rain, snow and industrial fallout.
There are many ways to protect automobiles against
corrosion. Primers, primer surfacers and paints are ap-
plied by electrodeposition or spray to protect the car
body.Anti–rust Agents and Spray Guns
Use the following anti–rust agents or equivalents when
making a body repair.
.
CAUTION : ANTI–RUST agents contain substances
that are harmful if you breathe or swallow them, or get
them on your skin. Wear converalls, gloves, eye
protection, and an approved respirator while using
such agents.
.
.
Anti–rust agents:
RUSTOP
DEOX #100
WAXOYL
U.S.A. MARKET
AUTO ARMOR 1031
(made by E.C.P)To be applied to welded joints
inside body panels.
NOX–RUST 409–20S
SOLTION 1000SAUTO ARMOR OUTSIDE COATING
(made by E.C.P)To be appled to under floor
and wheelhouse.
Spray guns:
Use the correct gun for the agent being used.
S Use of a pressure type spray gun is recommended when
work involves a considerable number of cars.
For RUSTOP
DEOX#100For WAXOYLFor NOXRUST 409–20S/
SOLTION 1000S
Protectors: Wear gloves, mask and suitable eye protection.
S Use light oil and a rag to clean up spilled anti–rust agents.