Page 996 of 2643

AUTOMATIC TRANSAXLE DRIVE AXLE 3A – 7
DAEWOO V–121 BL4
UNIT REPAIR
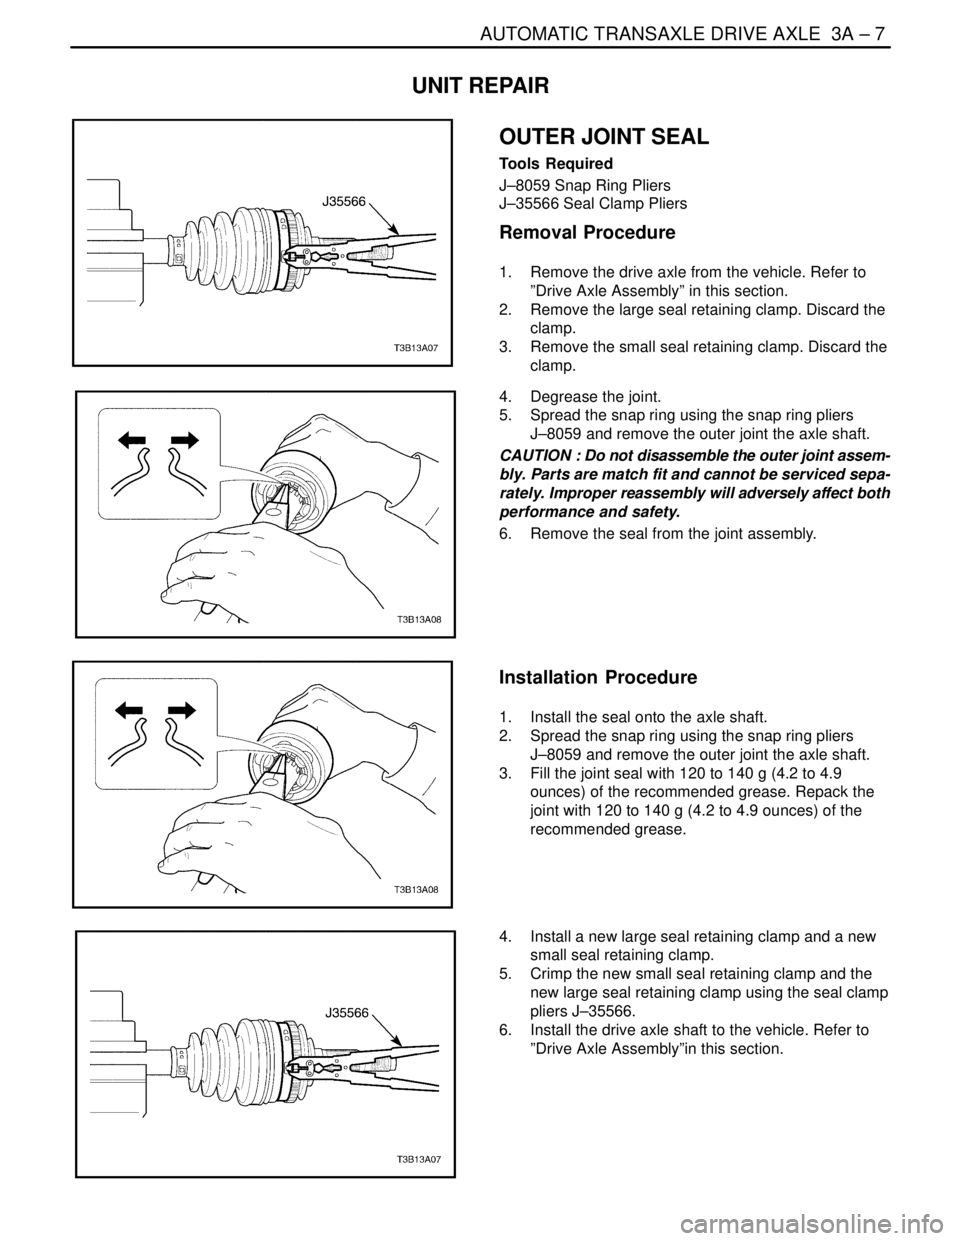
OUTER JOINT SEAL
Tools Required
J–8059 Snap Ring Pliers
J–35566 Seal Clamp Pliers
Removal Procedure
1. Remove the drive axle from the vehicle. Refer to
”Drive Axle Assembly” in this section.
2. Remove the large seal retaining clamp. Discard the
clamp.
3. Remove the small seal retaining clamp. Discard the
clamp.
4. Degrease the joint.
5. Spread the snap ring using the snap ring pliers
J–8059 and remove the outer joint the axle shaft.
CAUTION : Do not disassemble the outer joint assem-
bly. Parts are match fit and cannot be serviced sepa-
rately. Improper reassembly will adversely affect both
performance and safety.
6. Remove the seal from the joint assembly.
Installation Procedure
1. Install the seal onto the axle shaft.
2. Spread the snap ring using the snap ring pliers
J–8059 and remove the outer joint the axle shaft.
3. Fill the joint seal with 120 to 140 g (4.2 to 4.9
ounces) of the recommended grease. Repack the
joint with 120 to 140 g (4.2 to 4.9 ounces) of the
recommended grease.
4. Install a new large seal retaining clamp and a new
small seal retaining clamp.
5. Crimp the new small seal retaining clamp and the
new large seal retaining clamp using the seal clamp
pliers J–35566.
6. Install the drive axle shaft to the vehicle. Refer to
”Drive Axle Assembly”in this section.
Page 997 of 2643
3A – 8IAUTOMATIC TRANSAXLE DRIVE AXLE
DAEWOO V–121 BL4
INNER TRIPOT SEAL
Tools Required
J–35566 Snap Ring Pliers
J–8059 Snap Ring Pliers
Removal Procedure
1. Remove the drive axle from the vehicle. Refer to
”Drive Axle” in this section.
2. Remove the large seal retaining clamp. Discard the
clamp.
3. Remove the small seal retaining clamp. Discard the
clamp.
4. Separate the joint housing from the boot.
5. Degrease the tripot assembly.
6. Remove the shaft retaining ring using the snap ring
pliers J–8059.
7. Remove the tripot and the tripot joint retaining ring
from the axle shaft.
8. Remove the tripot joint seal from the axle shaft.
Page 998 of 2643
AUTOMATIC TRANSAXLE DRIVE AXLE 3A – 9
DAEWOO V–121 BL4
Installation Procedure
Tools Required
J–8059 Snap Ring Pliers
J–35566 Seal Clamp Pliers
1. Install a new small seal retaining clamp onto the
seal.
2. Install the seal onto the axle shaft.
3. Install the shaft retaining ring onto the axle shaft
using the snap ring pliers J–8059.
4. Fill the tripot housing with 195 to 215 g (6.9 to 7.6
ounces) of the recommended grease. Repack the
tripot with 195 to 215 g (6.9 to 7.6 ounces) of the
recommended grease.
5. Install the boot to the joint housing.
6. Install a new large seal retaining clamp. Crimp the
large seal retaining clamp using the seal clamp pli-
ers J–35566.
7. Crimp the new small seal retaining clamp using the
seal clamp pliers J–35566.
8. Install the drive axle shaft to the vehicle. Refer to
”Drive Axle Assembly” in this section.
Page 1001 of 2643
3B – 2IMANUAL TRANSAXLE DRIVE AXLE
DAEWOO V–121 BL4
SPECIAL TOOLS
SPECIAL TOOLS TABLE
J–8059
Snap Ring Pliers
KM–507–B
Ball Joint Remover
KM–460–A
Axle Shaft Remover
J–35566
Seal Clamp Pliers
COMPONENT LOCATOR
FRONT DRIVE AXLE
Page 1002 of 2643
MANUAL TRANSAXLE DRIVE AXLE 3B – 3
DAEWOO V–121 BL4
1. Caulking Nut
2. C/V Joint
3. Axle Shaft
4. Seal Retaining Clamp
5. Drive Axle Outboard Seal
6. Seal Retaining Clamp7. Seal Retaining Clamp
8. Drive Axle Inboard Seal
9. Seal Retaining Clamp
10. Race Retaining Ring
11. Cross Groove Joint
12. Retaining Ring
Page 1003 of 2643
3B – 4IMANUAL TRANSAXLE DRIVE AXLE
DAEWOO V–121 BL4
1. C/V Joint Assembly
2. C/V Joint
3. Seal Retaining Clamp
4. Drive Axle Outboard Seal
5. Seal Retaining Clamp
6. Axle Shaft7. Seal Retaining Clamp
8. Drive Axle Inboard Seal
9. Seal Retaining Clamp
10. Tripot Housing
11. Snap Ring
12. Tripot Joint Assembly
Page 1007 of 2643

3B – 8IMANUAL TRANSAXLE DRIVE AXLE
DAEWOO V–121 BL4
UNIT REPAIR
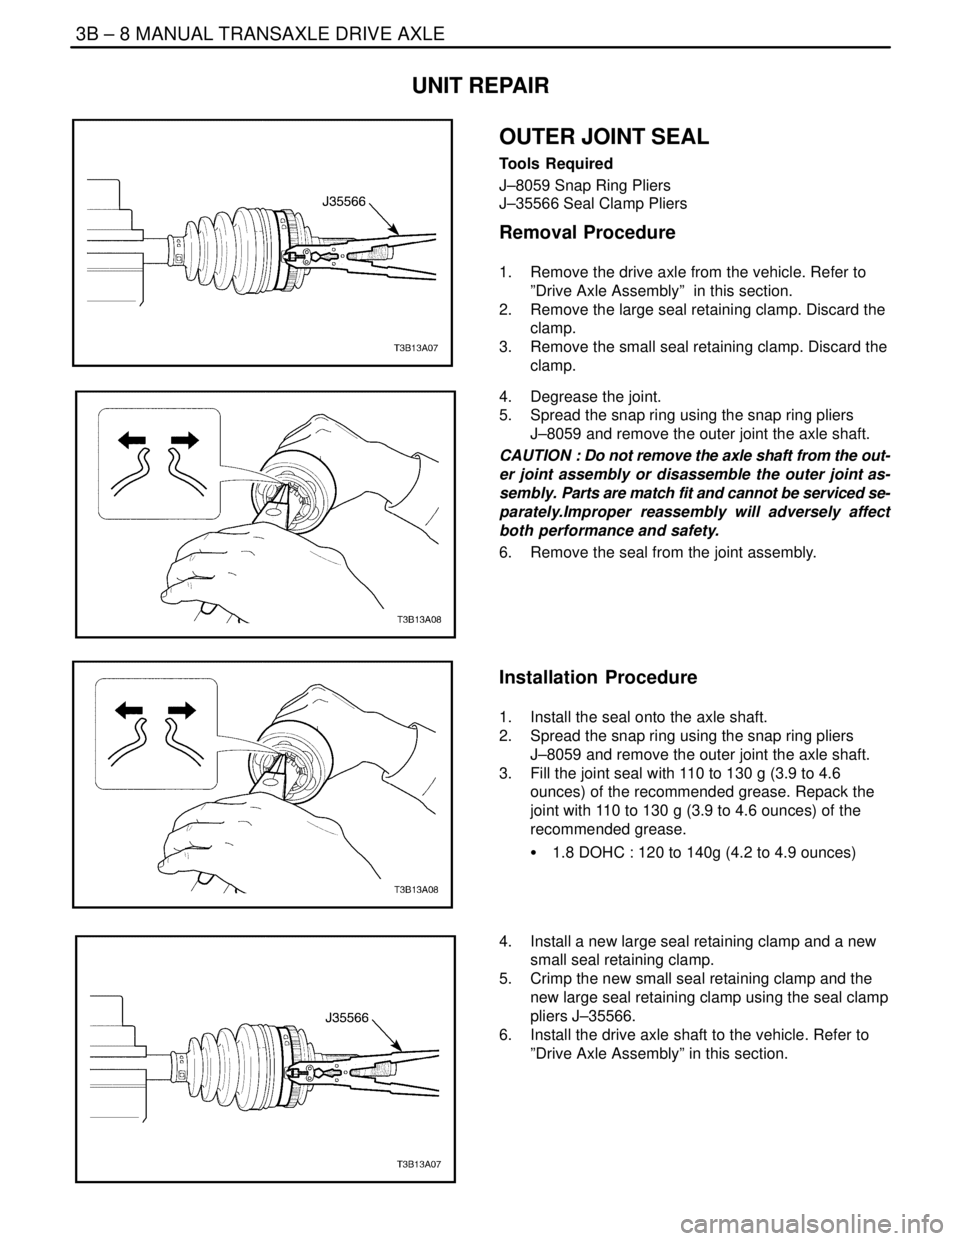
OUTER JOINT SEAL
Tools Required
J–8059 Snap Ring Pliers
J–35566 Seal Clamp Pliers
Removal Procedure
1. Remove the drive axle from the vehicle. Refer to
”Drive Axle Assembly” in this section.
2. Remove the large seal retaining clamp. Discard the
clamp.
3. Remove the small seal retaining clamp. Discard the
clamp.
4. Degrease the joint.
5. Spread the snap ring using the snap ring pliers
J–8059 and remove the outer joint the axle shaft.
CAUTION : Do not remove the axle shaft from the out-
er joint assembly or disassemble the outer joint as-
sembly. Parts are match fit and cannot be serviced se-
parately.Improper reassembly will adversely affect
both performance and safety.
6. Remove the seal from the joint assembly.
Installation Procedure
1. Install the seal onto the axle shaft.
2. Spread the snap ring using the snap ring pliers
J–8059 and remove the outer joint the axle shaft.
3. Fill the joint seal with 110 to 130 g (3.9 to 4.6
ounces) of the recommended grease. Repack the
joint with 110 to 130 g (3.9 to 4.6 ounces) of the
recommended grease.
S 1.8 DOHC : 120 to 140g (4.2 to 4.9 ounces)
4. Install a new large seal retaining clamp and a new
small seal retaining clamp.
5. Crimp the new small seal retaining clamp and the
new large seal retaining clamp using the seal clamp
pliers J–35566.
6. Install the drive axle shaft to the vehicle. Refer to
”Drive Axle Assembly” in this section.
Page 1008 of 2643
MANUAL TRANSAXLE DRIVE AXLE 3B – 9
DAEWOO V–121 BL4
INNER TRIPOT SEAL
Tools Required
J–35566 Snap Ring Pliers
J–8059 Snap Ring Pliers
Removal Procedure
1. Remove the drive axle from the vehicle. Refer to
”Drive Axle” in this section.
2. Remove the large seal retaining clamp. Discard the
clamp.
3. Remove the small seal retaining clamp. Discard the
clamp.
4. Separate the joint housing from the boot.
5. Degrease the tripot assembly.
6. Remove the shaft retaining ring using the snap ring
pliers J–8059.
7. Remove the tripot and the tripot joint retaining ring
from the axle shaft.
8. Remove the tripot joint seal from the axle shaft.