2004 DAEWOO LACETTI wheel
[x] Cancel search: wheelPage 908 of 2643

SECTION : 2B
WHEEL ALIGNMENT
TABLE OF CONTENTS
SPECIFICATIONS2B–1 . . . . . . . . . . . . . . . . . . . . . . . . . .
Wheel Alignment Specifications 2B–1. . . . . . . . . . . . . .
Fastener Tightening Specifications 2B–1. . . . . . . . . . .
DIAGNOSIS2B–2 . . . . . . . . . . . . . . . . . . . . . . . . . . . . . . . .
Tire Diagnosis 2B–2. . . . . . . . . . . . . . . . . . . . . . . . . . . . .
Radial Tire Lead/Pull 2B–3. . . . . . . . . . . . . . . . . . . . . . .
Vibration Diagnosis 2B–5. . . . . . . . . . . . . . . . . . . . . . . .
Preliminary Inspection 2B–8. . . . . . . . . . . . . . . . . . . . . .
Front Toe Adjustment 2B–8. . . . . . . . . . . . . . . . . . . . . .
Front Camber and Caster Check 2B–8. . . . . . . . . . . . .
Rear Camber Check 2B–8. . . . . . . . . . . . . . . . . . . . . . . Rear Toe Adjustment 2B–9. . . . . . . . . . . . . . . . . . . . . . .
GENERAL DESCRIPTION AND SYSTEM
OPERATION2B–10 . . . . . . . . . . . . . . . . . . . . . . . . . . . . .
Four Wheel Alignment 2B–10. . . . . . . . . . . . . . . . . . . . .
Toe 2B–10. . . . . . . . . . . . . . . . . . . . . . . . . . . . . . . . . . . . .
Caster 2B–10. . . . . . . . . . . . . . . . . . . . . . . . . . . . . . . . . .
Camber 2B–10. . . . . . . . . . . . . . . . . . . . . . . . . . . . . . . . .
Steering Axis Inclination 2B–10. . . . . . . . . . . . . . . . . . .
Included Angle 2B–10. . . . . . . . . . . . . . . . . . . . . . . . . . .
Scrub Radius 2B–10. . . . . . . . . . . . . . . . . . . . . . . . . . . .
Setback 2B–10. . . . . . . . . . . . . . . . . . . . . . . . . . . . . . . . .
Turning Angle 2B–10. . . . . . . . . . . . . . . . . . . . . . . . . . . .
SPECIFICATIONS
WHEEL ALIGNMENT SPECIFICATIONS
ApplicationFrontRear
Camber–0°20’ ± 45’–1°00’ ± 45’
Caster4°00’ ± 45’–
Toe–in (No person, full tank)0°00 ± 10’0°12’ ± 10’
FASTENER TIGHTENING SPECIFICATIONS
ApplicationNSmLb–FtLb–In
Rear Parallel Link–to–Crossmember Nut9066–
Page 909 of 2643

2B – 2IWHEEL ALIGNMENT
DAEWOO V–121 BL4
DIAGNOSIS
TIRE DIAGNOSIS
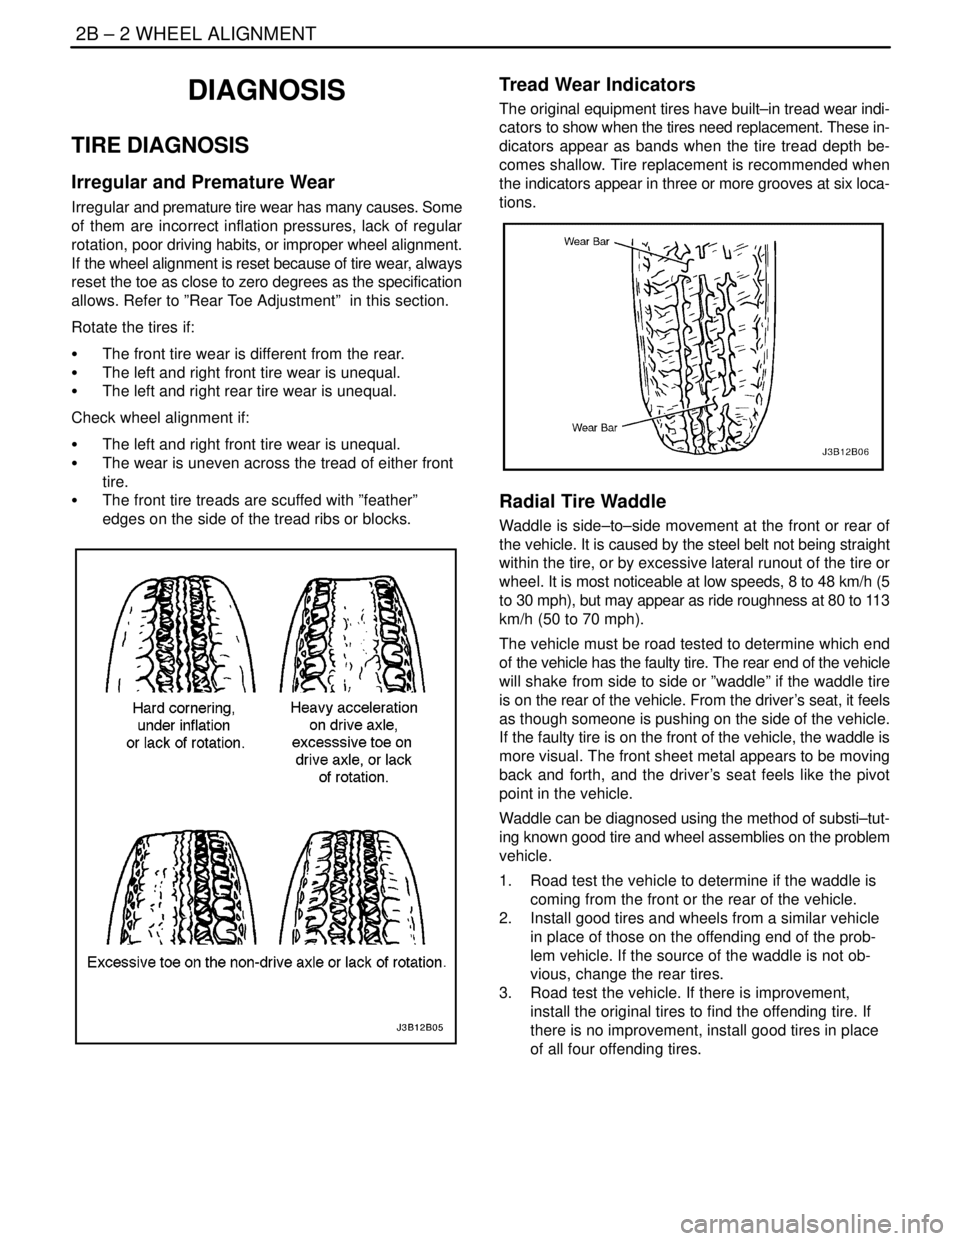
Irregular and Premature Wear
Irregular and premature tire wear has many causes. Some
of them are incorrect inflation pressures, lack of regular
rotation, poor driving habits, or improper wheel alignment.
If the wheel alignment is reset because of tire wear, always
reset the toe as close to zero degrees as the specification
allows. Refer to ”Rear Toe Adjustment” in this section.
Rotate the tires if:
S The front tire wear is different from the rear.
S The left and right front tire wear is unequal.
S The left and right rear tire wear is unequal.
Check wheel alignment if:
S The left and right front tire wear is unequal.
S The wear is uneven across the tread of either front
tire.
S The front tire treads are scuffed with ”feather”
edges on the side of the tread ribs or blocks.
Tread Wear Indicators
The original equipment tires have built–in tread wear indi-
cators to show when the tires need replacement. These in-
dicators appear as bands when the tire tread depth be-
comes shallow. Tire replacement is recommended when
the indicators appear in three or more grooves at six loca-
tions.
Radial Tire Waddle
Waddle is side–to–side movement at the front or rear of
the vehicle. It is caused by the steel belt not being straight
within the tire, or by excessive lateral runout of the tire or
wheel. It is most noticeable at low speeds, 8 to 48 km/h (5
to 30 mph), but may appear as ride roughness at 80 to 113
km/h (50 to 70 mph).
The vehicle must be road tested to determine which end
of the vehicle has the faulty tire. The rear end of the vehicle
will shake from side to side or ”waddle” if the waddle tire
is on the rear of the vehicle. From the driver’s seat, it feels
as though someone is pushing on the side of the vehicle.
If the faulty tire is on the front of the vehicle, the waddle is
more visual. The front sheet metal appears to be moving
back and forth, and the driver’s seat feels like the pivot
point in the vehicle.
Waddle can be diagnosed using the method of substi–tut-
ing known good tire and wheel assemblies on the problem
vehicle.
1. Road test the vehicle to determine if the waddle is
coming from the front or the rear of the vehicle.
2. Install good tires and wheels from a similar vehicle
in place of those on the offending end of the prob-
lem vehicle. If the source of the waddle is not ob-
vious, change the rear tires.
3. Road test the vehicle. If there is improvement,
install the original tires to find the offending tire. If
there is no improvement, install good tires in place
of all four offending tires.
Page 910 of 2643

WHEEL ALIGNMENT 2B – 3
DAEWOO V–121 BL4
4. Install original tires one at a time to find the offend-
ing tire.
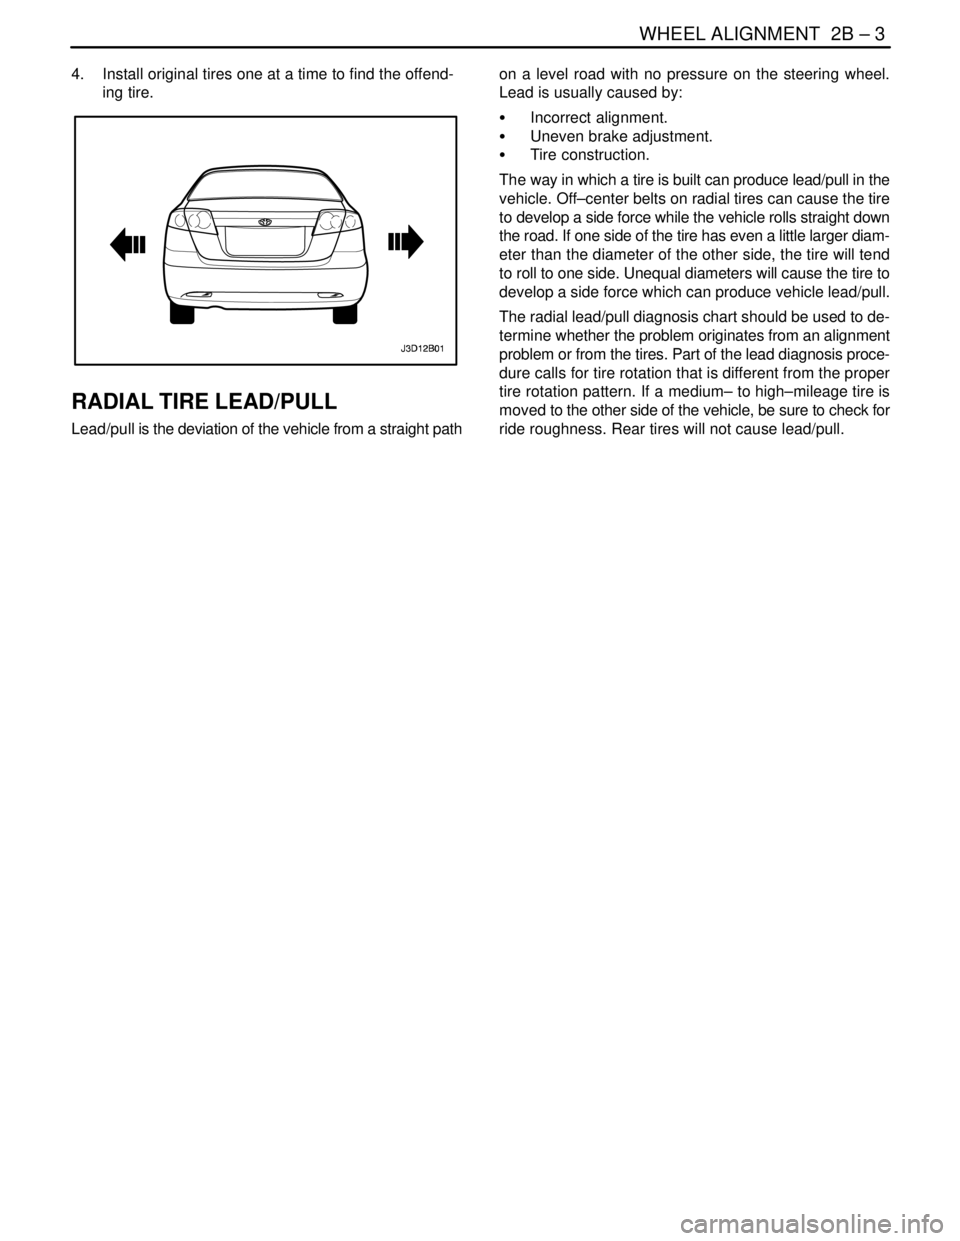
RADIAL TIRE LEAD/PULL
Lead/pull is the deviation of the vehicle from a straight pathon a level road with no pressure on the steering wheel.
Lead is usually caused by:
S Incorrect alignment.
S Uneven brake adjustment.
S Tire construction.
The way in which a tire is built can produce lead/pull in the
vehicle. Off–center belts on radial tires can cause the tire
to develop a side force while the vehicle rolls straight down
the road. If one side of the tire has even a little larger diam-
eter than the diameter of the other side, the tire will tend
to roll to one side. Unequal diameters will cause the tire to
develop a side force which can produce vehicle lead/pull.
The radial lead/pull diagnosis chart should be used to de-
termine whether the problem originates from an alignment
problem or from the tires. Part of the lead diagnosis proce-
dure calls for tire rotation that is different from the proper
tire rotation pattern. If a medium– to high–mileage tire is
moved to the other side of the vehicle, be sure to check for
ride roughness. Rear tires will not cause lead/pull.
Page 911 of 2643

2B – 4IWHEEL ALIGNMENT
DAEWOO V–121 BL4
Radial Tire Lead/Pull Diagnosis Chart
StepActionValue(s)YesNo
11. Perform wheel alignment preliminary inspec-
tion.
2. Check the brakes for dragging.
3. Road test the vehicle.
Does the vehicle lead/pull?–Go to Step 2System OK
21. Cross switch the front tire and wheel assem-
blies.
2. Road test the vehicle.
Does the vehicle lead/pull?–Go to Step 3System OK
3Check the front wheel alignment.
Is the alignment within specifications?–Go to Step 4Adjust
alignment
4Compare the front camber and front caster to speci-
fications.
Are they within specifications?–Go to Step 7Go to Step 5
5Check the vehicle frame.
Is the frame bent?–Go to Step 6Go to Step 1
6Straighten the frame.
Is the repair complete?–Go to Step 3–
71. The probable cause is the tires.
2. Switch the left front tire and wheel assembly
with the left rear tire and wheel assembly.
3. Road test the vehicle.
Does the vehicle still lead/pull?–Go to Step 9Go to Step 8
8Switch the left front tire and wheel assembly with the
left rear tire and wheel assembly and replace the left
front tire.
Is the repair complete?–System OKGo to Step 1
91. Switch the right front tire and wheel assembly
with the right rear tire and wheel assembly.
2. Road test the vehicle.
Does the vehicle still lead/pull?–Go to Step 1Go to Step 10
10Switch the right front tire and wheel assembly with
the right rear tire and wheel assembly and replace
the right front tire.
Is the repair complete?–System OKGo to Step 1
Page 912 of 2643

WHEEL ALIGNMENT 2B – 5
DAEWOO V–121 BL4
VIBRATION DIAGNOSIS
Wheel imbalance causes most highway speed vibration
problems. A vibration can remain after dynamic balancing
because:
S A tire is out of round.
S A rim is out of round.
S A tire stiffness variation exists.
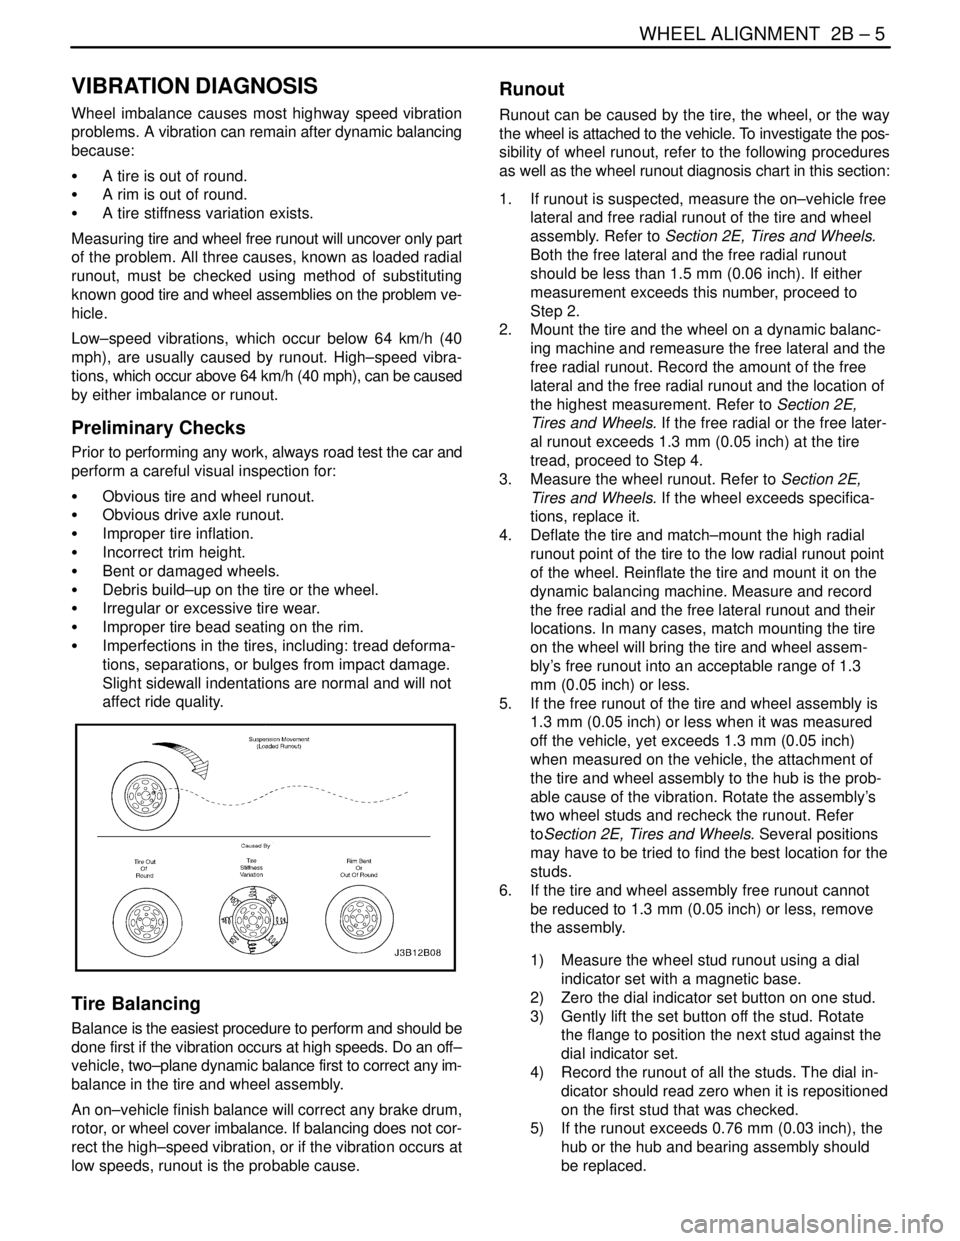
Measuring tire and wheel free runout will uncover only part
of the problem. All three causes, known as loaded radial
runout, must be checked using method of substituting
known good tire and wheel assemblies on the problem ve-
hicle.
Low–speed vibrations, which occur below 64 km/h (40
mph), are usually caused by runout. High–speed vibra-
tions, which occur above 64 km/h (40 mph), can be caused
by either imbalance or runout.
Preliminary Checks
Prior to performing any work, always road test the car and
perform a careful visual inspection for:
S Obvious tire and wheel runout.
S Obvious drive axle runout.
S Improper tire inflation.
S Incorrect trim height.
S Bent or damaged wheels.
S Debris build–up on the tire or the wheel.
S Irregular or excessive tire wear.
S Improper tire bead seating on the rim.
S Imperfections in the tires, including: tread deforma-
tions, separations, or bulges from impact damage.
Slight sidewall indentations are normal and will not
affect ride quality.
Tire Balancing
Balance is the easiest procedure to perform and should be
done first if the vibration occurs at high speeds. Do an off–
vehicle, two–plane dynamic balance first to correct any im-
balance in the tire and wheel assembly.
An on–vehicle finish balance will correct any brake drum,
rotor, or wheel cover imbalance. If balancing does not cor-
rect the high–speed vibration, or if the vibration occurs at
low speeds, runout is the probable cause.
Runout
Runout can be caused by the tire, the wheel, or the way
the wheel is attached to the vehicle. To investigate the pos-
sibility of wheel runout, refer to the following procedures
as well as the wheel runout diagnosis chart in this section:
1. If runout is suspected, measure the on–vehicle free
lateral and free radial runout of the tire and wheel
assembly. Refer to Section 2E, Tires and Wheels.
Both the free lateral and the free radial runout
should be less than 1.5 mm (0.06 inch). If either
measurement exceeds this number, proceed to
Step 2.
2. Mount the tire and the wheel on a dynamic balanc-
ing machine and remeasure the free lateral and the
free radial runout. Record the amount of the free
lateral and the free radial runout and the location of
the highest measurement. Refer to Section 2E,
Tires and Wheels. If the free radial or the free later-
al runout exceeds 1.3 mm (0.05 inch) at the tire
tread, proceed to Step 4.
3. Measure the wheel runout. Refer to Section 2E,
Tires and Wheels. If the wheel exceeds specifica-
tions, replace it.
4. Deflate the tire and match–mount the high radial
runout point of the tire to the low radial runout point
of the wheel. Reinflate the tire and mount it on the
dynamic balancing machine. Measure and record
the free radial and the free lateral runout and their
locations. In many cases, match mounting the tire
on the wheel will bring the tire and wheel assem-
bly’s free runout into an acceptable range of 1.3
mm (0.05 inch) or less.
5. If the free runout of the tire and wheel assembly is
1.3 mm (0.05 inch) or less when it was measured
off the vehicle, yet exceeds 1.3 mm (0.05 inch)
when measured on the vehicle, the attachment of
the tire and wheel assembly to the hub is the prob-
able cause of the vibration. Rotate the assembly’s
two wheel studs and recheck the runout. Refer
toSection 2E, Tires and Wheels. Several positions
may have to be tried to find the best location for the
studs.
6. If the tire and wheel assembly free runout cannot
be reduced to 1.3 mm (0.05 inch) or less, remove
the assembly.
1) Measure the wheel stud runout using a dial
indicator set with a magnetic base.
2) Zero the dial indicator set button on one stud.
3) Gently lift the set button off the stud. Rotate
the flange to position the next stud against the
dial indicator set.
4) Record the runout of all the studs. The dial in-
dicator should read zero when it is repositioned
on the first stud that was checked.
5) If the runout exceeds 0.76 mm (0.03 inch), the
hub or the hub and bearing assembly should
be replaced.
Page 913 of 2643

2B – 6IWHEEL ALIGNMENT
DAEWOO V–121 BL4
Whenever a tire is rotated on the wheel, or whenever a tire
or wheel is replaced, rebalance the assembly.
Wheel Runout Diagnosis Chart
StepActionValue(s)YesNo
1Road test the vehicle to verify the vibration com-
plaint.
Are the customer’s concerns verified?–Go to Step 2System OK
21. Perform a vibration diagnosis preliminary
check.
2. Repair any of the problems found.
Is the vibration still present?–Go to Step 3System OK
3Determine at what speed the vibration is present.
Is the vibration over 64 km/h (40 mph)?–Go to Step 4Go to Step 6
4Perform off–vehicle dynamic wheel balance.
Is the vibration still present?–Go to Step 5System OK
5Perform on–vehicle finish balance.
Is the vibration still present?–Go to Step 6System OK
6Perform free lateral and radial on–vehicle runout
check.
Does the runout match the value specified?1.5mm
(0.06 in.)Go to Step 4Go to Step 7
7Perform free lateral and free radial off–vehicle run-
out check.
Does the runout match the value specified?1.3mm
(0.05 in.)Go to Step 8Go to Step 12
81. Index the tire and wheel assembly on the
wheel studs.
2. Obtain the least amount of runout possible.
Does the runout match the value specified?0.76mm
(0.03 in.)Go to Step 9Go to Step 14
9Perform off–vehicle dynamic wheel balance.
Is the vibration still present?–Go to Step 10System OK
10Perform on–vehicle finish balance.
Is the vibration still present?–Go to Step 11System OK
111. Check for any engine driveline imbalance.
2. Thoroughly inspect the drive axles and the
constant velocity joints.
3. Repair any problems found.
Are the repairs complete?–Go to Step 1–
121. Match–mount the tire on the wheel.
2. Perform free lateral and free radial off–vehicle
runout check.
Does the runout match the value specified?1.5mm
(0.06 in.)Go to Step 9Go to Step 13
131. Dismount the tire from the wheel of the sus-
pected assembly.
2. Measure the runout of the wheel.
Does the runout match the value specified?0.8mm
(0.03 in.)Go to Step 15Go to Step 16
14Measure the hub flange runout.
Does the runout match the value specified?0.76mm
(0.03 in.)Go to Step 9Go to Step 17
15Replace the tire.
Is the repair complete?–Go to Step 1–
Page 914 of 2643

WHEEL ALIGNMENT 2B – 7
DAEWOO V–121 BL4
StepNo Yes Value(s) Action
16Replace the wheel.
Is the repair complete?–Go to Step 1–
17Replace the hub.
Is the repair complete?–Go to Step 1–
Page 915 of 2643

2B – 8IWHEEL ALIGNMENT
DAEWOO V–121 BL4
PRELIMINARY INSPECTION
ChecksAction
Check the tires for proper inflation pressures and normal
tread wear.Inflate the tires to the proper tire pressure. Replace the
tires as needed.
Check the wheel bearings for looseness.Tighten the axle nut to the proper specification. Replace
the strut wheel bearing as needed.
Check for loose ball joints and tie rod ends.Tighten the ball joints and the tie rods.
Check the runout of the wheels and the tires.Measure and correct the tire runout.
Check the vehicle trim heights.Correct the trim heights. Make the correction before ad-
justing the toe.
Check for loose rack and pinion mounting.Tighten the mounting brackets for the rack and pinion as-
sembly.
Check for improperly operating struts.Replace the strut assembly.
Check for loose control arms.Tighten the control arm attachment bolts. Replace the con-
trol arm bushings as needed.
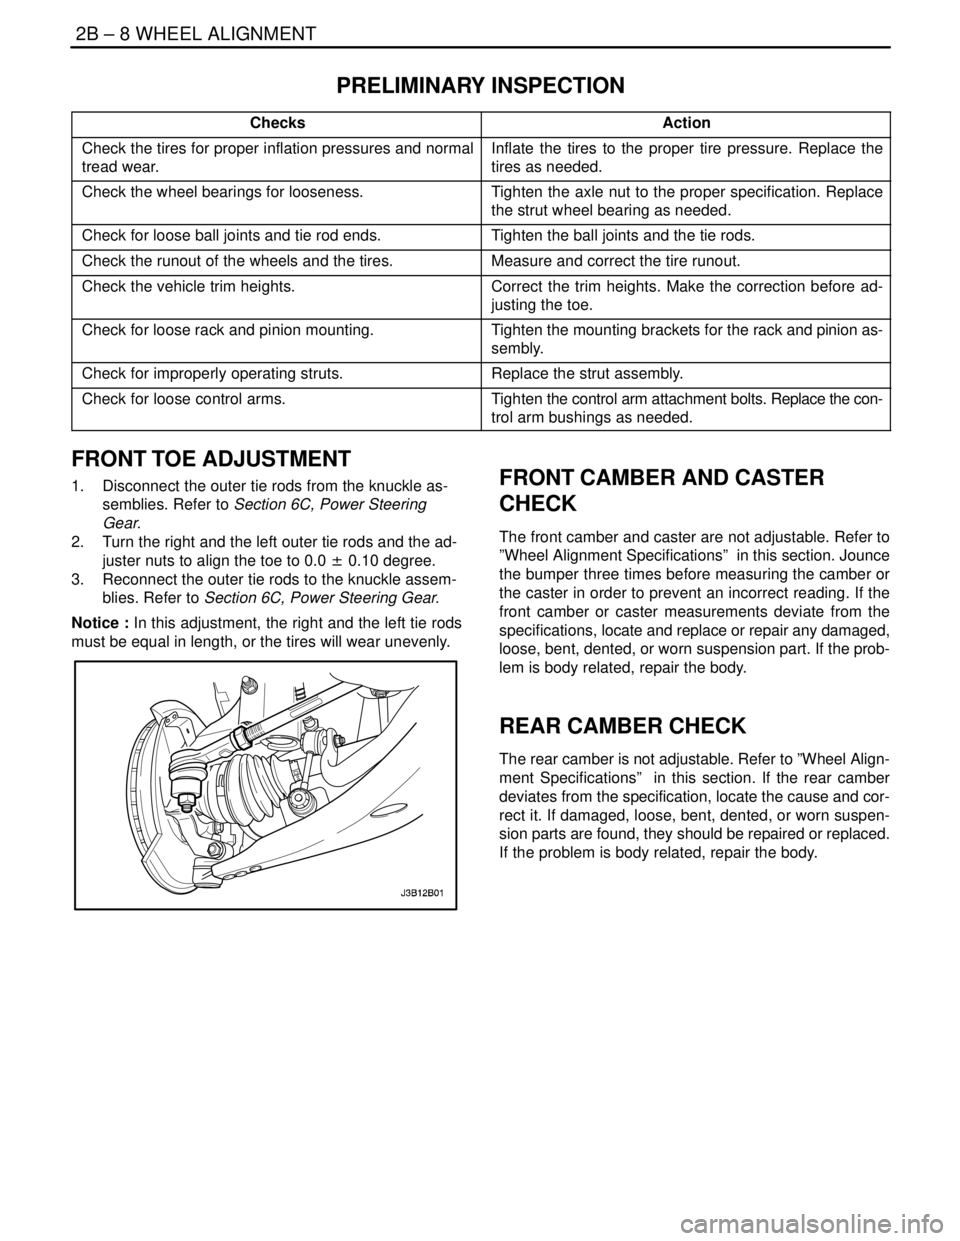
FRONT TOE ADJUSTMENT
1. Disconnect the outer tie rods from the knuckle as-
semblies. Refer to Section 6C, Power Steering
Gear.
2. Turn the right and the left outer tie rods and the ad-
juster nuts to align the toe to 0.0 ± 0.10 degree.
3. Reconnect the outer tie rods to the knuckle assem-
blies. Refer to Section 6C, Power Steering Gear.
Notice : In this adjustment, the right and the left tie rods
must be equal in length, or the tires will wear unevenly.FRONT CAMBER AND CASTER
CHECK
The front camber and caster are not adjustable. Refer to
”Wheel Alignment Specifications” in this section. Jounce
the bumper three times before measuring the camber or
the caster in order to prevent an incorrect reading. If the
front camber or caster measurements deviate from the
specifications, locate and replace or repair any damaged,
loose, bent, dented, or worn suspension part. If the prob-
lem is body related, repair the body.
REAR CAMBER CHECK
The rear camber is not adjustable. Refer to ”Wheel Align-
ment Specifications” in this section. If the rear camber
deviates from the specification, locate the cause and cor-
rect it. If damaged, loose, bent, dented, or worn suspen-
sion parts are found, they should be repaired or replaced.
If the problem is body related, repair the body.