Page 2026 of 2585
(3) Ensure the transaxle oil pan and transaxle
case sealing surfaces are clean and dry. Install an
1/8º bead of Mopar tSilicone Rubber Adhesive Seal-
ant to the oil pan and install (Fig. 347). Torque oil
pan-to-transaxle case bolts (Fig. 348) to 19 N´m (165
in. lbs.).
(4) Lower vehicle.
(5) Connect transmission range sensor connector.
(6) Install manual valve lever to manual shaft.
(7) Install gearshift cable to manual valve lever.
(8) Connect battery negative cable.
(9) Fill transaxle with MopartATF +4 Transmis-
sion fluid. (Refer to 21 - TRANSMISSION/TRANS-
AXLE/AUTOMATIC - 41TE/FLUID - STANDARD
PROCEDURE)
Fig. 348 Oil Pan Bolts
1 - OIL PAN BOLTS (USE RTV UNDER BOLT HEADS)
Fig. 347 Oil Pan
1 - OIL PAN
2 - 1/8 INCH BEAD OF RTV SEALANT
3 - OIL FILTER
RS 40TE AUTOMATIC TRANSAXLE21s - 165
VALVE BODY (Continued)
Page 2046 of 2585
(4) Install low/reverse piston retainer-to-case bolts
(Fig. 74) and torque to 5 N´m (45 in. lbs.).
NOTE: The Low/Reverse Clutch Piston has bonded
seals which are not individually serviceable. Seal
replacement requires replacement of the piston
assembly.
(5) Install low/reverse clutch piston (Fig. 75). (6) Assemble park guide bracket assembly (Fig.
77) (Fig. 76).
Fig. 74 Install Piston Retainer Attaching Screws
1 - LOW/REVERSE CLUTCH PISTON RETAINER
2 - SCREWDRIVER
3 - TORX-LOC SCREWS
Fig. 75 Install Low/Reverse Clutch Piston
1 - LOW/REVERSE CLUTCH PISTON
2 - BONDED SEAL
3 - BONDED SEAL
Fig. 76 Guide Bracket Disassembled
1 - ANTIRATCHET SPRING
2 - GUIDE BRACKET
3 - SPLIT SLEEVE
4 - SPACER
5-PAWL
6 - STEPPED SPACER
Fig. 77 Guide Bracket
1 - GUIDE BRACKET
2 - ANTIRATCHET SPRING (MUST BE ASSEMBLED AS SHOWN)
3-PAWL
RS 41TE AUTOMATIC TRANSAXLE21s - 185
41TE AUTOMATIC TRANSAXLE (Continued)
Page 2049 of 2585

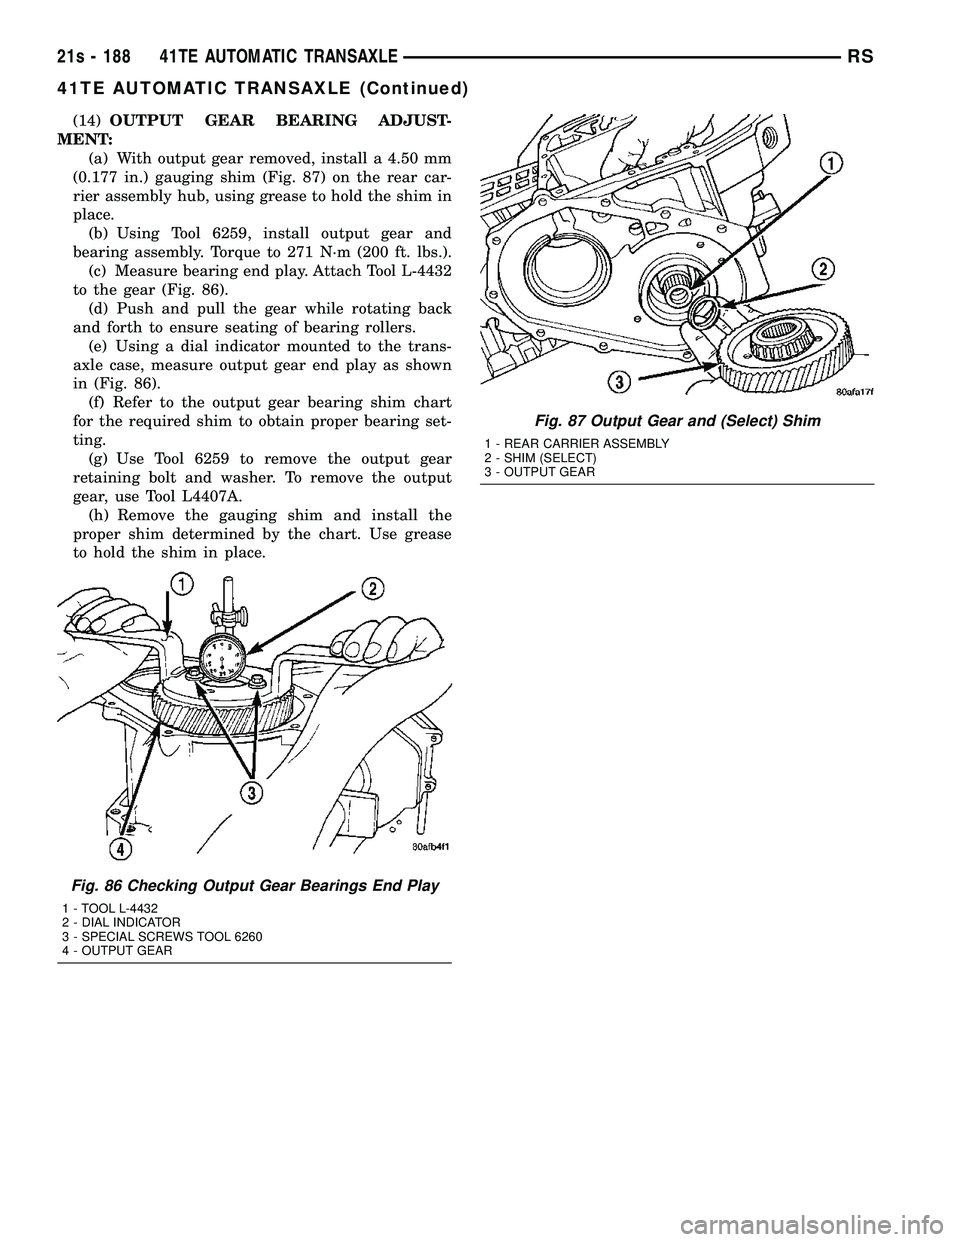
(14)OUTPUT GEAR BEARING ADJUST-
MENT: (a) With output gear removed, install a 4.50 mm
(0.177 in.) gauging shim (Fig. 87) on the rear car-
rier assembly hub, using grease to hold the shim in
place. (b) Using Tool 6259, install output gear and
bearing assembly. Torque to 271 N´m (200 ft. lbs.). (c) Measure bearing end play. Attach Tool L-4432
to the gear (Fig. 86). (d) Push and pull the gear while rotating back
and forth to ensure seating of bearing rollers. (e) Using a dial indicator mounted to the trans-
axle case, measure output gear end play as shown
in (Fig. 86). (f) Refer to the output gear bearing shim chart
for the required shim to obtain proper bearing set-
ting. (g) Use Tool 6259 to remove the output gear
retaining bolt and washer. To remove the output
gear, use Tool L4407A. (h) Remove the gauging shim and install the
proper shim determined by the chart. Use grease
to hold the shim in place.
Fig. 86 Checking Output Gear Bearings End Play
1 - TOOL L-4432
2 - DIAL INDICATOR
3 - SPECIAL SCREWS TOOL 6260
4 - OUTPUT GEAR
Fig. 87 Output Gear and (Select) Shim
1 - REAR CARRIER ASSEMBLY
2 - SHIM (SELECT)
3 - OUTPUT GEAR
21s - 188 41TE AUTOMATIC TRANSAXLERS
41TE AUTOMATIC TRANSAXLE (Continued)
Page 2051 of 2585

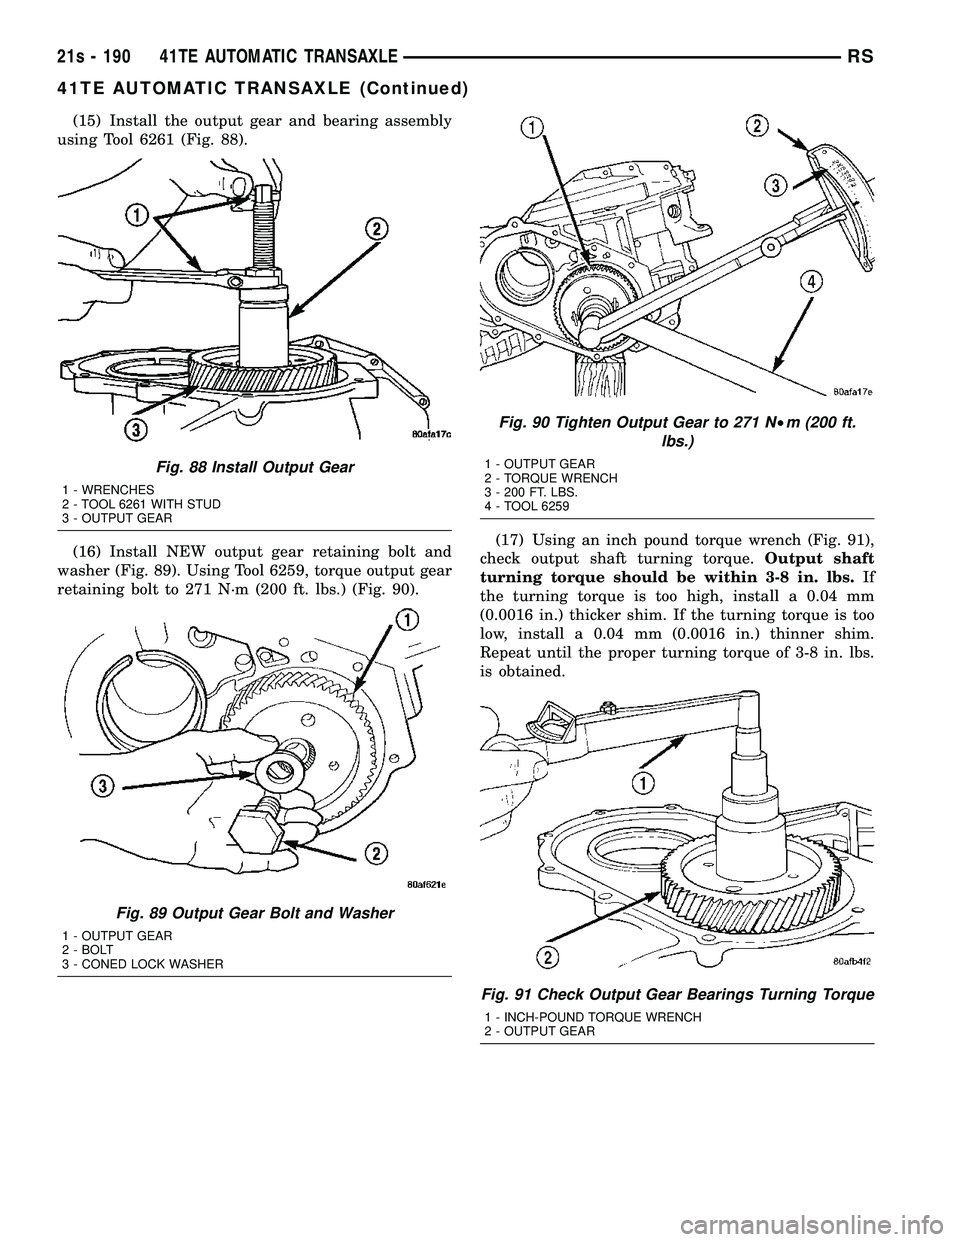
(15) Install the output gear and bearing assembly
using Tool 6261 (Fig. 88).
(16) Install NEW output gear retaining bolt and
washer (Fig. 89). Using Tool 6259, torque output gear
retaining bolt to 271 N´m (200 ft. lbs.) (Fig. 90). (17) Using an inch pound torque wrench (Fig. 91),
check output shaft turning torque. Output shaft
turning torque should be within 3-8 in. lbs. If
the turning torque is too high, install a 0.04 mm
(0.0016 in.) thicker shim. If the turning torque is too
low, install a 0.04 mm (0.0016 in.) thinner shim.
Repeat until the proper turning torque of 3-8 in. lbs.
is obtained.
Fig. 88 Install Output Gear
1 - WRENCHES
2 - TOOL 6261 WITH STUD
3 - OUTPUT GEAR
Fig. 89 Output Gear Bolt and Washer
1 - OUTPUT GEAR
2 - BOLT
3 - CONED LOCK WASHER
Fig. 90 Tighten Output Gear to 271 N²m (200 ft.
lbs.)
1 - OUTPUT GEAR
2 - TORQUE WRENCH
3 - 200 FT. LBS.
4 - TOOL 6259
Fig. 91 Check Output Gear Bearings Turning Torque
1 - INCH-POUND TORQUE WRENCH
2 - OUTPUT GEAR
21s - 190 41TE AUTOMATIC TRANSAXLERS
41TE AUTOMATIC TRANSAXLE (Continued)
Page 2052 of 2585
(18) Install output gear stirrup with serrated side
out (Fig. 92).
(19) Install retaining strap.
(20) Install strap bolts but do not tighten at this
time (Fig. 93). (21) Rotate stirrup clockwise against flats of
retaining bolt (Fig. 94).
(22) Torque stirrup strap bolts to 23 N´m (200 in.
lbs.) (Fig. 95).
Fig. 92 Install Stirrup
1 - STIRRUP
2 - OUTPUT GEAR RETAINING BOLT
Fig. 93 Install Strap Bolts
1 - RETAINING STRAP
2 - STIRRUP
3 - RETAINING STRAP BOLTS
Fig. 94 Turn Stirrup Clockwise Against Bolt Flats
1 - RETAINING STRAP
2 - STIRRUP
Fig. 95 Tighten Stirrup Strap Bolts To 23 N´m (200 in.) lbs.)
1 - RETAINING STRAP
2 - STIRRUP
RS 41TE AUTOMATIC TRANSAXLE21s - 191
41TE AUTOMATIC TRANSAXLE (Continued)
Page 2057 of 2585

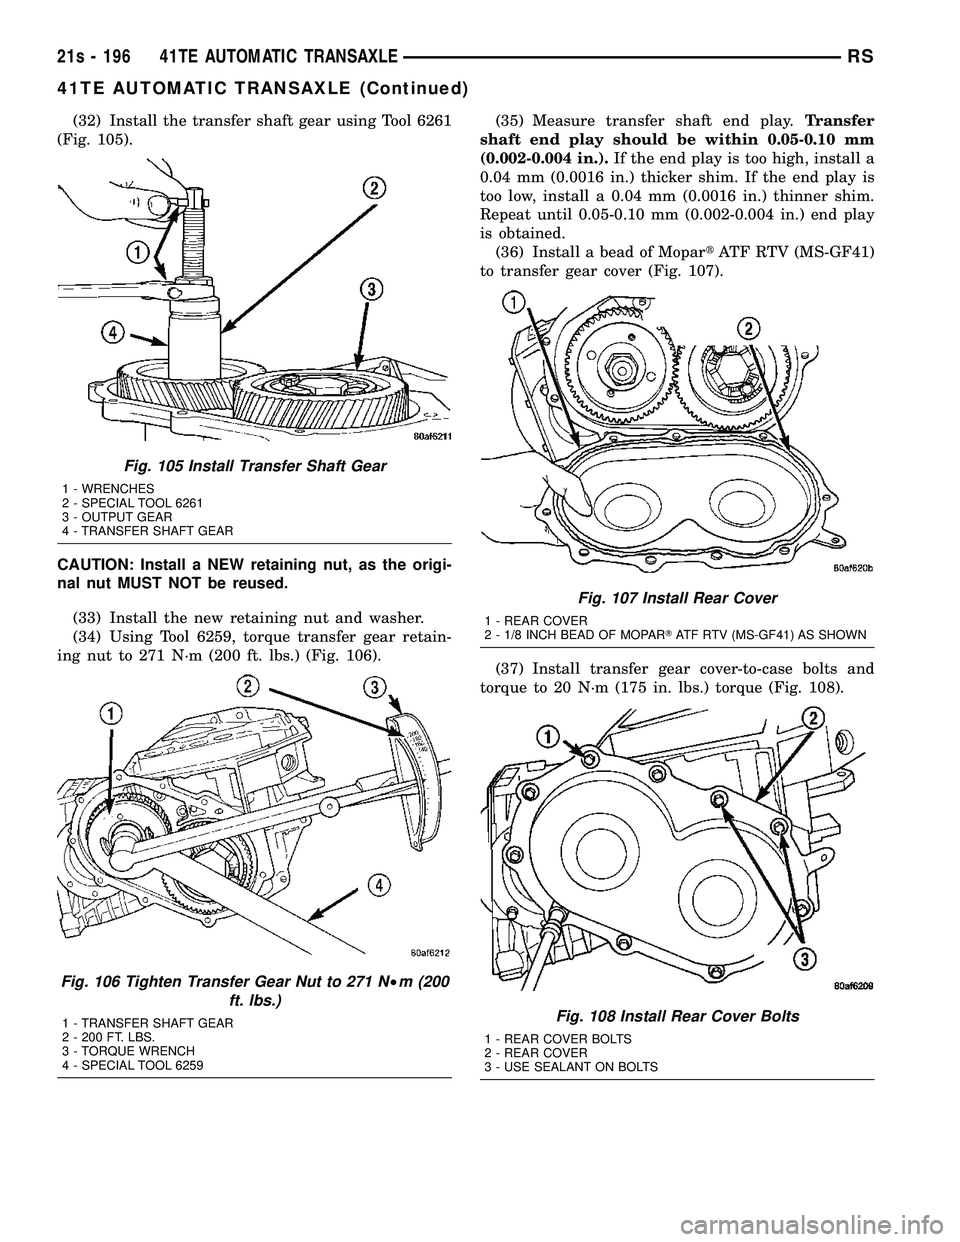
(32) Install the transfer shaft gear using Tool 6261
(Fig. 105).
CAUTION: Install a NEW retaining nut, as the origi-
nal nut MUST NOT be reused.
(33) Install the new retaining nut and washer.
(34) Using Tool 6259, torque transfer gear retain-
ing nut to 271 N´m (200 ft. lbs.) (Fig. 106). (35) Measure transfer shaft end play.
Transfer
shaft end play should be within 0.05-0.10 mm
(0.002-0.004 in.). If the end play is too high, install a
0.04 mm (0.0016 in.) thicker shim. If the end play is
too low, install a 0.04 mm (0.0016 in.) thinner shim.
Repeat until 0.05-0.10 mm (0.002-0.004 in.) end play
is obtained. (36) Install a bead of Mopar tATF RTV (MS-GF41)
to transfer gear cover (Fig. 107).
(37) Install transfer gear cover-to-case bolts and
torque to 20 N´m (175 in. lbs.) torque (Fig. 108).
Fig. 105 Install Transfer Shaft Gear
1 - WRENCHES
2 - SPECIAL TOOL 6261
3 - OUTPUT GEAR
4 - TRANSFER SHAFT GEAR
Fig. 106 Tighten Transfer Gear Nut to 271 N²m (200
ft. lbs.)
1 - TRANSFER SHAFT GEAR
2 - 200 FT. LBS.
3 - TORQUE WRENCH
4 - SPECIAL TOOL 6259
Fig. 107 Install Rear Cover
1 - REAR COVER
2 - 1/8 INCH BEAD OF MOPAR TATF RTV (MS-GF41) AS SHOWN
Fig. 108 Install Rear Cover Bolts
1 - REAR COVER BOLTS
2 - REAR COVER
3 - USE SEALANT ON BOLTS
21s - 196 41TE AUTOMATIC TRANSAXLERS
41TE AUTOMATIC TRANSAXLE (Continued)
Page 2062 of 2585

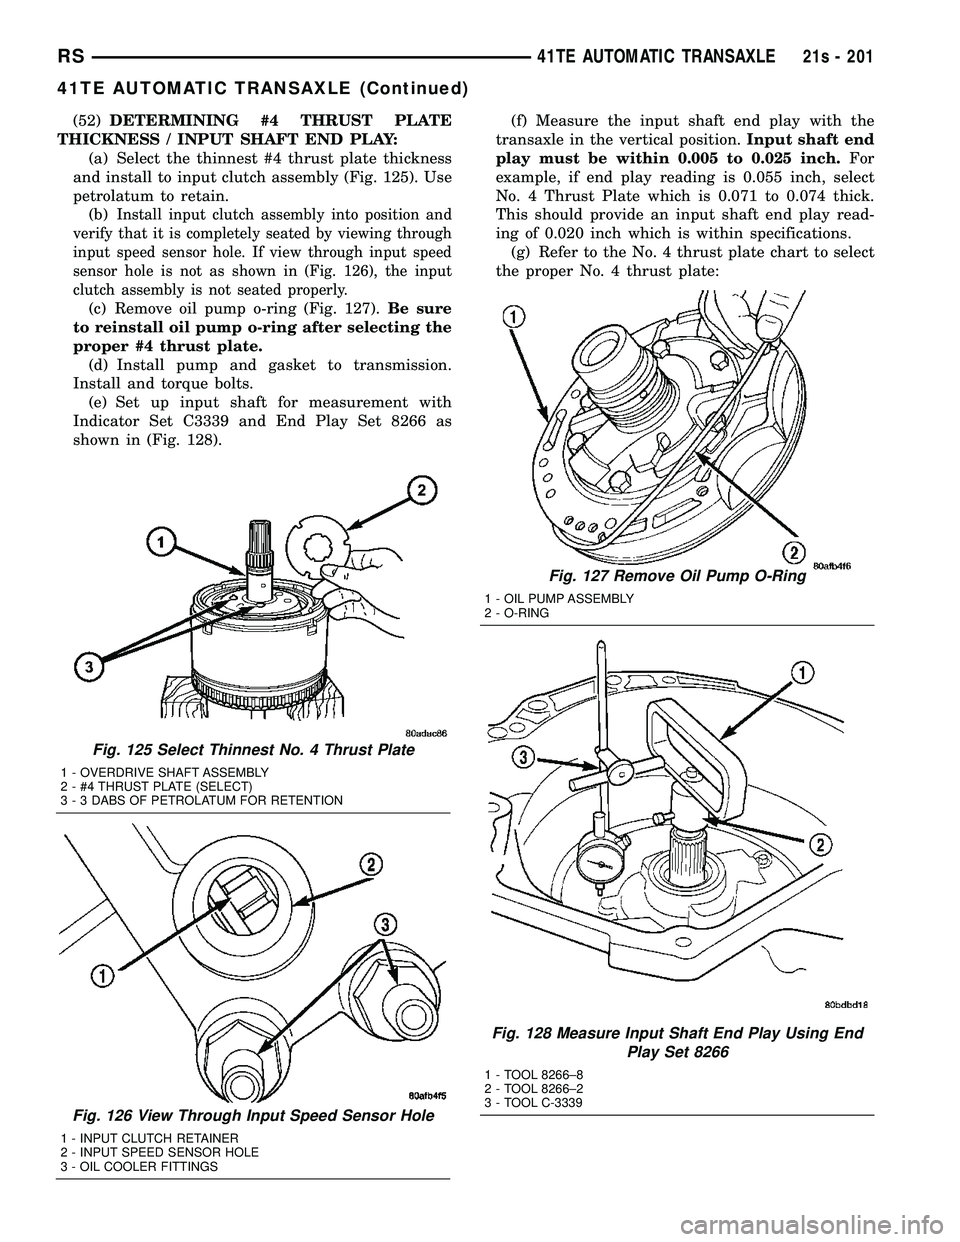
(52)DETERMINING #4 THRUST PLATE
THICKNESS / INPUT SHAFT END PLAY: (a) Select the thinnest #4 thrust plate thickness
and install to input clutch assembly (Fig. 125). Use
petrolatum to retain. (b)
Install input clutch assembly into position and
verify that it is completely seated by viewing through
input speed sensor hole. If view through input speed
sensor hole is not as shown in (Fig. 126), the input
clutch assembly is not seated properly.
(c) Remove oil pump o-ring (Fig. 127). Be sure
to reinstall oil pump o-ring after selecting the
proper #4 thrust plate. (d) Install pump and gasket to transmission.
Install and torque bolts. (e) Set up input shaft for measurement with
Indicator Set C3339 and End Play Set 8266 as
shown in (Fig. 128). (f) Measure the input shaft end play with the
transaxle in the vertical position. Input shaft end
play must be within 0.005 to 0.025 inch. For
example, if end play reading is 0.055 inch, select
No. 4 Thrust Plate which is 0.071 to 0.074 thick.
This should provide an input shaft end play read-
ing of 0.020 inch which is within specifications. (g) Refer to the No. 4 thrust plate chart to select
the proper No. 4 thrust plate:
Fig. 125 Select Thinnest No. 4 Thrust Plate
1 - OVERDRIVE SHAFT ASSEMBLY
2 - #4 THRUST PLATE (SELECT)
3 - 3 DABS OF PETROLATUM FOR RETENTION
Fig. 126 View Through Input Speed Sensor Hole
1 - INPUT CLUTCH RETAINER
2 - INPUT SPEED SENSOR HOLE
3 - OIL COOLER FITTINGS
Fig. 127 Remove Oil Pump O-Ring
1 - OIL PUMP ASSEMBLY
2 - O-RING
Fig. 128 Measure Input Shaft End Play Using End Play Set 8266
1 - TOOL 8266±8
2 - TOOL 8266±2
3 - TOOL C-3339
RS 41TE AUTOMATIC TRANSAXLE21s - 201
41TE AUTOMATIC TRANSAXLE (Continued)
Page 2064 of 2585
(57) Install oil pump assembly (Fig. 133).
(58) Install oil pump-to-case bolts and torque to 27
N´m (20 ft. lbs.) (Fig. 134). (59) Install low/reverse accumulator (Fig. 135).
(60) Install low/reverse accumulator plug (Fig.
136).
Fig. 133 Install Oil Pump
1 - OIL PUMP
2 - GASKET
Fig. 134 Install Pump-to-Case Bolts
1 - PUMP ATTACHING BOLTS
2 - PUMP HOUSING
Fig. 135 Low/Reverse Accumulator
1 - PISTON
2 - RETURN SPRINGS
Fig. 136 Install Low/Reverse Accumulator Plug (Cover)
1 - ADJUSTABLE PLIERS
2 - PLUG
RS 41TE AUTOMATIC TRANSAXLE21s - 203
41TE AUTOMATIC TRANSAXLE (Continued)