2004 CHRYSLER VOYAGER Temperature
[x] Cancel search: TemperaturePage 2426 of 2585
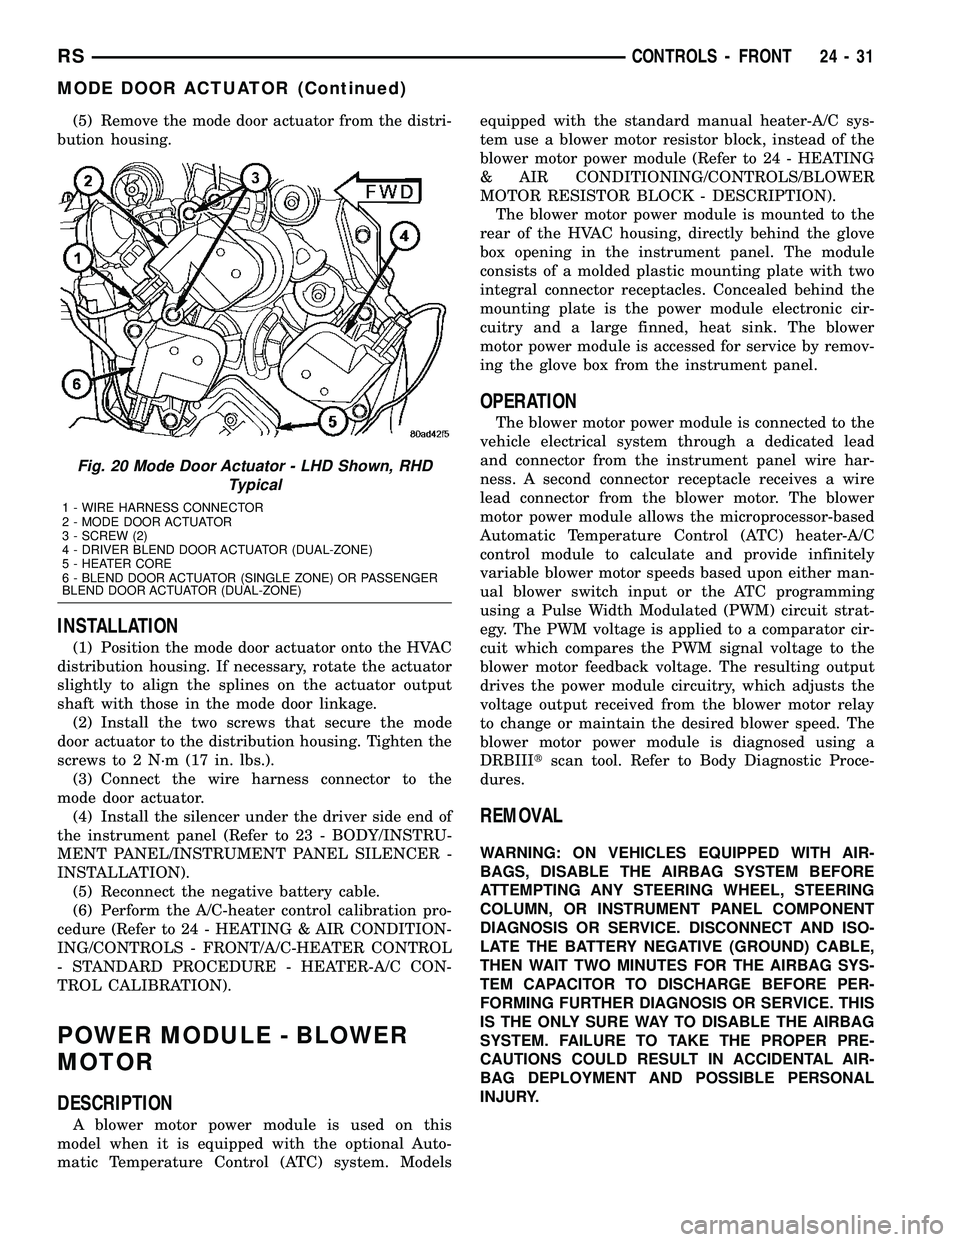
(5) Remove the mode door actuator from the distri-
bution housing.
INSTALLATION
(1) Position the mode door actuator onto the HVAC
distribution housing. If necessary, rotate the actuator
slightly to align the splines on the actuator output
shaft with those in the mode door linkage.
(2) Install the two screws that secure the mode
door actuator to the distribution housing. Tighten the
screws to 2 N´m (17 in. lbs.).
(3) Connect the wire harness connector to the
mode door actuator.
(4) Install the silencer under the driver side end of
the instrument panel (Refer to 23 - BODY/INSTRU-
MENT PANEL/INSTRUMENT PANEL SILENCER -
INSTALLATION).
(5) Reconnect the negative battery cable.
(6) Perform the A/C-heater control calibration pro-
cedure (Refer to 24 - HEATING & AIR CONDITION-
ING/CONTROLS - FRONT/A/C-HEATER CONTROL
- STANDARD PROCEDURE - HEATER-A/C CON-
TROL CALIBRATION).
POWER MODULE - BLOWER
MOTOR
DESCRIPTION
A blower motor power module is used on this
model when it is equipped with the optional Auto-
matic Temperature Control (ATC) system. Modelsequipped with the standard manual heater-A/C sys-
tem use a blower motor resistor block, instead of the
blower motor power module (Refer to 24 - HEATING
& AIR CONDITIONING/CONTROLS/BLOWER
MOTOR RESISTOR BLOCK - DESCRIPTION).
The blower motor power module is mounted to the
rear of the HVAC housing, directly behind the glove
box opening in the instrument panel. The module
consists of a molded plastic mounting plate with two
integral connector receptacles. Concealed behind the
mounting plate is the power module electronic cir-
cuitry and a large finned, heat sink. The blower
motor power module is accessed for service by remov-
ing the glove box from the instrument panel.
OPERATION
The blower motor power module is connected to the
vehicle electrical system through a dedicated lead
and connector from the instrument panel wire har-
ness. A second connector receptacle receives a wire
lead connector from the blower motor. The blower
motor power module allows the microprocessor-based
Automatic Temperature Control (ATC) heater-A/C
control module to calculate and provide infinitely
variable blower motor speeds based upon either man-
ual blower switch input or the ATC programming
using a Pulse Width Modulated (PWM) circuit strat-
egy. The PWM voltage is applied to a comparator cir-
cuit which compares the PWM signal voltage to the
blower motor feedback voltage. The resulting output
drives the power module circuitry, which adjusts the
voltage output received from the blower motor relay
to change or maintain the desired blower speed. The
blower motor power module is diagnosed using a
DRBIIItscan tool. Refer to Body Diagnostic Proce-
dures.
REMOVAL
WARNING: ON VEHICLES EQUIPPED WITH AIR-
BAGS, DISABLE THE AIRBAG SYSTEM BEFORE
ATTEMPTING ANY STEERING WHEEL, STEERING
COLUMN, OR INSTRUMENT PANEL COMPONENT
DIAGNOSIS OR SERVICE. DISCONNECT AND ISO-
LATE THE BATTERY NEGATIVE (GROUND) CABLE,
THEN WAIT TWO MINUTES FOR THE AIRBAG SYS-
TEM CAPACITOR TO DISCHARGE BEFORE PER-
FORMING FURTHER DIAGNOSIS OR SERVICE. THIS
IS THE ONLY SURE WAY TO DISABLE THE AIRBAG
SYSTEM. FAILURE TO TAKE THE PROPER PRE-
CAUTIONS COULD RESULT IN ACCIDENTAL AIR-
BAG DEPLOYMENT AND POSSIBLE PERSONAL
INJURY.
Fig. 20 Mode Door Actuator - LHD Shown, RHD
Typical
1 - WIRE HARNESS CONNECTOR
2 - MODE DOOR ACTUATOR
3 - SCREW (2)
4 - DRIVER BLEND DOOR ACTUATOR (DUAL-ZONE)
5 - HEATER CORE
6 - BLEND DOOR ACTUATOR (SINGLE ZONE) OR PASSENGER
BLEND DOOR ACTUATOR (DUAL-ZONE)
RSCONTROLS - FRONT24-31
MODE DOOR ACTUATOR (Continued)
Page 2429 of 2585
CONTROLS - REAR
TABLE OF CONTENTS
page page
A/C-HEATER CONTROL
DESCRIPTION.........................34
OPERATION...........................34
REMOVAL.............................34
INSTALLATION.........................35
BLEND DOOR ACTUATOR
DESCRIPTION.........................35
OPERATION...........................35
REMOVAL.............................36
INSTALLATION.........................36
BLOWER MOTOR RELAY
DESCRIPTION.........................37
OPERATION...........................37
REMOVAL.............................38
INSTALLATION.........................38
BLOWER MOTOR RESISTOR
DESCRIPTION.........................38OPERATION...........................38
DIAGNOSIS AND TESTING - REAR BLOWER
MOTOR RESISTOR BLOCK..............38
REMOVAL.............................39
INSTALLATION.........................39
MODE DOOR ACTUATOR - REAR
DESCRIPTION.........................39
OPERATION...........................40
REMOVAL.............................40
INSTALLATION.........................40
POWER MODULE - REAR BLOWER MOTOR
DESCRIPTION.........................41
OPERATION...........................41
REMOVAL.............................41
INSTALLATION.........................42
A/C-HEATER CONTROL
DESCRIPTION
The rear heater-A/C system is controlled by rotary-
type blower motor and temperature controls, cen-
trally mounted in the headliner. The rear A/C-heater
control allows selection of three blower motor speeds
and an Off position when the center knob on the
front A/C-heater control is set to the Rear position,
otherwise the front unit controls both front and rear
heater-A/C operation.
OPERATION
With the rear A/C-heater control active, tempera-
ture selection dictates the air distribution mode (floor
or overhead air) of the rear unit. A cool temperature
setting directs flow to the overhead outlets and a
warm temperature setting to the floor. Refer to Body
Diagnostic Procedures for further diagnostic informa-
tion.
REMOVAL
(1) Disconnect and isolate the battery negative
cable.
(2) Using a trim stick or another suitable wide flat
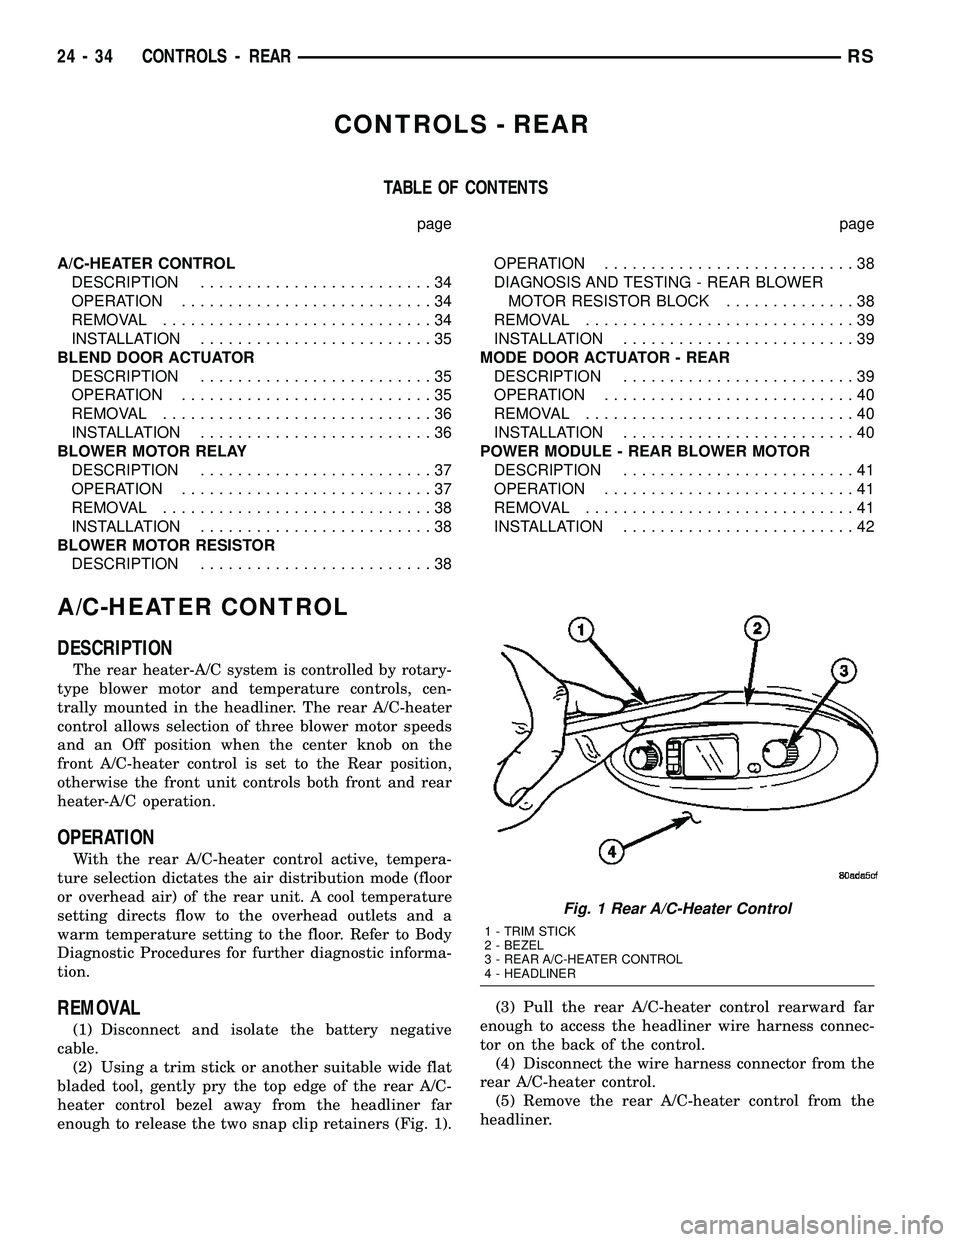
bladed tool, gently pry the top edge of the rear A/C-
heater control bezel away from the headliner far
enough to release the two snap clip retainers (Fig. 1).(3) Pull the rear A/C-heater control rearward far
enough to access the headliner wire harness connec-
tor on the back of the control.
(4) Disconnect the wire harness connector from the
rear A/C-heater control.
(5) Remove the rear A/C-heater control from the
headliner.
Fig. 1 Rear A/C-Heater Control
1 - TRIM STICK
2 - BEZEL
3 - REAR A/C-HEATER CONTROL
4 - HEADLINER
24 - 34 CONTROLS - REARRS
Page 2430 of 2585
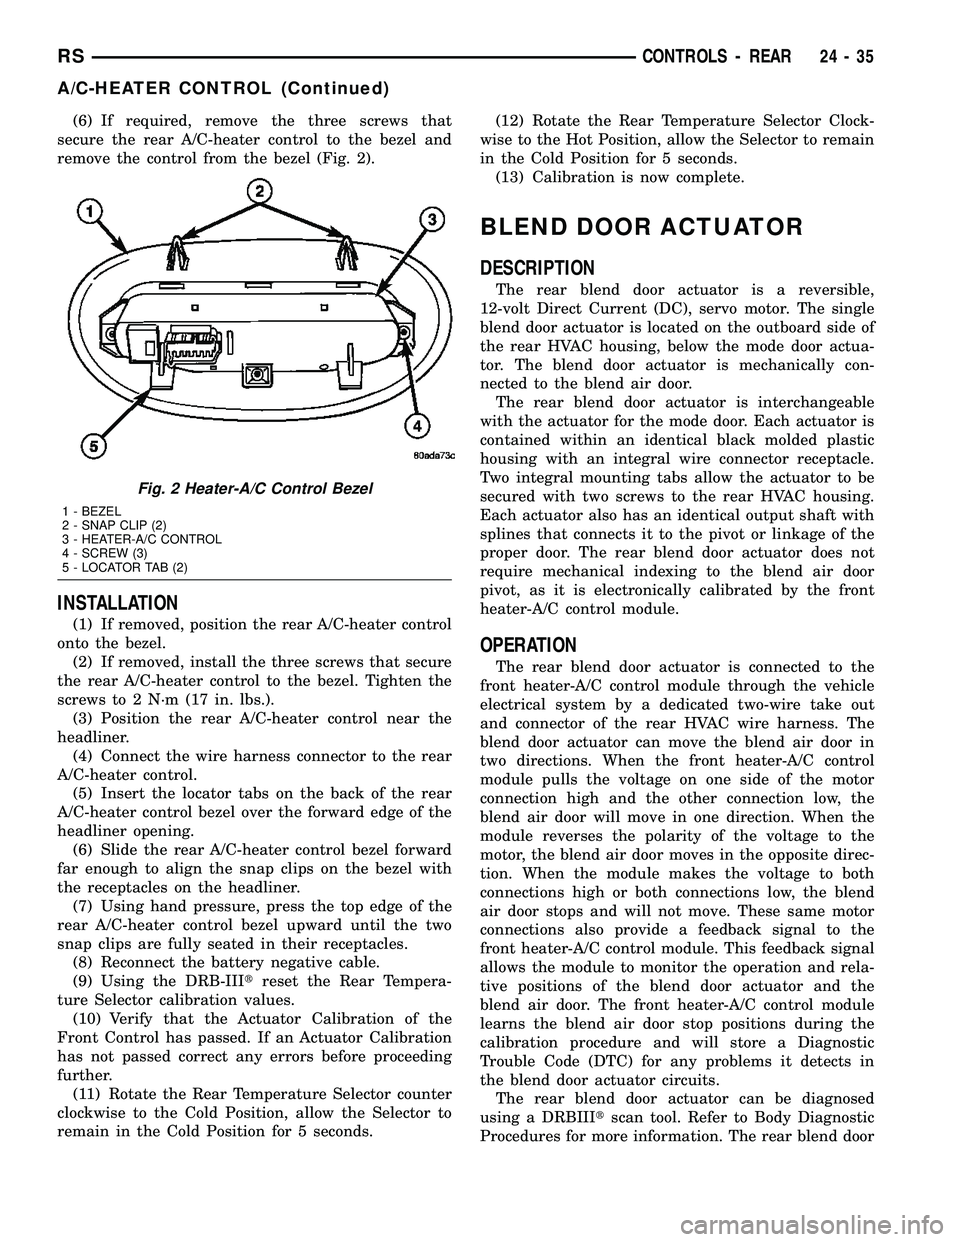
(6) If required, remove the three screws that
secure the rear A/C-heater control to the bezel and
remove the control from the bezel (Fig. 2).
INSTALLATION
(1) If removed, position the rear A/C-heater control
onto the bezel.
(2) If removed, install the three screws that secure
the rear A/C-heater control to the bezel. Tighten the
screws to 2 N´m (17 in. lbs.).
(3) Position the rear A/C-heater control near the
headliner.
(4) Connect the wire harness connector to the rear
A/C-heater control.
(5) Insert the locator tabs on the back of the rear
A/C-heater control bezel over the forward edge of the
headliner opening.
(6) Slide the rear A/C-heater control bezel forward
far enough to align the snap clips on the bezel with
the receptacles on the headliner.
(7) Using hand pressure, press the top edge of the
rear A/C-heater control bezel upward until the two
snap clips are fully seated in their receptacles.
(8) Reconnect the battery negative cable.
(9) Using the DRB-IIItreset the Rear Tempera-
ture Selector calibration values.
(10) Verify that the Actuator Calibration of the
Front Control has passed. If an Actuator Calibration
has not passed correct any errors before proceeding
further.
(11) Rotate the Rear Temperature Selector counter
clockwise to the Cold Position, allow the Selector to
remain in the Cold Position for 5 seconds.(12) Rotate the Rear Temperature Selector Clock-
wise to the Hot Position, allow the Selector to remain
in the Cold Position for 5 seconds.
(13) Calibration is now complete.
BLEND DOOR ACTUATOR
DESCRIPTION
The rear blend door actuator is a reversible,
12-volt Direct Current (DC), servo motor. The single
blend door actuator is located on the outboard side of
the rear HVAC housing, below the mode door actua-
tor. The blend door actuator is mechanically con-
nected to the blend air door.
The rear blend door actuator is interchangeable
with the actuator for the mode door. Each actuator is
contained within an identical black molded plastic
housing with an integral wire connector receptacle.
Two integral mounting tabs allow the actuator to be
secured with two screws to the rear HVAC housing.
Each actuator also has an identical output shaft with
splines that connects it to the pivot or linkage of the
proper door. The rear blend door actuator does not
require mechanical indexing to the blend air door
pivot, as it is electronically calibrated by the front
heater-A/C control module.
OPERATION
The rear blend door actuator is connected to the
front heater-A/C control module through the vehicle
electrical system by a dedicated two-wire take out
and connector of the rear HVAC wire harness. The
blend door actuator can move the blend air door in
two directions. When the front heater-A/C control
module pulls the voltage on one side of the motor
connection high and the other connection low, the
blend air door will move in one direction. When the
module reverses the polarity of the voltage to the
motor, the blend air door moves in the opposite direc-
tion. When the module makes the voltage to both
connections high or both connections low, the blend
air door stops and will not move. These same motor
connections also provide a feedback signal to the
front heater-A/C control module. This feedback signal
allows the module to monitor the operation and rela-
tive positions of the blend door actuator and the
blend air door. The front heater-A/C control module
learns the blend air door stop positions during the
calibration procedure and will store a Diagnostic
Trouble Code (DTC) for any problems it detects in
the blend door actuator circuits.
The rear blend door actuator can be diagnosed
using a DRBIIItscan tool. Refer to Body Diagnostic
Procedures for more information. The rear blend door
Fig. 2 Heater-A/C Control Bezel
1 - BEZEL
2 - SNAP CLIP (2)
3 - HEATER-A/C CONTROL
4 - SCREW (3)
5 - LOCATOR TAB (2)
RSCONTROLS - REAR24-35
A/C-HEATER CONTROL (Continued)
Page 2433 of 2585
Refer to the appropriate wiring information for
diagnosis and testing of the micro-relay and for com-
plete HVAC wiring diagrams.
REMOVAL
(1) Disconnect and isolate the battery negative
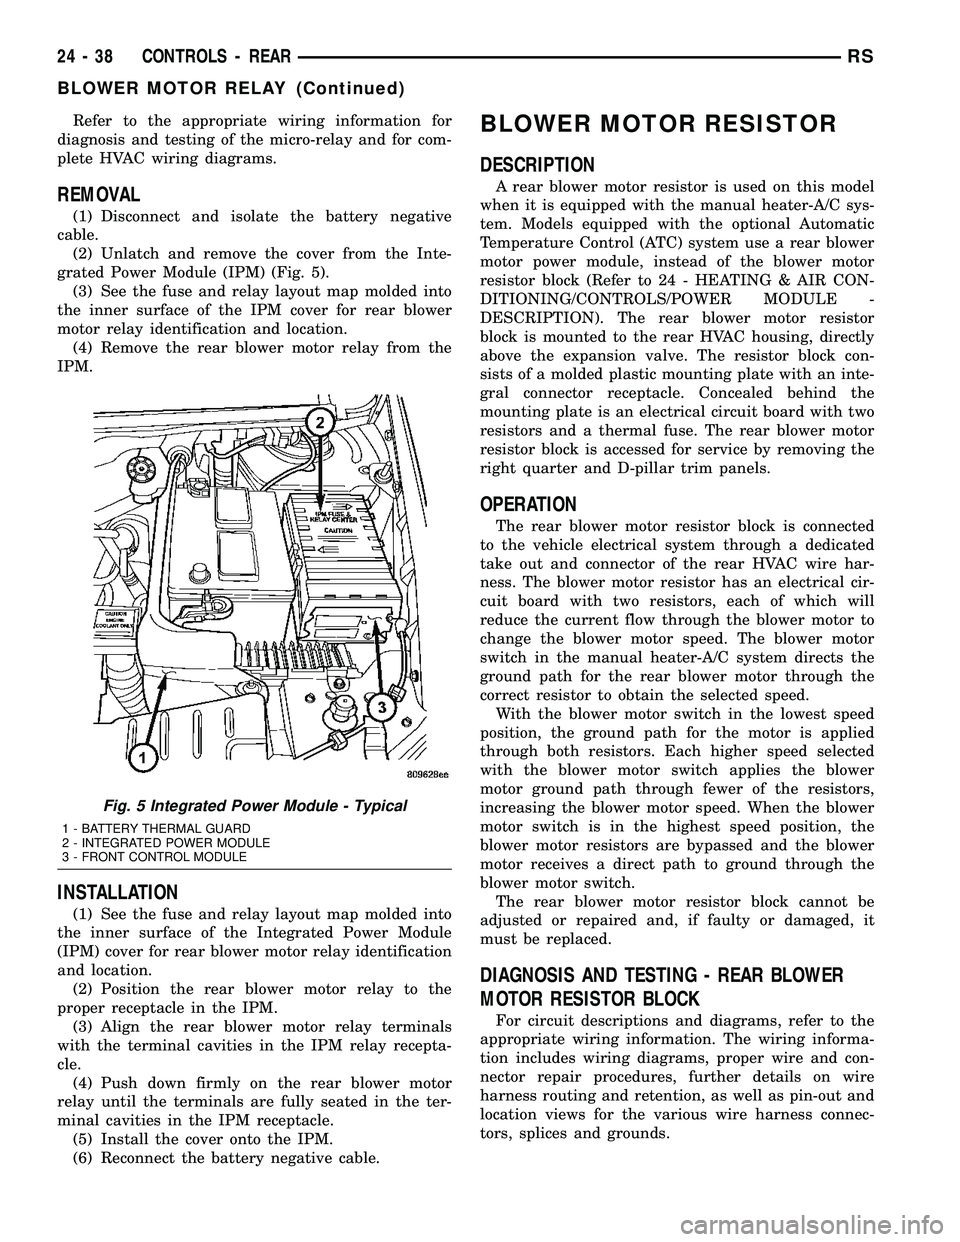
cable.
(2) Unlatch and remove the cover from the Inte-
grated Power Module (IPM) (Fig. 5).
(3) See the fuse and relay layout map molded into
the inner surface of the IPM cover for rear blower
motor relay identification and location.
(4) Remove the rear blower motor relay from the
IPM.
INSTALLATION
(1) See the fuse and relay layout map molded into
the inner surface of the Integrated Power Module
(IPM) cover for rear blower motor relay identification
and location.
(2) Position the rear blower motor relay to the
proper receptacle in the IPM.
(3) Align the rear blower motor relay terminals
with the terminal cavities in the IPM relay recepta-
cle.
(4) Push down firmly on the rear blower motor
relay until the terminals are fully seated in the ter-
minal cavities in the IPM receptacle.
(5) Install the cover onto the IPM.
(6) Reconnect the battery negative cable.
BLOWER MOTOR RESISTOR
DESCRIPTION
A rear blower motor resistor is used on this model
when it is equipped with the manual heater-A/C sys-
tem. Models equipped with the optional Automatic
Temperature Control (ATC) system use a rear blower
motor power module, instead of the blower motor
resistor block (Refer to 24 - HEATING & AIR CON-
DITIONING/CONTROLS/POWER MODULE -
DESCRIPTION). The rear blower motor resistor
block is mounted to the rear HVAC housing, directly
above the expansion valve. The resistor block con-
sists of a molded plastic mounting plate with an inte-
gral connector receptacle. Concealed behind the
mounting plate is an electrical circuit board with two
resistors and a thermal fuse. The rear blower motor
resistor block is accessed for service by removing the
right quarter and D-pillar trim panels.
OPERATION
The rear blower motor resistor block is connected
to the vehicle electrical system through a dedicated
take out and connector of the rear HVAC wire har-
ness. The blower motor resistor has an electrical cir-
cuit board with two resistors, each of which will
reduce the current flow through the blower motor to
change the blower motor speed. The blower motor
switch in the manual heater-A/C system directs the
ground path for the rear blower motor through the
correct resistor to obtain the selected speed.
With the blower motor switch in the lowest speed
position, the ground path for the motor is applied
through both resistors. Each higher speed selected
with the blower motor switch applies the blower
motor ground path through fewer of the resistors,
increasing the blower motor speed. When the blower
motor switch is in the highest speed position, the
blower motor resistors are bypassed and the blower
motor receives a direct path to ground through the
blower motor switch.
The rear blower motor resistor block cannot be
adjusted or repaired and, if faulty or damaged, it
must be replaced.
DIAGNOSIS AND TESTING - REAR BLOWER
MOTOR RESISTOR BLOCK
For circuit descriptions and diagrams, refer to the
appropriate wiring information. The wiring informa-
tion includes wiring diagrams, proper wire and con-
nector repair procedures, further details on wire
harness routing and retention, as well as pin-out and
location views for the various wire harness connec-
tors, splices and grounds.
Fig. 5 Integrated Power Module - Typical
1 - BATTERY THERMAL GUARD
2 - INTEGRATED POWER MODULE
3 - FRONT CONTROL MODULE
24 - 38 CONTROLS - REARRS
BLOWER MOTOR RELAY (Continued)
Page 2436 of 2585
(6) Install the screw that secures the front of the
rear HVAC housing to the right quarter inner panel.
Tighten the screw to 11 N´m (97 in. lbs.).
(7) Install the screw that secures the back of the
rear HVAC housing to the right D-pillar. Tighten the
screw to 11 N´m (97 in. lbs.).
(8) Install the two screws that secure the top of
the quarter trim panel attaching bracket to the quar-
ter inner panel. Tighten the screws to 2 N´m (17 in.
lbs.).
(9) Reinstall the right quarter trim panel and
right D-pillar trim panel onto the quarter inner
panel (Refer to 23 - BODY/INTERIOR/QUARTER
TRIM PANEL - INSTALLATION).
(10) Reconnect the battery negative cable.
(11) Perform the heater-A/C control calibration
procedure (Refer to 24 - HEATING & AIR CONDI-
TIONING/CONTROLS - FRONT/A/C-HEATER CON-
TROL - STANDARD PROCEDURE - HEATER-A/C
CONTROL CALIBRATION).
POWER MODULE - REAR
BLOWER MOTOR
DESCRIPTION
A rear blower motor power module is used on this
model when it is equipped with the optional Auto-
matic Temperature Control (ATC) system. Models
equipped with the standard manual heater-A/C sys-
tem use a blower motor resistor block , instead of the
blower motor power module (Refer to 24 - HEATING
& AIR CONDITIONING/CONTROLS/BLOWER
MOTOR RESISTOR BLOCK - DESCRIPTION).
The rear blower motor power module is installed in
the back of the rear HVAC housing, directly above
the expansion valve. The module consists of a molded
plastic mounting plate with two integral connector
receptacles. Concealed behind the mounting plate
within the evaporator housing is the power module
electronic circuitry and a large finned, heat sink. The
power module is accessed for service by removing the
right quarter and D-pillar trim panels.
OPERATION
The rear blower motor power module is connected
to the vehicle electrical system through a dedicated
take out and connector of the rear HVAC wire har-
ness. A second connector receptacle receives the pig-
tail wire connector from the rear blower motor. The
rear blower motor power module allows the micropro-
cessor-based Automatic Temperature Control (ATC)
heater-A/C control module to calculate and provide
infinitely variable blower motor speeds based upon
either manual blower switch input or the ATC pro-
gramming using a Pulse Width Modulated (PWM)circuit strategy. The PWM voltage is applied to a
comparator circuit which compares the PWM signal
voltage to the blower motor feedback voltage. The
resulting output drives the power module circuitry,
which adjusts the voltage output received from the
rear blower motor relay to change or maintain the
desired blower speed. The rear blower motor power
module is diagnosed using a DRBIIItscan tool. Refer
to Body Diagnostic Procedures.
REMOVAL
(1) Disconnect and isolate the battery negative
cable.
(2) Remove the right quarter trim panel and right
D-pillar trim panel from the quarter inner panel
(Refer to 23 - BODY/INTERIOR/QUARTER TRIM
PANEL - REMOVAL).
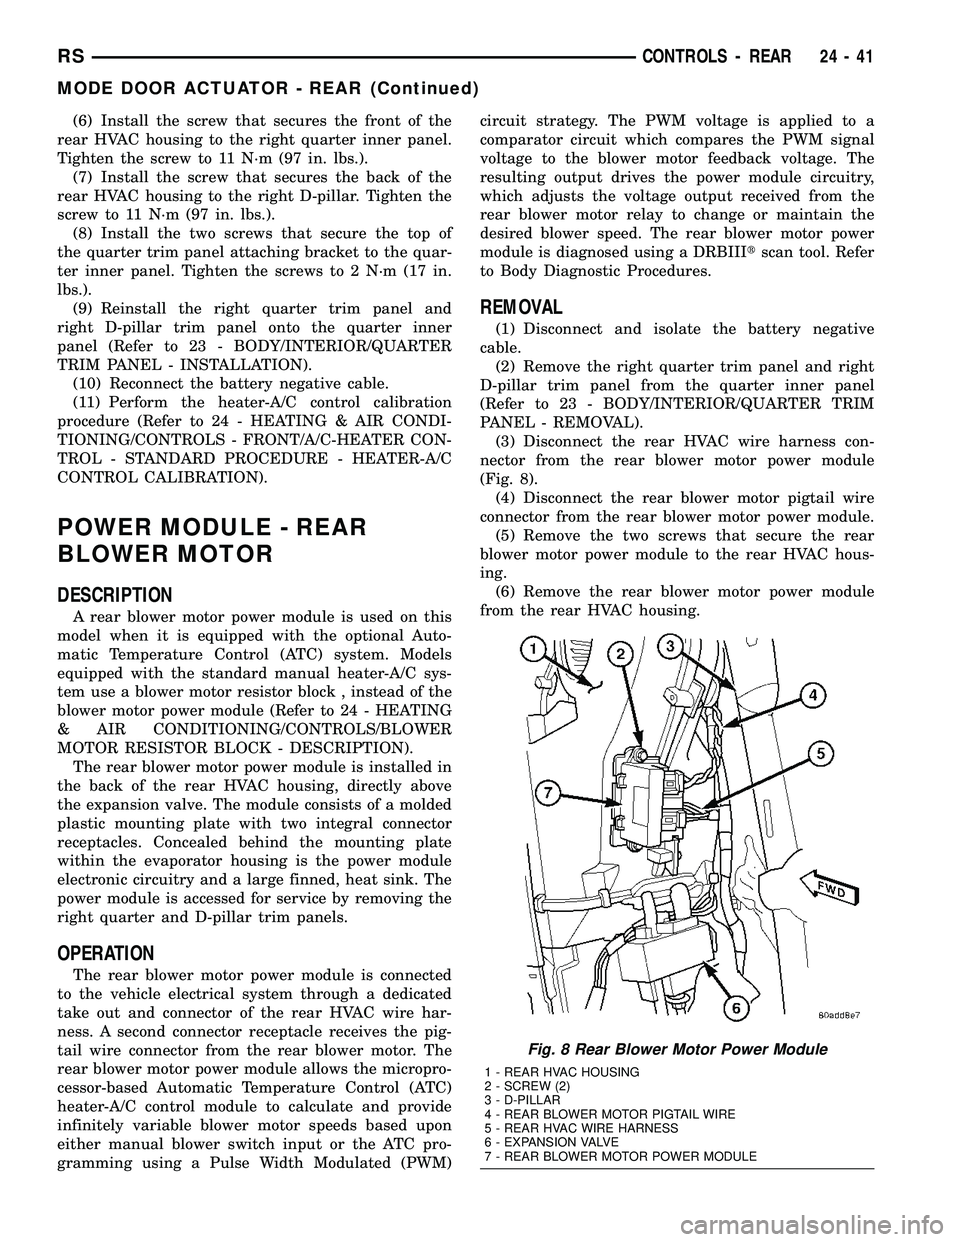
(3) Disconnect the rear HVAC wire harness con-
nector from the rear blower motor power module
(Fig. 8).
(4) Disconnect the rear blower motor pigtail wire
connector from the rear blower motor power module.
(5) Remove the two screws that secure the rear
blower motor power module to the rear HVAC hous-
ing.
(6) Remove the rear blower motor power module
from the rear HVAC housing.
Fig. 8 Rear Blower Motor Power Module
1 - REAR HVAC HOUSING
2 - SCREW (2)
3 - D-PILLAR
4 - REAR BLOWER MOTOR PIGTAIL WIRE
5 - REAR HVAC WIRE HARNESS
6 - EXPANSION VALVE
7 - REAR BLOWER MOTOR POWER MODULE
RSCONTROLS - REAR24-41
MODE DOOR ACTUATOR - REAR (Continued)
Page 2438 of 2585

DISTRIBUTION - FRONT
TABLE OF CONTENTS
page page
AIR FILTER
DESCRIPTION.........................43
REMOVAL.............................43
INSTALLATION.........................44
AIR OUTLETS
DESCRIPTION.........................44
REMOVAL
REMOVAL - CENTER BEZEL OUTLETS....44
REMOVAL - DEMISTER OUTLET..........45
REMOVAL - INSTRUMENT PANEL OUTLET . 45
INSTALLATION
INSTALLATION - CENTER BEZEL OUTLETS . 45
INSTALLATION - DEMISTER OUTLET......46
INSTALLATION - INSTRUMENT PANEL
OUTLET............................46
BLOWER MOTOR
DESCRIPTION.........................46
OPERATION...........................46
DIAGNOSIS AND TESTING - BLOWER
MOTOR .............................47
REMOVAL.............................47INSTALLATION.........................49
DEFROSTER DUCT
REMOVAL.............................50
INSTALLATION.........................50
FLOOR DISTRIBUTION DUCTS
REMOVAL.............................50
INSTALLATION.........................50
HVAC HOUSING
REMOVAL
REMOVAL...........................51
DISSASEMBLY.......................51
INSTALLATION
ASSEMBLY..........................53
INSTALLATION.......................54
INSTRUMENT PANEL DEMISTER DUCTS
REMOVAL.............................55
INSTALLATION.........................55
INSTRUMENT PANEL DUCTS
REMOVAL.............................55
INSTALLATION.........................55
AIR FILTER
DESCRIPTION
A dust and odor air filter is standard equipment on
models equipped with the three zone temperature
control systems (Fig. 1). The filter element is the
same size as the front air conditioner evaporator to
ensure ample filtering capacity. A removable door on
the bottom of the front HVAC housing below the
glove box provides easy access to the filter element
for replacement. The filter should be checked and
replaced at least once every 24,000 km (15,000 miles)
and checked if heater-A/C system performance seems
lower than expected.
REMOVAL
(1) Locate the air filter door on the bottom of the
lower HVAC housing just outboard of the passenger
side of the instrument panel center stack (Fig. 2).
(2) Slide the air filter door latch toward the rear of
the vehicle until it engages the opened stop on the
door.
(3) Pull the air filter door straight downward to
disengage it from the air filter opening of the lower
HVAC housing.(4) Use your fingers to reach through the air filter
opening of the lower HVAC housing far enough to
grasp the air filter.Fig. 1 Air Filter - LHD Shown, RHD Typical
1 - LOWER HVAC HOUSING
2 - LOWER EDGE OF INSTRUMENT PANEL
3 - AIR FILTER (IF EQUIPPED)
4 - CENTER FLOOR BRACKET COVER
5 - FILTER SEALING EDGES (IF EQUIPPED)
6 - AIR FILTER OPENING (IF EQUIPPED)
RSDISTRIBUTION - FRONT24-43
Page 2439 of 2585
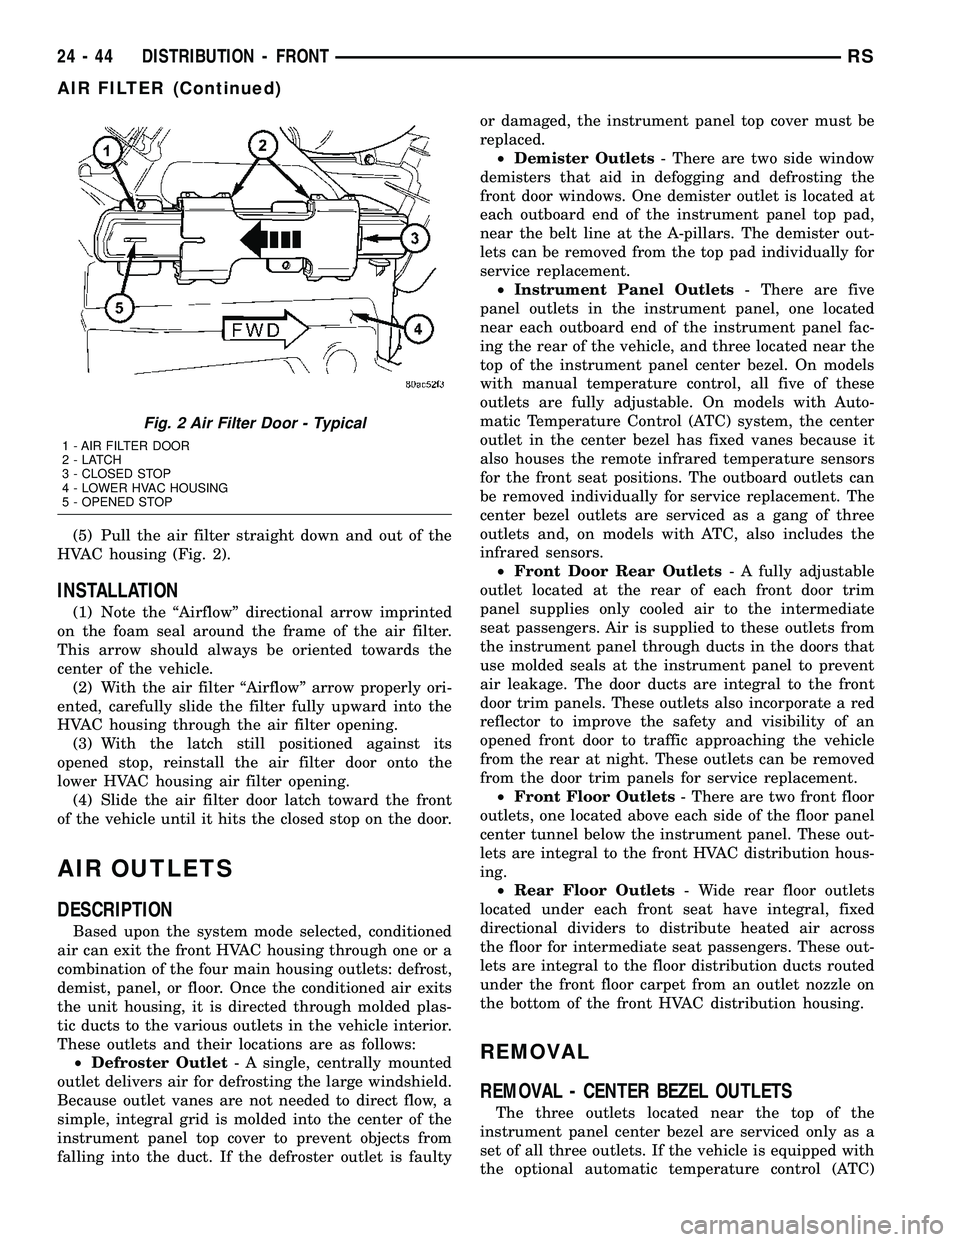
(5) Pull the air filter straight down and out of the
HVAC housing (Fig. 2).
INSTALLATION
(1) Note the ªAirflowº directional arrow imprinted
on the foam seal around the frame of the air filter.
This arrow should always be oriented towards the
center of the vehicle.
(2) With the air filter ªAirflowº arrow properly ori-
ented, carefully slide the filter fully upward into the
HVAC housing through the air filter opening.
(3) With the latch still positioned against its
opened stop, reinstall the air filter door onto the
lower HVAC housing air filter opening.
(4) Slide the air filter door latch toward the front
of the vehicle until it hits the closed stop on the door.
AIR OUTLETS
DESCRIPTION
Based upon the system mode selected, conditioned
air can exit the front HVAC housing through one or a
combination of the four main housing outlets: defrost,
demist, panel, or floor. Once the conditioned air exits
the unit housing, it is directed through molded plas-
tic ducts to the various outlets in the vehicle interior.
These outlets and their locations are as follows:
²Defroster Outlet- A single, centrally mounted
outlet delivers air for defrosting the large windshield.
Because outlet vanes are not needed to direct flow, a
simple, integral grid is molded into the center of the
instrument panel top cover to prevent objects from
falling into the duct. If the defroster outlet is faultyor damaged, the instrument panel top cover must be
replaced.
²Demister Outlets- There are two side window
demisters that aid in defogging and defrosting the
front door windows. One demister outlet is located at
each outboard end of the instrument panel top pad,
near the belt line at the A-pillars. The demister out-
lets can be removed from the top pad individually for
service replacement.
²Instrument Panel Outlets- There are five
panel outlets in the instrument panel, one located
near each outboard end of the instrument panel fac-
ing the rear of the vehicle, and three located near the
top of the instrument panel center bezel. On models
with manual temperature control, all five of these
outlets are fully adjustable. On models with Auto-
matic Temperature Control (ATC) system, the center
outlet in the center bezel has fixed vanes because it
also houses the remote infrared temperature sensors
for the front seat positions. The outboard outlets can
be removed individually for service replacement. The
center bezel outlets are serviced as a gang of three
outlets and, on models with ATC, also includes the
infrared sensors.
²Front Door Rear Outlets- A fully adjustable
outlet located at the rear of each front door trim
panel supplies only cooled air to the intermediate
seat passengers. Air is supplied to these outlets from
the instrument panel through ducts in the doors that
use molded seals at the instrument panel to prevent
air leakage. The door ducts are integral to the front
door trim panels. These outlets also incorporate a red
reflector to improve the safety and visibility of an
opened front door to traffic approaching the vehicle
from the rear at night. These outlets can be removed
from the door trim panels for service replacement.
²Front Floor Outlets- There are two front floor
outlets, one located above each side of the floor panel
center tunnel below the instrument panel. These out-
lets are integral to the front HVAC distribution hous-
ing.
²Rear Floor Outlets- Wide rear floor outlets
located under each front seat have integral, fixed
directional dividers to distribute heated air across
the floor for intermediate seat passengers. These out-
lets are integral to the floor distribution ducts routed
under the front floor carpet from an outlet nozzle on
the bottom of the front HVAC distribution housing.
REMOVAL
REMOVAL - CENTER BEZEL OUTLETS
The three outlets located near the top of the
instrument panel center bezel are serviced only as a
set of all three outlets. If the vehicle is equipped with
the optional automatic temperature control (ATC)
Fig. 2 Air Filter Door - Typical
1 - AIR FILTER DOOR
2-LATCH
3 - CLOSED STOP
4 - LOWER HVAC HOUSING
5 - OPENED STOP
24 - 44 DISTRIBUTION - FRONTRS
AIR FILTER (Continued)
Page 2440 of 2585
system, the center outlet of the three has fixed vanes
and also houses the remote front infrared tempera-
ture sensors.
WARNING: ON VEHICLES EQUIPPED WITH AIR-
BAGS, DISABLE THE AIRBAG SYSTEM BEFORE
ATTEMPTING ANY STEERING WHEEL, STEERING
COLUMN, OR INSTRUMENT PANEL COMPONENT
DIAGNOSIS OR SERVICE. DISCONNECT AND ISO-
LATE THE BATTERY NEGATIVE (GROUND) CABLE,
THEN WAIT TWO MINUTES FOR THE AIRBAG SYS-
TEM CAPACITOR TO DISCHARGE BEFORE PER-
FORMING FURTHER DIAGNOSIS OR SERVICE. THIS
IS THE ONLY SURE WAY TO DISABLE THE AIRBAG
SYSTEM. FAILURE TO TAKE THE PROPER PRE-
CAUTIONS COULD RESULT IN ACCIDENTAL AIR-
BAG DEPLOYMENT AND POSSIBLE PERSONAL
INJURY.
(1) Disconnect and isolate the negative battery
cable.
(2) Remove the center bezel from the instrument
panel (Refer to 23 - BODY/INSTRUMENT PANEL/
INSTRUMENT PANEL CENTER BEZEL -
REMOVAL).
(3) Place the center bezel face down on a suitable
work surface. Be certain to take the proper precau-
tions to protect the face of the center bezel from cos-
metic damage.
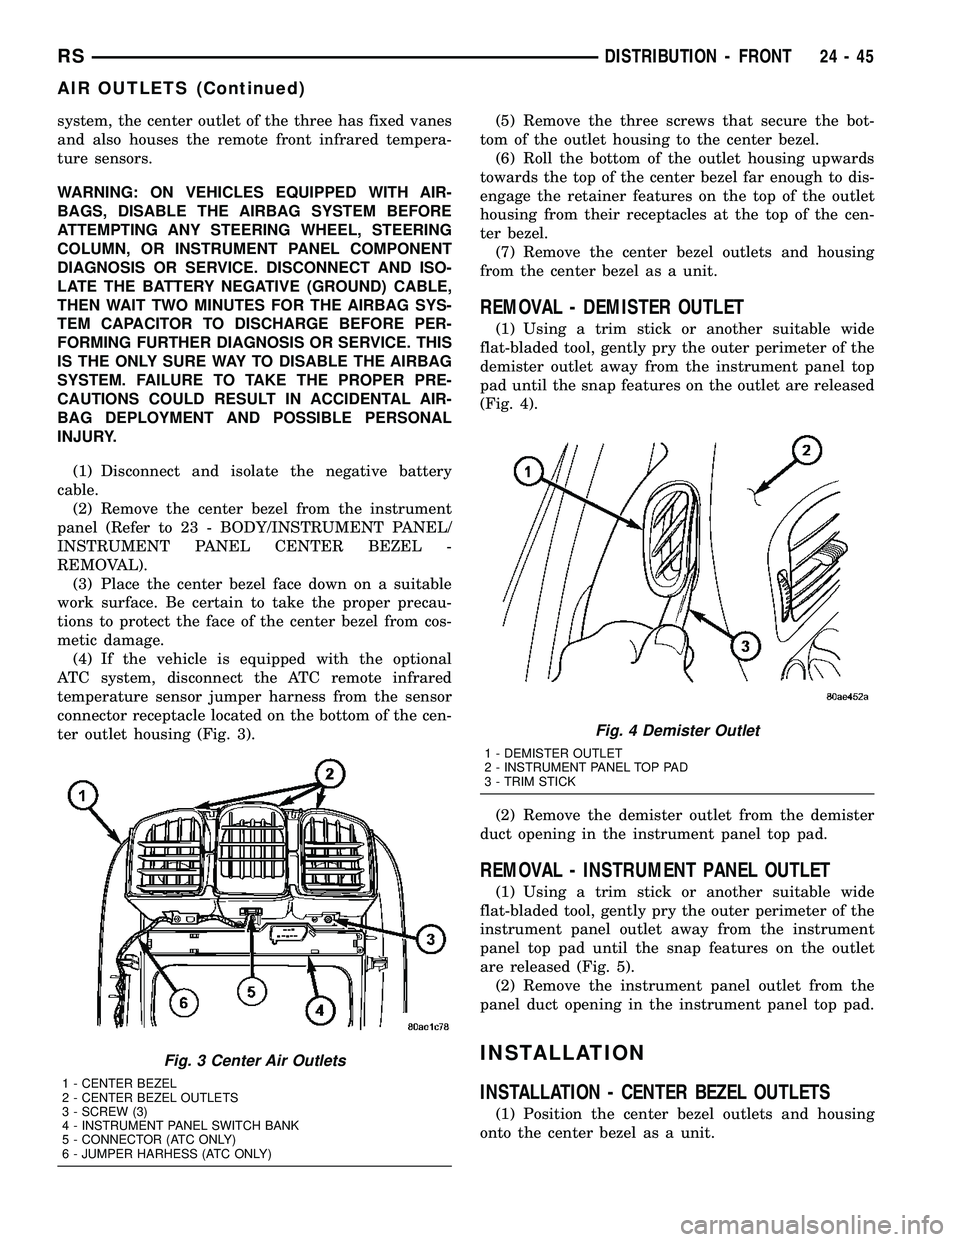
(4) If the vehicle is equipped with the optional
ATC system, disconnect the ATC remote infrared
temperature sensor jumper harness from the sensor
connector receptacle located on the bottom of the cen-
ter outlet housing (Fig. 3).(5) Remove the three screws that secure the bot-
tom of the outlet housing to the center bezel.
(6) Roll the bottom of the outlet housing upwards
towards the top of the center bezel far enough to dis-
engage the retainer features on the top of the outlet
housing from their receptacles at the top of the cen-
ter bezel.
(7) Remove the center bezel outlets and housing
from the center bezel as a unit.
REMOVAL - DEMISTER OUTLET
(1) Using a trim stick or another suitable wide
flat-bladed tool, gently pry the outer perimeter of the
demister outlet away from the instrument panel top
pad until the snap features on the outlet are released
(Fig. 4).
(2) Remove the demister outlet from the demister
duct opening in the instrument panel top pad.
REMOVAL - INSTRUMENT PANEL OUTLET
(1) Using a trim stick or another suitable wide
flat-bladed tool, gently pry the outer perimeter of the
instrument panel outlet away from the instrument
panel top pad until the snap features on the outlet
are released (Fig. 5).
(2) Remove the instrument panel outlet from the
panel duct opening in the instrument panel top pad.
INSTALLATION
INSTALLATION - CENTER BEZEL OUTLETS
(1) Position the center bezel outlets and housing
onto the center bezel as a unit.
Fig. 3 Center Air Outlets
1 - CENTER BEZEL
2 - CENTER BEZEL OUTLETS
3 - SCREW (3)
4 - INSTRUMENT PANEL SWITCH BANK
5 - CONNECTOR (ATC ONLY)
6 - JUMPER HARHESS (ATC ONLY)
Fig. 4 Demister Outlet
1 - DEMISTER OUTLET
2 - INSTRUMENT PANEL TOP PAD
3 - TRIM STICK
RSDISTRIBUTION - FRONT24-45
AIR OUTLETS (Continued)