Page 425 of 516

snow tires, space-saver or temporary use spare tires,
tires with nominal rim diameters of 10 to 12 inches
(25 to 30 cm), or to some limited-production tires.
While the tires available on General Motors passenger
cars and light trucks may vary with respect to these
grades, they must also conform to federal safety
requirements and additional General Motors Tire
Performance Criteria (TPC) standards.
Treadwear
The treadwear grade is a comparative rating based on
the wear rate of the tire when tested under controlled
conditions on a speci�ed government test course.
For example, a tire graded 150 would wear one and
a half (1.5) times as well on the government course as
a tire graded 100. The relative performance of tires
depends upon the actual conditions of their use,
however, and may depart signi�cantly from the norm
due to variations in driving habits, service practices and
differences in road characteristics and climate.
Traction – AA, A, B, C
The traction grades, from highest to lowest, are AA, A,
B, and C. Those grades represent the tire’s ability
to stop on wet pavement as measured under controlled
conditions on speci�ed government test surfaces ofasphalt and concrete. A tire marked C may have poor
traction performance. Warning: The traction grade
assigned to this tire is based on straight-ahead braking
traction tests, and does not include acceleration,
cornering, hydroplaning, or peak traction characteristics.
Temperature – A, B, C
The temperature grades are A (the highest), B, and C,
representing the tire’s resistance to the generation
of heat and its ability to dissipate heat when tested
under controlled conditions on a speci�ed indoor
laboratory test wheel. Sustained high temperature can
cause the material of the tire to degenerate and
reduce tire life, and excessive temperature can lead to
sudden tire failure. The grade C corresponds to a
level of performance which all passenger car tires must
meet under the Federal Motor Vehicle Safety Standard
No. 109. Grades B and A represent higher levels of
performance on the laboratory test wheel than the
minimum required by law.
Warning: The temperature grade for this tire is
established for a tire that is properly in�ated and not
overloaded. Excessive speed, underin�ation, or
excessive loading, either separately or in combination,
can cause heat buildup and possible tire failure.
5-73
Page 432 of 516
Removing the Spare Tire and Tools
The tools you will need are
located in the storage
compartment at the rear of
the vehicle, on the
passenger’s side.
To remove the tools, do the following:
1. Remove the side convenience net.
2. Open the jack storage compartment by lifting up the
tab and pulling the cover off.A. Jack
B. Strap
C. Bracket
D. Wing Nut
E. Jacking InstructionsF. Bag and Tools
G. Tire Bag and Cable
(All-Wheel Drive
(AWD) only)
3. Remove the jack and jacking tools by loosening the
wing nut and bracket.
4. Separate the plastic pouch from the jack and
remove the jacking tools, including the folding
wrench and extension, from the pouch.
5-80
Page 433 of 516
The tools you will be using include the jack (A),
extension (B) and folding wrench (C).
The compact spare tire is located under the rear of the
vehicle. See “Compact Spare Tire” later in this
section for more information about the compact spare.
To remove the compact spare tire, do the following:A. Hoist Shaft
B. Hoist Assembly
C. Retainer
D. Compact Spare TireE. Extension
(Chisel End)
F. Folding Wrench
1. Attach the folding wrench to the extension and
insert the chisel end on an angle through the
hole in the rear bumper and into the hoist shaft.
2. Turn the folding wrench counterclockwise to lower
the compact spare tire to the ground. Continue to
turn the wrench so the compact spare tire can
be pulled out from under the vehicle.
5-81
Page 434 of 516

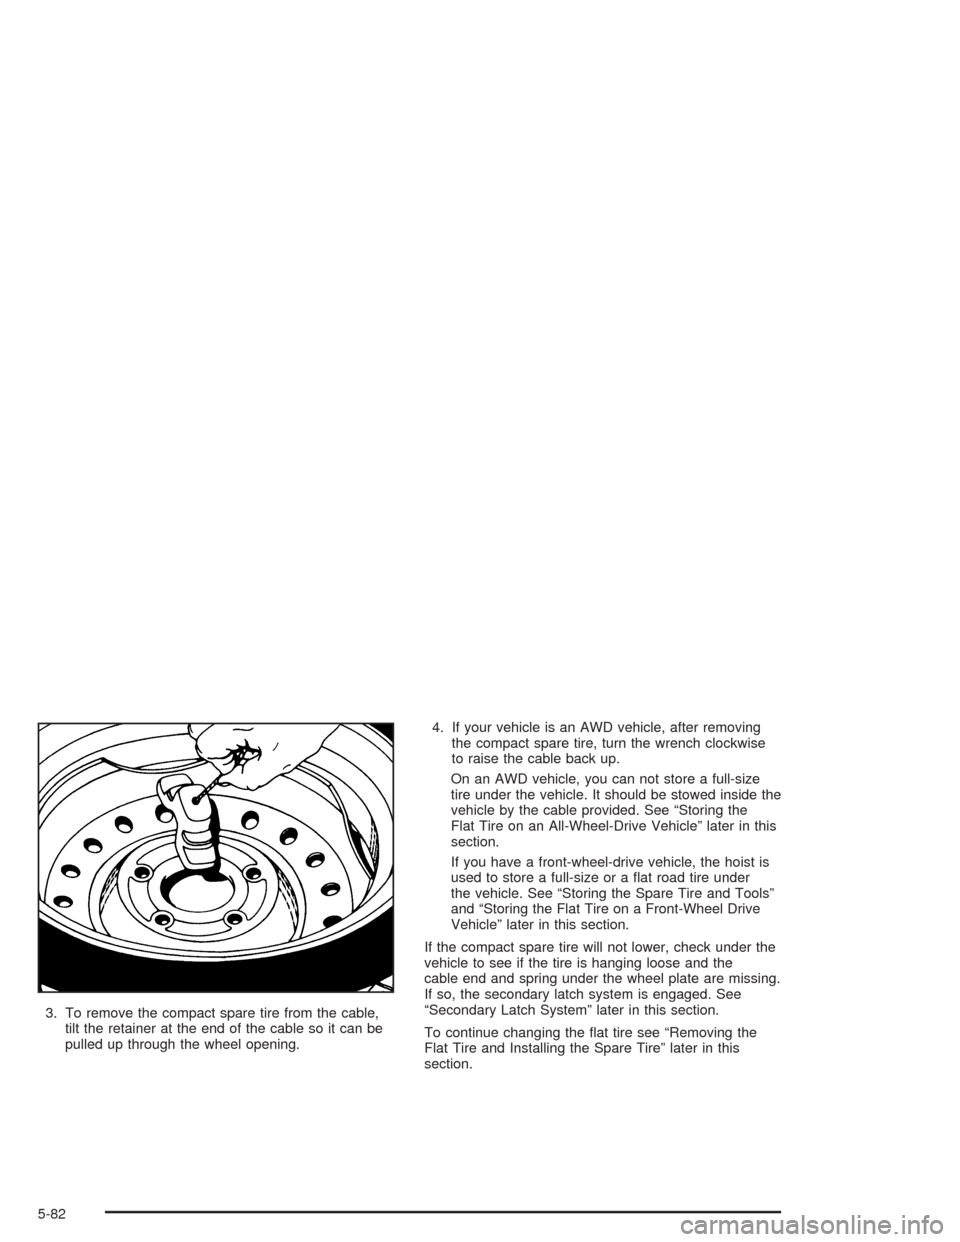
3. To remove the compact spare tire from the cable,
tilt the retainer at the end of the cable so it can be
pulled up through the wheel opening.4. If your vehicle is an AWD vehicle, after removing
the compact spare tire, turn the wrench clockwise
to raise the cable back up.
On an AWD vehicle, you can not store a full-size
tire under the vehicle. It should be stowed inside the
vehicle by the cable provided. See “Storing the
Flat Tire on an All-Wheel-Drive Vehicle” later in this
section.
If you have a front-wheel-drive vehicle, the hoist is
used to store a full-size or a �at road tire under
the vehicle. See “Storing the Spare Tire and Tools”
and “Storing the Flat Tire on a Front-Wheel Drive
Vehicle” later in this section.
If the compact spare tire will not lower, check under the
vehicle to see if the tire is hanging loose and the
cable end and spring under the wheel plate are missing.
If so, the secondary latch system is engaged. See
“Secondary Latch System” later in this section.
To continue changing the �at tire see “Removing the
Flat Tire and Installing the Spare Tire” later in this
section.
5-82
Page 435 of 516

Secondary Latch System
Your vehicle may have an underbody mounted tire hoist
assembly equipped with a secondary latch system.
It is designed to stop a tire from suddenly falling off your
vehicle if the cable holding the spare tire is damaged.
For the secondary latch to work, the tire must be stowed
with the valve stem pointing down.
Front-wheel-drive vehicles use the underbody tire hoist
assembly to store either the compact spare or a �at
road tire. See “Storing a Flat or Spare Tire and Tools”
later in this section for instructions on storing the
spare or �at tire correctly.
If your vehicle is equipped with AWD, the underbody tire
hoist assembly stores only the compact spare tire.
See “Storing the Spare Tire and Tools” later in
this section for instructions. To store a �at full-size tire
correctly, see “Storing the Flat Tire on an
All-Wheel-Drive Vehicle” later in this section.{CAUTION:
Before beginning this procedure read all the
instructions. Failure to read and follow the
instructions could damage the hoist assembly
and you and others could get hurt. Read and
follow the instructions listed below.
To release the spare tire from the secondary latch, do
the following:
{CAUTION:
Someone standing too close during the
procedure could be injured by the jack.
If the spare tire does not slide off the jack
completely, make sure no one is behind you or
on either side of you as you pull the jack out
from the spare.
5-83
Page 436 of 516
1. Place the jack under the vehicle, ahead of the rear
bumper. Position the center lift point of the jack
under the center of the compact spare tire.
2. Turn the folding wrench clockwise to raise the jack
until it lifts the secondary latch device under the
wheel plate.
3. Keep raising the jack until the compact spare tire
stops moving upward and is held �rmly in place,
this lets you know that the secondary latch
has released.
4. Lower the jack by turning the folding wrench
counterclockwise. Keep lowering the jack until the
compact spare tire is resting on the folding wrench.5. Grasp the compact spare tire with both hands and
pull it out from under the vehicle.
6. Reach under the vehicle and remove the folding
wrench and jack.
Have the hoist assembly inspected as soon as you can.
You will not be able to store a spare or �at tire using
the hoist assembly until it has been repaired or replaced.
5-84
Page 437 of 516
Removing the Wheel Covers
If the wheel has a center cap, use the handle of the
folding wrench to pry it off. Then, with the other end of
the folding wrench, loosen the nuts.
If your vehicle has the plastic bolt-on wheel covers,
loosen the bolts completely using the folding wrench,
and remove the wheel cover.
Removing the Flat Tire and Installing
the Spare Tire
1. Loosen the wheel
nuts — but do not
remove them — using
the folding wrench.
Turn the handle about
180 degrees, then
�ip the handle back to
the starting position.
This avoids taking
the wrench off the lug
nut for each turn.
For wheels with a wheel lock key, use the wheel
lock key between the lock nut and folding wrench.
The key is supplied in the front passenger door
pocket.
Notice:If your vehicle has wheel locks and you use
an impact wrench to remove the wheel nuts, you
could damage the lock nut or wheel lock key. Do not
use an impact wrench to remove the wheel nuts if
your vehicle has wheel locks.
5-85
Page 438 of 516
2. Near each wheel, there
is a notch in the
vehicle’s body. Position
the jack and raise
the jack head until it
�ts �rmly into the notch
in the vehicle’s frame
nearest the �at tire.Notice:If you use a jack to raise the vehicle
without positioning it correctly, you could damage
your vehicle. When raising your vehicle on a
jack, avoid contact with the rear axle control arms.
Do not raise the vehicle yet. Put the compact spare
tire near you.
{CAUTION:
Getting under a vehicle when it is jacked up is
dangerous. If the vehicle slips off the jack you
could be badly injured or killed. Never get under
a vehicle when it is supported only by a jack.
5-86