2004 CHEVROLET VENTURE reset
[x] Cancel search: resetPage 244 of 516
AM-FM Radio
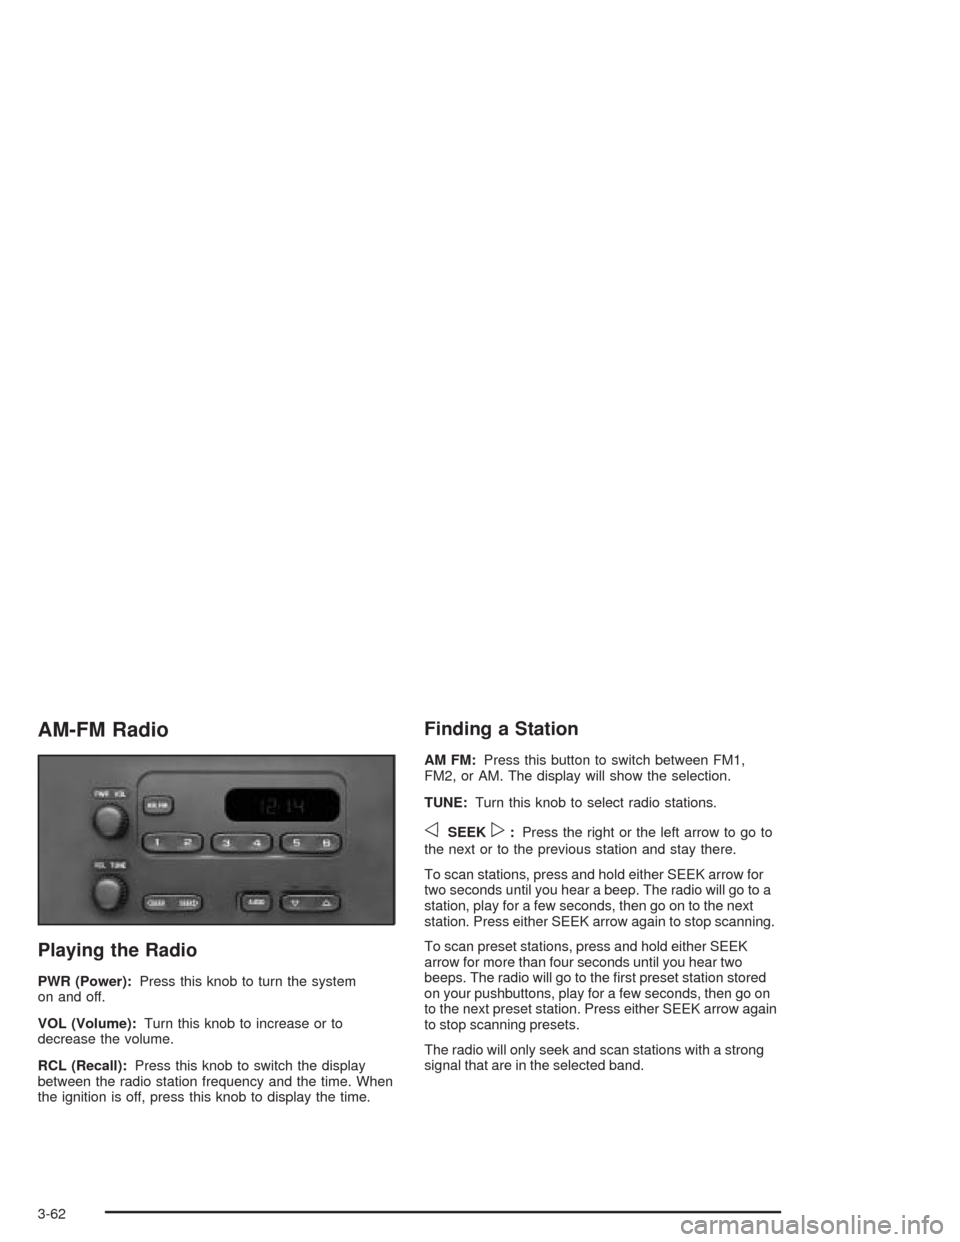
Playing the Radio
PWR (Power):Press this knob to turn the system
on and off.
VOL (Volume):Turn this knob to increase or to
decrease the volume.
RCL (Recall):Press this knob to switch the display
between the radio station frequency and the time. When
the ignition is off, press this knob to display the time.
Finding a Station
AM FM:Press this button to switch between FM1,
FM2, or AM. The display will show the selection.
TUNE:Turn this knob to select radio stations.
oSEEKp:Press the right or the left arrow to go to
the next or to the previous station and stay there.
To scan stations, press and hold either SEEK arrow for
two seconds until you hear a beep. The radio will go to a
station, play for a few seconds, then go on to the next
station. Press either SEEK arrow again to stop scanning.
To scan preset stations, press and hold either SEEK
arrow for more than four seconds until you hear two
beeps. The radio will go to the �rst preset station stored
on your pushbuttons, play for a few seconds, then go on
to the next preset station. Press either SEEK arrow again
to stop scanning presets.
The radio will only seek and scan stations with a strong
signal that are in the selected band.
3-62
Page 245 of 516
Setting Preset Stations
Up to 18 stations (six FM1, six FM2, and six AM) can be
programmed on the six numbered pushbuttons, by
performing the following steps:
1. Turn the radio on.
2. Press AM FM to select FM1, FM2, or AM.
3. Tune in the desired station.
4. Press and hold one of the six numbered
pushbuttons until you hear a beep. Whenever that
numbered pushbutton is pressed, the station
that was set will return.
5. Repeat the steps for each pushbutton.
Setting the Tone (Bass/Treble)
AUDIO:To adjust the bass and the treble, press and
release AUDIO until BAS or TRE appears on the
display. Then press and hold the up or the down arrow
to increase or to decrease. If a station is weak or
noisy, decrease the treble.
To adjust bass or treble to the middle position, select
BAS or TRE. Then press and hold AUDIO for more than
two seconds until you hear a beep. B and a zero or T
and a zero will appear on the display.
To adjust both tone controls and both speaker controls
to the middle position, �rst end out of audio mode
by pressing another button, causing the radio to perform
that function, or by waiting �ve seconds for the display
to return to time of day. Then press and hold AUDIO for
more than two seconds until you hear a beep. CEN
will appear on the display.
3-63
Page 249 of 516
Finding a Station
BAND:Press this button to switch between FM1, FM2,
AM, or XM1 or XM2 (48 contiguous US states, if
equipped). The display will show your selection.
TUNE:Turn this knob to select radio stations.
qSEEKr:Press the right or the left arrow to go to
the next or to the previous station and stay there.
The radio will seek only to stations that are in the
selected band and only to those with a strong signal.
qPSCANr(Preset Scan):Press and hold
either arrow for more than two seconds. SCAN will
appear on the display and the radio will produce one
beep. The radio will go to the �rst preset station stored
on the pushbuttons, play for a few seconds, then go
on to the next preset station. Press either arrow again or
one of the pushbuttons to stop scanning presets.
The radio will scan only to the preset stations that are in
the selected band and only to those with a strong signal.
Setting Preset Stations
The six numbered pushbuttons let you return to your
favorite stations. You can set up to 30 stations
(six FM1, six FM2, and six AM, six XM1 and six XM2
(48 contiguous US states, if equipped), by performing the
following steps:
1. Turn the radio on.
2. Press BAND to select FM1, FM2, AM or XM1
or XM2.
3. Tune in the desired station.
4. Press AUTO TONE to select the equalization.
5. Press and hold one of the six numbered
pushbuttons until you hear a beep. Whenever you
press that numbered pushbutton, the station
you set will return and the equalization that you
selected will be automatically stored for that
pushbutton.
6. Repeat the steps for each pushbutton.
3-67
Page 254 of 516
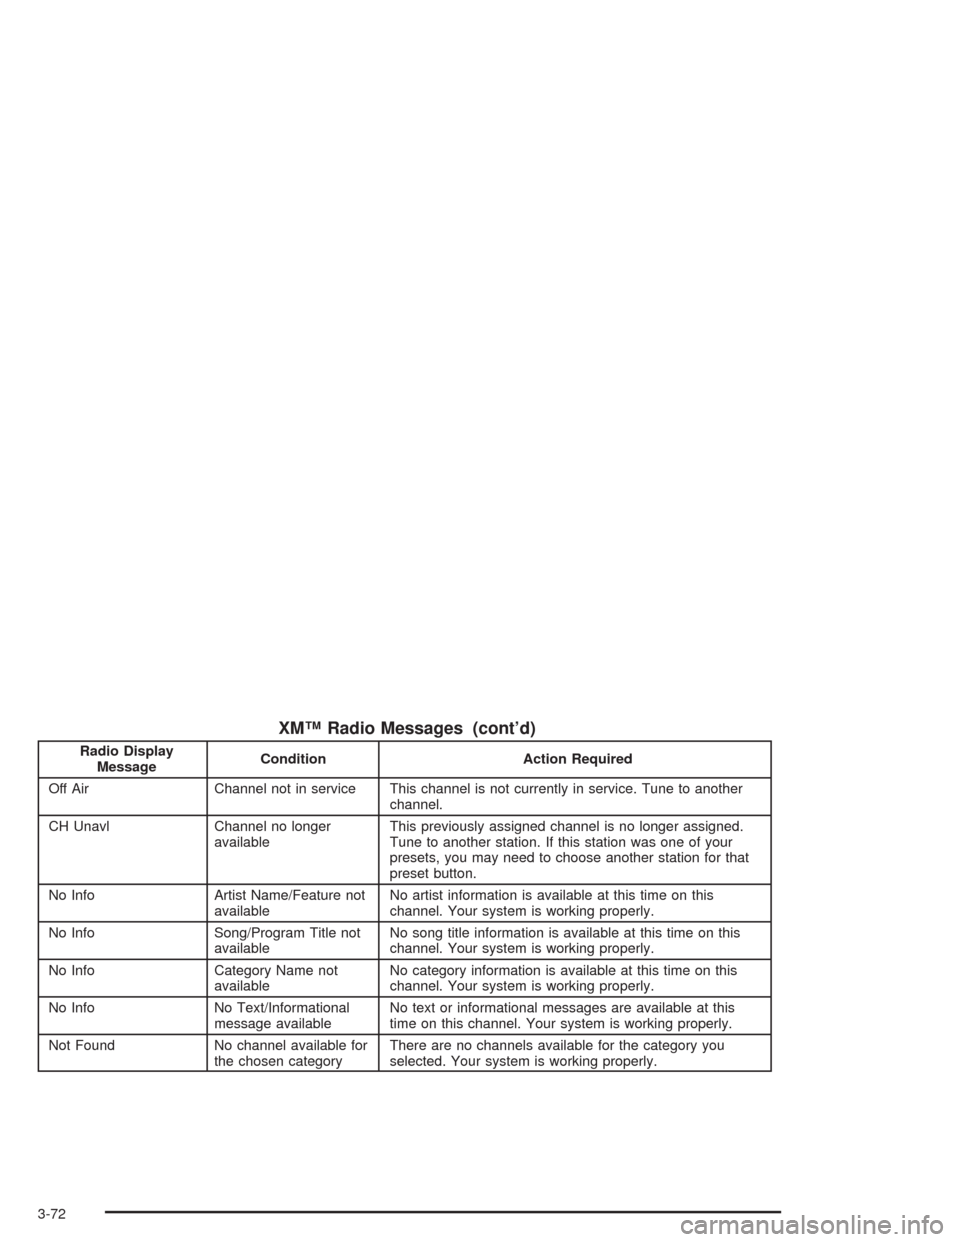
XM™ Radio Messages (cont’d)
Radio Display
MessageCondition Action Required
Off Air Channel not in service This channel is not currently in service. Tune to another
channel.
CH Unavl Channel no longer
availableThis previously assigned channel is no longer assigned.
Tune to another station. If this station was one of your
presets, you may need to choose another station for that
preset button.
No Info Artist Name/Feature not
availableNo artist information is available at this time on this
channel. Your system is working properly.
No Info Song/Program Title not
availableNo song title information is available at this time on this
channel. Your system is working properly.
No Info Category Name not
availableNo category information is available at this time on this
channel. Your system is working properly.
No Info No Text/Informational
message availableNo text or informational messages are available at this
time on this channel. Your system is working properly.
Not Found No channel available for
the chosen categoryThere are no channels available for the category you
selected. Your system is working properly.
3-72
Page 261 of 516
Finding a Station
BAND:Press this button to switch between FM1, FM2,
AM, or XM1 or XM2 (48 contiguous US states, if
equipped). The display will show your selection.
TUNE:Turn this knob to select radio stations.
oSEEKp:Press the right or the left arrow to go to
the next or to the previous station and stay there.
The radio will seek only to stations that are in the
selected band and only to those with a strong signal.
oPSCANp(Preset Scan):Press and hold
either arrow for more than two seconds. SCAN will
appear on the display and the radio will produce one
beep. The radio will scan to the �rst preset station stored
on the pushbuttons, play for a few seconds, then go
on to the next preset station. Press either arrow again or
one of the pushbuttons to stop scanning presets.
The radio will scan only to the preset stations that are in
the selected band and only to those with a strong signal.
Setting Preset Stations
The six numbered pushbuttons let you return to your
favorite stations. You can set up to 30 stations
(six FM1, six FM2, and six AM, six XM1 and six XM2
(48 contiguous US states, if equipped), by performing
the following steps:
1. Turn the radio on.
2. Press BAND to select FM1, FM2, AM, or XM1
or XM2.
3. Tune in the desired station.
4. Press AUTO TONE to select the equalization.
5. Press and hold one of the six numbered
pushbuttons until you hear a beep. Whenever you
press that numbered pushbutton, the station
you set will return and the equalization that you
selected will be automatically stored for that
pushbutton.
6. Repeat the steps for each pushbutton.
3-79
Page 266 of 516
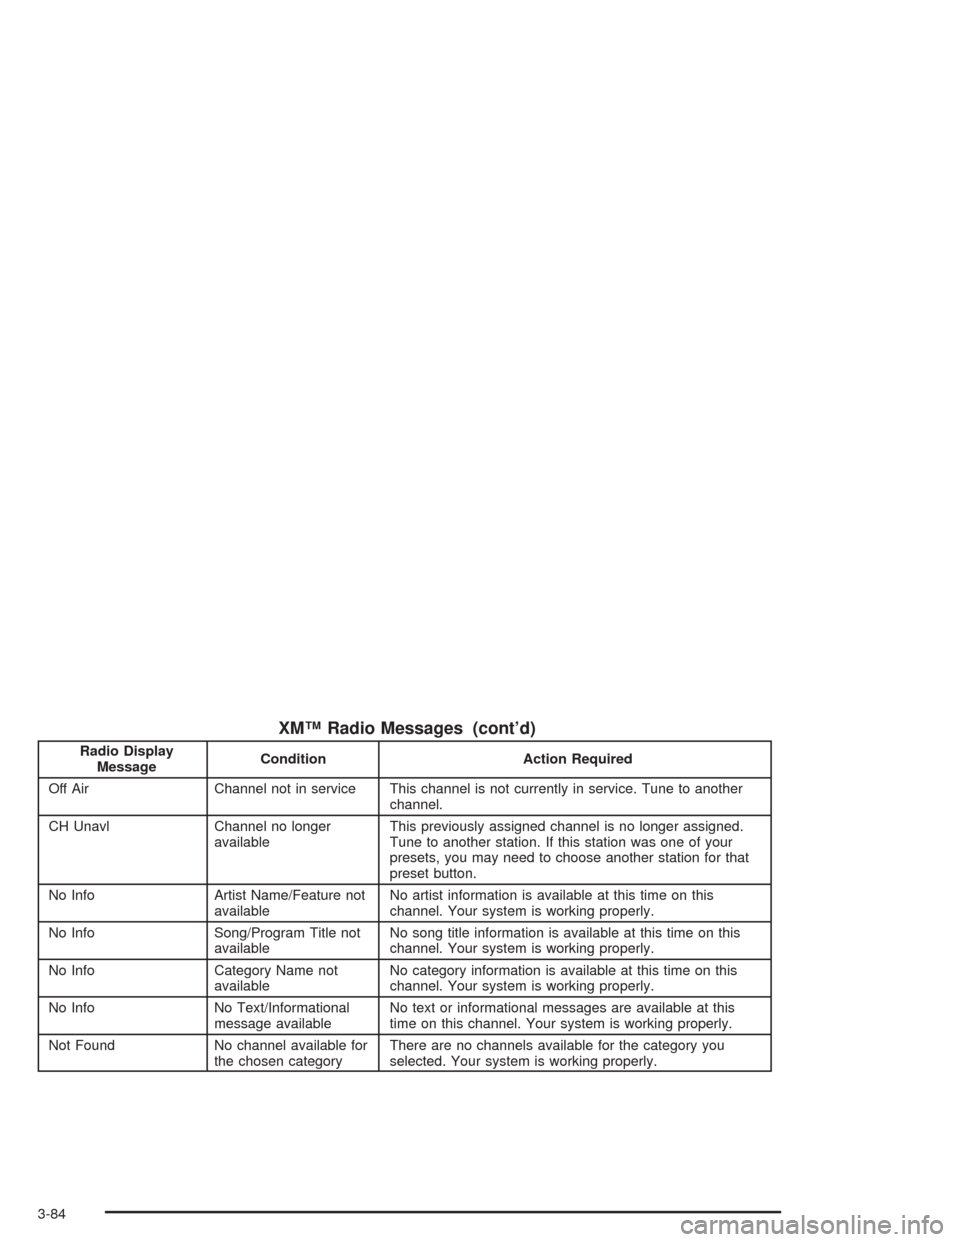
XM™ Radio Messages (cont’d)
Radio Display
MessageCondition Action Required
Off Air Channel not in service This channel is not currently in service. Tune to another
channel.
CH Unavl Channel no longer
availableThis previously assigned channel is no longer assigned.
Tune to another station. If this station was one of your
presets, you may need to choose another station for that
preset button.
No Info Artist Name/Feature not
availableNo artist information is available at this time on this
channel. Your system is working properly.
No Info Song/Program Title not
availableNo song title information is available at this time on this
channel. Your system is working properly.
No Info Category Name not
availableNo category information is available at this time on this
channel. Your system is working properly.
No Info No Text/Informational
message availableNo text or informational messages are available at this
time on this channel. Your system is working properly.
Not Found No channel available for
the chosen categoryThere are no channels available for the category you
selected. Your system is working properly.
3-84
Page 277 of 516
Finding a Station
BAND:Press this button to switch between FM1, FM2,
AM, or XM1 or XM2 (48 contiguous US states, if
equipped). The display will show your selection.
TUNE:Turn this knob to select radio stations.
sSEEKt:Press the right or the left arrow to go to
the next or to the previous station and stay there.
The radio will seek only to stations that are in the
selected band and only to those with a strong signal.
sSCANt:Press and hold either SCAN arrow
for two seconds until SC appears on the display and
you hear a beep. The radio will go to a station, play for
a few seconds, then go on to the next station. Press
either SCAN arrow again to stop scanning.
To scan preset stations, press and hold either SCAN
arrow for more than four seconds. PRESET SCAN will
appear on the display. You will hear a double beep.
The radio will go to the �rst preset station stored on your
pushbuttons, play for a few seconds, then go on to
the next preset station. Press either SCAN arrow again
to stop scanning presets.
The radio will scan only to stations that are in the
selected band and only to those with a strong signal.
Setting Preset Stations
The six numbered pushbuttons let you return to your
favorite stations. You can set up to 30 stations (six FM1,
six FM2, and six AM, six XM1 and six XM2
(48 contiguous US states, if equipped), by performing
the following steps:
1. Turn the radio on.
2. Press BAND to select FM1, FM2, AM, or XM1
or XM2.
3. Tune in the desired station.
4. Press AUTO EQ to select the equalization.
5. Press and hold one of the six numbered
pushbuttons until you hear a beep. Whenever you
press that numbered pushbutton, the station
you set will return and the equalization that you
selected will be automatically stored for that
pushbutton.
6. Repeat the steps for each pushbutton.
3-95
Page 280 of 516
BAND (Alternate Frequency):Alternate frequency
allows the radio to switch to a stronger station with the
same program type. To turn alternate frequency on
press and hold BAND for two seconds AF ON will
appear on the display. The radio may switch to stronger
stations.
To turn alternate frequency off press and hold BAND
again for two seconds. AF OFF will appear on the
display. The radio will not switch to other stations. When
you turn the ignition off and then on again, the
alternate frequency feature will automatically be
turned on.
This function does not apply for XM™ Satellite Radio
Service.
Setting Preset PTYs (RDS Only)
The six numbered pushbuttons let you return to your
favorite PTYs. These buttons have factory PTY presets.
You can set up to 12 PTYs (six FM1 and six FM2) by
performing the following steps:
1. Press BAND to select FM1 or FM2.
2. Press the P-TYPE button to activate program type
select mode. P-TYPE and the last selected PTY will
appear on the display.3. Turn the P-TYPE knob to select a PTY.
4. Press and hold one of the six numbered
pushbuttons until you hear a beep. Whenever you
press that numbered pushbutton, the PTY you
set will return.
5. Repeat the steps for each pushbutton.
RDS Messages
ALERT!:Alert warns of local or national emergencies.
When an alert announcement comes on the current
radio station, ALERT! will appear on the display. You will
hear the announcement, even if the volume is muted
or a CD is playing. If a CD is playing, play will stop
during the announcement. You will not be able to turn
off alert announcements.
ALERT! will not be affected by tests of the emergency
broadcast system. This feature is not supported by
all RDS stations.
3-98