2004 CHEVROLET TAHOE spare wheel
[x] Cancel search: spare wheelPage 329 of 556
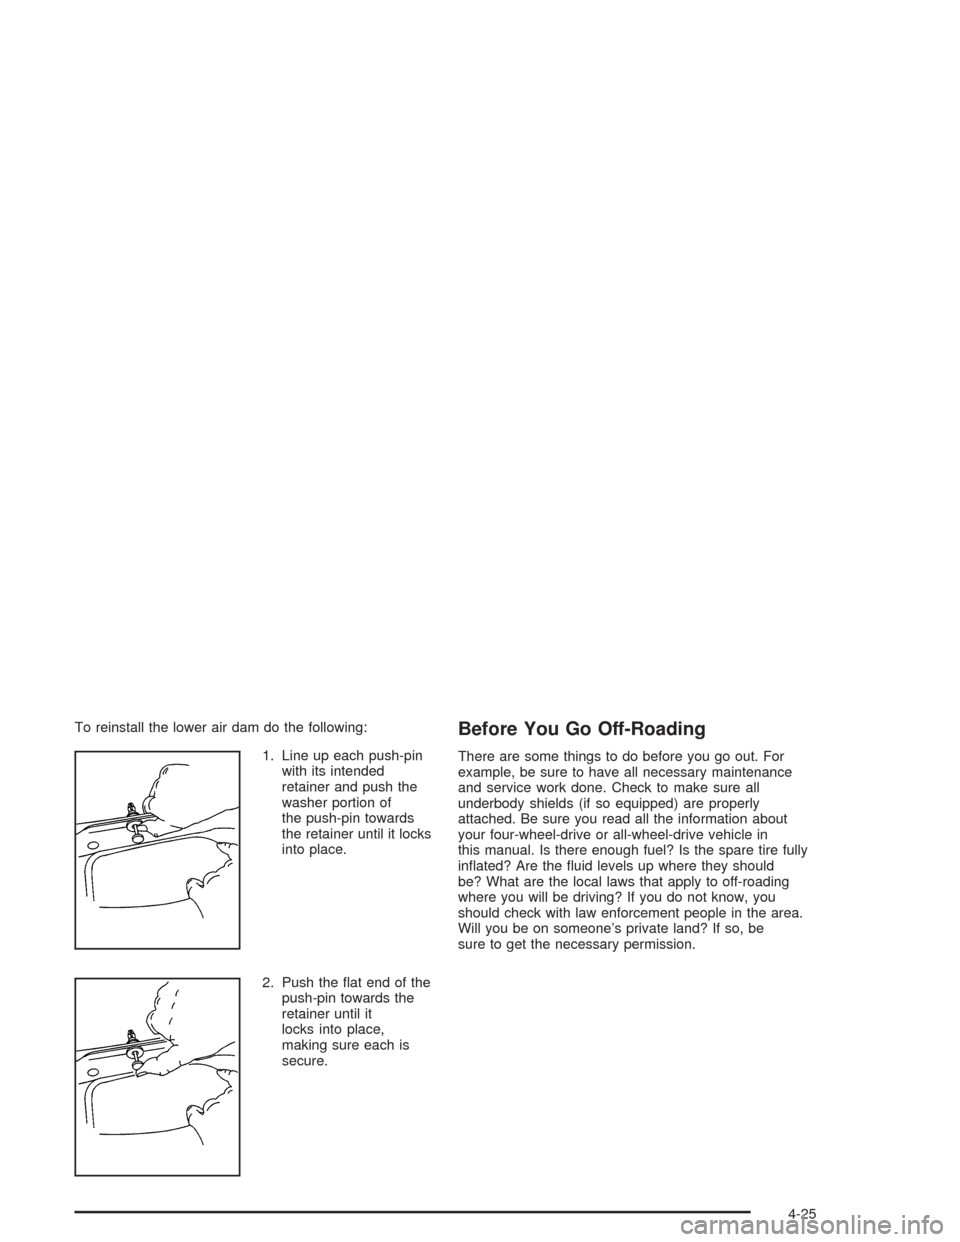
To reinstall the lower air dam do the following:
1. Line up each push-pin
with its intended
retainer and push the
washer portion of
the push-pin towards
the retainer until it locks
into place.
2. Push the �at end of the
push-pin towards the
retainer until it
locks into place,
making sure each is
secure.Before You Go Off-Roading
There are some things to do before you go out. For
example, be sure to have all necessary maintenance
and service work done. Check to make sure all
underbody shields (if so equipped) are properly
attached. Be sure you read all the information about
your four-wheel-drive or all-wheel-drive vehicle in
this manual. Is there enough fuel? Is the spare tire fully
in�ated? Are the �uid levels up where they should
be? What are the local laws that apply to off-roading
where you will be driving? If you do not know, you
should check with law enforcement people in the area.
Will you be on someone’s private land? If so, be
sure to get the necessary permission.
4-25
Page 388 of 556

Windshield Wiper Blade Replacement..............5-60
Tires..............................................................5-61
In�ation - Tire Pressure.................................5-69
Tire Pressure Monitor System.........................5-70
Tire Inspection and Rotation...........................5-72
When It Is Time for New Tires.......................5-74
Buying New Tires.........................................5-74
Uniform Tire Quality Grading..........................5-76
Wheel Alignment and Tire Balance..................5-77
Wheel Replacement......................................5-77
Tire Chains..................................................5-79
If a Tire Goes Flat........................................5-80
Changing a Flat Tire.....................................5-80
Spare Tire.................................................5-100
Appearance Care..........................................5-100
Cleaning the Inside of Your Vehicle...............5-101
Care of Safety Belts....................................5-103Weatherstrips.............................................5-103
Cleaning the Outside of Your Vehicle.............5-104
Sheet Metal Damage...................................5-106
Finish Damage...........................................5-107
Underbody Maintenance...............................5-107
Chemical Paint Spotting...............................5-107
Vehicle Care/Appearance Materials................5-108
Vehicle Identi�cation.....................................5-109
Vehicle Identi�cation Number (VIN)................5-109
Service Parts Identi�cation Label...................5-109
Electrical System..........................................5-110
Add-On Electrical Equipment.........................5-110
Windshield Wiper Fuses...............................5-110
Power Windows and Other Power Options......5-110
Fuses and Circuit Breakers..........................5-110
Capacities and Speci�cations........................5-118
Section 5 Service and Appearance Care
5-2
Page 456 of 556

Tire Pressure Monitor System
The Tire Pressure Monitor (TPM) system uses radio
and sensor technology to check tire pressure levels.
If your vehicle has this feature, sensors are mounted on
each tire and wheel assembly, except the spare tire.
The TPM sensors transmit tire pressure readings
to a receiver located in the vehicle.
When a low tire pressure condition is detected, the
TPM system will display the CHECK TIRE PRESSURE
warning message on the Driver Information Center
(DIC); and at the same time illuminate the low tire
pressure warning symbol. For additional information and
details about the DIC operation and displays seeDIC
Operation and Displays on page 3-56andDIC Warnings
and Messages on page 3-68.
When the tire pressure
monitoring system
warning light is lit, one or
more of your tires is
signi�cantly under-in�ated.
You should stop and check your tires as soon as
possible, and in�ate them to the proper pressure as
indicated on the vehicle’s tire information placard.Driving on a signi�cantly under-in�ated tire causes
the tire to overheat and can lead to tire failure.
Under-in�ation also reduces fuel efficiency and tire tread
life, and may affect the vehicle’s handling and stopping
ability. Each tire, including the spare, should be
checked monthly when cold and set to the
recommended in�ation pressure as speci�ed in the
vehicle placard and owner’s manual.
The Certi�cation/Tire label or the Tire and Loading
Information label (tire information placard) shows the
size of your vehicle’s original tires and the correct
in�ation pressure for your vehicle’s tires when they
are cold. SeeIn�ation - Tire Pressure on page 5-69.
For the location of the tire and loading information label,
seeLoading Your Vehicle on page 4-58.
Your vehicle’s TPM system can alert you about a low
tire pressure condition but it does not replace normal tire
maintenance. SeeTire Inspection and Rotation on
page 5-72andTires on page 5-61.
Notice:Do not use a tire sealant if your vehicle is
equipped with Tire Pressure Monitors. The liquid
sealant can damage the tire pressure monitor
sensors.
5-70
Page 458 of 556

10. Set all four tires to the recommended air pressure
level as indicated on the Certi�cation/Tire label or
the Tire and Loading Information label.
11. Put the valve caps back on the valve stems
The spare tire does not have a TPM sensor. If you
replace one of the road tires with the spare, the CHECK
TIRE PRESSURE message will be displayed on the DIC
screen. This message should go off once you re-install
the road tire containing the TPM sensor. The SVC TIRE
MONITOR message is displayed when the TPM system
is malfunctioning. One or more missing or inoperable
TPM sensors will cause the service tire monitor message
to be displayed. See your dealer for service.
Federal Communications Commission and
Industry and Science Canada
The TPM system operates on a radio frequency subject
to Federal Communications Commission (FCC) Rules
and with Industry and Science Canada.
This device complies with Part 15 of the FCC Rules
and with RSS-210 of Industry and Science Canada.
Operation is subject to the following two conditions:
(1) This device may not cause harmful interference, and
(2) this device must accept any interference received
including interference that may cause undesired
operation of the device.Changes or modi�cations to this system by other than
an authorized service facility could void authorization to
use this equipment.
Tire Inspection and Rotation
Tires should be rotated every 5,000 to 8,000 miles
(8 000 to 13 000 km).
Any time you notice unusual wear, rotate your tires as
soon as possible and check wheel alignment. Also
check for damaged tires or wheels. SeeWhen It Is Time
for New Tires on page 5-74andWheel Replacement
on page 5-77for more information.
Make sure the spare tire is stored securely. Push, pull,
and then try to rotate or turn the tire. If it moves, use the
ratchet/wheel wrench to tighten the cable. SeeChanging
a Flat Tire on page 5-80.
The purpose of regular rotation is to achieve more
uniform wear for all tires on the vehicle. The �rst rotation
is the most important. SeeScheduled Maintenance
on page 6-4.
5-72
Page 461 of 556
Whenever you replace your tires with those not having
a TPC Spec number, make sure they are the same
size, load range, speed rating and construction
type (bias, bias-belted or radial) as your original tires.
If you replace your vehicle’s tires with those not having a
TPC Spec number, the tire pressure monitoring
system may give an inaccurate low pressure warning.
Non-TPC Spec tires may give a low pressure warning
that is higher or lower than the proper warning level you
would get with TPC Spec numbered tires.
{CAUTION:
Mixing tires could cause you to lose control
while driving. If you mix tires of different sizes
or types (radial and bias-belted tires), the
vehicle may not handle properly, and you could
have a crash. Using tires of different sizes may
also cause damage to your vehicle. Be sure to
use the same size and type tires on all wheels.
CAUTION: (Continued)
CAUTION: (Continued)
Your vehicle may be equipped with a different
size spare than the road tires (those originally
installed on your vehicle). When new, your
vehicle included a spare tire and wheel
assembly with a similar overall diameter as
your vehicle’s road tires and wheels, so it is all
right to drive on it. Because this spare was
developed for use on your vehicle, it will not
affect vehicle handling.
{CAUTION:
If you use bias-ply tires on your vehicle, the
wheel rim �anges could develop cracks after
many miles of driving. A tire and/or wheel
could fail suddenly, causing a crash. Use only
radial-ply tires with the wheels on your vehicle.
5-75
Page 468 of 556
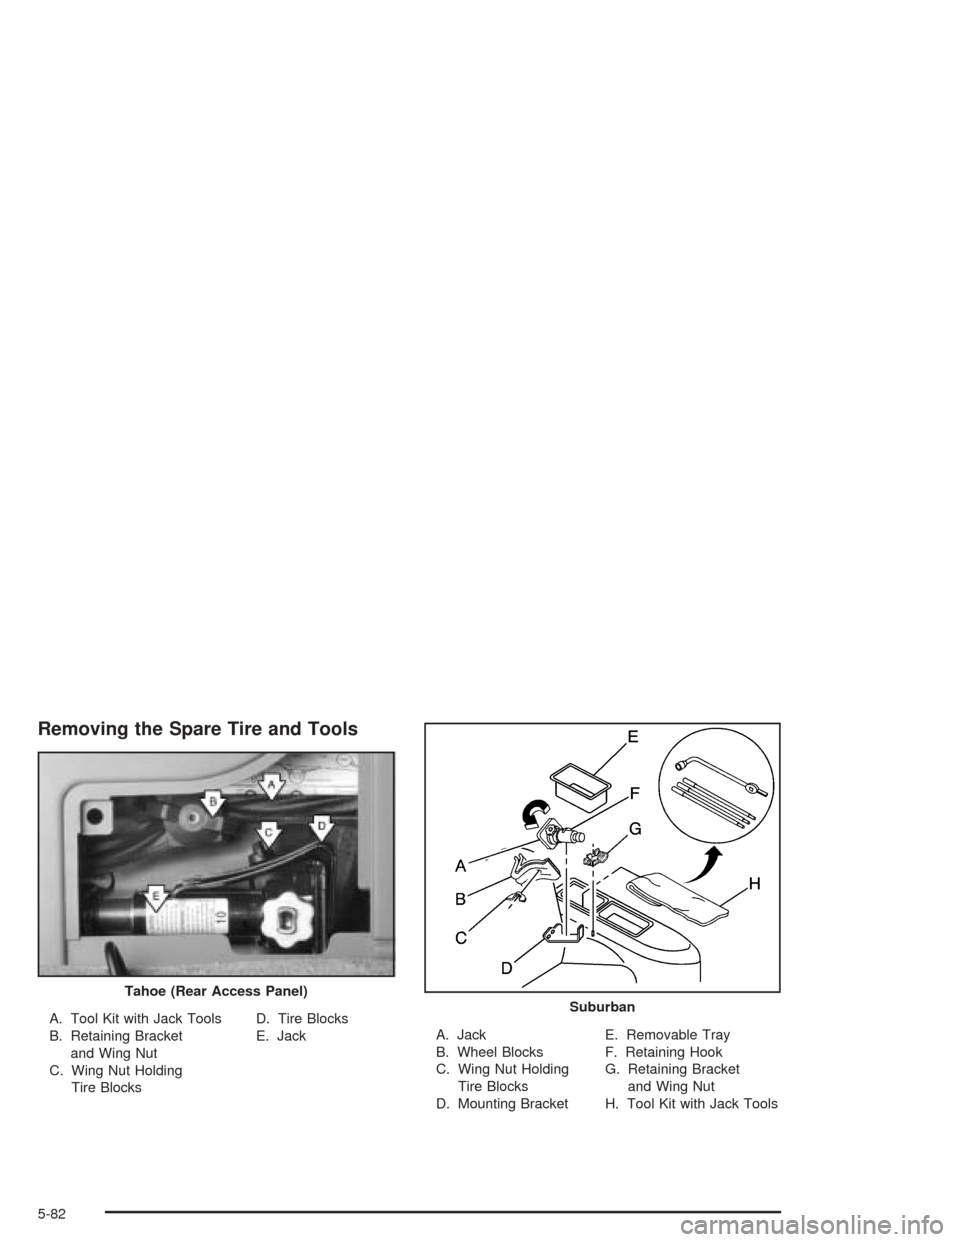
Removing the Spare Tire and Tools
A. Tool Kit with Jack Tools
B. Retaining Bracket
and Wing Nut
C. Wing Nut Holding
Tire BlocksD. Tire Blocks
E. JackA. Jack
B. Wheel Blocks
C. Wing Nut Holding
Tire Blocks
D. Mounting BracketE. Removable Tray
F. Retaining Hook
G. Retaining Bracket
and Wing Nut
H. Tool Kit with Jack Tools Tahoe (Rear Access Panel)Suburban
5-82
Page 469 of 556
For Tahoe, the equipment is located behind the left trim
panel in the rear of the vehicle. Unlatch the release
lever to open the trim panel door. Skip the �rst step and
follow the last three.
For Suburban, the equipment you’ll need is under the
storage tray in the left trim panel.
1. Remove the tray to access the tools.
2. There is a wing nut used to retain the tool kit.
To remove it, turn the wing nut counterclockwise.
3. To release the jack from its holder, turn the knob on
the jack counterclockwise to lower the jack head.
4. The wheel blocks and the wheel block retainer can
be removed by turning the wing nut
counterclockwise.
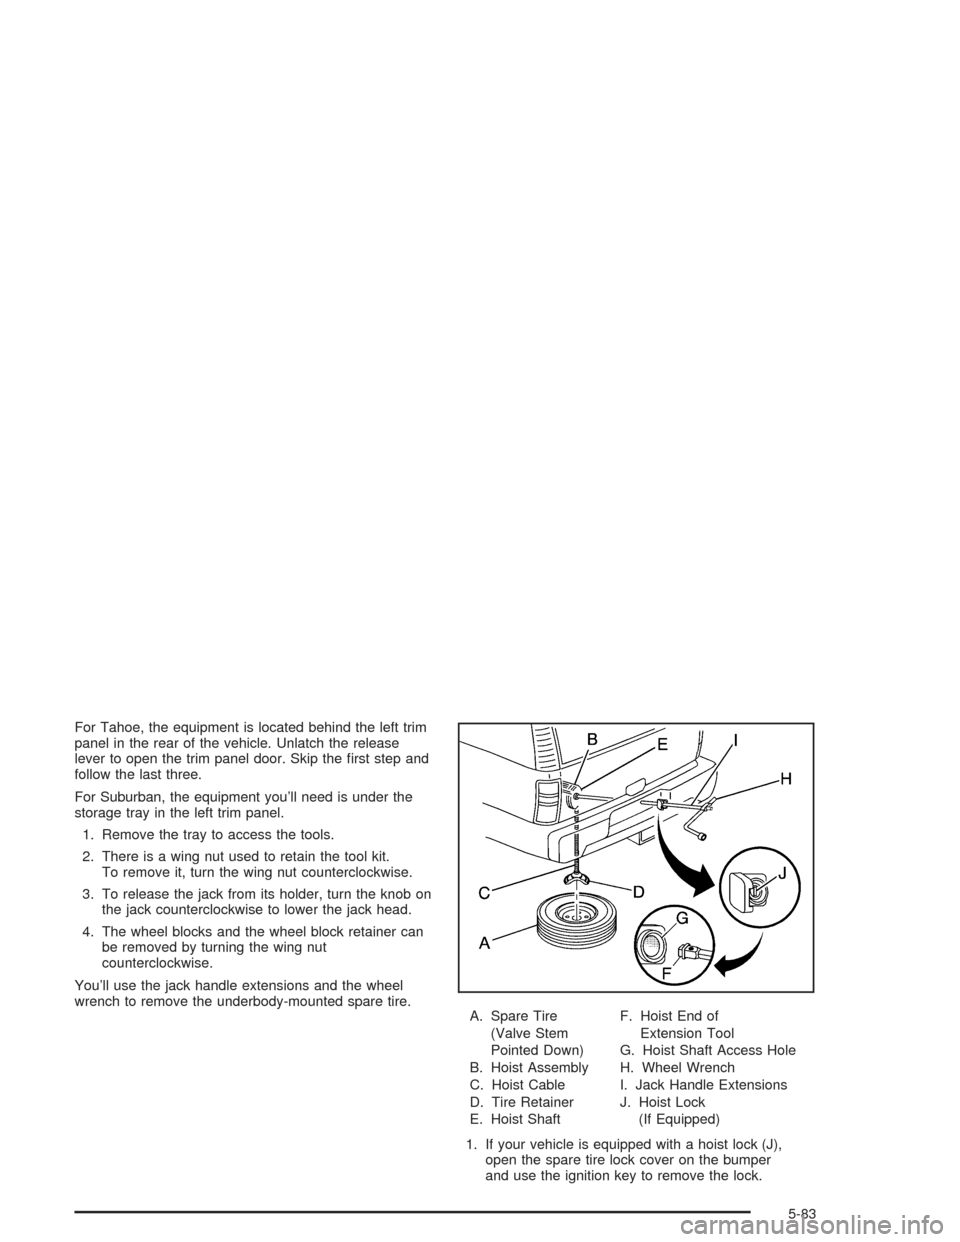
You’ll use the jack handle extensions and the wheel
wrench to remove the underbody-mounted spare tire.
A. Spare Tire
(Valve Stem
Pointed Down)
B. Hoist Assembly
C. Hoist Cable
D. Tire Retainer
E. Hoist ShaftF. Hoist End of
Extension Tool
G. Hoist Shaft Access Hole
H. Wheel Wrench
I. Jack Handle Extensions
J. Hoist Lock
(If Equipped)
1. If your vehicle is equipped with a hoist lock (J),
open the spare tire lock cover on the bumper
and use the ignition key to remove the lock.
5-83
Page 470 of 556
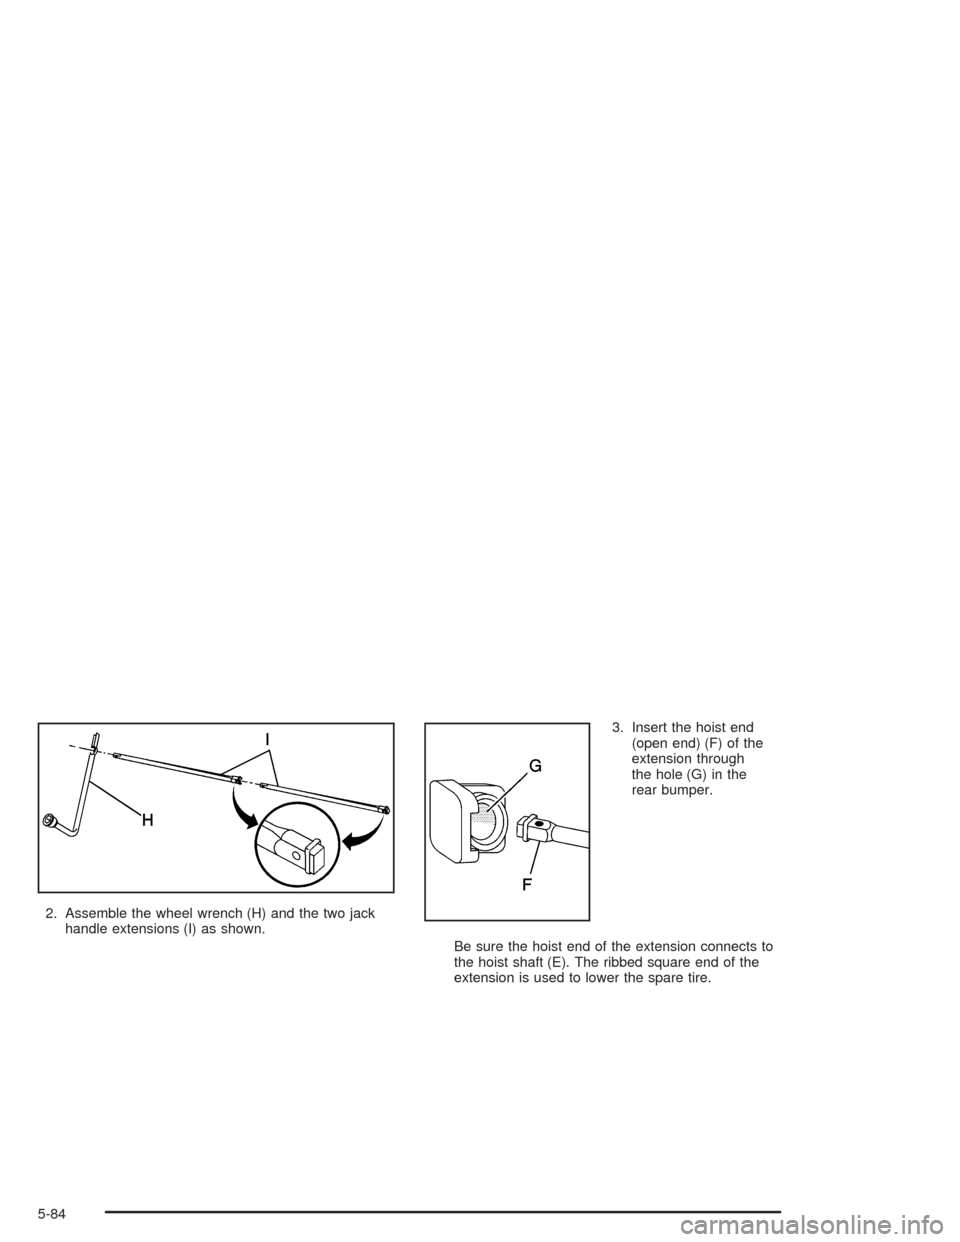
2. Assemble the wheel wrench (H) and the two jack
handle extensions (I) as shown.3. Insert the hoist end
(open end) (F) of the
extension through
the hole (G) in the
rear bumper.
Be sure the hoist end of the extension connects to
the hoist shaft (E). The ribbed square end of the
extension is used to lower the spare tire.
5-84