2004 CHEVROLET MALIBU turn signal
[x] Cancel search: turn signalPage 131 of 426
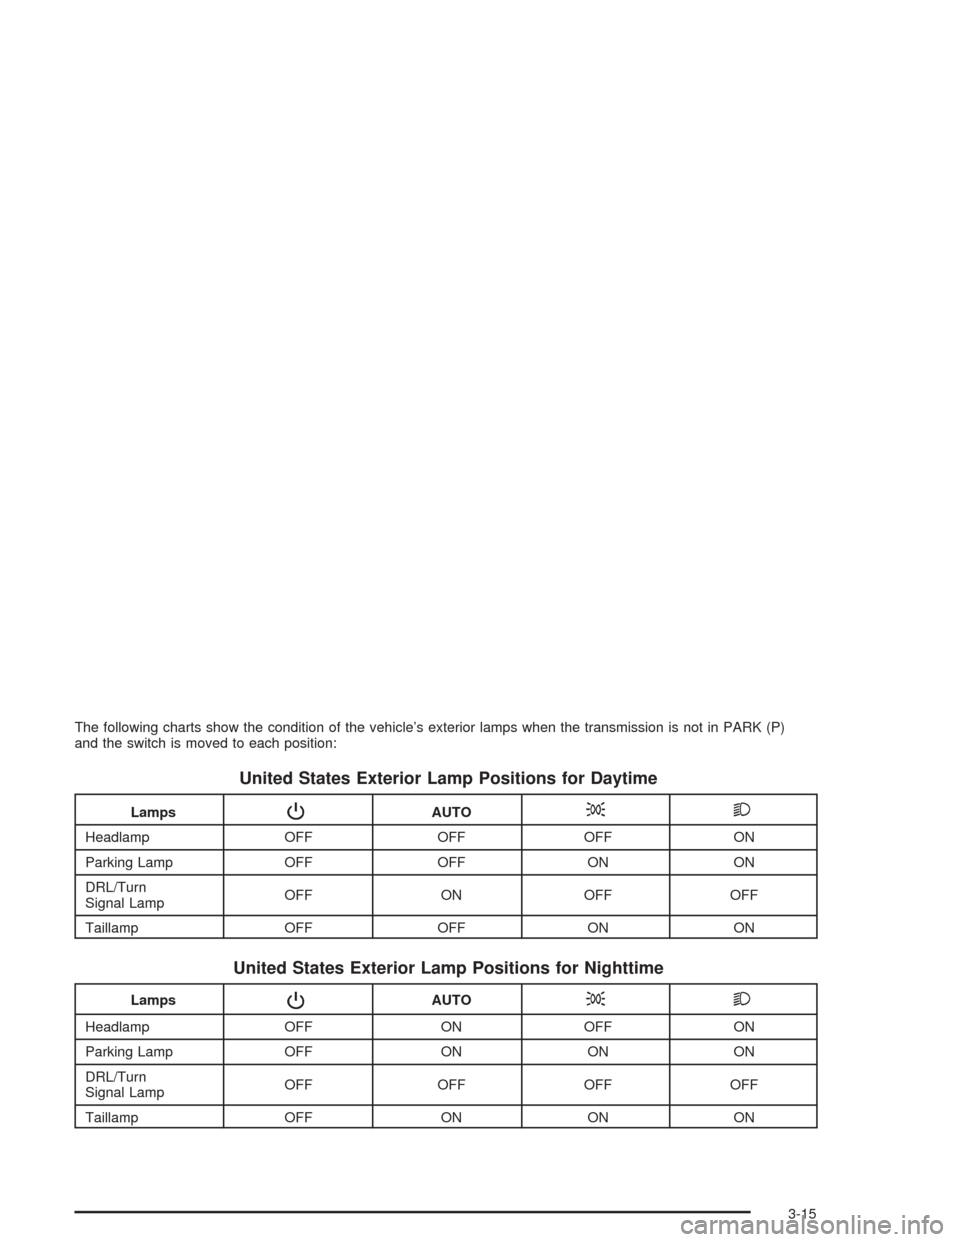
The following charts show the condition of the vehicle’s exterior lamps when the transmission is not in PARK (P)
and the switch is moved to each position:
United States Exterior Lamp Positions for Daytime
LampsPAUTO;2
Headlamp OFF OFF OFF ON
Parking Lamp OFF OFF ON ON
DRL/Turn
Signal LampOFF ON OFF OFF
Taillamp OFF OFF ON ON
United States Exterior Lamp Positions for Nighttime
LampsPAUTO;2
Headlamp OFF ON OFF ON
Parking Lamp OFF ON ON ON
DRL/Turn
Signal LampOFF OFF OFF OFF
Taillamp OFF ON ON ON
3-15
Page 132 of 426
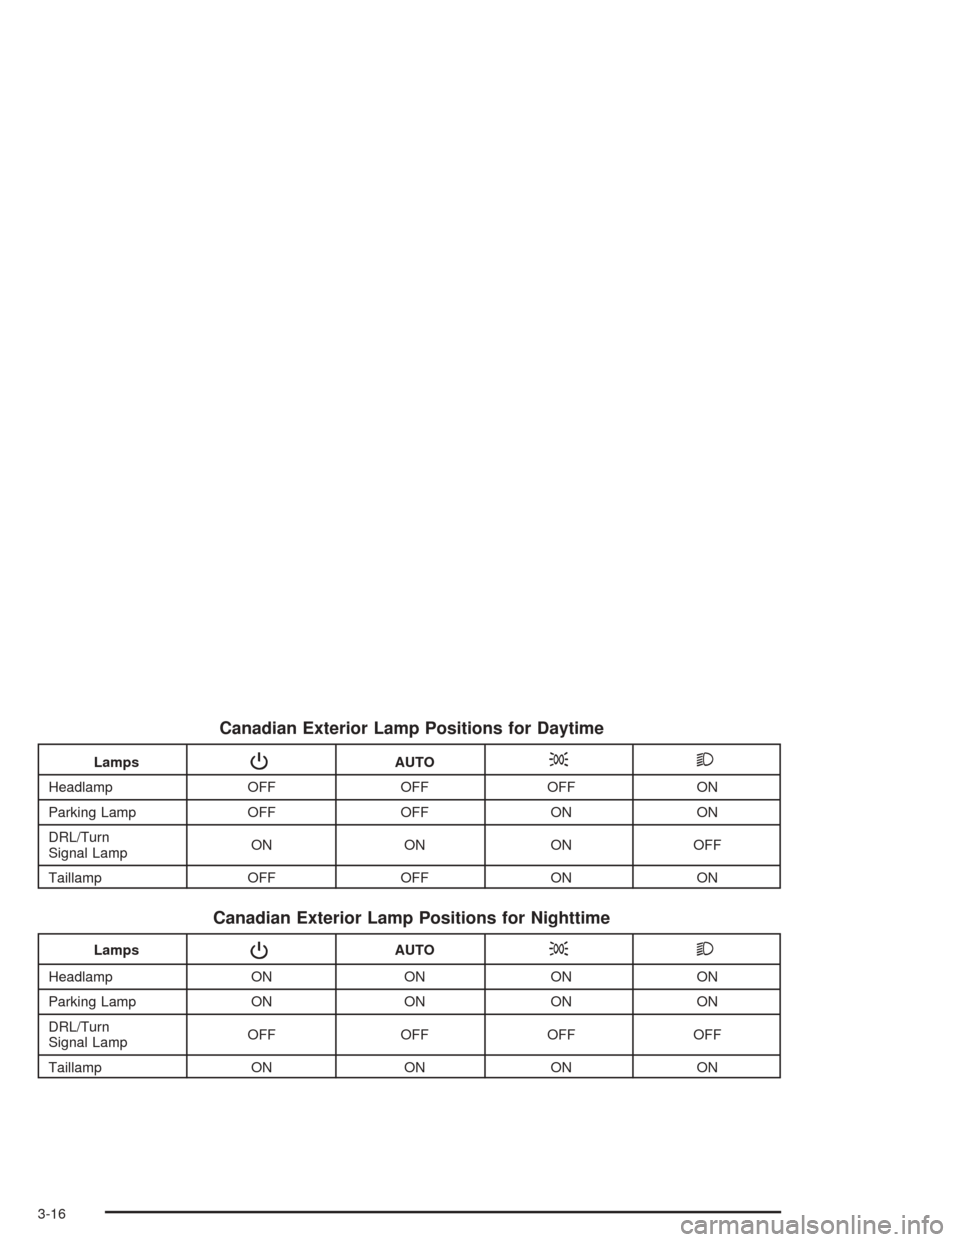
Canadian Exterior Lamp Positions for Daytime
LampsPAUTO;2
Headlamp OFF OFF OFF ON
Parking Lamp OFF OFF ON ON
DRL/Turn
Signal LampON ON ON OFF
Taillamp OFF OFF ON ON
Canadian Exterior Lamp Positions for Nighttime
LampsPAUTO;2
Headlamp ON ON ON ON
Parking Lamp ON ON ON ON
DRL/Turn
Signal LampOFF OFF OFF OFF
Taillamp ON ON ON ON
3-16
Page 133 of 426
Daytime Running Lamps (DRL)
Daytime Running Lamps (DRL) can make it easier for
others to see the front of your vehicle during the day. DRL
can be helpful in many different driving conditions, but
they can be especially helpful in the short periods after
dawn and before sunset. Fully functional daytime running
lamps are required on all vehicles �rst sold in Canada.
The DRL system will make both front turn signal lamps
turn on when the following conditions are met:
The ignition is on.
The exterior lamp control is turned to AUTO.
In addition, Canadian vehicles DRL will also turn
on if you have turned on your parking lamps.
The light sensor detects daytime light.
The shift lever is not in PARK (P).
While the DRL system is on, the taillamps, sidemarker
lamps, and instrument panel lights will not be illuminated.
The DRL system will be off any time your vehicle is in
PARK (P). The DRL system on U.S. vehicles can
also be turned off by using the Off/On switch for one
ignition cycle.
As with any vehicle, you should turn on the regular
headlamp system when you need it.
Automatic Headlamp System
When it is dark enough outside, your automatic system
will turn on your headlamps at the normal brightness
along with other lamps such as the taillamps, sidemarker,
parking lamps, instrument panel lights, and interior
switch backlighting.
Your vehicle is equipped with a light sensor on the top of
the instrument panel that inputs to the ACC, so be sure it
is not covered which will cause the system to be on
whenever the ignition is on.
The system may also be on when driving through a
parking garage, heavy overcast weather or a tunnel.
This is normal.
There is a delay in the transition between the daytime
and nighttime operation of the automatic lamp control
system so that driving under bridges or bright overhead
street lights does not affect the system. The automatic
lamp control system will only be affected when the light
sensor sees a change in lighting lasting longer than
this delay.
If you start your vehicle in a dark garage, the automatic
lamp system will come on immediately. Once you leave
the garage, it will take about one minute for the automatic
lamp system to change to DRL if it is light outside.
3-17
Page 134 of 426
During that delay, your instrument panel cluster may
not be as bright as usual. Make sure your instrument
panel brightness control is in the full bright position.
See “Instrument Panel Brightness Control” underInterior
Lamps on page 3-19.
To idle your vehicle with the system off, turn the
ignition on and rotate the exterior light switch to the
Off/On position. For Canadian vehicles, the transmission
must stay in PARK (P) for this function.
As with any vehicle, you should turn on the regular
headlamps when you need them.
Headlamps Off in Park (P)
This feature works when the ignition is on and it is
dark outside. To turn the headlamps off when it is
dark outside but keep other exterior lights on, turn
the exterior lamp control to the parking lamp position.
In this position, the parking lamps, sidemarker
lamps, taillamps, license plate lamps and instrument
panel lights will be on, but the headlamps will be off.
To turn on the headlamps along with the other
lamps when it is dark outside, turn the exterior lamp
control to the AUTO or headlamp position.
This feature will work for Canadian vehicles if the
vehicle is in PARK (P).
Delayed Headlamps
The delayed headlamps feature will continue to illuminate
the headlamps for 20 seconds after the key is turned to
OFF at night. Then the headlamps will automatically
turn off.
To override the 20 second delayed headlamp feature
while it is active turn the switch at the end of the
turn signal/multifunction lever to the Off/On position.
Fog Lamps
If your vehicle has this
feature, the button for the
fog lamps is located on
the instrument panel, to the
left of the steering wheel.
If your vehicle has fog lamps, the ignition must be on.
Push the button to turn the fog lamps on. An indicator
light in the button will glow when the fog lamps are
on. Push the button again to turn the fog lamps off.
The fog lamps will turn off while the high-beam
headlamps are turned on.
3-18
Page 170 of 426
DISP (Display):Press this knob to switch the display
between time and temperature or radio station frequency
and temperature. Time display is available with the
ignition turned off.
To change the default on the display, press this knob
until you see the display you want, then hold the
knob for two seconds. You will hear a beep and the
selected display will now be the default.
Finding a Station
AM/FM/CD:Press this button to switch between FM1,
FM2, AM, and CD. The display will show your selection.
ADJ (Adjust):Turn this knob to select radio stations.
SEEK
w/ SEEKx:Press the SEEK up button or the
SEEK down button to go to the next or to the previous
station and stay there.
To scan stations, press and hold either SEEK button for
two seconds until you hear a beep. The radio will go
to a station, play for a few seconds, then go on to
the next station. Press either SEEK button again to
stop scanning.To scan preset stations, press and hold either SEEK
button for more than four seconds until you hear
two beeps. The radio will go to the �rst preset station
stored on your pushbuttons, play for a few seconds, then
go on to the next preset station. Press either SEEK
button again to stop scanning presets.
The radio will seek and scan only to stations that are in
the selected band and only to those with a strong signal.
Setting Preset Stations
The six numbered pushbuttons let you return to your
favorite stations. You can set up to 18 stations (six FM1,
six FM2, and six AM) by performing the following steps:
1. Turn the radio on.
2. Press AM/FM/CD to select FM1, FM2, or AM.
3. Tune in the desired station.
4. Press and hold one of the six numbered pushbuttons
until you hear a beep. Whenever you press that
numbered pushbutton, the station you set will return.
5. Repeat the steps for each pushbutton.
3-54
Page 176 of 426
Then as you drive, automatic volume increases the
volume, as necessary, to overcome noise at any speed.
The volume level should always sound the same to
you as you drive. AUTO VOL NONE will appear on the
display if the radio cannot determine the vehicle
speed or if the engine is not running. If you do not want
to use automatic volume, select AUTO VOL OFF.
DISP (Display):Press this knob to switch the display
between time and temperature or radio station frequency
and temperature. Time display is available with the
ignition turned off.
For RDS, press this knob to change what appears on
the display while using RDS. The display options
are station name, RDS station frequency, PTY, and the
name of the program (if available).
For XM™ (48 contiguous US states, if equipped), press
this knob while in XM mode to retrieve four different
categories of information related to the current song or
channel: Artist, Song Title, Category or PTY, Channel
Number/Channel Name.
To change the default on the display, press this knob
until you see the display you want, then hold the
knob for two seconds. You will hear a beep and the
selected display will now be the default.Finding a Station
BAND:Press this button to switch between FM1, FM2,
or AM, or XM1 or XM2 (48 contiguous US states, if
equipped). The display will show your selection.
ADJ (Adjust):Turn this knob to select radio stations.
xSEEKw:Press the down or up arrow to go to the
next or to the previous station and stay there.
To scan stations, press and hold either arrow for
two seconds until you hear a beep. The radio will go to
a station, play for a few seconds, then go on to the
next station. Press either arrow again to stop scanning.
To scan preset stations, press and hold either arrow
for more than four seconds until you hear two beeps.
The radio will go to the �rst preset station stored on your
pushbuttons, play for a few seconds, then go on to
the next preset station. Press either arrow again to stop
scanning presets.
The radio will seek and scan only to stations that are in
the selected band and only to those with a strong signal.
3-60
Page 181 of 426
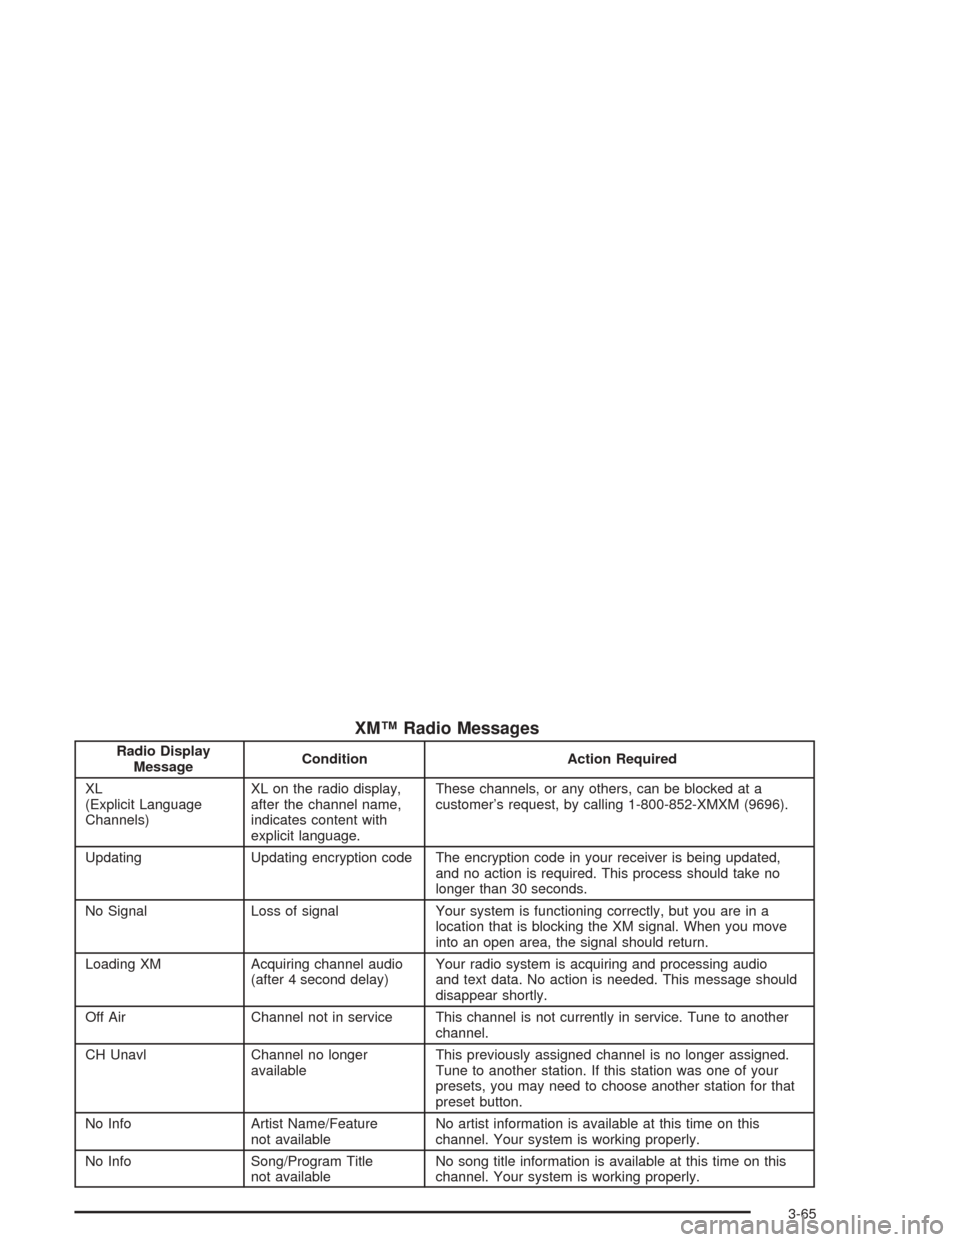
XM™ Radio Messages
Radio Display
MessageCondition Action Required
XL
(Explicit Language
Channels)XL on the radio display,
after the channel name,
indicates content with
explicit language.These channels, or any others, can be blocked at a
customer’s request, by calling 1-800-852-XMXM (9696).
Updating Updating encryption code The encryption code in your receiver is being updated,
and no action is required. This process should take no
longer than 30 seconds.
No Signal Loss of signal Your system is functioning correctly, but you are in a
location that is blocking the XM signal. When you move
into an open area, the signal should return.
Loading XM Acquiring channel audio
(after 4 second delay)Your radio system is acquiring and processing audio
and text data. No action is needed. This message should
disappear shortly.
Off Air Channel not in service This channel is not currently in service. Tune to another
channel.
CH Unavl Channel no longer
availableThis previously assigned channel is no longer assigned.
Tune to another station. If this station was one of your
presets, you may need to choose another station for that
preset button.
No Info Artist Name/Feature
not availableNo artist information is available at this time on this
channel. Your system is working properly.
No Info Song/Program Title
not availableNo song title information is available at this time on this
channel. Your system is working properly.
3-65
Page 187 of 426
Then as you drive, automatic volume increases the
volume, as necessary, to overcome noise at any speed.
The volume level should always sound the same to
you as you drive. AUTO VOL NONE will appear on the
display if the radio cannot determine the vehicle
speed or if the engine is not running. If you do not want
to use automatic volume, select AUTO VOL OFF.
DISP (Display):Press this knob to switch the display
between time and temperature or radio station frequency
and temperature. Time display is available with the
ignition turned off.
For RDS, press this knob to change what appears on
the display while using RDS. The display options
are station name, RDS station frequency, PTY, and
the name of the program (if available).
For XM™ (48 contiguous US states, if equipped), press
this knob while in XM mode to retrieve four different
categories of information related to the current song or
channel: Artist, Song Title, Category or PTY, Channel
Number/Channel Name.
To change the default on the display, press this knob
until you see the display you want, then hold the
knob for two seconds. You will hear a beep and the
selected display will now be the default.Finding a Station
BAND:Press this button to switch between FM1, FM2,
or AM, or XM1 or XM2 (48 contiguous US states, if
equipped). The display will show your selection.
ADJ (Adjust):Turn this knob to select radio stations.
xSEEKw:Press the down or up arrow to go to
the next or to the previous station and stay there.
To scan stations, press and hold either arrow for
two seconds until you hear a beep. The radio will go
to a station, play for a few seconds, then go on to
the next station. Press either arrow again to stop
scanning.
To scan preset stations, press and hold either arrow for
more than four seconds until you hear two beeps.
The radio will go to the �rst preset station stored on your
pushbuttons, play for a few seconds, then go on to
the next preset station. Press either arrow again to stop
scanning presets.
The radio will seek and scan only to stations that are in
the selected band and only to those with a strong signal.
3-71