2004 CHEVROLET CORVETTE manual transmission
[x] Cancel search: manual transmissionPage 179 of 384

If the SERVICE ABS message is being displayed, your
Traction Control System and the Active Handling
System will also be disabled. The Driver Information
Center will scroll three messages: SERVICE ABS,
SERVICE TRACTION SYS and SERVICE ACTIVE
HNDLG, and the instrument cluster car icon will
be illuminated. The driver can acknowledge these
messages by pressing the reset button three times.
When the service message is displayed the computer
controlled systems will not assist the driver and you
should have the system repaired as soon as possible.
Adjust your driving accordingly.
SERVICE ACTIVE HANDLING:If the SERVICE
ACTIVE HNDLG message is displayed, there is a
problem with your Active Handling System and your
vehicle needs service. The instrument cluster light
will also be on and a chime will sound. When this
message is displayed, the system is not working. Adjust
your driving accordingly.SERVICE COLUMN LOCK (Manual Transmission
Only):If the system that controls the locking and
unlocking of the steering column does not work properly,
have the vehicle towed to a dealer for service.
SERVICE RIDE CONTROL:This message is used to
indicate to the driver that the Selective Ride Control
system has detected a malfunction and that the system
must be serviced. The SERVICE RIDE CONTROL
message will always come on when a failure is detected
by the Selective Ride Control system. If a fault is
present in the Selective Ride Control system which
causes the shocks to be in their full soft condition, the
SERVICE RIDE CONTROL, SHOCKS INOPERATIVE
and MAXIMUM SPEED 80 MPH (129 km/h) will
display together. You will never get a SHOCKS
INOPERATIVE and MAXIMUM SPEED 80 MPH
(129 km/h) message without a SERVICE RIDE
CONTROL message.
3-65
Page 182 of 384
Other Messages
Here are more messages that you can receive on your
Driver Information Center (DIC). To acknowledge a
message and read another message that may have
come on at the same time, press the RESET button.
•BRAKE BEFORE SHIFT
(See “Automatic Transmissions Only” under
Automatic Transmission Operation on page 2-25.)
•CHANGE OIL NOW
(See “GM Oil Life System™” underEngine Oil on
page 5-13.)
•CHANGE OIL SOON
(See “GM Oil Life System™” underEngine Oil on
page 5-13andScheduled Maintenance on
page 6-4.)
•CRUISE DISENGAGED
(See “Cruise Control” underTurn
Signal/Multifunction Lever on page 3-6.)
•CRUISE SET_MPH (_km/h)
(See “Cruise Control” underTurn
Signal/Multifunction Lever on page 3-6.)
•DOOR AJAR
•ENGINE PROTECTION REDUCE ENGINE RPM
•HATCH AJAR (Coupe)
•HIGH VOLTAGE
(SeeVoltmeter Gage on page 3-37.)
•LOW BRAKE FLUID
(See “Brake Fluid” underBrakes on page 5-37.)
•LOW FUEL
(SeeFuel Gage on page 3-46.)
•LOW VOLTAGE
(SeeVoltmeter Gage on page 3-37.)
•LOW WASHER FLUID
(SeeWindshield Washer Fluid on page 5-36.)
•RESERVE FUEL
(SeeFuel Gage on page 3-46.)
•TONNEAU AJAR (Convertible)
•TRUNK AJAR (Convertible/Z06)
•UPSHIFT NOW
(SeeManual Transmission Operation on
page 2-28.)
3-68
Page 236 of 384
If You Are Stuck: In Sand, Mud,
Ice or Snow
In order to free your vehicle when it is stuck, you will
need to spin the wheels, but you do not want to
spin your wheels too fast. The method known as
“rocking” can help you get out when you are stuck, but
you must use caution.
{CAUTION:
If you let your tires spin at high speed, they can
explode, and you or others could be injured.
And, the transmission or other parts of the
vehicle can overheat. That could cause an
engine compartment �re or other damage.
When you are stuck, spin the wheels as little as
possible. Do not spin the wheels above 35 mph
(55 km/h) as shown on the speedometer.
Notice:Spinning your wheels can destroy parts of
your vehicle as well as the tires. If you spin the
wheels too fast while shifting your transmission
back and forth, you can destroy your transmission.
For information about using tire chains on your
vehicle, seeTire Chains on page 5-71.
Rocking Your Vehicle To Get It Out
First, turn your steering wheel left and right. That will
clear the area around your front wheels. You should turn
your TCS System off. SeeTraction Control System
(TCS) on page 4-9. Then shift back and forth between
REVERSE (R) and a forward gear, spinning the
wheels as little as possible. For a manual transmission,
shift slowly between either FIRST (1) or SECOND (2)
and REVERSE (R), allowing the wheels to stop
before shifting into gear. Release the accelerator pedal
while you shift, and press lightly on the accelerator
pedal when the transmission is in gear. By slowly
spinning your wheels in the forward and reverse
directions, you will cause a rocking motion that may free
your vehicle. If that does not get you out after a few
tries, you may need to be towed out. If you do need to
be towed out, seeTowing Your Vehicle on page 4-33.
4-32
Page 243 of 384
Service............................................................5-3
Doing Your Own Service Work.........................5-4
Adding Equipment to the Outside of
Your Vehicle..............................................5-4
Fuel................................................................5-4
Gasoline Octane............................................5-5
Gasoline Specifications....................................5-5
California Fuel...............................................5-5
Additives.......................................................5-6
Fuels in Foreign Countries...............................5-6
Filling Your Tank............................................5-7
Filling a Portable Fuel Container.....................5-10
Checking Things Under the Hood....................5-10
Hood Release..............................................5-11
Engine Compartment Overview.......................5-12
Engine Oil...................................................5-13
Engine Air Cleaner/Filter................................5-18
Automatic Transmission Fluid.........................5-20
Manual Transmission Fluid.............................5-21
Hydraulic Clutch...........................................5-22
Engine Coolant.............................................5-23
Coolant Surge Tank Pressure Cap..................5-26
Engine Overheating.......................................5-26
Cooling System............................................5-29
Power Steering Fluid.....................................5-35
Windshield Washer Fluid................................5-36Brakes........................................................5-37
Battery........................................................5-40
Jump Starting...............................................5-41
Rear Axle.......................................................5-47
Bulb Replacement..........................................5-48
Halogen Bulbs..............................................5-48
Headlamps..................................................5-48
Taillamps and Turn Signal Lamps...................5-50
Back-Up Lamps............................................5-52
Windshield Wiper Blade Replacement..............5-52
Tires..............................................................5-55
Extended Mobility Tires (Except Z06)...............5-61
Inflation - Tire Pressure.................................5-62
Tire Pressure Monitor Operation
(Except Z06).............................................5-64
Tire Rotation................................................5-65
When It Is Time for New Tires.......................5-65
Buying New Tires.........................................5-66
Uniform Tire Quality Grading..........................5-67
Wheel Alignment and Tire Balance..................5-68
Wheel Replacement......................................5-68
Tire Chains..................................................5-71
Lifting Your Vehicle.......................................5-71
If a Tire Goes Flat........................................5-75
Tire Inflator Kit (Z06 Only).............................5-77
Section 5 Service and Appearance Care
5-1
Page 262 of 384
Automatic Transmission Fluid
How to Check
It is not necessary to check the transmission fluid level.
A transmission fluid leak is the only reason for fluid
loss. If a leak occurs, take the vehicle to your dealer
service department and have it repaired as soon
as possible.
There is a special procedure for checking and changing
the transmission fluid. Because this procedure is
difficult, you should have this done at your dealer service
department. Contact your dealer for additional
information or the procedure can be found in the service
manual. To purchase a service manual, seeService
Publications Ordering Information on page 7-11.
Notice:We recommend you use only �uid labeled
DEXRON
®-III, because �uid with that label is
made especially for your automatic transmission.
Damage caused by �uid other than DEXRON
®-III is
not covered by your new vehicle warranty.Change both the fluid and filter every 50,000 miles
(80 000 km) if the vehicle is mainly driven under one of
these conditions:
•In heavy city traffic where the outside temperature
regularly reaches 90°F (32°C) or higher.
•In hilly or mountainous terrain.
•High performance operation.
If you do not use your vehicle under one of these
conditions, change the fluid and filter every
100,000 miles (166 000 km).
SeeScheduled Maintenance on page 6-4for the proper
service intervals for the transmission fluid and filter.
5-20
Page 263 of 384
Manual Transmission Fluid
When to Check
A good time to have it checked is when the engine oil is
changed. However, the fluid in your manual transmission
doesn’t require changing.
How to Check
Because this operation can be difficult, you may choose
to have this done at your dealership service department.
If you do it yourself, be sure to follow all the instructions
here, or you could get a false reading.
Notice:Too much or too little �uid can damage
your transmission. Too much can mean that some
of the �uid could come out and fall on hot engine
part or exhaust system parts, starting a �re.
Too little �uid could cause the transmission to
overheat. Be sure to get an accurate reading if you
check your transmission �uid.
Check the fluid level only when your engine is off, the
vehicle is parked on a level place and the transmission
is cool enough for you to rest your fingers on the
transmission case.Then, follow these steps:
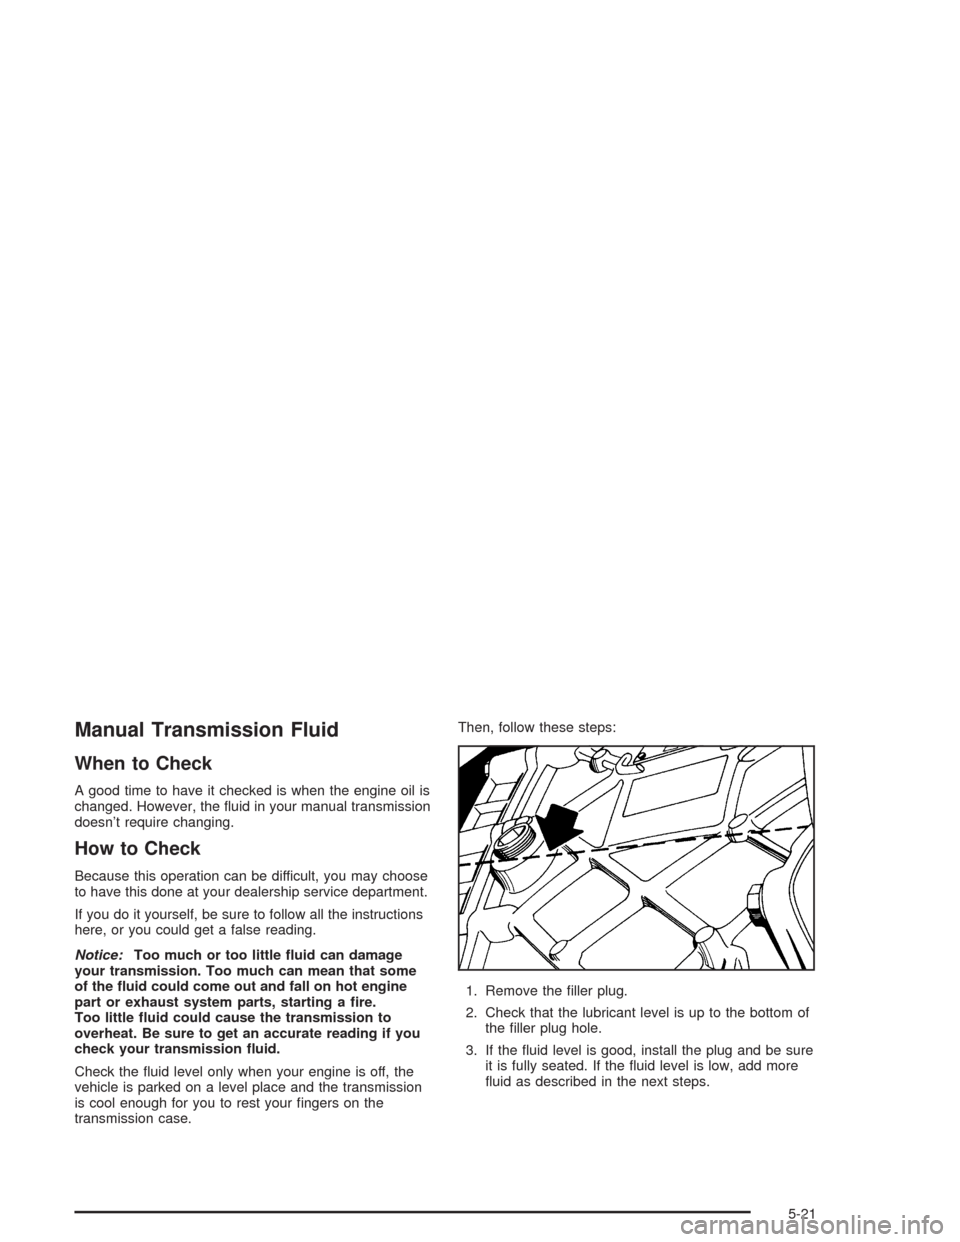
1. Remove the filler plug.
2. Check that the lubricant level is up to the bottom of
the filler plug hole.
3. If the fluid level is good, install the plug and be sure
it is fully seated. If the fluid level is low, add more
fluid as described in the next steps.
5-21
Page 284 of 384
1. Check the other vehicle. It must have a 12-volt
battery with a negative ground system.
Notice:If the other vehicle’s system is not a 12-volt
system with a negative ground, both vehicles can
be damaged. Only use vehicles with 12-volt systems
with negative grounds to jump start your vehicle.
2. Get the vehicles close enough so the jumper cables
can reach, but be sure the vehicles are not touching
each other. If they are, it could cause a ground
connection you do not want. You would not be able
to start your vehicle, and the bad grounding
could damage the electrical systems.
To avoid the possibility of the vehicles rolling, set
the parking brake firmly on both vehicles involved in
the jump start procedure. Put an automatic
transmission in PARK (P) or a manual transmission
in NEUTRAL before setting the parking brakes.Notice:If you leave your radio or other accessories
on during the jump starting procedure, they could
be damaged. The repairs would not be covered
by your warranty. Always turn off your radio and
other accessories when jump starting your vehicle.
3. Turn off the ignition on both vehicles. Unplug
unnecessary accessories plugged into the cigarette
lighter or in the accessory power outlet. Turn off
the radio and all lamps that are not needed. This will
avoid sparks and help save both batteries. And it
could save your radio!
4. Open the hoods and locate the batteries. Find the
positive (+) and negative (−) terminal locations on
each vehicle. SeeEngine Compartment Overview
on page 5-12for more information on location.
{CAUTION:
An electric fan can start up even when the
engine is not running and can injure you. Keep
hands, clothing and tools away from any
underhood electric fan.
5-42
Page 313 of 384
Tire Chains
{CAUTION:
Don’t use tire chains. There’s not enough
clearance. Tire chains used on a vehicle without
the proper amount of clearance can cause
damage to the brakes, suspension or other
vehicle parts. The area damaged by the tire
chains could cause you to lose control of your
vehicle and you or others may be injured in a
crash. Use another type of traction device only
if its manufacturer recommends it for use on
your vehicle and tire size combination and road
conditions. Follow that manufacturer’s
instructions. To help avoid damage to your
vehicle, drive slowly, readjust or remove the
device if it’s contacting your vehicle, and don’t
spin your wheels. If you do �nd traction devices
that will �t, install them on the rear tires.
Lifting Your Vehicle
{CAUTION:
Lifting a vehicle can cause an injury. The
vehicle can slip off the jack and roll over you
or other people. You and they could be badly
injured. Find a level place to lift your vehicle.
To help prevent the vehicle from moving:
1. Set the parking brake �rmly.
2. Put an automatic transmission shift lever
in PARK (P), or shift a manual transmission
to FIRST (1) or REVERSE (R).
3. Turn off the engine.
To be even more certain the vehicle won’t move,
you can put blocks in front of and behind the
wheels.
5-71