2004 CHEVROLET CORVETTE buttons
[x] Cancel search: buttonsPage 64 of 384
5. Press and hold the lock and unlock buttons on the
first transmitter simultaneously for five seconds.
6. When a transmitter is learned (matched), the DIC
will display FOB LEARNED and then prompt you to
learn the second transmitter.
7. Repeat Steps 5 and 6 for the third transmitter.
8. Remove the key from the ignition.
The programming mode will shut off if any of following
has occurred:
•You do not program any transmitters for
two minutes.
•You take the key out of the ignition.
•You have programmed three transmitters.
Battery Replacement
Under normal use, the battery in your remote keyless
entry transmitter should last about three years.
You can tell the battery is weak if the transmitter will not
work at the normal range in any location. If you have
to get close to your vehicle before the transmitter works,
it is probably time to change the battery.
Notice:When replacing the battery, use care not to
touch any of the circuitry. Static from your body
transferred to these surfaces may damage the
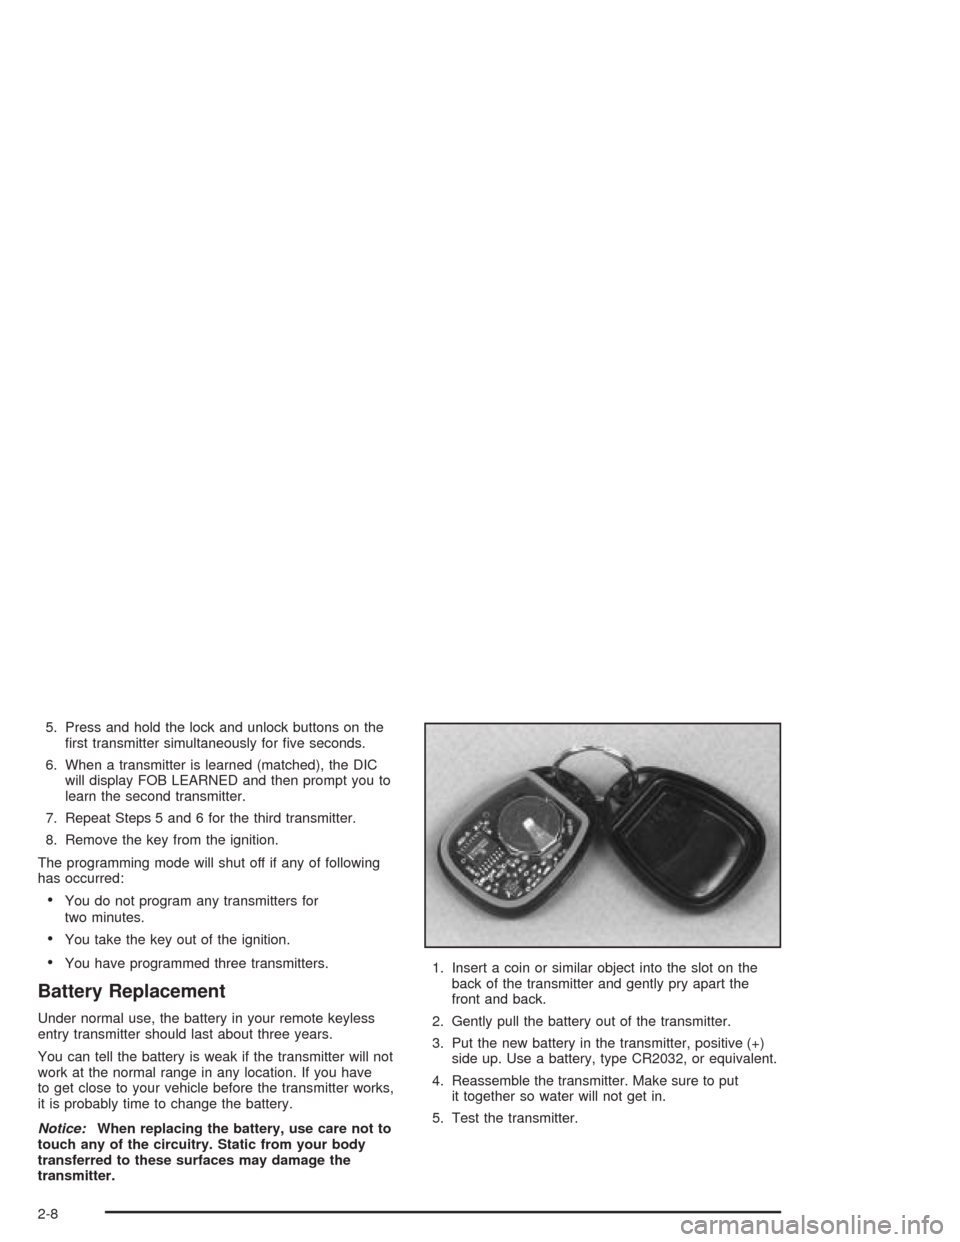
transmitter.1. Insert a coin or similar object into the slot on the
back of the transmitter and gently pry apart the
front and back.
2. Gently pull the battery out of the transmitter.
3. Put the new battery in the transmitter, positive (+)
side up. Use a battery, type CR2032, or equivalent.
4. Reassemble the transmitter. Make sure to put
it together so water will not get in.
5. Test the transmitter.
2-8
Page 113 of 384
Vehicle Personalization
Memory
If your vehicle has this feature, MEMORY can store and
recall the settings for the driver’s seat position, the
outside rearview mirror positions, telescopic steering
column (if equipped), radio presets, tone, volume,
playback mode (AM/FM, tape or CD), last displayed
station, compact disc position and tape direction and the
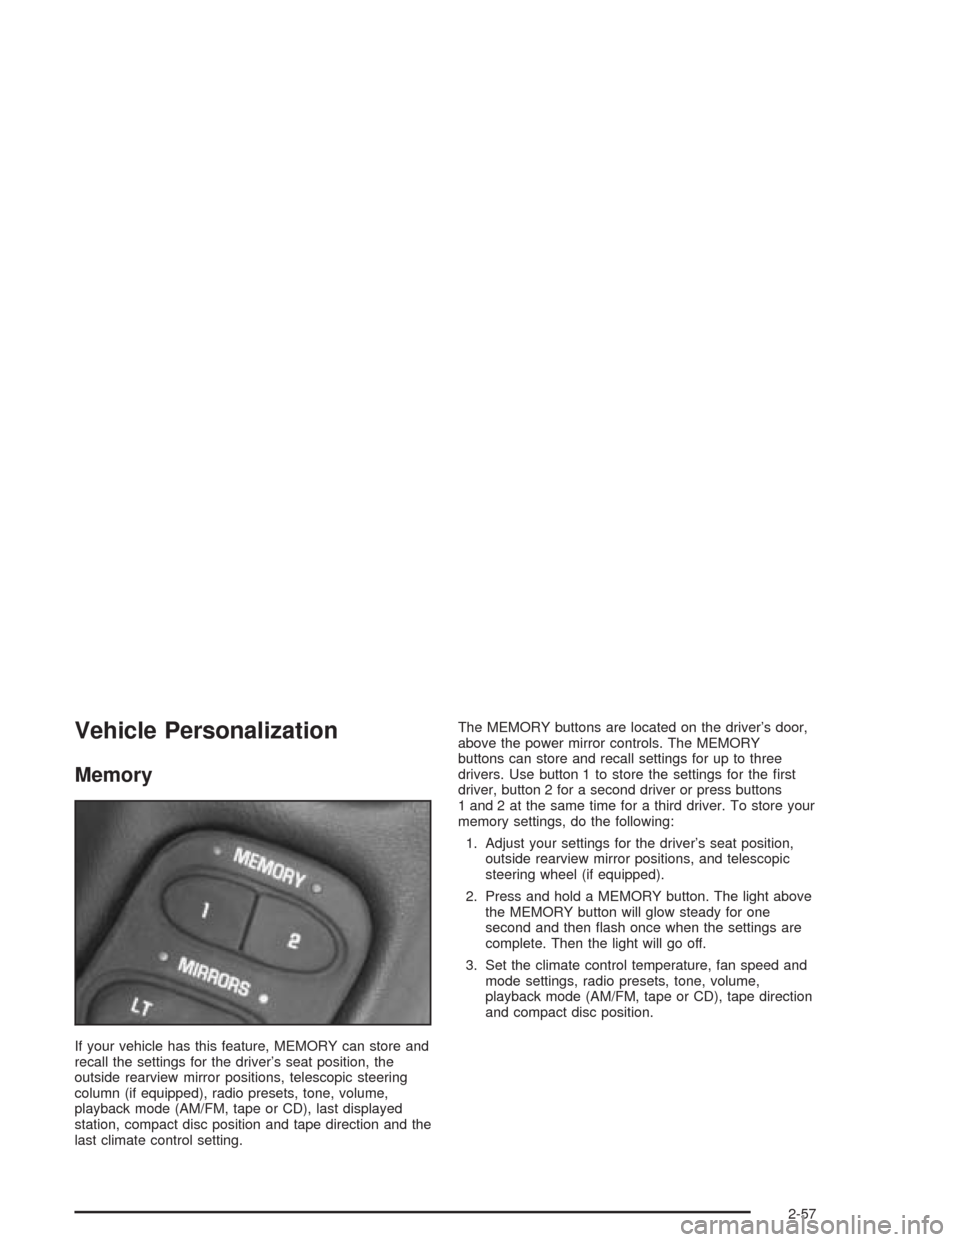
last climate control setting.The MEMORY buttons are located on the driver’s door,
above the power mirror controls. The MEMORY
buttons can store and recall settings for up to three
drivers. Use button 1 to store the settings for the first
driver, button 2 for a second driver or press buttons
1 and 2 at the same time for a third driver. To store your
memory settings, do the following:
1. Adjust your settings for the driver’s seat position,
outside rearview mirror positions, and telescopic
steering wheel (if equipped).
2. Press and hold a MEMORY button. The light above
the MEMORY button will glow steady for one
second and then flash once when the settings are
complete. Then the light will go off.
3. Set the climate control temperature, fan speed and
mode settings, radio presets, tone, volume,
playback mode (AM/FM, tape or CD), tape direction
and compact disc position.
2-57
Page 162 of 384
Driver Information Center (DIC)
The Driver Information Center (DIC) will display
information about how your vehicle is functioning, as
well as warning messages if a system problem is
detected. The DIC display area is located in the
instrument panel cluster below the speedometer and
tachometer, directly above the steering column.
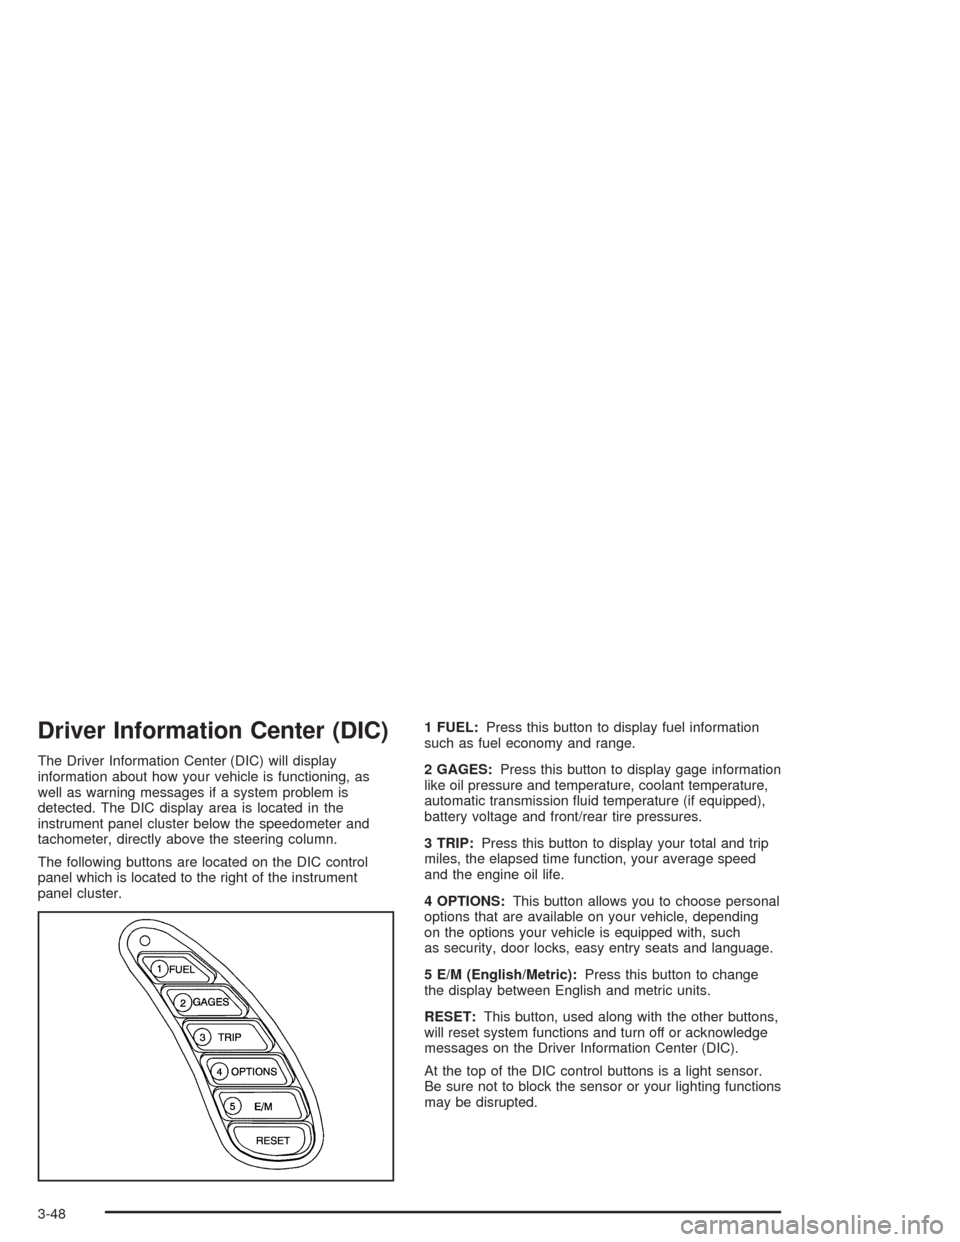
The following buttons are located on the DIC control
panel which is located to the right of the instrument
panel cluster.1 FUEL:Press this button to display fuel information
such as fuel economy and range.
2 GAGES:Press this button to display gage information
like oil pressure and temperature, coolant temperature,
automatic transmission fluid temperature (if equipped),
battery voltage and front/rear tire pressures.
3 TRIP:Press this button to display your total and trip
miles, the elapsed time function, your average speed
and the engine oil life.
4 OPTIONS:This button allows you to choose personal
options that are available on your vehicle, depending
on the options your vehicle is equipped with, such
as security, door locks, easy entry seats and language.
5 E/M (English/Metric):Press this button to change
the display between English and metric units.
RESET:This button, used along with the other buttons,
will reset system functions and turn off or acknowledge
messages on the Driver Information Center (DIC).
At the top of the DIC control buttons is a light sensor.
Be sure not to block the sensor or your lighting functions
may be disrupted.
3-48
Page 163 of 384

DIC Controls and Displays
Turn on the system by turning the ignition to ON. When
you turn on the ignition, the DIC will be in the mode
last displayed when the engine was turned off. Each DIC
button allows you to scroll through a menu. A blank
page ends each menu.
If a problem is detected, a diagnostic message will
appear on the display. Press RESET to acknowledge
any current warning or service messages. The following
pages will show the messages you can see on the
Driver Information Center (DIC) display by pressing the
DIC buttons.
1 FUEL
The FUEL button displays average fuel economy and
instantaneous fuel economy calculated for your specific
driving conditions and range.
Press the FUEL button to display average fuel economy,
such as:
•AVERAGE 20.1 MPG or
•AVERAGE 5.3 L/100 km
3-49
Page 168 of 384
4 OPTIONS
This button allows you to choose personal options that
may be available on your vehicle, depending on the
options your vehicle is equipped with. Some of these
functions work along with the remote keyless entry
transmitter.
When returning to the options menu, the first item of the
options list will always be displayed, not the one you
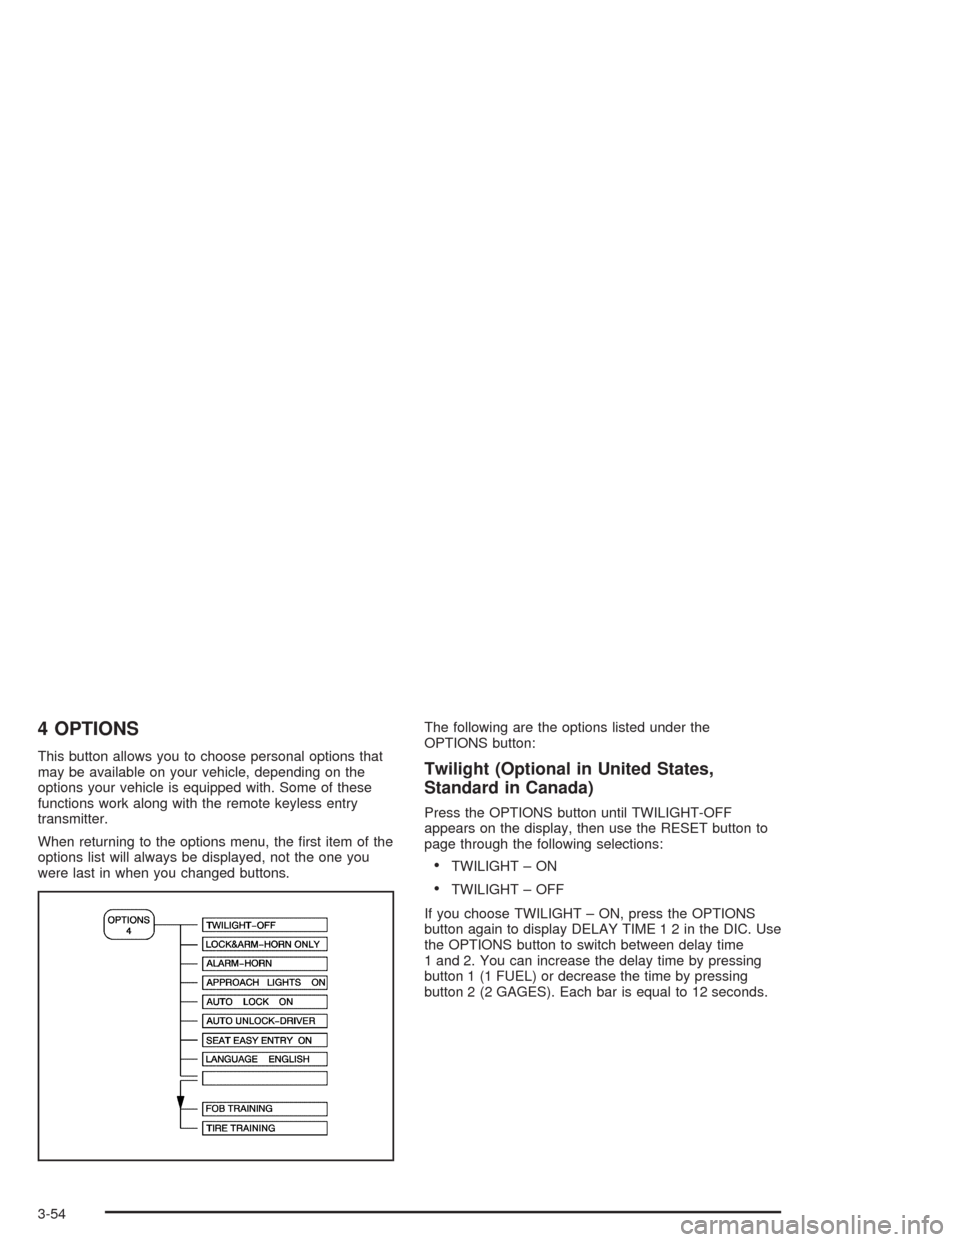
were last in when you changed buttons.The following are the options listed under the
OPTIONS button:Twilight (Optional in United States,
Standard in Canada)
Press the OPTIONS button until TWILIGHT-OFF
appears on the display, then use the RESET button to
page through the following selections:
•TWILIGHT – ON
•TWILIGHT – OFF
If you choose TWILIGHT – ON, press the OPTIONS
button again to display DELAY TIME 1 2 in the DIC. Use
the OPTIONS button to switch between delay time
1 and 2. You can increase the delay time by pressing
button 1 (1 FUEL) or decrease the time by pressing
button 2 (2 GAGES). Each bar is equal to 12 seconds.
3-54
Page 185 of 384
Finding a Station
AM FM:Press this button to switch between FM1,
FM2, and AM. The display will show the selection.
TUNE:Press this knob lightly so it extends. Turn it to
select radio stations. Push the knob back into its stored
position when you are not using it.
oSEEKp:Press the right or the left arrow to go to
the next or to the previous station and stay there.
To scan stations, press and hold either SEEK arrow for
two seconds. SCAN will appear on the display. The
radio will go to a station, play for a few seconds, then go
on to the next station. Press either SEEK arrow again
to stop scanning.
The radio will only seek or scan stations with a strong
signal that are in the selected band.
P.SCAN (Preset Scan):Press this button to scan your
preset stations. P.SCAN will appear on the display.
The radio will go to the first preset station stored on the
pushbuttons, play for a few seconds, then go on to
the next preset station. Press P.SCAN again or one of
the pushbuttons to stop scanning presets.
The radio will only scan preset stations with a strong
signal that are in the selected band.
Setting Preset Stations
Up to 18 stations (six FM1, six FM2, and six AM) can be
programmed on the six numbered pushbuttons, by
performing the following steps:
1. Turn the radio on.
2. Press AM FM to select FM1, FM2, or AM.
3. Tune in the desired station.
4. Press AUTO TONE to select the equalization.
5. Press and hold one of the six numbered
pushbuttons. The sound will mute. When the sound
returns, release the pushbutton. Whenever that
numbered pushbutton is pressed, the station that
was set will return and the equalization that
was selected will be stored for that pushbutton.
6. Repeat the steps for each pushbutton.
3-71
Page 191 of 384
Finding a Station
AM FM:Press this button to switch between FM1,
FM2, and AM. The display will show your selection.
TUNE:Press this knob lightly so it extends. Turn it to
select radio stations. Push the knob back into its stored
position when you are not using it.
oSEEKp:Press the right or the left arrow to go to
the next or to the previous station and stay there.
To scan stations, press either SEEK arrow for two
seconds. SCAN will appear on the display. The radio
will go to a station, play for a few seconds, then go on to
the next station. Press either SEEK arrow again to
stop scanning.
The radio will seek or scan only to stations that are in
the selected band and only to those with a strong signal.
P.SCAN (Preset Scan):Press this button to scan
your preset stations. P.SCAN will appear on the display.
The radio will go to the first preset station stored on
your pushbuttons, play for a few seconds, then go on to
the next preset station. Press P.SCAN again or one
of the pushbuttons to stop scanning presets.
The radio will scan only to preset stations that are in the
selected band and only to those with a strong signal.
Setting Preset Stations
The six numbered pushbuttons let you return to
your favorite stations. You can set up to 18 stations
(six FM1, six FM2, and six AM) by performing the
following steps:
1. Turn the radio on.
2. Press AM FM to select FM1, FM2, or AM.
3. Tune in the desired station.
4. Press AUTO TONE to select the equalization.
5. Press and hold one of the six numbered
pushbuttons. The sound will mute. When the sound
returns, release the pushbutton. Whenever you
press that numbered pushbutton, the station you set
will return and the equalization that you selected
will be automatically stored for that pushbutton.
6. Repeat the steps for each pushbutton.
3-77
Page 197 of 384
To eject the magazine from the player, slide the CD
changer door all the way open. The magazine will
automatically eject. Remember to keep the door closed
whenever possible to keep dirt and dust from getting
inside the changer.
Whenever a CD magazine with CDs is loaded in the
changer and the door is closed, the CD symbol
will appear on the radio display. If the CD changer is
checking the magazine for CDs, the CD symbol will flash
on the radio display until the changer is ready to play.
When a CD begins playing, CD will appear in the bottom
left corner and a CD and track number will appear on
the radio display. The CD numbers are listed on the front
of the magazine.
All of the CD functions are controlled by the radio
buttons except for ejecting the magazine.Operating the Trunk-Mounted CD
Changer with the Radio with Cassette
If an error appears on the display, see “CD Messages”
later in this section.
1 PREV (Previous):Press this pushbutton to go to the
start of the current track if more than eight seconds
have played. If this pushbutton is held or pressed more
than once, the player will continue moving backward
through the CD.
2 PROG (Program):Press this pushbutton to select
the next CD in the magazine. If a CD cannot be played,
its number will be skipped when selecting CDs while
using this pushbutton.
3 NEXT:Press this pushbutton to go to the next track.
If this pushbutton is held or pressed more than once,
the player will continue moving forward through the CD.
REV 4 (Reverse):Press and hold this pushbutton to
quickly reverse within a track. Release the pushbutton to
play the passage. The elapsed time of the track will
appear on the display.
3-83