2004 CHEVROLET CORVETTE seats
[x] Cancel search: seatsPage 41 of 384
If your vehicle is a convertible or has a removable roof
panel, there are no top strap anchors in your vehicle.
Do not secure a child seat in a convertible or a vehicle
with a removable roof panel, if a national or local
law requires that the top strap be anchored, or if the
instructions that come with the restraint say that the top
strap must be anchored.
1. Your vehicle has a passenger’s air bag. SeeAir
Bag Off Switch on page 1-46. If your child restraint
is forward-facing, always move the seat as far
back as it will go before securing it in this seat. See
Manual Seats on page 1-2orPower Seats on
page 1-2. Never use a rear-facing child restraint in
this seat unless the air bag is off.
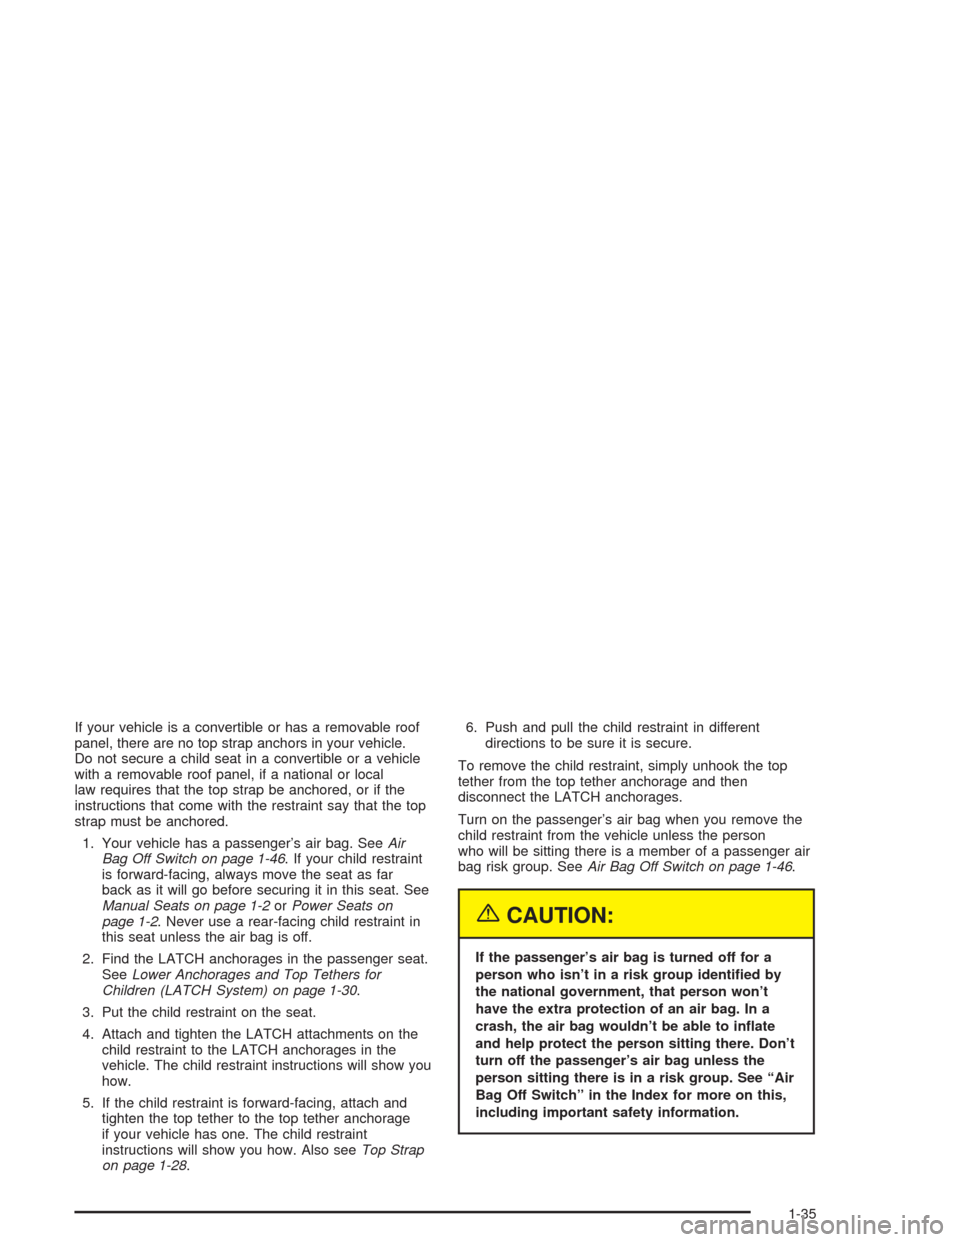
2. Find the LATCH anchorages in the passenger seat.
SeeLower Anchorages and Top Tethers for
Children (LATCH System) on page 1-30.
3. Put the child restraint on the seat.
4. Attach and tighten the LATCH attachments on the
child restraint to the LATCH anchorages in the
vehicle. The child restraint instructions will show you
how.
5. If the child restraint is forward-facing, attach and
tighten the top tether to the top tether anchorage
if your vehicle has one. The child restraint
instructions will show you how. Also seeTop Strap
on page 1-28.6. Push and pull the child restraint in different
directions to be sure it is secure.
To remove the child restraint, simply unhook the top
tether from the top tether anchorage and then
disconnect the LATCH anchorages.
Turn on the passenger’s air bag when you remove the
child restraint from the vehicle unless the person
who will be sitting there is a member of a passenger air
bag risk group. SeeAir Bag Off Switch on page 1-46.
{CAUTION:
If the passenger’s air bag is turned off for a
person who isn’t in a risk group identi�ed by
the national government, that person won’t
have the extra protection of an air bag. In a
crash, the air bag wouldn’t be able to in�ate
and help protect the person sitting there. Don’t
turn off the passenger’s air bag unless the
person sitting there is in a risk group. See “Air
Bag Off Switch” in the Index for more on this,
including important safety information.
1-35
Page 44 of 384
If your child restraint is equipped with the LATCH
system, seeLower Anchorages and Top Tethers for
Children (LATCH System) on page 1-30. SeeTop Strap
on page 1-28if the child restraint has one.
If your vehicle is a convertible or has a removable roof
panel, there are no top strap anchors in your vehicle.
Do not secure a child seat in a convertible or a vehicle
with a removable roof panel, if a national or local
law requires that the top strap be anchored, or if the
instructions that come with the restraint say that the top
strap must be anchored.
If your child restraint does not have the LATCH system
you will be using the lap-shoulder belt to secure the
child restraint in this position. Be sure to follow the
instructions that came with the child restraint. Secure
the child in the child restraint when and as the
instructions say.
1. Your vehicle has a passenger’s air bag. SeeAir
Bag Off Switch on page 1-46. If your child restraint
is forward-facing, always move the seat as far
back as it will go before securing it in this seat. See
Manual Seats on page 1-2orPower Seats on
page 1-2. Never use a rear-facing child restraint in
this seat unless the air bag is off.
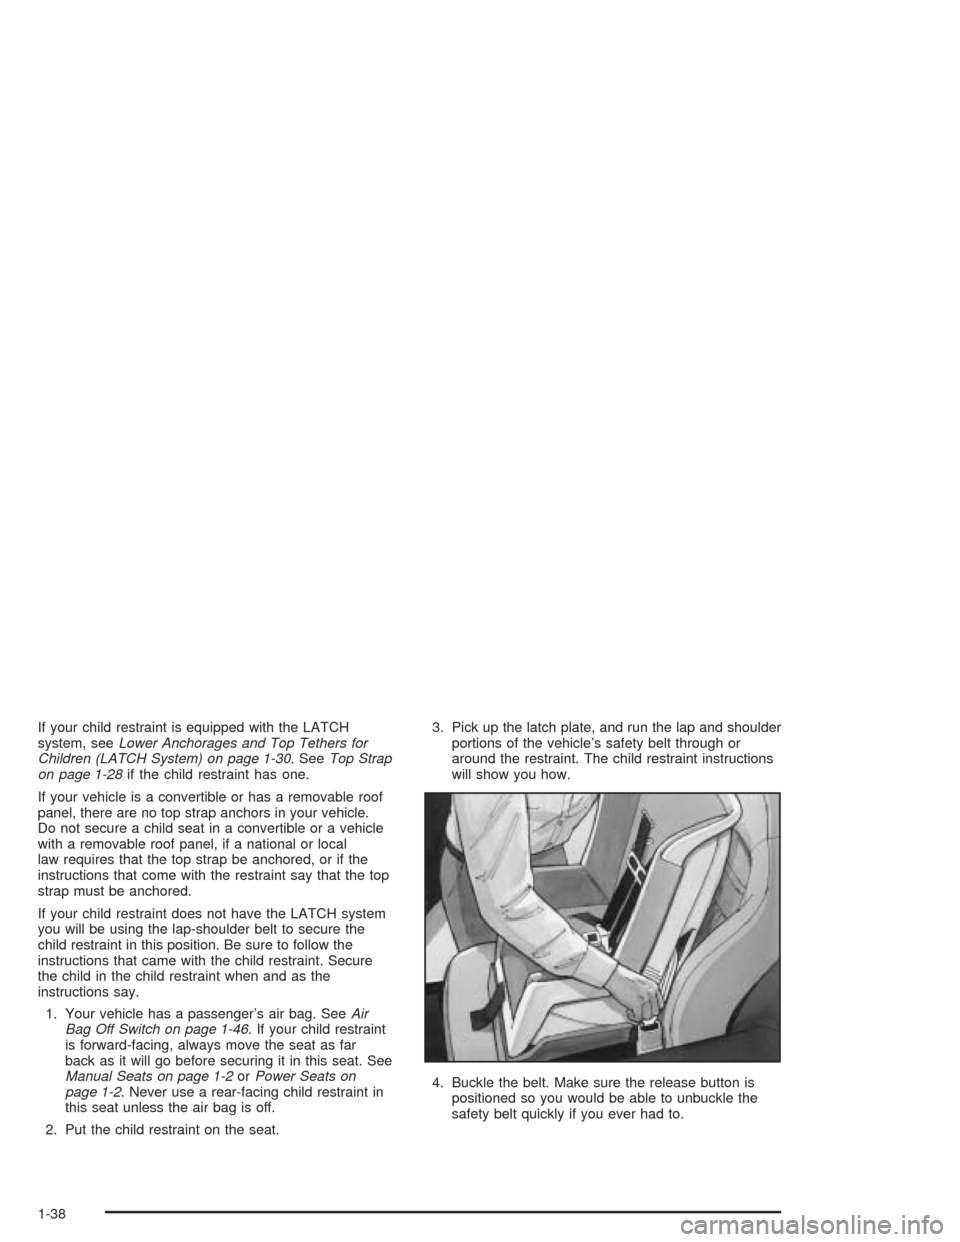
2. Put the child restraint on the seat.3. Pick up the latch plate, and run the lap and shoulder
portions of the vehicle’s safety belt through or
around the restraint. The child restraint instructions
will show you how.
4. Buckle the belt. Make sure the release button is
positioned so you would be able to unbuckle the
safety belt quickly if you ever had to.
1-38
Page 109 of 384
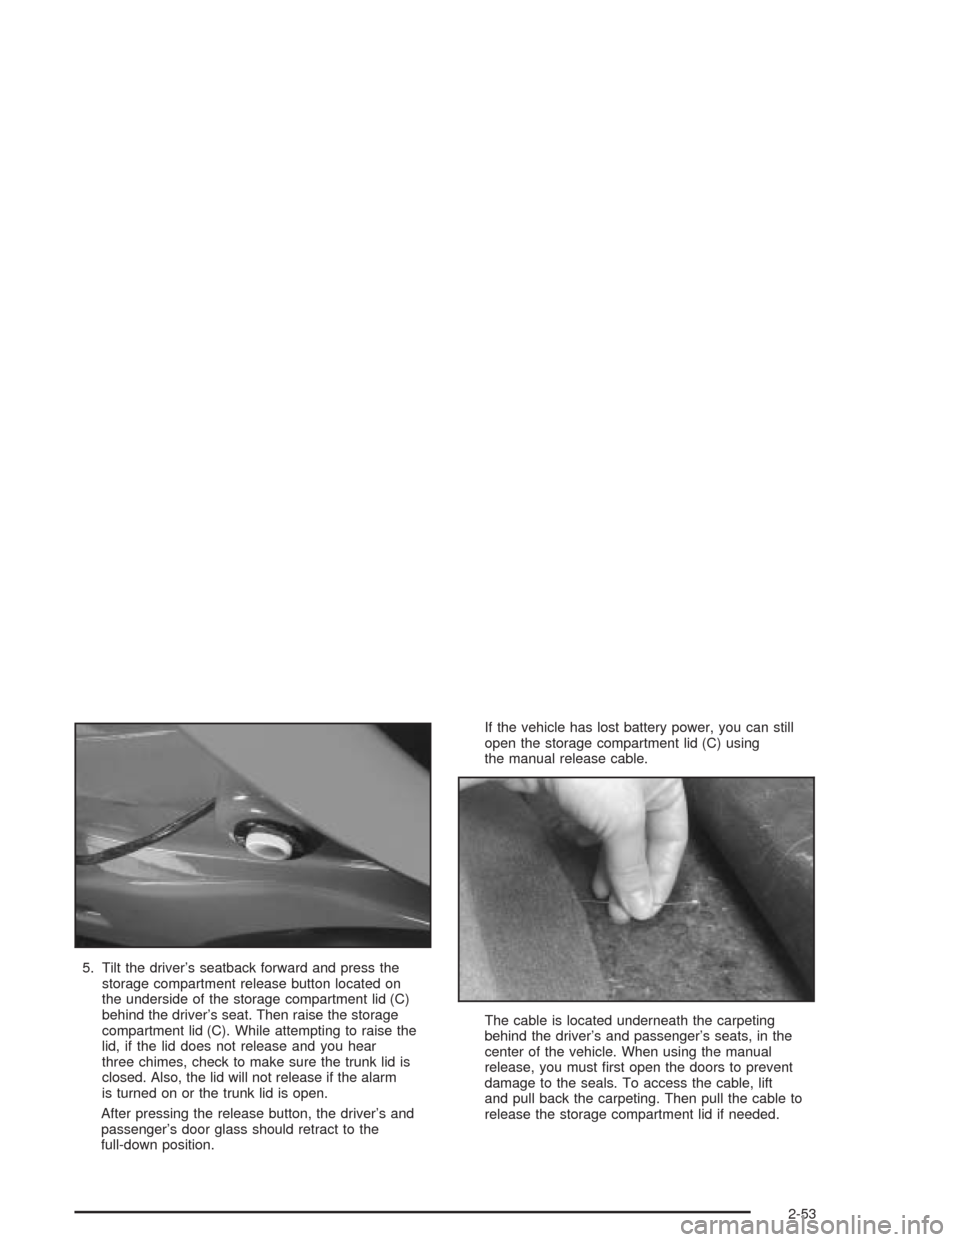
5. Tilt the driver’s seatback forward and press the
storage compartment release button located on
the underside of the storage compartment lid (C)
behind the driver’s seat. Then raise the storage
compartment lid (C). While attempting to raise the
lid, if the lid does not release and you hear
three chimes, check to make sure the trunk lid is
closed. Also, the lid will not release if the alarm
is turned on or the trunk lid is open.
After pressing the release button, the driver’s and
passenger’s door glass should retract to the
full-down position.If the vehicle has lost battery power, you can still
open the storage compartment lid (C) using
the manual release cable.
The cable is located underneath the carpeting
behind the driver’s and passenger’s seats, in the
center of the vehicle. When using the manual
release, you must first open the doors to prevent
damage to the seals. To access the cable, lift
and pull back the carpeting. Then pull the cable to
release the storage compartment lid if needed.
2-53
Page 145 of 384
Rear Window Defogger
The rear window defogger uses a warming grid to
remove fog or frost from the rear window.
The rear window defogger will only work when the
engine is running.
=REAR:Press this button to turn the rear window
defogger on. Be sure to clear as much snow from
the rear window as possible. An indicator light in the
button will come on to let you know that the rear window
defogger is activated.
The rear window defogger will automatically turn off
about 15 minutes after the button is pressed. If turned
on again, the defogger will only run for about seven
minutes before turning off. The defogger can also
be turned off by pressing the button again or by turning
off the engine.
Your vehicle has heated outside rearview mirrors. The
mirrors will heat to help clear fog or frost from the
surface of the mirrors when the rear window defog
button is pressed.
Notice:Don’t use anything sharp on the inside of
the rear window. If you do, you could cut or damage
the warming grid, and the repairs wouldn’t be
covered by your warranty. Do not attach a temporary
vehicle license, tape, a decal or anything similar
to the defogger grid.
Outlet Adjustment
Use the tab located on the air outlets to change the
direction of the airflow.
Operation Tips
•
Clear away any ice, snow or leaves from the air
inlets at the base of the windshield that may
block the flow of air into your vehicle.
•Use of non-GM approved hood deflectors may
adversely affect the performance of the system.
•Keep the area around the base of the instrument
panel console and air path under the seats clear
of objects to help circulate the air inside of
your vehicle more effectively.
3-31
Page 162 of 384
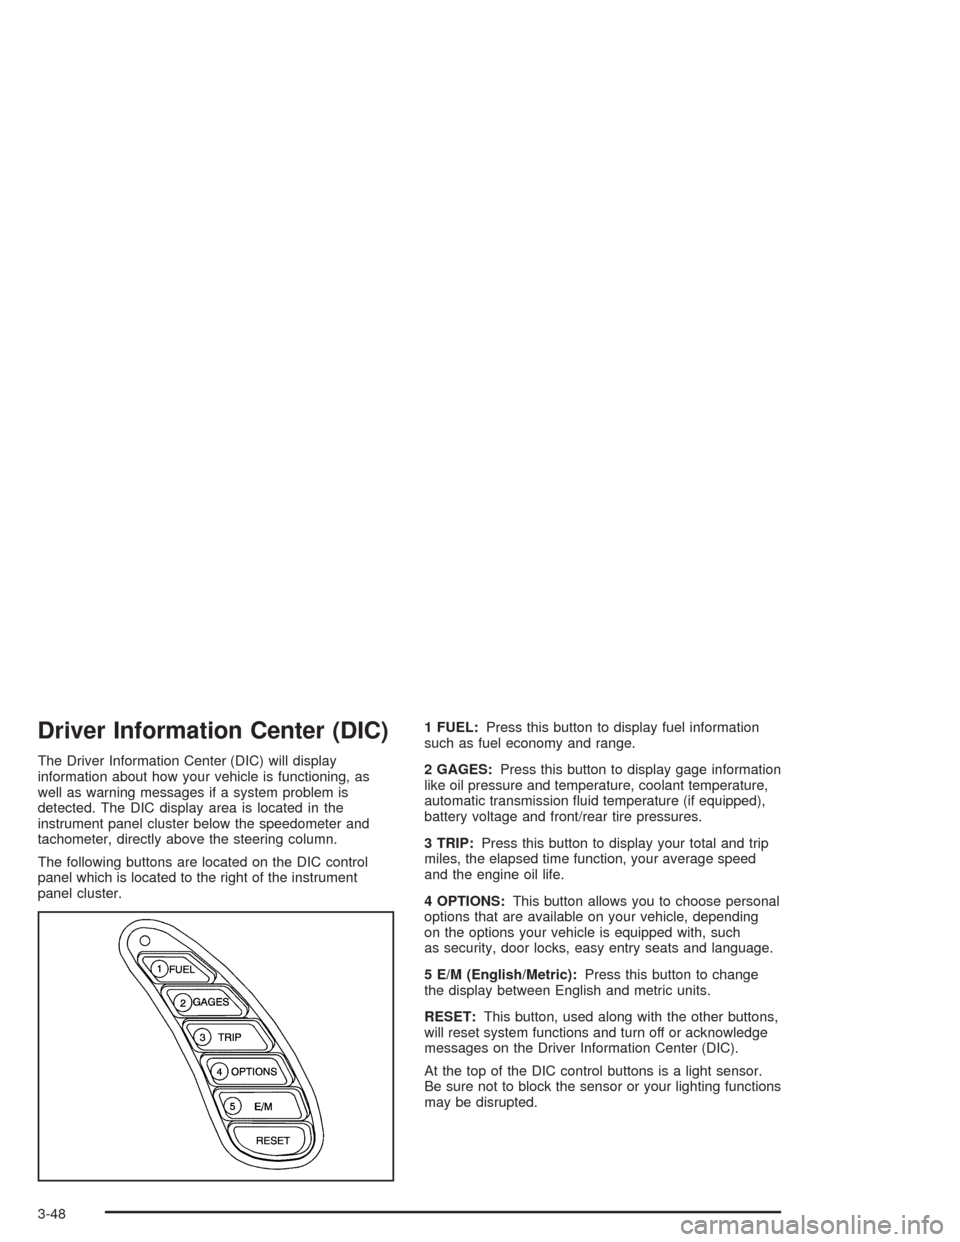
Driver Information Center (DIC)
The Driver Information Center (DIC) will display
information about how your vehicle is functioning, as
well as warning messages if a system problem is
detected. The DIC display area is located in the
instrument panel cluster below the speedometer and
tachometer, directly above the steering column.
The following buttons are located on the DIC control
panel which is located to the right of the instrument
panel cluster.1 FUEL:Press this button to display fuel information
such as fuel economy and range.
2 GAGES:Press this button to display gage information
like oil pressure and temperature, coolant temperature,
automatic transmission fluid temperature (if equipped),
battery voltage and front/rear tire pressures.
3 TRIP:Press this button to display your total and trip
miles, the elapsed time function, your average speed
and the engine oil life.
4 OPTIONS:This button allows you to choose personal
options that are available on your vehicle, depending
on the options your vehicle is equipped with, such
as security, door locks, easy entry seats and language.
5 E/M (English/Metric):Press this button to change
the display between English and metric units.
RESET:This button, used along with the other buttons,
will reset system functions and turn off or acknowledge
messages on the Driver Information Center (DIC).
At the top of the DIC control buttons is a light sensor.
Be sure not to block the sensor or your lighting functions
may be disrupted.
3-48
Page 242 of 384

And, if you do have a heavy load, you should spread it
out. Do not carry more than 100 lbs. (45 kg) in your
rear area.
{CAUTION:
Do not load your vehicle any heavier than the
GVWR, or either the maximum front or rear
GAWR. If you do, parts on your vehicle can
break, and it can change the way your vehicle
handles. These could cause you to lose
control and crash. Also, overloading can
shorten the life of your vehicle.
Notice:Overloading your vehicle may cause
damage. Repairs would not be covered by your
warranty. Do not overload your vehicle.
If you put things inside your vehicle – like suitcases,
tools, packages or anything else – they will go as fast as
the vehicle goes. If you have to stop or turn quickly,
or if there is a crash, they will keep going.
{CAUTION:
Things you put inside your vehicle can strike
and injure people in a sudden stop or turn, or
in a crash.
Put things in the rear area of your vehicle.
Try to spread the weight evenly.
Never stack heavier things, like suitcases,
inside the vehicle so that some of them
are above the tops of the seats.
Do not leave an unsecured child restraint
in your vehicle.
When you carry something inside the
vehicle, secure it whenever you can.
Towing a Trailer
Your Corvette is neither designed nor intended to tow a
trailer.
4-38
Page 300 of 384
(C) Aspect Ratio:A two-digit number that indicates the
tire height-to-width measurements. For example, if
the tire size aspect ratio is “70,” as shown in item “C” of
the illustration, it would mean that the tire’s sidewall
is 70% as high as it is wide.
(D) Construction Code:A letter code is used to
indicate the type of ply construction in the tire. The letter
“R” means radial ply construction; the letter “D” means
diagonal or bias ply construction; and the letter “B”
means belted-bias ply construction.
(E) Rim Diameter:Diameter of the wheel in inches.
(F) Service Description:These characters represent
the load range and the speed rating of a tire. The
load range represents the load carrying capacity a tire is
certified to carry. The load index can range from 1 to
279. The speed rating is the maximum speed a tire
is certified to carry a load. Speed ratings range
from “A” to “Z”.Tire Terminology and De�nitions
Air Pressure:The amount of air inside the tire pressing
outward on each square inch of the tire. Air pressure
is expressed in pounds per square inch (psi) or
kilopascal (kPa).
Accessory Weight:This means the combined weight
of optional accessories. Some examples of optional
accessories are, automatic transmission, power steering,
power brakes, power windows, power seats, and air
conditioning.
Aspect Ratio:The relationship of a tire’s height to its
width.
Belt:A rubber coated layer of cords that is located
between the plies and the tread. Cords may be made
from steel or other reinforcing materials.
Bead:The tire bead contains steel wires wrapped by
steel cords that hold the tire onto the rim.
Bias Ply Tire:A pneumatic tire in which the plies are
laid at alternate angles less than 90 degrees to the
centerline of the tread.
Cold In�ation Pressure:The amount of air pressure
in a tire, measured in pounds per square inch (psi)
before a tire has built up heat from driving.
SeeIn�ation - Tire Pressure on page 5-62.
5-58
Page 334 of 384
Service Parts Identi�cation Label
You will find this label located inside the glovebox. It is
very helpful if you ever need to order parts. On this
label is:
•your VIN,
•the model designation,
•paint information and
•a list of all production options and special equipment
Be sure that this label is not removed from the
vehicle.
Electrical System
Add-On Electrical Equipment
Notice:Don’t add anything electrical to your vehicle
unless you check with your dealer �rst. Some
electrical equipment can damage your vehicle and
the damage wouldn’t be covered by your warranty.
Some add-on electrical equipment can keep other
components from working as they should.
Your vehicle has an air bag system. Before attempting
to add anything electrical to your vehicle, see
Servicing Your Air Bag-Equipped Vehicle on page 1-49.
Headlamp Wiring
The headlamp wiring is protected by a circuit breaker.
An electrical overload will cause the lamps to go on and
off, or in some cases to remain off. If this happens,
have your headlamp wiring checked right away.
Windshield Wiper Fuses
The windshield wiper motor is protected by a fuse and
an internal circuit breaker. If the motor overheats
due to heavy snow, etc., the wiper will stop until the
motor cools. If the overload is caused by some electrical
problem and not snow, etc., be sure to get it fixed.
Power Windows and Other Power
Options
Circuit breakers protect the power seats and other
power accessories. When the current load is too heavy,
the circuit breaker opens and closes, protecting the
circuit until the problem is fixed or goes away.
5-92