2004 CADILLAC SEVILLE spare tire
[x] Cancel search: spare tirePage 262 of 410
Wheel Alignment and Tire Balance..................5-75
Wheel Replacement......................................5-75
Tire Chains..................................................5-77
If a Tire Goes Flat........................................5-77
Changing a Flat Tire.....................................5-78
Compact Spare Tire......................................5-87
Appearance Care............................................5-87
Cleaning the Inside of Your Vehicle.................5-88
Care of Safety Belts......................................5-90
Weatherstrips...............................................5-90
Cleaning the Outside of Your Vehicle..............5-90
Sheet Metal Damage.....................................5-92
Finish Damage.............................................5-92
Underbody Maintenance................................5-93Chemical Paint Spotting.................................5-93
Vehicle Care/Appearance Materials..................5-94
Vehicle Identification......................................5-95
Vehicle Identification Number (VIN).................5-95
Service Parts Identification Label.....................5-95
Electrical System............................................5-96
Add-On Electrical Equipment..........................5-96
Headlamp Wiring..........................................5-96
Windshield Wiper Fuses................................5-96
Power Windows and Other Power Options.......5-96
Fuses and Circuit Breakers............................5-97
Removing the Rear Seat Cushion...................5-99
Capacities and Specifications........................5-104
Section 5 Service and Appearance Care
5-2
Page 318 of 410
Center High-Mounted
Stoplamp (CHMSL)
It is recommended that this component be replaced as
a unit. See your dealer.
Taillamps and Turn Signal Lamps
1. Open the trunk to gain access to the lamp housing.
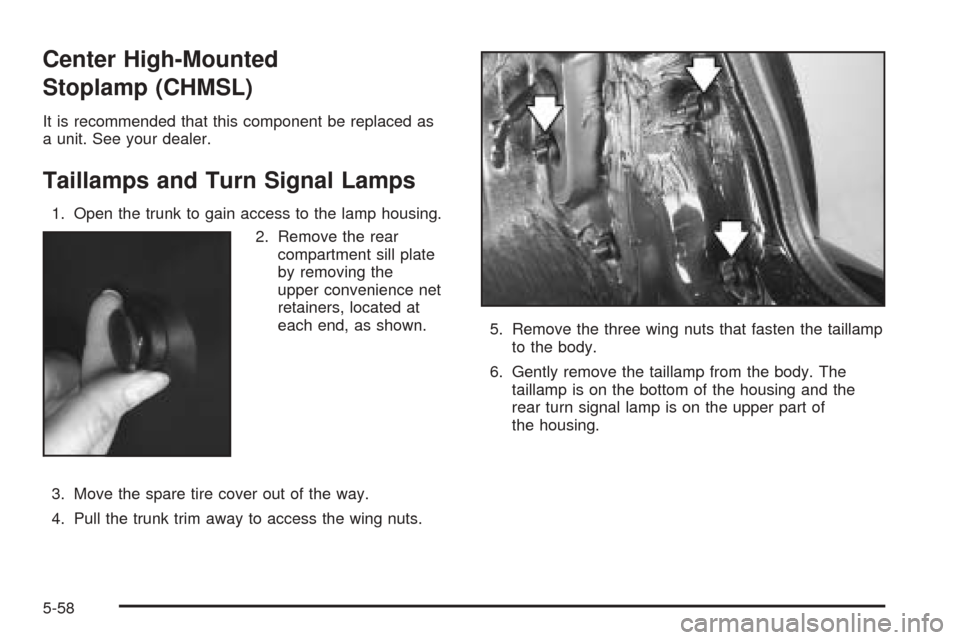
2. Remove the rear
compartment sill plate
by removing the
upper convenience net
retainers, located at
each end, as shown.
3. Move the spare tire cover out of the way.
4. Pull the trunk trim away to access the wing nuts.5. Remove the three wing nuts that fasten the taillamp
to the body.
6. Gently remove the taillamp from the body. The
taillamp is on the bottom of the housing and the
rear turn signal lamp is on the upper part of
the housing.
5-58
Page 321 of 410
Tires
Your new vehicle comes with high-quality tires made by
a leading tire manufacturer. If you ever have questions
about your tire warranty and where to obtain service,
see your GM Warranty booklet for details. For additional
information refer to the tire manufacturer’s booklet
included with your vehicle’s Owner’s Manual.
{CAUTION:
•Poorly maintained and improperly used
tires are dangerous.
•Overloading your tires can cause
overheating as a result of too much
friction. You could have an air-out and a
serious accident. See “Loading Your
Vehicle” in the Index.
CAUTION: (Continued)
CAUTION: (Continued)
•
Underinflated tires pose the same danger
as overloaded tires. The resulting accident
could cause serious injury. Check all tires
frequently to maintain the recommended
pressure. Tire pressure should be checked
when your tires are cold.
•Overinflated tires are more likely to be
cut, punctured or broken by a sudden
impact— such as when you hit a pothole.
Keep tires at the recommended pressure.
•Worn, old tires can cause accidents. If
your tread is badly worn, or if your tires
have been damaged, replace them. See
“Inflation – Tire Pressure” in this section
for inflation pressure adjustment for higher
speed driving.
Tire Sidewall Labeling
Useful information about a tire is molded into its
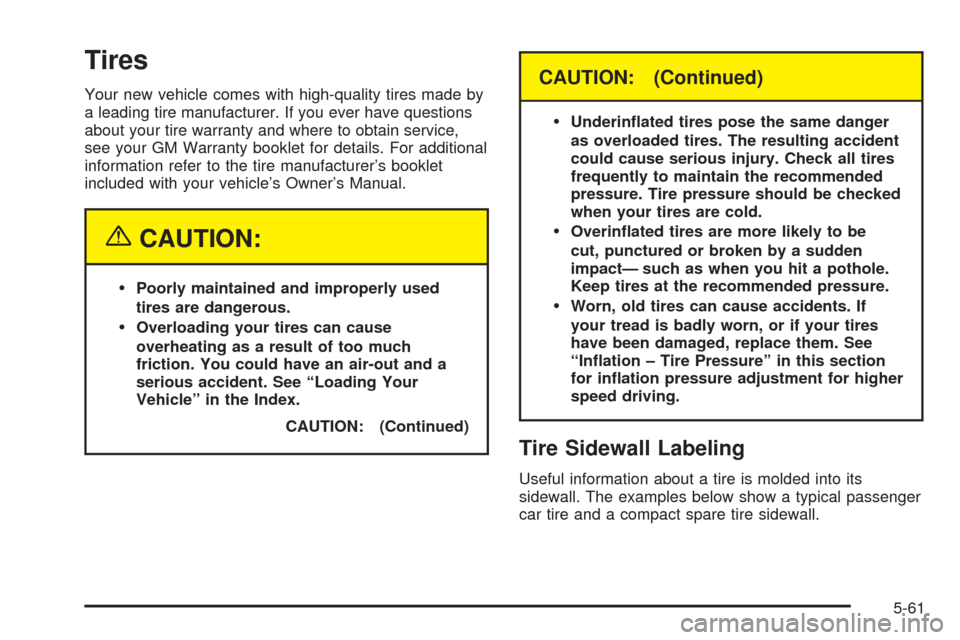
sidewall. The examples below show a typical passenger
car tire and a compact spare tire sidewall.
5-61
Page 323 of 410
(E) Tire Ply Material:The type of cord and number of
plies in the sidewall and under the tread.
(F) Uniform Tire Quality Grading (UTQG):Tire
manufacturers are required to grade tires based on three
performance factors: treadwear, traction and
temperature resistance. For more information see
Uniform Tire Quality Grading on page 5-74.
(G) Maximum Cold Inflation Load Limit:Maximum
load that can be carried and the maximum pressure
needed to support that load. For more information on
recommended tire pressure seeIn�ation - Tire Pressure
on page 5-68andLoading Your Vehicle on page 4-31.
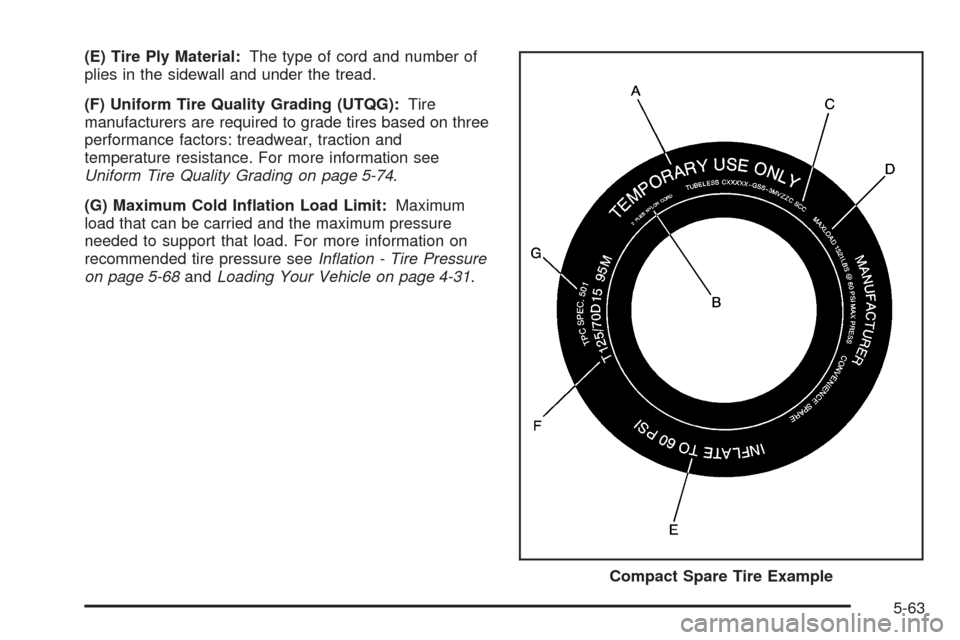
Compact Spare Tire Example
5-63
Page 324 of 410
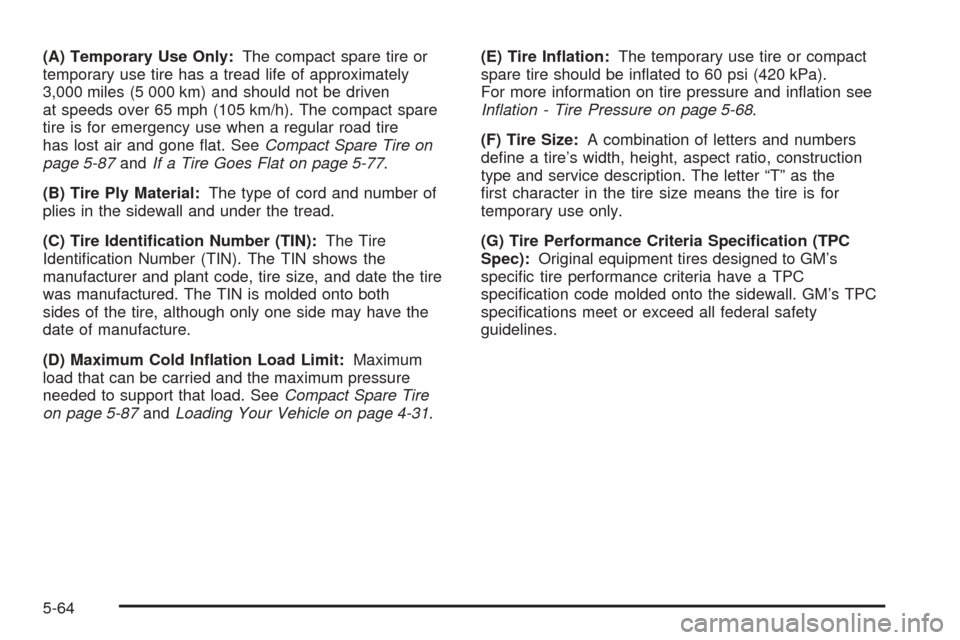
(A) Temporary Use Only:The compact spare tire or
temporary use tire has a tread life of approximately
3,000 miles (5 000 km) and should not be driven
at speeds over 65 mph (105 km/h). The compact spare
tire is for emergency use when a regular road tire
has lost air and gone flat. SeeCompact Spare Tire on
page 5-87andIf a Tire Goes Flat on page 5-77.
(B) Tire Ply Material:The type of cord and number of
plies in the sidewall and under the tread.
(C) Tire Identification Number (TIN):The Tire
Identification Number (TIN). The TIN shows the
manufacturer and plant code, tire size, and date the tire
was manufactured. The TIN is molded onto both
sides of the tire, although only one side may have the
date of manufacture.
(D) Maximum Cold Inflation Load Limit:Maximum
load that can be carried and the maximum pressure
needed to support that load. SeeCompact Spare Tire
on page 5-87andLoading Your Vehicle on page 4-31.(E) Tire Inflation:The temporary use tire or compact
spare tire should be inflated to 60 psi (420 kPa).
For more information on tire pressure and inflation see
In�ation - Tire Pressure on page 5-68.
(F) Tire Size:A combination of letters and numbers
define a tire’s width, height, aspect ratio, construction
type and service description. The letter “T” as the
first character in the tire size means the tire is for
temporary use only.
(G) Tire Performance Criteria Specification (TPC
Spec):Original equipment tires designed to GM’s
specific tire performance criteria have a TPC
specification code molded onto the sidewall. GM’s TPC
specifications meet or exceed all federal safety
guidelines.
5-64
Page 328 of 410
Inflation - Tire Pressure
The Tire and Loading Information label, shows the
correct inflation pressures for your tires when they’re
cold. “Cold” means your vehicle has been sitting for at
least three hours or driven no more than 1 mile
(1.6 km). SeeLoading Your Vehicle on page 4-31for
more information on the Tire and Loading Information
label.
If you’ll be driving at high speeds (e.g., speeds of
100 mph (160 km/h) or higher), where it is legal, set the
cold inflation pressure to the maximum inflation
pressure shown on the tire sidewall, or to 38 psi
(265 kPa), whichever is lower. See the example below.
When you end this high-speed driving, return to the
cold inflation pressure shown on the Tire-Loading
Information label.
Example:
You’ll find maximum load and inflation pressure molded
on the tire’s sidewall, in small letters, near the rim
flange. It will read something like this: Maximum load
690 kg (1521 lbs) 300 kPa (44 psi) Max. Press.
For this example, you would set the inflation pressure
for high-speed driving at 38 psi (265 kPa).Notice:Don’t let anyone tell you that underinflation
or overinflation is all right. It’s not. If your tires
don’t have enough air (underinflation), you can get
the following:
•Too much flexing
•Too much heat
•Tire overloading
•Bad wear
•Bad handling
•Bad fuel economy
If your tires have too much air (overinflation), you
can get the following:
•Unusual wear
•Bad handling
•Rough ride
•Needless damage from road hazards
When to Check
Check your tires once a month or more.
Do not forget your compact spare tire. It should be at
60 psi (420 kPa).
5-68
Page 330 of 410
This device complies with Part 15 of the FCC Rules.
Operation is subject to the following two conditions:
(1) this device may not cause harmful interference, and
(2) this device must accept any interference received,
including interference that may cause undesired
operation.
This device complies with RSS-210 of Industry and
Science Canada. Operation is subject to the following
two conditions: (1) this device may not cause
interference, and (2) this device must accept any
interference received, including interference that may
cause undesired operation of the device.
Changes or modifications to this system by anyone
other than an authorized service facility could void
authorization to use this equipment.
If the TPM system detects low tire pressure, below
25 psi (172 kPa), or high tire pressure, above 38 psi
(262 kPa), a message, CHECK TIRE PRESSURE, will
appear on the Driver Information Center (DIC)
display. By pressing the INFO button, the DIC screen
will show which tire(s) has the low or high pressure
condition. SeeIn�ation - Tire Pressure on page 5-68for
information regarding correct tire inflation. If a tire is
low, you should stop as soon as possible and check all
your tires for damage. If a tire is flat, seeIf a Tire
Goes Flat on page 5-77.Notice:Do not use a tire sealant if your vehicle is
equipped with Tire Pressure Monitors. The liquid
sealant can damage the tire pressure monitor
sensors.
Once a low or high tire pressure condition is detected,
the TPM system will display the CHECK TIRE
MESSAGE each time the engine is started, until the
tire(s) are set to the correct inflation pressure.
The Tire-Loading Information Label, which is located on
the rear edge of the driver’s door, shows the correct
inflation pressure for the tires on your vehicle.
The TPM system also allows the driver to check the air
pressure status of each road tire using the Driver
Information Center (DIC). Each tire’s air pressure will be
listed individually, in the following order: LF (left front
or driver’s side front tire), RF (right front or passenger’s
side front tire), RR (right rear or passenger’s side
rear tire) and LR (left rear or driver’s side rear tire). See
In�ation - Tire Pressure on page 5-68for information
regarding correct tire inflation. Also, seeDriver
Information Center (DIC) on page 3-52for information
on the DIC controls and displays.
If the DIC display does not show tire pressures or the
SERVICE TPM SYSTEM message appears, see
your dealer for service. The TPM system may not work
properly while the compact spare tire is installed.
5-70
Page 331 of 410
Anytime you replace one or more tires or rotate your
tires, the TPM system will need to be reset. A special
tool is needed to reset the sensor identification
codes. See your dealer for service.
Your vehicle was delivered from the factory with
aluminum valve stem caps. If you ever have to replace
the valve stem caps on your vehicle, you should
replace them with aluminum or plastic caps.
The TPM system can alert you about a low or high tire
pressure condition, but it does not replace normal
tire maintenance. SeeTires on page 5-61.
Tire Inspection and Rotation
Tires should be rotated every 5,000 to 8,000 miles
(8 000 to 13 000 km).
Any time you notice unusual wear, rotate your tires as
soon as possible and check wheel alignment. Also
check for damaged tires or wheels. SeeWhen It Is Time
for New Tires on page 5-72andWheel Replacement
on page 5-75for more information.The purpose of regular rotation is to achieve more
uniform wear for all tires on the vehicle. The first rotation
is the most important. SeeScheduled Maintenance
on page 6-4for scheduled rotation intervals.
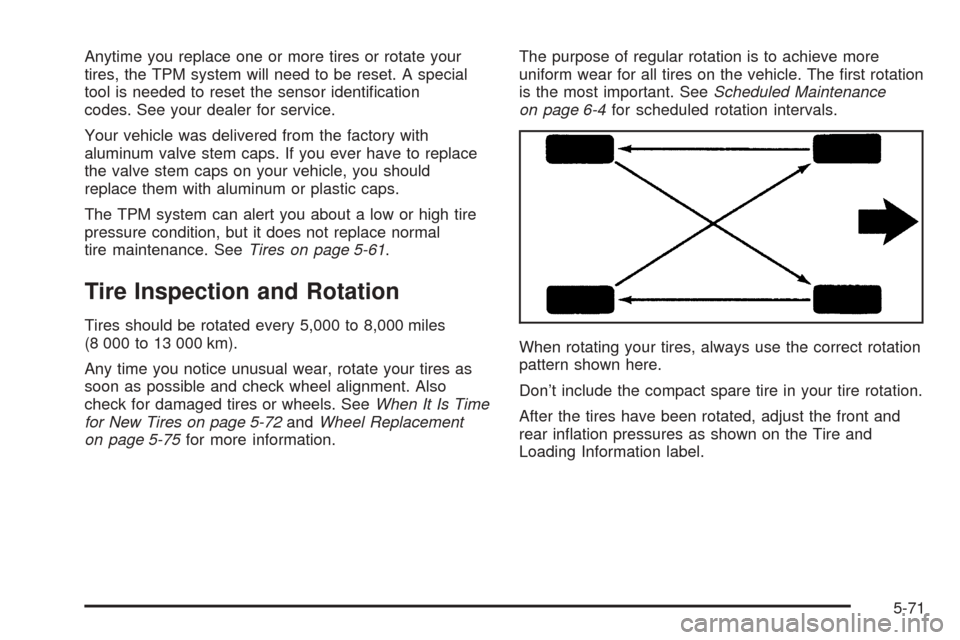
When rotating your tires, always use the correct rotation
pattern shown here.
Don’t include the compact spare tire in your tire rotation.
After the tires have been rotated, adjust the front and
rear inflation pressures as shown on the Tire and
Loading Information label.
5-71