Page 379 of 454
Removing the Flat Tire and Installing
the Spare Tire
1. Place the wheel wrench (A) securely over the wheel
nut (B). Turn the wheel wrench counterclockwise to
loosen all the wheel nuts. Don’t remove them yet.2. Find the jacking location using the diagram above
and corresponding hoisting notches located in the
plastic molding. The notches in the plastic molding
are marked with a triangle shape to help you
�nd them.
The front location (A) is about 14 inches (35.6 cm)
from the rear edge of the front wheel well, and
the rear location (B) is about 7 inches (17.8 cm)
from the front edge of the rear wheel well.
5-85
Page 380 of 454

{CAUTION:
Getting under a vehicle when it is jacked up is
dangerous. If the vehicle slips off the jack you
could be badly injured or killed. Never get under
a vehicle when it is supported only by a jack.
{CAUTION:
Raising your vehicle with the jack improperly
positioned can damage the vehicle and even
make the vehicle fall. To help avoid personal
injury and vehicle damage, be sure to �t the
jack lift head into the proper location before
raising the vehicle.
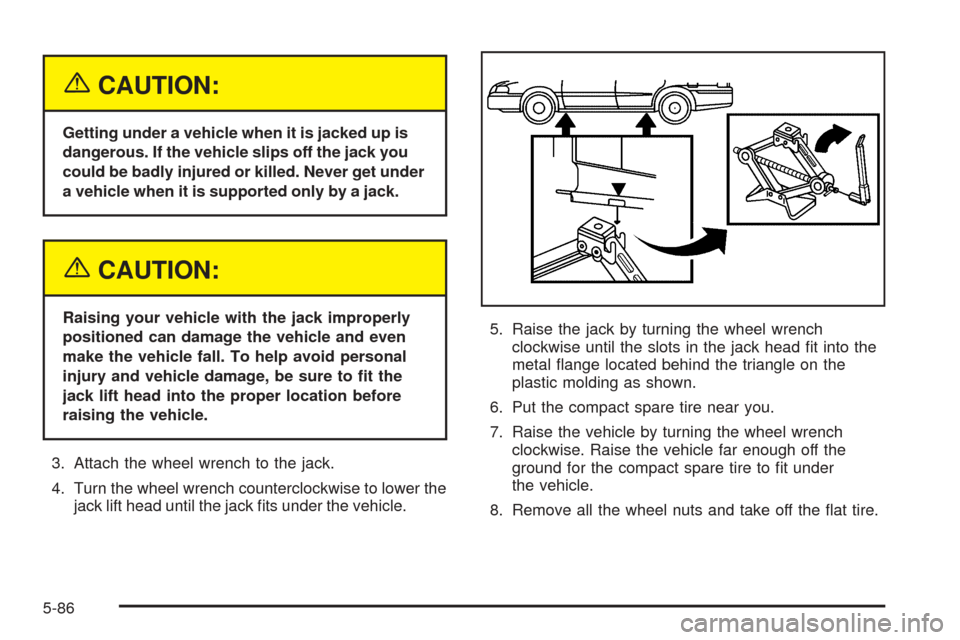
3. Attach the wheel wrench to the jack.
4. Turn the wheel wrench counterclockwise to lower the
jack lift head until the jack �ts under the vehicle.5. Raise the jack by turning the wheel wrench
clockwise until the slots in the jack head �t into the
metal �ange located behind the triangle on the
plastic molding as shown.
6. Put the compact spare tire near you.
7. Raise the vehicle by turning the wheel wrench
clockwise. Raise the vehicle far enough off the
ground for the compact spare tire to �t under
the vehicle.
8. Remove all the wheel nuts and take off the �at tire.
5-86
Page 382 of 454
11. Put the wheel nuts
back on with the
rounded end of the
nuts toward the wheel.
Tighten each wheel
nut by turning it
clockwise with your
hand until the wheel is
held against the hub.
12. Lower the vehicle by turning the wheel wrench
counterclockwise. Lower the jack completely.
5-88
Page:
< prev 1-8 9-16 17-24