Page 1 of 20

Instrument Panel . . . . . . . . . . . . . . . . . . . . . . . . .2
Instrument Panel Cluster . . . . . . . . . . . . . . . . . .3
Audio Systems . . . . . . . . . . . . . . . . . . . . . . . . . .4
Climate Controls . . . . . . . . . . . . . . . . . . . . . . . . .6
Power Seat Controls . . . . . . . . . . . . . . . . . . . . . .7
Heated Seats . . . . . . . . . . . . . . . . . . . . . . . . . . . .7
Door Locks and Child Security . . . . . . . . . . . . .8
Mirrors . . . . . . . . . . . . . . . . . . . . . . . . . . . . . . . . .8
Window Controls . . . . . . . . . . . . . . . . . . . . . . . .9
Sunroof . . . . . . . . . . . . . . . . . . . . . . . . . . . . . . . .9
Lamp Controls . . . . . . . . . . . . . . . . . . . . . . . . .10
Turn Signal/Multifunction Lever . . . . . . . . . . . .10
Cruise Control . . . . . . . . . . . . . . . . . . . . . . . . . .11
Headlamps — High Beam . . . . . . . . . . . . . . . . .11Trunk and Fuel Door Releases . . . . . . . . . . . . .12
Convenience Features . . . . . . . . . . . . . . . . . . .13
OnStar
®Communication System . . . . . . . . . . .14
Head-Up Display (HUD) . . . . . . . . . . . . . . . . . . .14
Universal Transmitter . . . . . . . . . . . . . . . . . . . .15
Driver Memory Seat and Mirrors . . . . . . . . . . .16
Driver Information Center (DIC) . . . . . . . . . . . .16
DIC Programming . . . . . . . . . . . . . . . . . . . . . . .17
Roadside Assistance Program . . . . . . . . . . . . .20
My GMLink . . . . . . . . . . . . . . . . . . . . . . . . . . . .20
Congratulations on your purchase of a Buick LeSabre. Please read this information and your
Owner Manual to ensure an outstanding ownership experience. Note that your vehicle may not
include all the features described in this booklet. Place this booklet in your Owner Manual
portfolio for easy reference.
15778 LeSABRE GUIDE 5/22/03 1:54 PM Page 1
Page 2 of 20
A. Air Outlets
B. Driver Information Center (DIC)
Buttons (if equipped)
C. Turn Signal/Multifunction Lever
D. Steering Wheel Controls
(if equipped)E. Hazard Warning Flashers
F.Instrument Panel Cluster
G. Traction Control Button
(if equipped)
H. Exterior Lamp Buttons
I. Head-Up Display (HUD) Controls
(if equipped)J. Hood Release
K. Parking Brake
L. Cruise Controls
M. Audio System
N. Climate Controls
O. Glove Box
Getting to Know Your2004 LeSabre2
Instrument Panel
See Section 3 of your Owner Manual.
15778 LeSABRE GUIDE 5/22/03 1:54 PM Page 2
Page 3 of 20

Your vehicle’s instrument panel is
equipped with this cluster or one very
similar to it. The instrument panel
cluster includes these key features:
1. Tachometer
2. Turn Signal lndicator Light
3. Antilock Brake System Warning
Light
4. High Beam lndicator Light
5. Speedometer
6. Safety Belt Reminder Light
7. Air Bag Readiness Light
8. Turn Signal lndicator Light 9. Fuel Gauge
10. Service Vehicle Soon Light
11.Service Engine Soon Light
12. Engine Coolant Temperature
Gauge
13. Brake System Warning Light
14. Battery Warning Light
15. PRND321 lndicator
16. Cruise Control lndicator Light
17. Oil Pressure Light
18. Security Light
19. Trip Odometer 20. Trip Odometer
21. Traction Control System Off
Warning Light
IMPORTANT:The instrument panel
cluster is designed to let you know
about many important aspects of your
vehicle’s operation. It is important to
read your Owner Manual and become
familiar with the information being
relayed to you by the lights, gauges
and indicators, and what action can
be taken to ensure safety and to
prevent damage.
3
See Section 3 of your Owner Manual.
1
2
4
5
9
101112
13
14
16
17
15
18
20
21
19
3
6
8
7
Instrument Panel Cluster
15778 LeSABRE GUIDE 5/22/03 1:54 PM Page 3
Page 4 of 20

Radio Controls
PWR: Press this knob to turn the radio
on")
Getting to Know Your2004 LeSabre4
Audio Systems
AM-FM Stereo with Cassette Tape
Player, and CD Player with Automatic
Tone Control (if equipped)
Radio Controls
PWR: Press this knob to turn the radio
on or off. Turn the knob to the left to
decrease volume. Turn it to the right to
increase volume.
BAND: Press this button to select AM,
FM1 or FM2, or XM radio.
TUNE:Turn this knob to choose radio
stations.
SEEK:Press the left or right arrow to go
to the next higher or lower station. Press
a SEEK arrow for 2 seconds. SCAN will
appear in the display. Use SCAN to lis-
ten to stations for a few seconds.
Press and hold one of the SEEK arrows
for more than 4 seconds to listen to
each of your preset stations for a few
seconds. Press an arrow again to stop
scanning.
EQ:Press this button to bass and
treble equalization settings for different
program types.
AUDIO:Push and release this button
until BASS, MID or TREBLE appears on
the display. Then turn the Audio knob to
increase or decrease.
Also, use this button to adjust the bal-
ance and fade between the speakers.Radio Data System (RDS) Features
TRAF:Press this button to receive traf-
fic announcements. TRAF will appear on
the display and when a traffic announce-
ment comes on, you will hear it.
INFO:If the current station has a
message, press this button to view the
message.
P-TYP:Press this button to find the
desired program type. Then, find a cate-
gory by turning the AUDIO knob. Press
either SEEK arrow to select a category
and take you to the category’s first
station.
ALERT:Alert warns of local or national
emergencies. You will hear the
announcement, even if the volume is
muted or a cassette tape or compact
disc is playing. You will not be able to
turn off alert announcements.
Numbered Buttons
The six numbered buttons let you set up
to six AM and 12 FM stations (six FM1
stations and six FM2 stations).
Turn the radio on. Select the band.
Tune in the desired station.
Press and hold one of the six numbered
buttons until you hear one beep, then
release the button. The station is now
preset.
15778 LeSABRE GUIDE 5/22/03 1:54 PM Page 4
Page 5 of 20

Cassette Tape Player Controls
With the radio on, insert the tape into
the tape slot. The tape will begin")
5
AM-FM Stereo with Cassette Tape
Player, and CD Player with Automatic
Tone Control (optional)
Cassette Tape Player Controls
With the radio on, insert the tape into
the tape slot. The tape will begin to play.
BAND:Press this button to listen to the
radio when a cassette or CD is playing.
CD TAPE:Press this button to play a
cassette tape or a CD when listening to
the radio.
6 SIDE:Pressing this button changes
the side of the tape.
1 : Press this button to reverse the
tape rapidly. Press it again to return to
playing speed.
2 : Press this button to quickly
advance to another part of the tape.
Press the button again to resume play-
ing the tape.
: Press this button to search for
the next or previous selection on the
tape.
: Pressing this button removes the
tape.
Setting the Clock
H:Press and hold this button until the
correct hour appears.
M:Press and hold this button until the
correct minute appears.AM-FM Stereo with CD
CD Player Controls
With the radio on, insert the CD partway
into the slot with the label side up. The
player will pull the CD in and begin to
play.
DISP:Press this button to see which
track is playing. Press it again within 5
seconds to see how long the track has
been playing. To change the display
(track or elapsed time), press DISP to
select the display you want and hold the
button until the display flashes.
4RDM:Press this button to hear tracks
in random order. Press it again to stop.
1 : Press and hold this button to
quickly reverse within a track.
2 : Press and hold this button to
quickly advance within a track.
: Press the right arrow to go to
the next track. Press the left arrow to go
to the start of the current track.
BAND:Press this button to change to
the radio while a CD is playing.
: Press this button to remove the
disc.
CD:Press this button to play a CD while
listening to the radio.
See Section 3 of your Owner Manual.
15778 LeSABRE GUIDE 5/22/03 1:54 PM Page 5
Page 6 of 20

Getting to Know Your2004 LeSabre6
Climate Controls
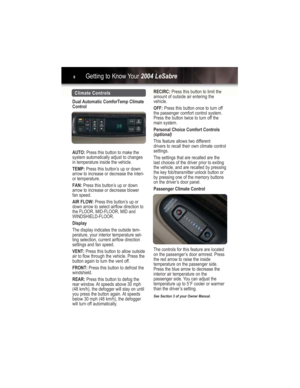
Dual Automatic ComforTemp Climate
Control
AUTO:Press this button to make the
system automatically adjust to changes
in temperature inside the vehicle.
TEMP:Press this button’s up or down
arrow to increase or decrease the interi-
or temperature.
FAN:Press this button’s up or down
arrow to increase or decrease blower
fan speed.
AIR FLOW:Press this button’s up or
down arrow to select airflow direction to
the FLOOR, MID-FLOOR, MID and
WINDSHIELD-FLOOR.
Display
The display indicates the outside tem-
perature, your interior temperature set-
ting selection, current airflow direction
settings and fan speed.
VENT:Press this button to allow outside
air to flow through the vehicle. Press the
button again to turn the vent off.
FRONT:Press this button to defrost the
windshield.
REAR:Press this button to defog the
rear window. At speeds above 30 mph
(48 km/h), the defogger will stay on until
you press the button again. At speeds
below 30 mph (48 km/h), the defogger
will turn off automatically.RECIRC:Press this button to limit the
amount of outside air entering the
vehicle.
OFF:Press this button once to turn off
the passenger comfort control system.
Press the button twice to turn off the
main system.
Personal Choice Comfort Controls
(optional)
This feature allows two different
drivers to recall their own climate control
settings.
The settings that are recalled are the
last choices of the driver prior to exiting
the vehicle, and are recalled by pressing
the key fob/transmitter unlock button or
by pressing one of the memory buttons
on the driver’s door panel.
Passenger Climate Control
The controls for this feature are located
on the passenger’s door armrest. Press
the red arrow to raise the inside
temperature on the passenger side.
Press the blue arrow to decrease the
interior air temperature on the
passenger side. You can adjust the
temperature up to 5˚F cooler or warmer
than the driver’s setting.
See Section 3 of your Owner Manual.
15778 LeSABRE GUIDE 5/22/03 1:54 PM Page 6
Page 7 of 20

7
Power Seat Controls
Adjust Seat Height and Cushion
Position
Push the horizontal control forward or
rearward to move the entire seat forward
or rearward. Move the entire horizontal
control up or down to move the entire
seat up or down. Move the front of the
horizontal control up or down to adjust
the front portion of the seat cushion up
or down. Move the rear of the horizontal
control up or down to adjust the rear
portion of the seat cushion up or down.
Reclining Front Seatbacks (optional)
Move the vertical control forward or rear-
ward to move the seatback forward or
rearward.
4-Way Power Lumbar Control
(optional)
Press the power lumbar control forward
or rearward to increase or decrease
support. Press the control up or down to
move the lumbar support up or down.
See Section 1 of your Owner Manual.
Heated Seats (optional)
The HEATED SEAT buttons are located
on the driver’s and front passenger’s
door panels. Press the button to turn the
heated seat to the HIGH setting. The
button will illuminate. Press again to
select the LO setting.
Pressing the button again turns the
heated seat off.
See Section 1 of your Owner Manual.
15778 LeSABRE GUIDE 5/22/03 1:54 PM Page 7
Page 8 of 20

Power Door Locks
Press UNLOCK or LOCK on the door
switch to unlock or lock all the doors.
Rear Door Child Security Locks
To prevent opening a rear door from
the inside:
•Open one of the rear doors. Move the
lever on the side of the door all the
way up to the lock symbol.
•Close the door.
•Repeat for the other door.
To open a rear door when the child
security lock is on:
Unlock the door from the inside and
open the door from the outside.
Getting to Know Your2004 LeSabre8
Mirrors
Outside Rearview
Your vehicle’s power mirror controls are
located on the driver’s door armrest. To
operate the left or right mirror, press L or
R on the selector switch located below
the control pad. If the switch is placed in
the center position, no mirror movement
will occur.
To adjust the mirror position, press the
arrows located on the control pad.
Inside Rearview
Electrochromic Day/Night Rearview
Mirror with Compass (optional)
Press the button to turn the automatic
dimming feature and compass on/off.
Agreen light will illuminate when the
dimming feature is on.
See Section 2 of your Owner Manual.
Door Locks and Child SecurityTo cancel the security feature:
•Open the door from the outside and
move the lever all the way down.
•Repeat for the other door.
Child Restraints
Your vehicle has top strap anchors
installed behind the rear seatback to
secure child safety seats.
See Section 2 of your Owner Manual.
15778 LeSABRE GUIDE 5/22/03 1:55 PM Page 8


Buttons (if equipped)
C. Turn Signal/Multifunction Lever
D. Steering Wheel Controls
(if equipped)E. Hazard Warning Flashers
F.Instrument Panel Cluste")