2004 BMW Z4 ROADSTER 3.0I ignition
[x] Cancel search: ignitionPage 59 of 120

Reference
At a glance
Controls
Driving tips
Mobility
57
them to be deactivated, the airbags have to
be deactivated with the vehicle ignition key
and the key switch on the outer passen-
ger's side of the instrument panel. Apart
from passengers, do not place any addi-
tional objects on the passenger seat. Do
not fit seat covers, seat cushion padding,
ball mats or other items to the passenger
seat unless they are specifically recom-
mended by BMW. Do not place any items
under the seat. Otherwise, the function of
the seat occupation detection could be
impaired.<
Indicator lamps
Airbag system operational
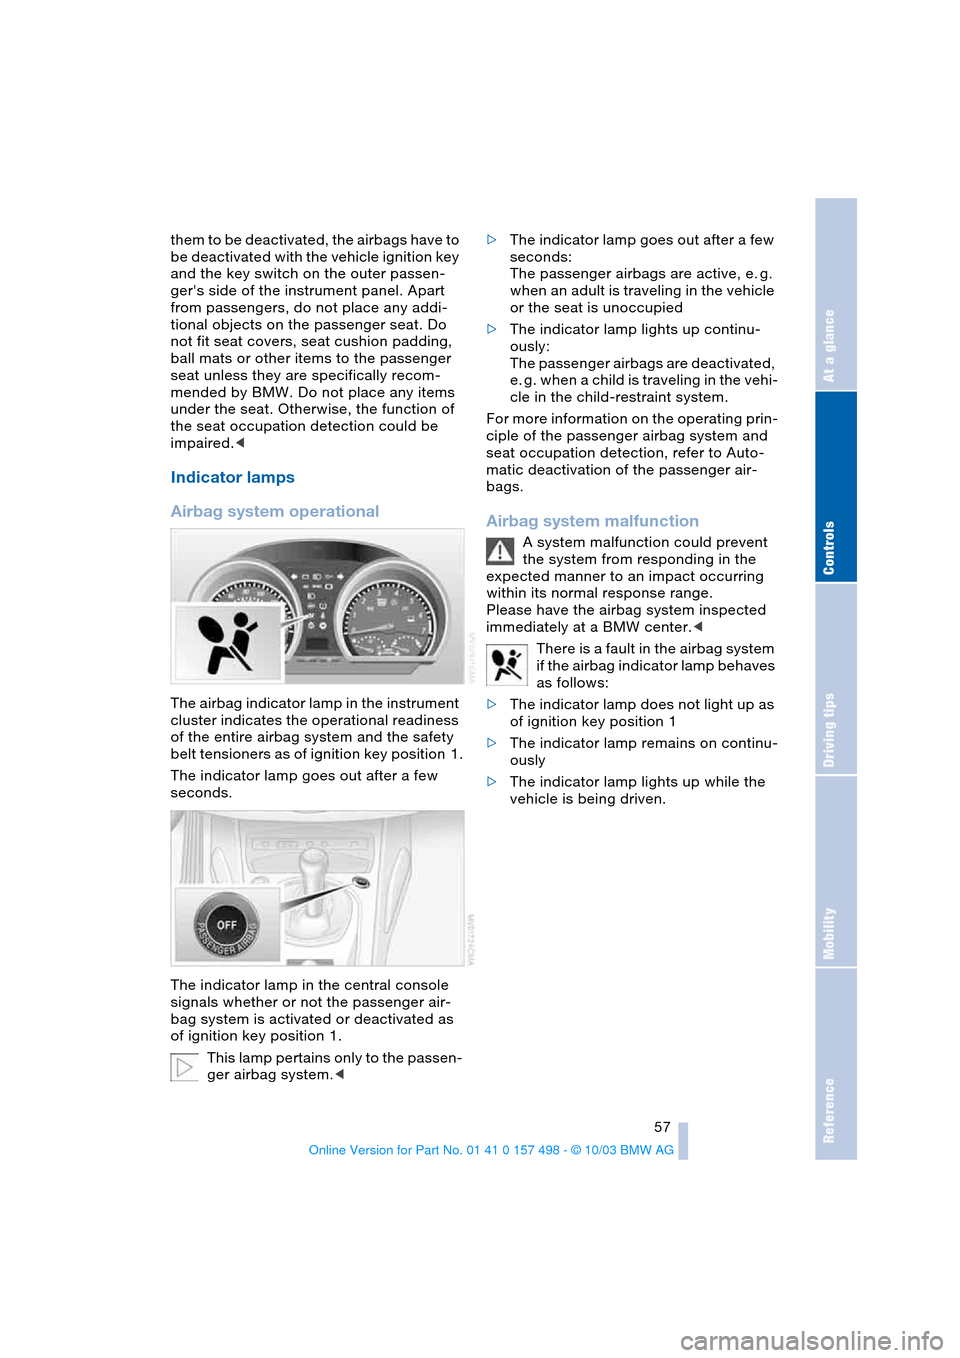
The airbag indicator lamp in the instrument
cluster indicates the operational readiness
of the entire airbag system and the safety
belt tensioners as of ignition key position 1.
The indicator lamp goes out after a few
seconds.
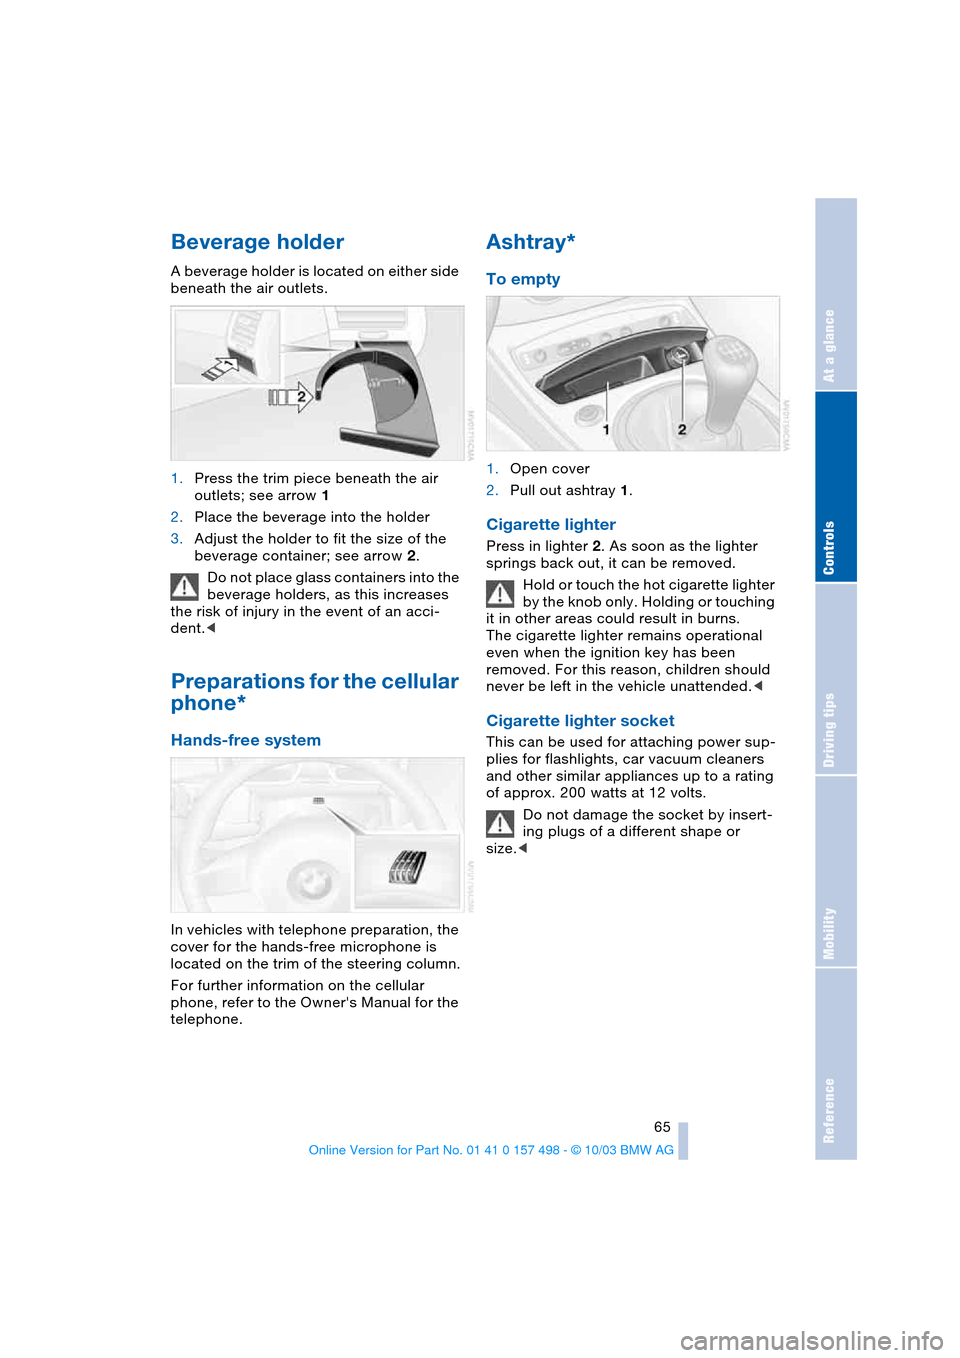
The indicator lamp in the central console
signals whether or not the passenger air-
bag system is activated or deactivated as
of ignition key position 1.
This lamp pertains only to the passen-
ger airbag system.<>The indicator lamp goes out after a few
seconds:
The passenger airbags are active, e. g.
when an adult is traveling in the vehicle
or the seat is unoccupied
>The indicator lamp lights up continu-
ously:
The passenger airbags are deactivated,
e. g. when a child is traveling in the vehi-
cle in the child-restraint system.
For more information on the operating prin-
ciple of the passenger airbag system and
seat occupation detection, refer to Auto-
matic deactivation of the passenger air-
bags.
Airbag system malfunction
A system malfunction could prevent
the system from responding in the
expected manner to an impact occurring
within its normal response range.
Please have the airbag system inspected
immediately at a BMW center.<
There is a fault in the airbag system
if the airbag indicator lamp behaves
as follows:
>The indicator lamp does not light up as
of ignition key position 1
>The indicator lamp remains on continu-
ously
>The indicator lamp lights up while the
vehicle is being driven.
Page 67 of 120

Reference
At a glance
Controls
Driving tips
Mobility
65
Beverage holder
A beverage holder is located on either side
beneath the air outlets.
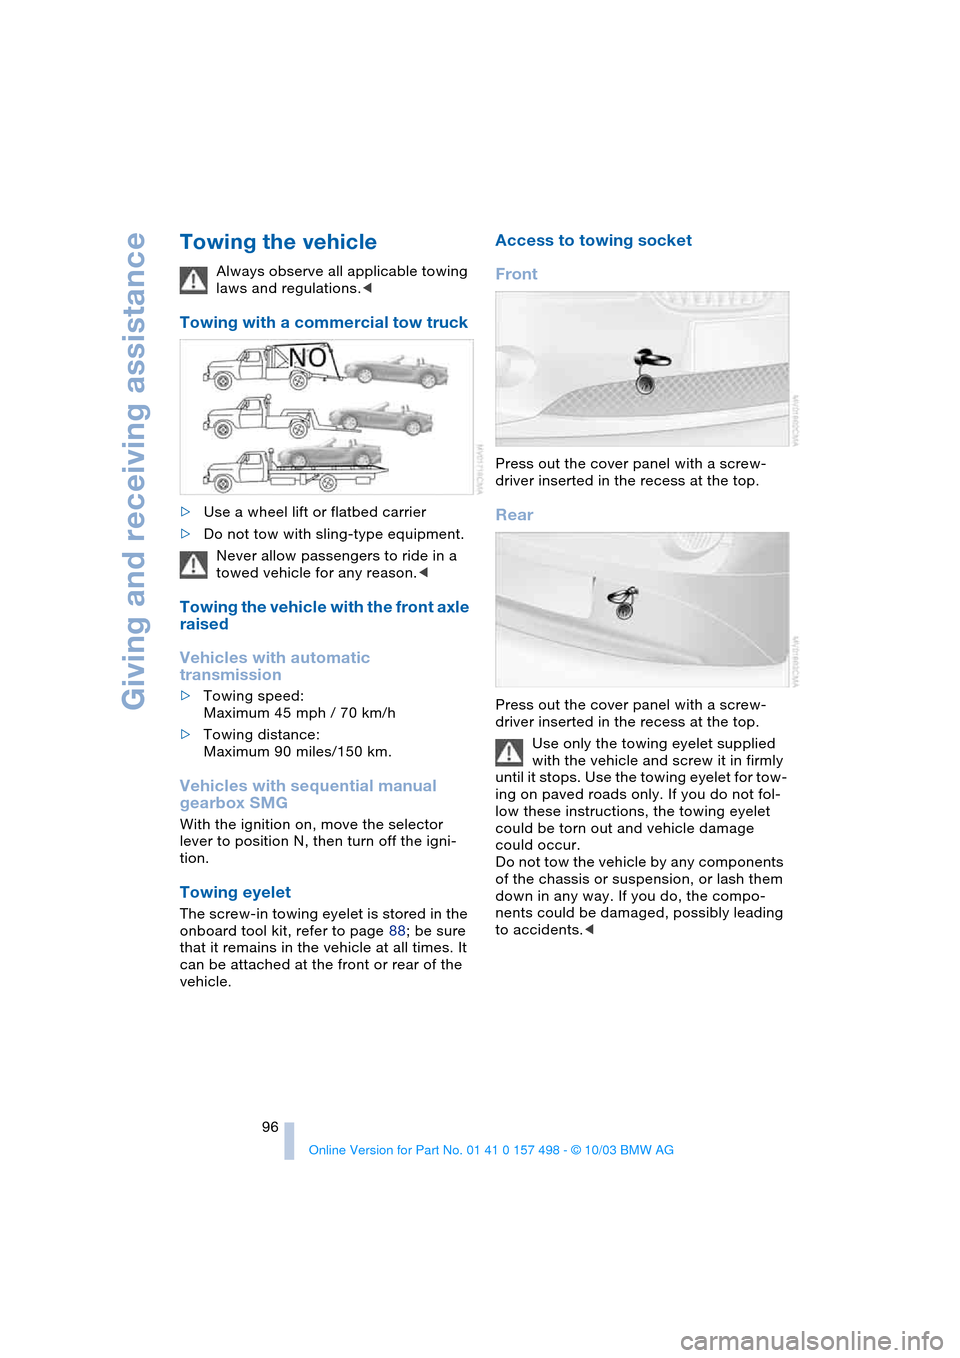
1.Press the trim piece beneath the air
outlets; see arrow 1
2.Place the beverage into the holder
3.Adjust the holder to fit the size of the
beverage container; see arrow 2.
Do not place glass containers into the
beverage holders, as this increases
the risk of injury in the event of an acci-
dent.<
Preparations for the cellular
phone*
Hands-free system
In vehicles with telephone preparation, the
cover for the hands-free microphone is
located on the trim of the steering column.
For further information on the cellular
phone, refer to the Owner's Manual for the
telephone.
Ashtray*
To empty
1.Open cover
2.Pull out ashtray 1.
Cigarette lighter
Press in lighter 2. As soon as the lighter
springs back out, it can be removed.
Hold or touch the hot cigarette lighter
by the knob only. Holding or touching
it in other areas could result in burns.
The cigarette lighter remains operational
even when the ignition key has been
removed. For this reason, children should
never be left in the vehicle unattended.<
Cigarette lighter socket
This can be used for attaching power sup-
plies for flashlights, car vacuum cleaners
and other similar appliances up to a rating
of approx. 200 watts at 12 volts.
Do not damage the socket by insert-
ing plugs of a different shape or
size.<
Page 98 of 120

Giving and receiving assistance
96
Towing the vehicle
Always observe all applicable towing
laws and regulations.<
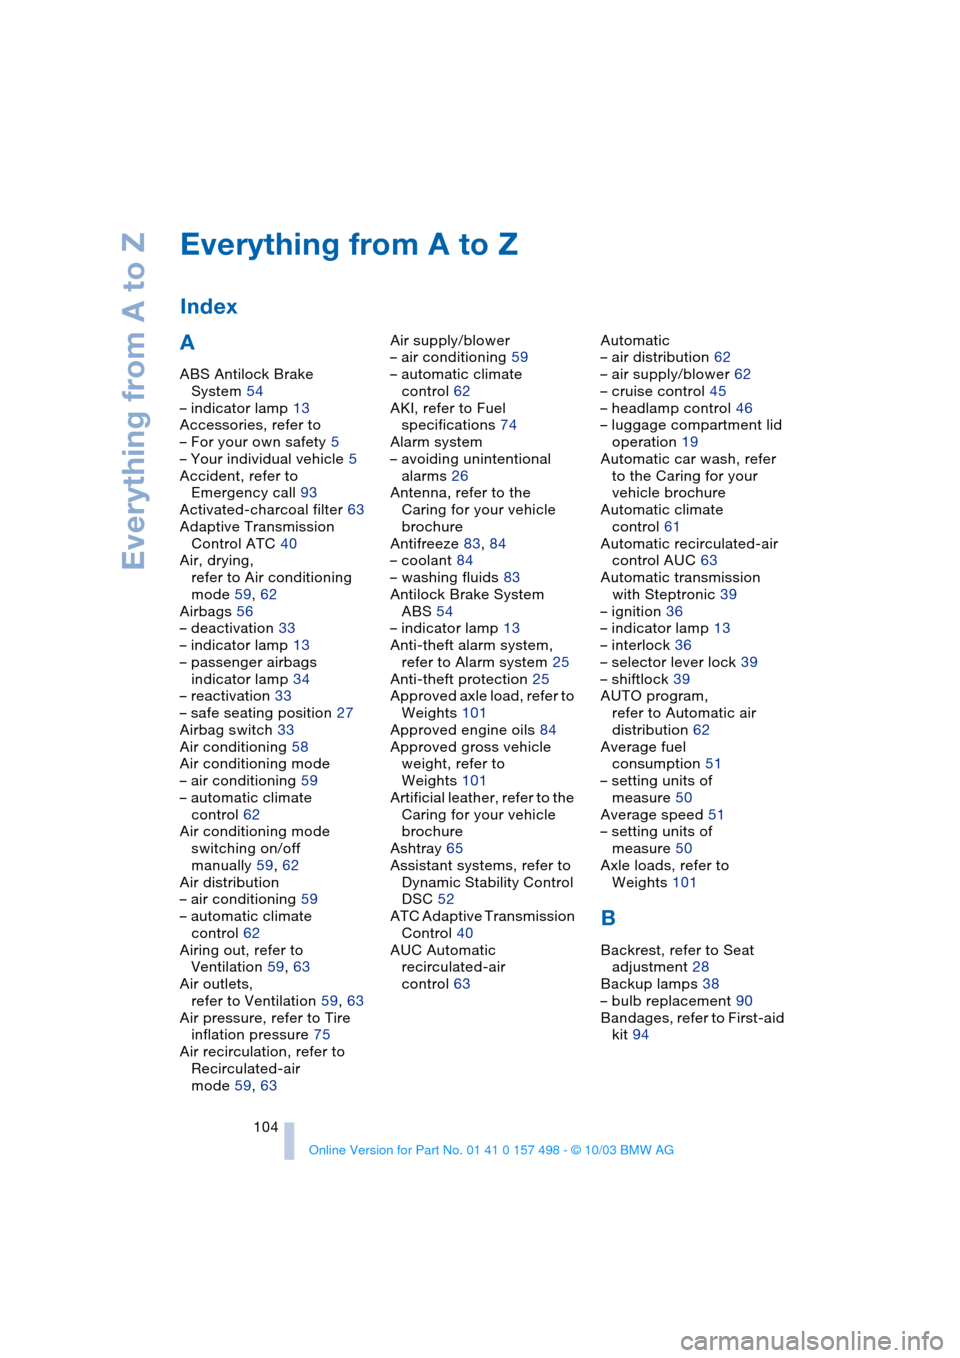
Towing with a commercial tow truck
>Use a wheel lift or flatbed carrier
>Do not tow with sling-type equipment.
Never allow passengers to ride in a
towed vehicle for any reason.<
Towing the vehicle with the front axle
raised
Vehicles with automatic
transmission
>Towing speed:
Maximum 45 mph / 70 km/h
>Towing distance:
Maximum 90 miles/150 km.
Vehicles with sequential manual
gearbox SMG
With the ignition on, move the selector
lever to position N, then turn off the igni-
tion.
Towing eyelet
The screw-in towing eyelet is stored in the
onboard tool kit, refer to page 88; be sure
that it remains in the vehicle at all times. It
can be attached at the front or rear of the
vehicle.
Access to towing socket
Front
Press out the cover panel with a screw-
driver inserted in the recess at the top.
Rear
Press out the cover panel with a screw-
driver inserted in the recess at the top.
Use only the towing eyelet supplied
with the vehicle and screw it in firmly
until it stops. Use the towing eyelet for tow-
ing on paved roads only. If you do not fol-
low these instructions, the towing eyelet
could be torn out and vehicle damage
could occur.
Do not tow the vehicle by any components
of the chassis or suspension, or lash them
down in any way. If you do, the compo-
nents could be damaged, possibly leading
to accidents.<
Page 106 of 120

Everything from A to Z
104
A
ABS Antilock Brake
System 54
– indicator lamp 13
Accessories, refer to
– For your own safety 5
– Your individual vehicle 5
Accident, refer to
Emergency call 93
Activated-charcoal filter 63
Adaptive Transmission
Control ATC 40
Air, drying,
refer to Air conditioning
mode 59, 62
Airbags 56
– deactivation 33
– indicator lamp 13
– passenger airbags
indicator lamp 34
– reactivation 33
– safe seating position 27
Airbag switch 33
Air conditioning 58
Air conditioning mode
– air conditioning 59
– automatic climate
control 62
Air conditioning mode
switching on/off
manually 59, 62
Air distribution
– air conditioning 59
– automatic climate
control 62
Airing out, refer to
Ventilation 59, 63
Air outlets,
refer to Ventilation 59, 63
Air pressure, refer to Tire
inflation pressure 75
Air recirculation, refer to
Recirculated-air
mode 59, 63Air supply/blower
– air conditioning 59
– automatic climate
control 62
AKI, refer to Fuel
specifications 74
Alarm system
– avoiding unintentional
alarms 26
Antenna, refer to the
Caring for your vehicle
brochure
Antifreeze 83, 84
– coolant 84
– washing fluids 83
Antilock Brake System
ABS 54
– indicator lamp 13
Anti-theft alarm system,
refer to Alarm system 25
Anti-theft protection 25
Approved axle load, refer to
Weights 101
Approved engine oils 84
Approved gross vehicle
weight, refer to
Weights 101
Artificial leather, refer to the
Caring for your vehicle
brochure
Ashtray 65
Assistant systems, refer to
Dynamic Stability Control
DSC 52
ATC Adaptive Transmission
Control 40
AUC Automatic
recirculated-air
control 63Automatic
– air distribution 62
– air supply/blower 62
– cruise control 45
– headlamp control 46
– luggage compartment lid
operation 19
Automatic car wash, refer
to the Caring for your
vehicle brochure
Automatic climate
control 61
Automatic recirculated-air
control AUC 63
Automatic transmission
with Steptronic 39
– ignition 36
– indicator lamp 13
– interlock 36
– selector lever lock 39
– shiftlock 39
AUTO program,
refer to Automatic air
distribution 62
Average fuel
consumption 51
– setting units of
measure 50
Average speed 51
– setting units of
measure 50
Axle loads, refer to
Weights 101
B
Backrest, refer to Seat
adjustment 28
Backup lamps 38
– bulb replacement 90
Bandages, refer to First-aid
kit 94
Everything from A to Z
Index
Page 110 of 120

Everything from A to Z
108 Hazard warning flashers 10
Headlamp cover, care,
refer to the Caring for
your vehicle brochure
Headlamp flasher 43
– indicator lamp 13
Headlamps
– bulb replacement 88
– care, refer to the Caring
for your vehicle brochure
– cleaning 44
Headlamps, automatic
control 46
Headlamp washer
reservoir 83
– content, refer to
Capacities 103
Headlamp washer
system
– cleaning the
headlamps 44
– washing fluids 83
Head restraints 28
Heated mirrors 31
Heated seats 30
Heating 58
– exterior mirrors 31
– rear window 59, 63
– seats 30
Heavy loads, refer to
Stowing cargo 70
Height, refer to
Dimensions 102
Height adjustment
– seats 28
– steering wheel 30
High beams 47
– bulb replacement 89
– headlamp flasher 43
– indicator lamp 13
High Performance
Synthetic Oil 84
– alternative oils 84
– approved oils 84
High temperatures 69
Holders for beverages 65
Hood 81
Horn 10
Hydraulic Brake Assistant,
refer to Dynamic Brake
Control DBC 52Hydraulics
– brakes 85
Hydroplaning 69
I
Ice warning 50
Identification mark
– Run Flat tires 80
Ignition 36
Ignition key 16
Ignition lock 36
Inclines 69
Index 104
Indicator/warning lamp
– airbags 57
– alarm system 26
– brakes 13
– coolant temperature 49
– DSC 52
– engine temperature 48
– Flat Tire Monitor 55
– fog lamps 47
– passenger airbags 34
– please fasten safety
belts 30
– reserve 48
Indicator and warning
lamps, overview 12
Individual air
distribution 59, 62
Individual settings, refer to
Vehicle Memory,
Key Memory 31
Inflation pressure, tires 75
Inflation pressure
monitoring, refer to Flat
Tire Monitor 54
INSPECTION 49
Instrument cluster 12
Instrument lighting 47
Instrument panel, refer to
Cockpit 10
Interior lamps 47
– remote control 17
Interior motion sensor 26
Interior rearview mirror 31
– automatic dimming
feature 31
Interior temperature
– adjusting 59, 62Interlock, refer to
Steering lock 36
Intermittent
– operation, wipers 44
Interval
– display, service 49
J
Jack 91
Jacking points 91
Jets, refer to
Ventilation 59, 63
Jump-starting 94
K
Key Memory 31
Keys 16
Key switch for passenger
airbags 33
Kickdown 39
Knock control 74
L
Lamps 46
Lamps and bulbs 88
LATCH, child-restraint
mounting system 35
Leather care, refer to the
Caring for your vehicle
brochure
Length, refer to
Dimensions 102
License plate lamps
– bulb replacement 91
Light-alloy wheels, care,
refer to the Caring for
your vehicle brochure
Lighter 65
Lighting
– of the instruments 47
Lighting of the instruments,
refer to Instrument
lighting 47
LIGHTS ON warning 46
Light switch 46
Loads, refer to Cargo
loading 70
Loads, securing 70