2004 BMW Z4 ROADSTER 3.0I ignition
[x] Cancel search: ignitionPage 46 of 120

Driving
44 5Rotary dial for control of the wipe inter-
val or the sensitivity of the rain sensor
Intermittent operation
Not on vehicles with rain sensor.
You can set the wipe interval over four
stages with rotary dial 5.
In addition, the wipe interval is varied auto-
matically depending on road speed.
Rain sensor
The rain sensor is positioned on the wind-
shield, directly behind the interior rearview
mirror.
To activate the rain sensor:
>With the ignition key in position 1 or
higher, move the lever to position 1. The
wipers travel once across the wind-
shield, regardless of the weather.
You can leave the lever permanently in
position 1, it is then only necessary to acti-
vate the rain sensor. To do this
>turn rotary dial 5 briefly.
To adjust the sensitivity of the rain sensor:
turn rotary dial 5.
To deactivate the rain sensor:
return lever to position 0.
Turn the rain sensor off in automatic
car washes. Failure to do so could
result in damage caused by undesired
wiper activation.<
Normal wiper speed
When the vehicle is stationary, the wipers
automatically switch to intermittent wipe,
not on vehicles with rain sensor.
Fast wiper speed
When the vehicle is stationary, the wipers
operate at normal speed, not on vehicles
with rain sensor.
Cleaning windshield and headlamps*
0Wipers retracted
1Cleaning windshield and headlamps
*
Do not use the washers if there is any
danger that the fluid will freeze on the
windshield, otherwise vision could be
obscured. For this reason, use an anti-
freeze agent. Refer to page 83.
Do not use the washers when the reservoir
is empty. Otherwise damage to the washer
pump could result.<
Cleaning the windshield
The system sprays washer fluid against the
windshield and activates the wipers for a
brief period.
Cleaning the headlamps
When the vehicle's lighting system is
switched on, the headlamps are cleaned at
reasonable intervals.
Windshield washer nozzles
The windshield washer nozzles are heated
automatically
* in ignition position 2.
Page 47 of 120
Reference
At a glance
Controls
Driving tips
Mobility
45
Cruise control*
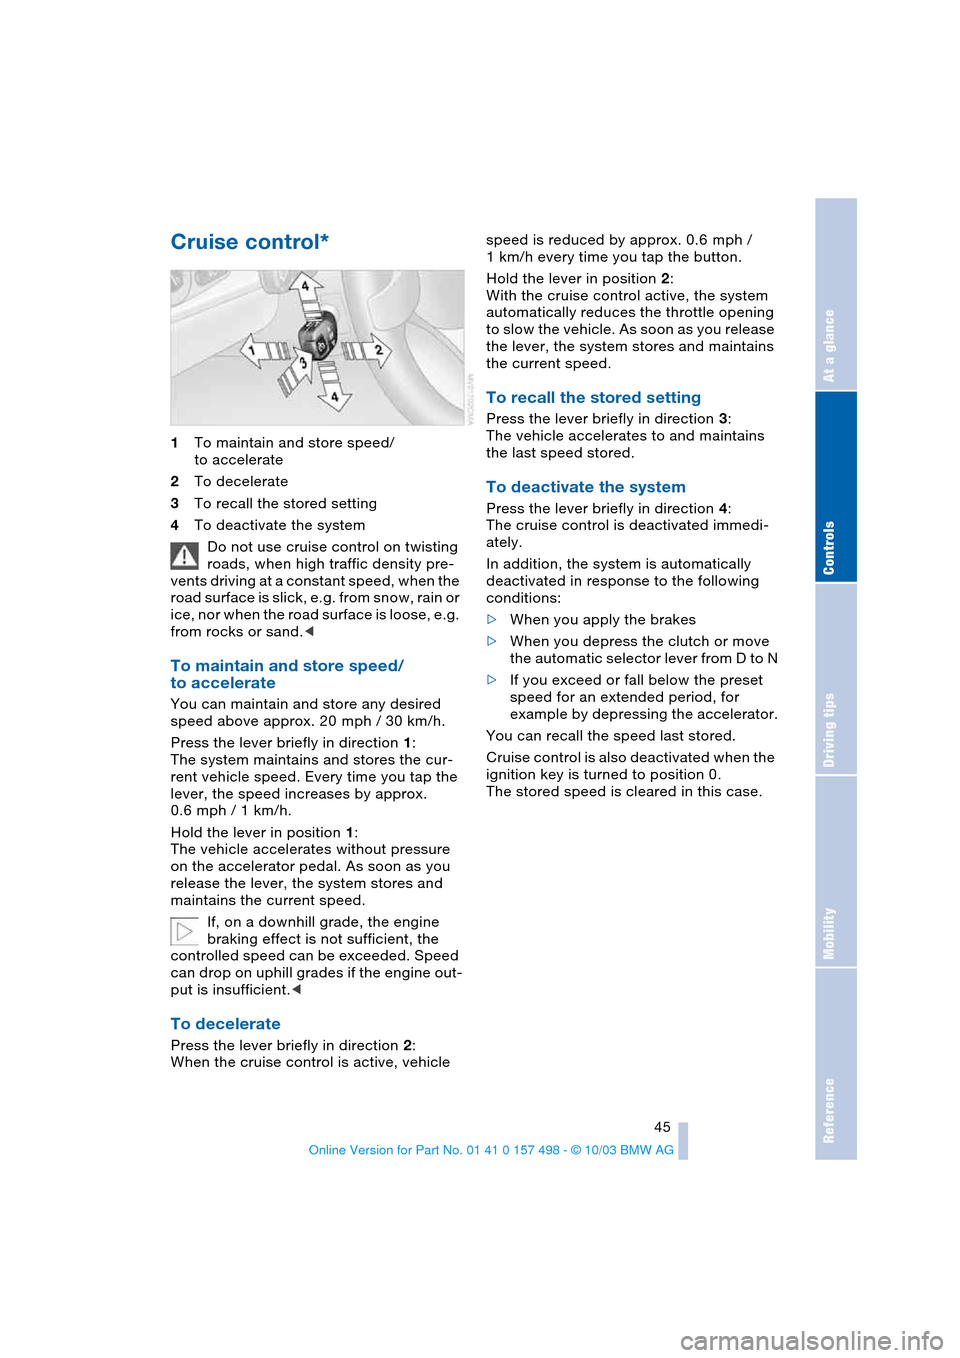
1To maintain and store speed/
to accelerate
2To decelerate
3To recall the stored setting
4To deactivate the system
Do not use cruise control on twisting
roads, when high traffic density pre-
vents driving at a constant speed, when the
road surface is slick, e.g. from snow, rain or
ice, nor when the road surface is loose, e.g.
from rocks or sand.<
To maintain and store speed/
to accelerate
You can maintain and store any desired
speed above approx. 20 mph / 30 km/h.
Press the lever briefly in direction 1:
The system maintains and stores the cur-
rent vehicle speed. Every time you tap the
lever, the speed increases by approx.
0.6 mph / 1 km/h.
Hold the lever in position 1:
The vehicle accelerates without pressure
on the accelerator pedal. As soon as you
release the lever, the system stores and
maintains the current speed.
If, on a downhill grade, the engine
braking effect is not sufficient, the
controlled speed can be exceeded. Speed
can drop on uphill grades if the engine out-
put is insufficient.<
To decelerate
Press the lever briefly in direction 2:
When the cruise control is active, vehicle speed is reduced by approx. 0.6 mph /
1 km/h every time you tap the button.
Hold the lever in position 2:
With the cruise control active, the system
automatically reduces the throttle opening
to slow the vehicle. As soon as you release
the lever, the system stores and maintains
the current speed.
To recall the stored setting
Press the lever briefly in direction 3:
The vehicle accelerates to and maintains
the last speed stored.
To deactivate the system
Press the lever briefly in direction 4:
The cruise control is deactivated immedi-
ately.
In addition, the system is automatically
deactivated in response to the following
conditions:
>When you apply the brakes
>When you depress the clutch or move
the automatic selector lever from D to N
>If you exceed or fall below the preset
speed for an extended period, for
example by depressing the accelerator.
You can recall the speed last stored.
Cruise control is also deactivated when the
ignition key is turned to position 0.
The stored speed is cleared in this case.
Page 48 of 120

Lamps
46
Lamps
Parking lamps/Low beams
Parking lamps
The front, rear and side vehicle
lighting is switched on. You can use
the parking lamps to signal the
position of the vehicle when it is parked.
For information on lighting on one side of
the vehicle for parking, which is available
as an additional feature, refer to page 47.
Low beams
When you switch off the ignition
with the low beam headlamps on,
only the parking lamps will remain
on.
Defective bulbs
The indicator lamp lights up:
At least one bulb of the vehicle's
exterior lighting has failed.
For replacing bulbs refer to page 88.
Follow me home lamps
When you activate the headlamp flasher
after parking the vehicle and switching off
the lights, the low beams will come on for a
brief period.
You can also have this function acti-
vated/deactivated if you wish.<
LIGHTS ON warning
Whenever you open the driver's door after
having turned the ignition key to position 0,
you will hear an acoustic signal for a few seconds to remind you that the lamps have
not been switched off
.
Daytime driving lamps*
If you desire, the light switch can be left in
the second position:
When the ignition is switched off, the exter-
nal lighting is also switched off.
You can have the activation settings
for the daytime driving lamps pro-
grammed on your vehicle.<
Automatic headlamp control*
When the switch is set to this posi-
tion, the system automatically acti-
vates and cancels the low beams in
response to changes in ambient light, for
example in tunnels, at dusk, and when it is
raining or snowing.
The vehicle's external lights remain
on constantly when you switch on the
front fog lamps after the headlamps have
come on automatically.<
Automatic headlamp control cannot
serve as a substitute for the driver's
judgement in determining when the vehicle
lights should be switched on. For example,
the sensors are not able to detect fog. To
avoid safety risks, you should respond to
these kinds of low-visibility situations by
switching the headlamps on manually.<
You can have the sensitivity of your
vehicle's automatic headlamp control
adjusted.<
Page 49 of 120
Reference
At a glance
Controls
Driving tips
Mobility
47
High beams/Standing
lamps
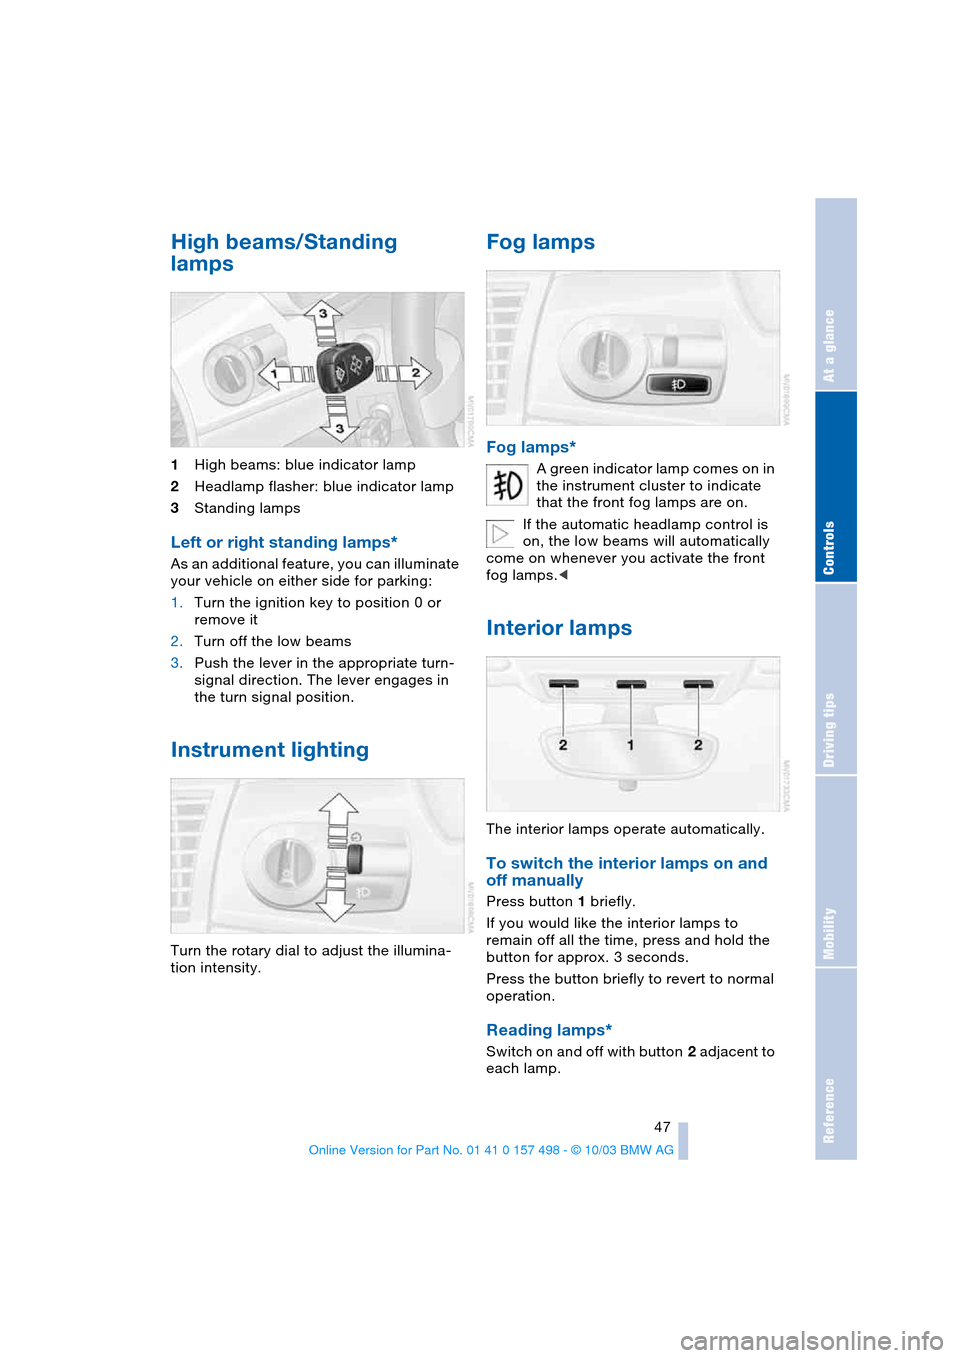
1High beams: blue indicator lamp
2Headlamp flasher: blue indicator lamp
3Standing lamps
Left or right standing lamps*
As an additional feature, you can illuminate
your vehicle on either side for parking:
1.Turn the ignition key to position 0 or
remove it
2.Turn off the low beams
3.Push the lever in the appropriate turn-
signal direction. The lever engages in
the turn signal position.
Instrument lighting
Turn the rotary dial to adjust the illumina-
tion intensity.
Fog lamps
Fog lamps*
A green indicator lamp comes on in
the instrument cluster to indicate
that the front fog lamps are on.
If the automatic headlamp control is
on, the low beams will automatically
come on whenever you activate the front
fog lamps.<
Interior lamps
The interior lamps operate automatically.
To switch the interior lamps on and
off manually
Press button 1 briefly.
If you would like the interior lamps to
remain off all the time, press and hold the
button for approx. 3 seconds.
Press the button briefly to revert to normal
operation.
Reading lamps*
Switch on and off with button 2 adjacent to
each lamp.
Page 50 of 120
Everything under control
48
Everything under control
Odometer
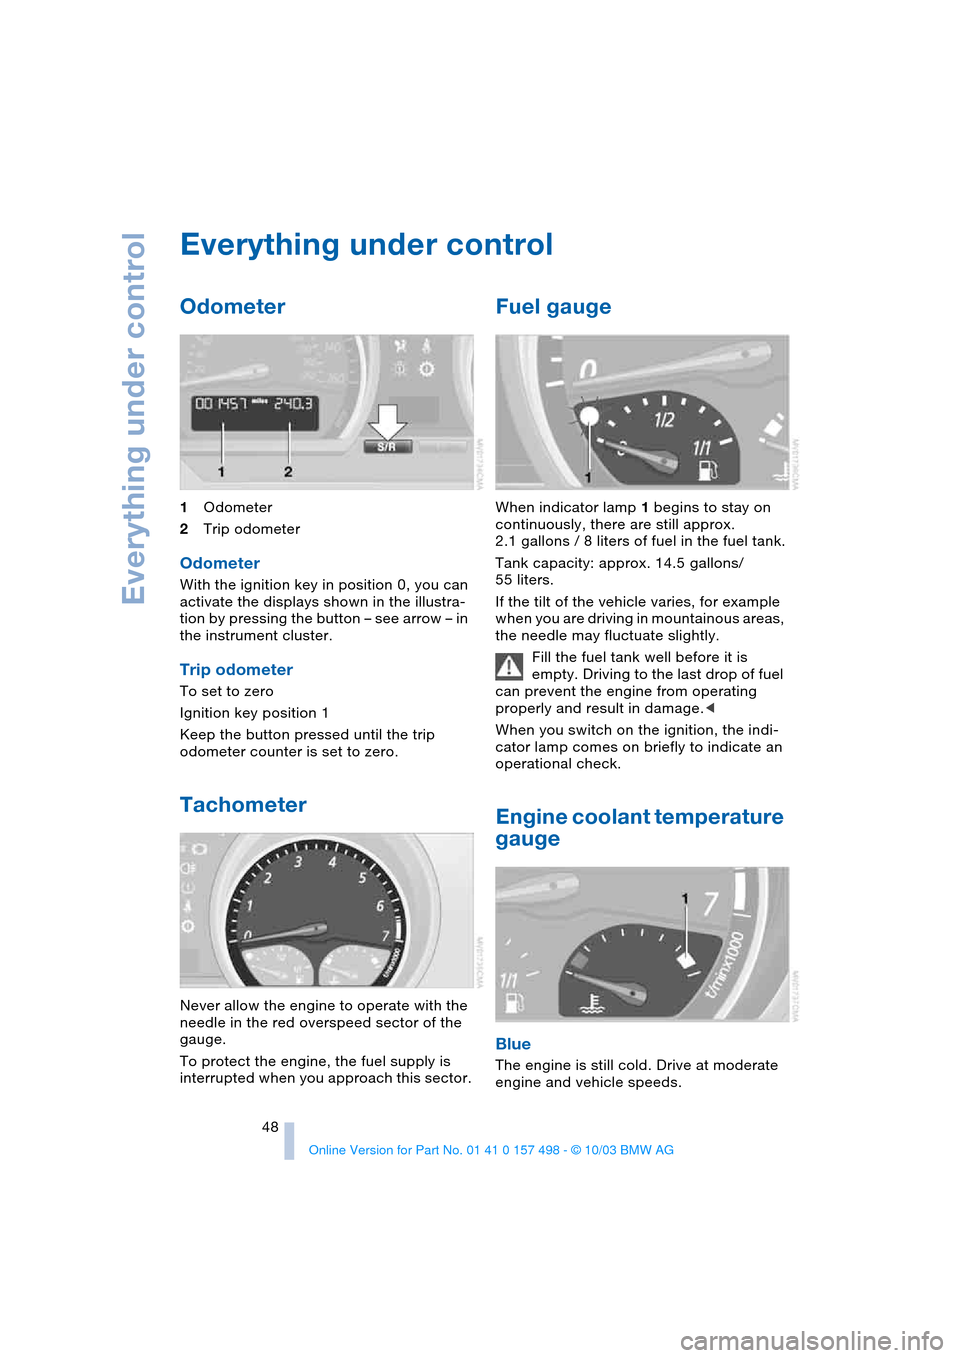
1Odometer
2Trip odometer
Odometer
With the ignition key in position 0, you can
activate the displays shown in the illustra-
tion by pressing the button – see arrow – in
the instrument cluster.
Trip odometer
To set to zero
Ignition key position 1
Keep the button pressed until the trip
odometer counter is set to zero.
Tachometer
Never allow the engine to operate with the
needle in the red overspeed sector of the
gauge.
To protect the engine, the fuel supply is
interrupted when you approach this sector.
Fuel gauge
When indicator lamp 1 begins to stay on
continuously, there are still approx.
2.1 gallons / 8 liters of fuel in the fuel tank.
Tank capacity: approx. 14.5 gallons/
55 liters.
If the tilt of the vehicle varies, for example
when you are driving in mountainous areas,
the needle may fluctuate slightly.
Fill the fuel tank well before it is
empty. Driving to the last drop of fuel
can prevent the engine from operating
properly and result in damage.<
When you switch on the ignition, the indi-
cator lamp comes on briefly to indicate an
operational check.
Engine coolant temperature
gauge
Blue
The engine is still cold. Drive at moderate
engine and vehicle speeds.
Page 51 of 120
Reference
At a glance
Controls
Driving tips
Mobility
49
Between the blue and red zones
Normal operating range. The needle may
rise as far as the edge of the red sector dur-
ing normal operation.
Red
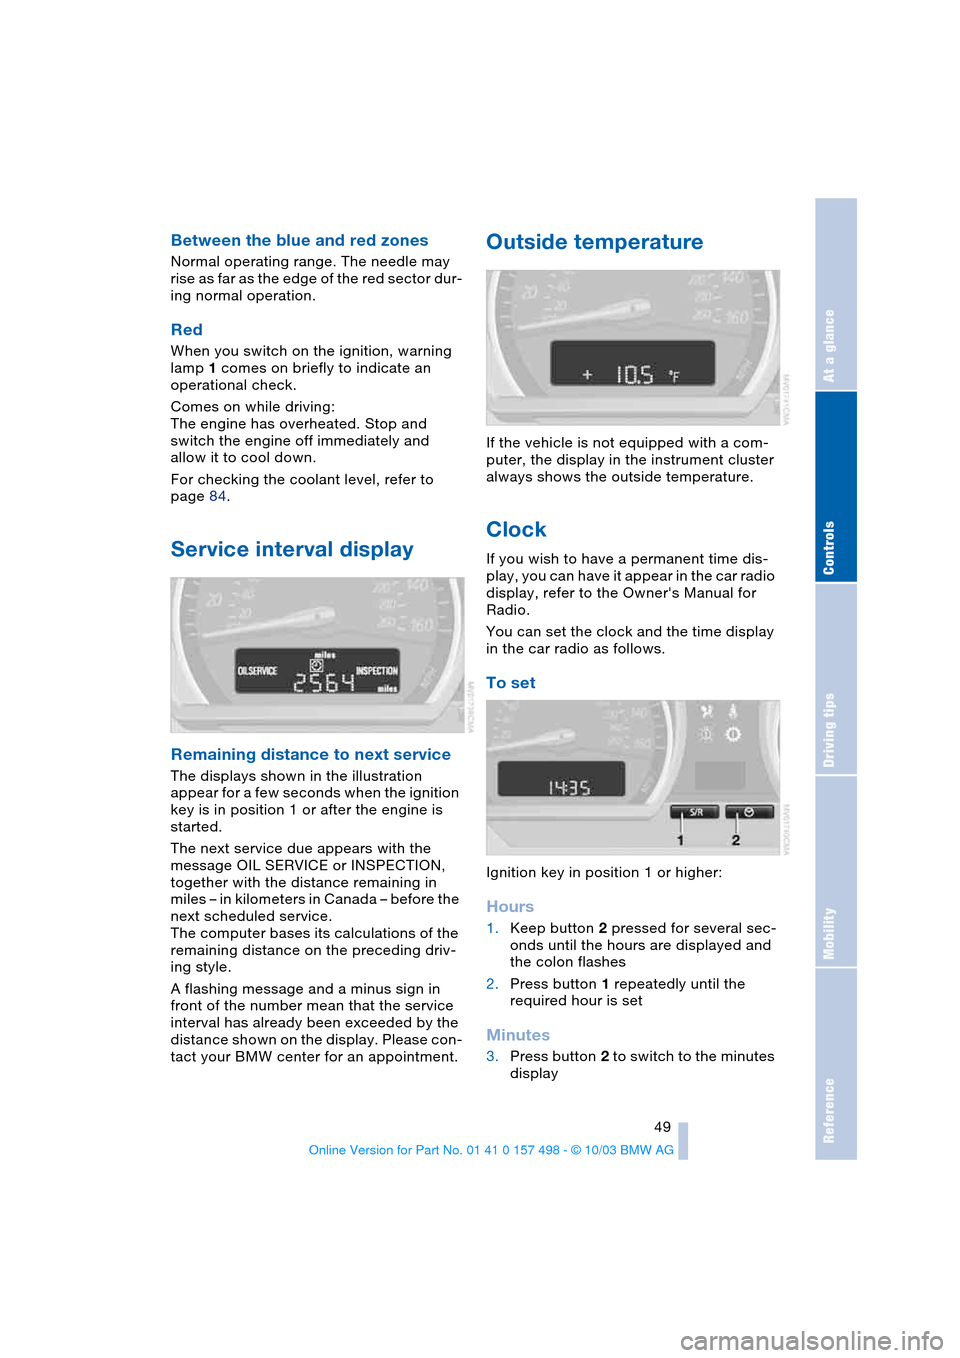
When you switch on the ignition, warning
lamp 1 comes on briefly to indicate an
operational check.
Comes on while driving:
The engine has overheated. Stop and
switch the engine off immediately and
allow it to cool down.
For checking the coolant level, refer to
page 84.
Service interval display
Remaining distance to next service
The displays shown in the illustration
appear for a few seconds when the ignition
key is in position 1 or after the engine is
started.
The next service due appears with the
message OIL SERVICE or INSPECTION,
together with the distance remaining in
miles – in kilometers in Canada – before the
next scheduled service.
The computer bases its calculations of the
remaining distance on the preceding driv-
ing style.
A flashing message and a minus sign in
front of the number mean that the service
interval has already been exceeded by the
distance shown on the display. Please con-
tact your BMW center for an appointment.
Outside temperature
If the vehicle is not equipped with a com-
puter, the display in the instrument cluster
always shows the outside temperature.
Clock
If you wish to have a permanent time dis-
play, you can have it appear in the car radio
display, refer to the Owner's Manual for
Radio.
You can set the clock and the time display
in the car radio as follows.
To set
Ignition key in position 1 or higher:
Hours
1.Keep button 2 pressed for several sec-
onds until the hours are displayed and
the colon flashes
2.Press button 1 repeatedly until the
required hour is set
Minutes
3.Press button 2 to switch to the minutes
display
Page 52 of 120
Everything under control
50 4.Press button 1 repeatedly until the
required minutes are set
5.Press button 2 to confirm the settings.
The set time of day is transferred to the car
radio display or appears in the instrument
cluster display.
Display mode
In ignition key position 0:
Press button 1.
The time of day is displayed for several
seconds.
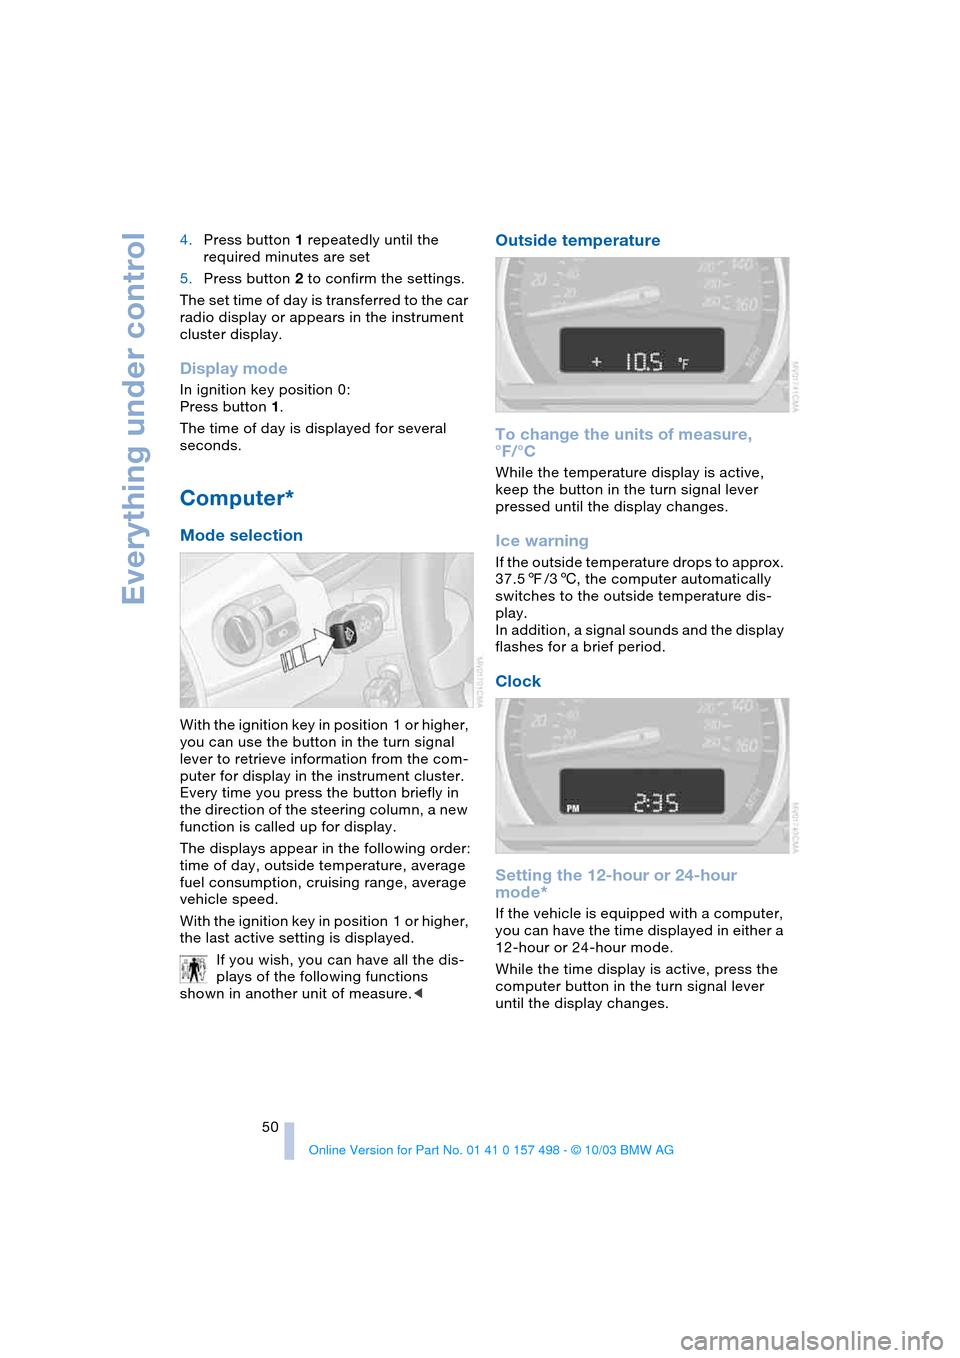
Computer*
Mode selection
With the ignition key in position 1 or higher,
you can use the button in the turn signal
lever to retrieve information from the com-
puter for display in the instrument cluster.
Every time you press the button briefly in
the direction of the steering column, a new
function is called up for display.
The displays appear in the following order:
time of day, outside temperature, average
fuel consumption, cruising range, average
vehicle speed.
With the ignition key in position 1 or higher,
the last active setting is displayed.
If you wish, you can have all the dis-
plays of the following functions
shown in another unit of measure.<
Outside temperature
To change the units of measure,
°F/°C
While the temperature display is active,
keep the button in the turn signal lever
pressed until the display changes.
Ice warning
If the outside temperature drops to approx.
37.57/36, the computer automatically
switches to the outside temperature dis-
play.
In addition, a signal sounds and the display
flashes for a brief period.
Clock
Setting the 12-hour or 24-hour
mode*
If the vehicle is equipped with a computer,
you can have the time displayed in either a
12-hour or 24-hour mode.
While the time display is active, press the
computer button in the turn signal lever
until the display changes.
Page 54 of 120

Technology for safety and driving convenience
52
Technology for safety and driving
convenience
Dynamic Stability Control
DSC
The concept
This system optimizes driving stability and
traction, especially when just starting off,
when accelerating or when cornering. It
also maintains vehicle stability, even in crit-
ical driving situations.
DSC recognizes unstable vehicle condi-
tions, such as understeering or oversteer-
ing, and, within physically feasible limits,
helps keeping the vehicle on a steady
course by reducing engine speed and by
brake applications at individual wheels.
The DSC is operational every time you start
the engine. It includes the following func-
tions:
>Automatic Stability Control plus Trac-
tion ASC+T
>Dynamic Traction Control DTC
>Dynamic Brake Control DBC
The laws of physics cannot be
repealed even with DSC. It will always
be the driver's responsibility to drive in a
manner that matches road conditions. We
therefore urge you to avoid using the addi-
tional safety margin of the system as an
excuse for taking risks.
Do not make any modifications to the DSC
system. Allow only authorized technicians
to perform service procedures on the
DSC.<
Indicator lamps
The indicator lamps in the instrument clus-
ter go out shortly after you switch on the
ignition.
Dynamic Stability Control DSC indi-
cator lamp flashes:
The system is active and governs
drive torque and braking forces.The indicator lamp stays lit:
Dynamic Stability Control DSC and
Dynamic Traction Control DTC have been
switched off via the button.
Dynamic Traction Control DTC indi-
cator lamp lights up permanently:
DTC has been deactivated via the
DSC button.
Dynamic Stability Control DSC indi-
cator lamp flashes:
Dynamic Traction Control DTC indi-
cator lamp lights up permanently:
DTC is actively regulating drive
torque and braking forces.
Interventions to increase stability are
being performed to a limited degree
only.<
The Dynamic Stability Control DSC
indicator lamp and yellow brake
warning lamp for Dynamic Brake
Control DBC light up continuously:
Dynamic Stability Control DSC,
Dynamic Traction Control DTC and
Dynamic Brake Control DBC are malfunc-
tioning.
Have the system repaired at your BMW
center.
Dynamic Stability Control DSC indi-
cator lamp and yellow brake warn-
ing lamp for Dynamic Brake Control
DBC for Canadian models:
The vehicle remains completely oper-
ational without the DSC, DTC and
DBC functions.<
In the event of a malfunction, please see
your BMW center.