2004 BMW 645CI COUPE tow
[x] Cancel search: towPage 82 of 216

Technology for comfort, convenience and safety
80
Report of a flat tire
The warning lamp lights up in red
and a message appears on the
Control Display. In addition, an
acoustic signal sounds. There is a flat tire
or extensive inflation pressure loss.
1.Cautiously reduce the vehicle speed to
below 50 mph/80 km/h. Avoid sudden
braking and steering maneuvers. Do
not exceed a vehicle speed of 50 mph/
80 km/h
Due to the reinforcement on the
side walls of the run-flat tires,
inflation pressure loss can not usually
be recognized from the outside, refer to
Run-flat tires on page 168.<
2.To continue driving, comply with the
instructions for driving with damaged
tires on page 168.
Malfunction
The warning lamp lights up yellow
and a message appears on the
Control Display. The Flat Tire Moni-
tor has a malfunction or has failed. Have
the system checked as soon as possible.
Active steering*
The concept
The active steering is a system that actively
varies the steering angle of the front wheels
in relation to the steering wheel move-
ments.
When you are driving in the low road speed
range, e.g. in a town or when parking, the
steering angle of the wheels is reinforced,
i.e. the steering becomes very direct.
In the higher speed range, on the other
hand, the steering angle of the wheels is
reduced more and more. This improves the
handling capability of your BMW over the
entire speed range.
In critical situations, the system can make
targeted changes to the steering angle pro-
vided by the driver and thus stabilize the
vehicle before the driver intervenes.
Malfunction
The fixed warning lamp lights up.
The active steering is no longer
operational. In the low speed range,
greater steering wheel movement is neces-
sary. Have the system checked.
If the warning lamp lights up during the first
engine starting following a power supply
interruption, the system must be activated
with initialization.
Initializing system
1.Start the engine
2.With the vehicle stationary, turn the
steering wheel from the straight-ahead
position to the left as far as it will go and
then back to the straight-ahead position
3.Switch off the engine.
When you start the engine again, all the
functions of the active steering are avail-
able once again.
Brake Force Display
The two-stage brake lamps light up in two
stages depending on how strongly you
brake.
>Normal braking:
The brake lamps and the third brake
lamp go on
>Heavy braking and braking with ABS:
In addition, the light area of the rear
brake lamps is enlarged, refer to illus-
tration.
Page 88 of 216

Lamps
86 this switch position with the ignition key in
position 2.<
The automatic headlamp control can-
not serve as a substitute for your per-
sonal judgment in determining when the
lamps should be switched on in response
to ambient lighting conditions. For exam-
ple, the system cannot detect fog. To avoid
safety risks, you should always switch on
the lamps manually under these condi-
tions.<
Adaptive Head Light*
The concept
Adaptive Head Light is a variable headlamp
control system that enables better illumina-
tion of the road surface. Depending on the
steering angle and other assumptions, the
light from the headlamp follows the course
of the road.
Activating Adaptive Head Light
In ignition key position 2, turn the
light switch to the position 'Auto-
matic headlamp control', refer to
page 85.
So that oncoming traffic is not dazzled,
Adaptive Head Light is
>not active when the vehicle is reversing
>only active toward passenger's side
when stopped.
Malfunction
The LED beside the symbol for automatic
headlamp control flashes. The Adaptive
Head Light has a malfunction or has failed.
Have the system checked as soon as pos-
sible.
High beams/roadside
parking lamps
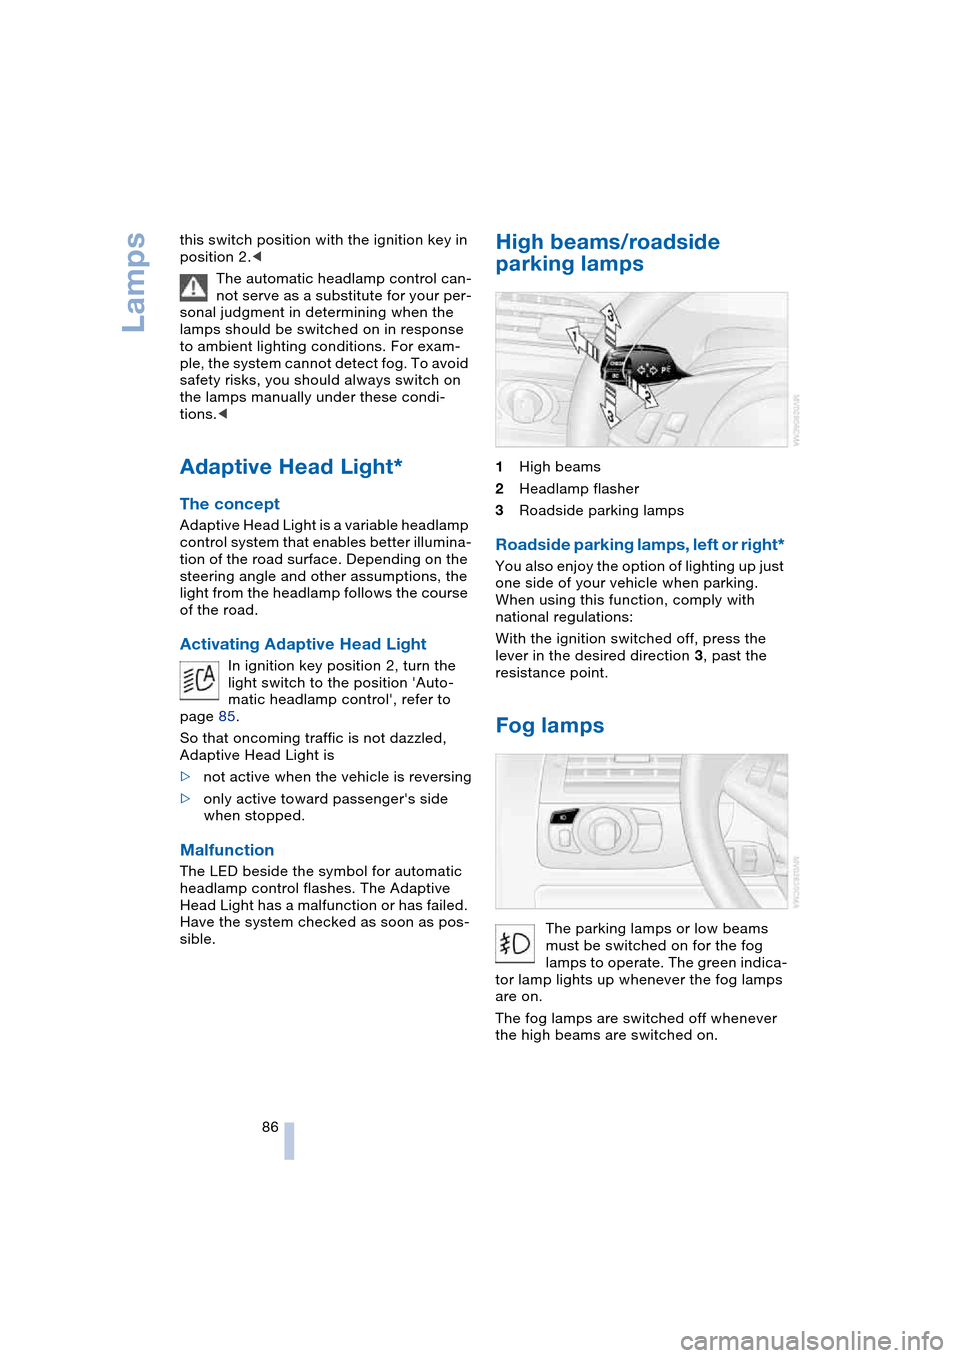
1High beams
2Headlamp flasher
3Roadside parking lamps
Roadside parking lamps, left or right*
You also enjoy the option of lighting up just
one side of your vehicle when parking.
When using this function, comply with
national regulations:
With the ignition switched off, press the
lever in the desired direction 3, past the
resistance point.
Fog lamps
The parking lamps or low beams
must be switched on for the fog
lamps to operate. The green indica-
tor lamp lights up whenever the fog lamps
are on.
The fog lamps are switched off whenever
the high beams are switched on.
Page 90 of 216

A congenial climate
88
A congenial climate
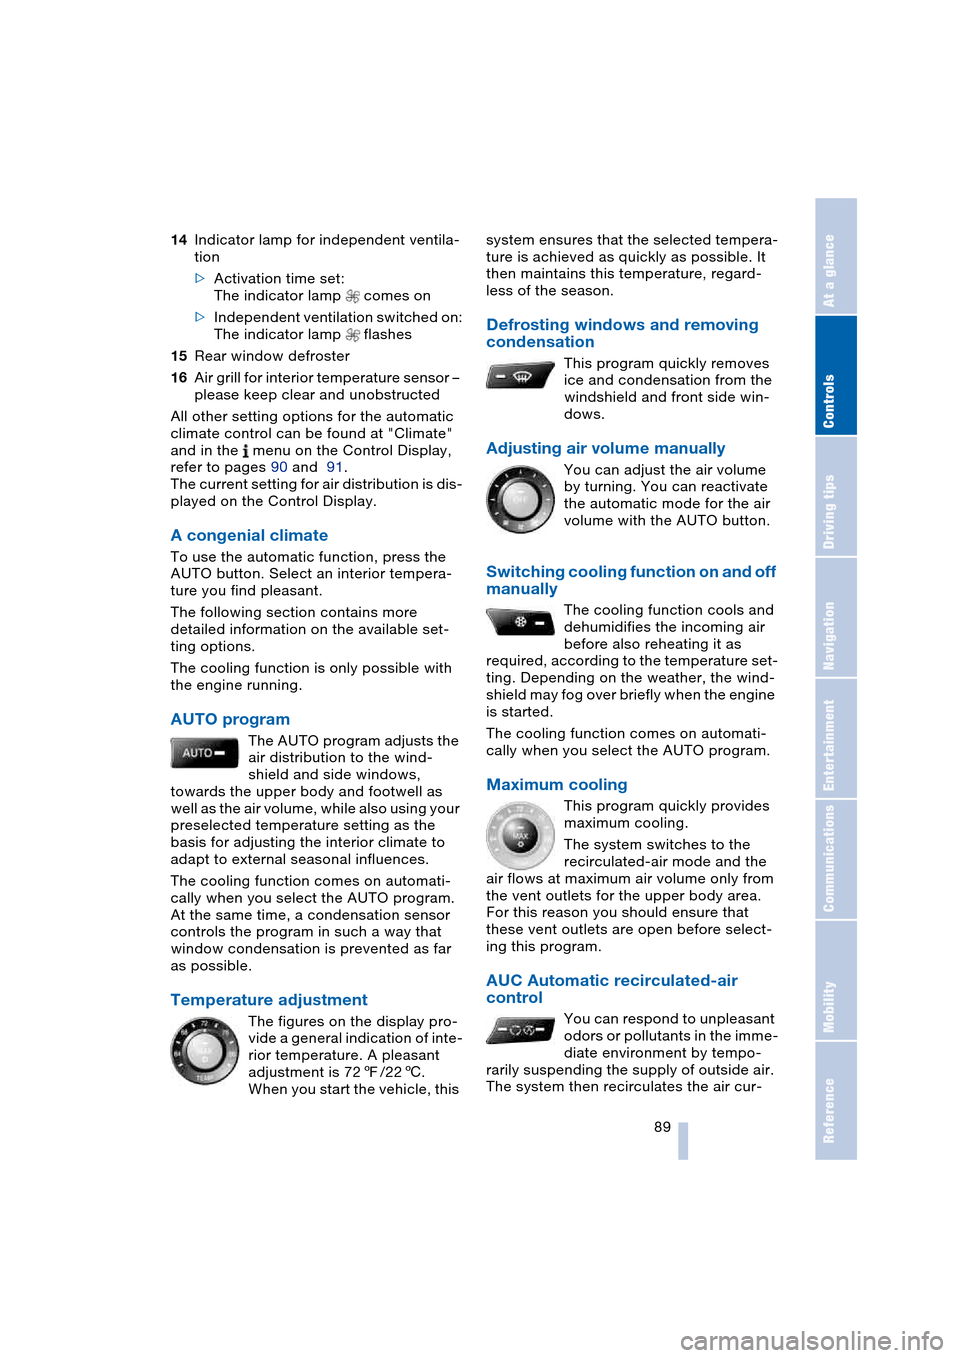
1Airflow directed toward the windshield
and side windows
2Air for the upper body region
The serrated dials allow you to open
and close the air supply vent outlets
through an infinitely-variable range.
The levers change the direction of the
airflow. You can find more information
on adjusting for draft-free ventilation on
page 92
3Air to footwell
4Setting the temperature, left side of
passenger compartment
5Maximum cooling6Defrosting windows and removing
condensation
7Adjusting the air volume manually
8Switching off automatic climate control
9Switching cooling function on and off
manually
10Setting the temperature, right side of
passenger compartment
11Residual heat mode
12AUTO program
13Outside air/AUC Automatic recircu-
lated-air control/recirculated air
Page 91 of 216

Controls
89Reference
At a glance
Driving tips
Communications
Navigation
Entertainment
Mobility
14Indicator lamp for independent ventila-
tion
>Activation time set:
The indicator lamp comes on
>Independent ventilation switched on:
The indicator lamp flashes
15Rear window defroster
16Air grill for interior temperature sensor –
please keep clear and unobstructed
All other setting options for the automatic
climate control can be found at "Climate"
and in the menu on the Control Display,
refer to pages 90 and 91.
The current setting for air distribution is dis-
played on the Control Display.
A congenial climate
To use the automatic function, press the
AUTO button. Select an interior tempera-
ture you find pleasant.
The following section contains more
detailed information on the available set-
ting options.
The cooling function is only possible with
the engine running.
AUTO program
The AUTO program adjusts the
air distribution to the wind-
shield and side windows,
towards the upper body and footwell as
well as the air volume, while also using your
preselected temperature setting as the
basis for adjusting the interior climate to
adapt to external seasonal influences.
The cooling function comes on automati-
cally when you select the AUTO program.
At the same time, a condensation sensor
controls the program in such a way that
window condensation is prevented as far
as possible.
Temperature adjustment
The figures on the display pro-
vide a general indication of inte-
rior temperature. A pleasant
adjustment is 727/226.
When you start the vehicle, this system ensures that the selected tempera-
ture is achieved as quickly as possible. It
then maintains this temperature, regard-
less of the season.
Defrosting windows and removing
condensation
This program quickly removes
ice and condensation from the
windshield and front side win-
dows.
Adjusting air volume manually
You can adjust the air volume
by turning. You can reactivate
the automatic mode for the air
volume with the AUTO button.
Switching cooling function on and off
manually
The cooling function cools and
dehumidifies the incoming air
before also reheating it as
required, according to the temperature set-
ting. Depending on the weather, the wind-
shield may fog over briefly when the engine
is started.
The cooling function comes on automati-
cally when you select the AUTO program.
Maximum cooling
This program quickly provides
maximum cooling.
The system switches to the
recirculated-air mode and the
air flows at maximum air volume only from
the vent outlets for the upper body area.
For this reason you should ensure that
these vent outlets are open before select-
ing this program.
AUC Automatic recirculated-air
control
You can respond to unpleasant
odors or pollutants in the imme-
diate environment by tempo-
rarily suspending the supply of outside air.
The system then recirculates the air cur-
Page 93 of 216

Controls
91Reference
At a glance
Driving tips
Communications
Navigation
Entertainment
Mobility
1.Select "Vent settings and press the
controller
2.Select "AUTO and press the controller.
The manual air distribution is
switched on
3.Select the desired field by moving the
controller and turn the controller to
adjust the air distribution.
1Airflow directed toward the windshield
and side windows, driver's side only
2Airflow for the upper body
3Air to footwell
To select the front passenger area:
Move the controller to the right.
Automatic air distribution
1.Select "Vent settings and press the
controller
2.Select "AUTO" and press the controller.
The automatic air distribution is
switched on.
The program handles adjustment of the air
distribution, separately for the driver and
passenger side.
To switch on the automatic air distribution
for the front passenger:
Move the controller to the right.
Adapting temperature in upper body
region
1.Select "Vent settings and press the
controller
2.Select the field by moving the controller
and turn the controller to adjust the air
distribution.
Setting intensity of AUTO program
To meet your individual needs, you can
weaken or strengthen the intensity of the
automatic climate control.
Control Center, for principle details, refer to
page 16:
1.Open the menu
2.Select "Vehicle settings" and press the
controller
3.Select "Climate control" and press the
controller
4.Select "Automatic programs" and press
the controller
5.Select the desired intensity
6.Press the controller.
Convertible program
When the convertible top is opened, the
convertible program can also be selected.
In the convertible program, the automatic
Page 106 of 216

Things to remember when driving
104
Mobile communication devices in
vehicle
BMW advises against using mobile
communication devices, e.g. portable
phones, in the inside of the vehicle without
a direct connection to an external antenna.
Otherwise, the vehicle electronics and
mobile communication device can influ-
ence one another. It is not ensured that the
waves emitted during transmission are led
out of the vehicle interior.<
Cargo loading
To avoid loading the tires beyond
their approved carrying capacity,
never overload the vehicle. Overloading
can lead to overheating and increases the
rate at which damage develops inside the
tires. The ultimate result can assume the
form of a sudden air loss.<
Determining loading limit
1.Locate the following statement on your
vehicle's placard
*:
The combined weight of occu-
pants and cargo should never
exceed XXX lbs. or YYY kg, as other-
wise the vehicle may be damaged and
unstable driving conditions may
result.<
2.Determine the combined weight of the
driver and passengers that will be riding
in your vehicle
3.Subtract the combined weight of the
driver and passengers from XXX lbs. or
YYY kg4.The resulting figure equals the available
amount of cargo and luggage load
capacity.
For example, if the XXX amount equals
1400 lbs. and there will be five 150-lbs.
passengers in your vehicle, the amount
of available cargo and luggage load
capacity is 650 lbs.:
1400 lbs. minus 750 lbs. = 650 lbs.
5.Determine the combined weight of lug-
gage and cargo being loaded on the
vehicle. That weight may not safely
exceed the available cargo and luggage
load capacity calculated in step 4
6.If your vehicle will be towing a trailer,
part of the load from your trailer will be
transferred to your vehicle. Consult the
manual for transporting a trailer to
determine how this may reduce the
available cargo and luggage load
capacity of your vehicle.
Load
The permitted load is the total of the weight
of occupants and cargo/luggage. The
greater the weight of occupants, the less
cargo/luggage can be transported.
Page 107 of 216

Driving tips
105Reference
At a glance
Controls
Communications
Navigation
Entertainment
Mobility
Stowing cargo
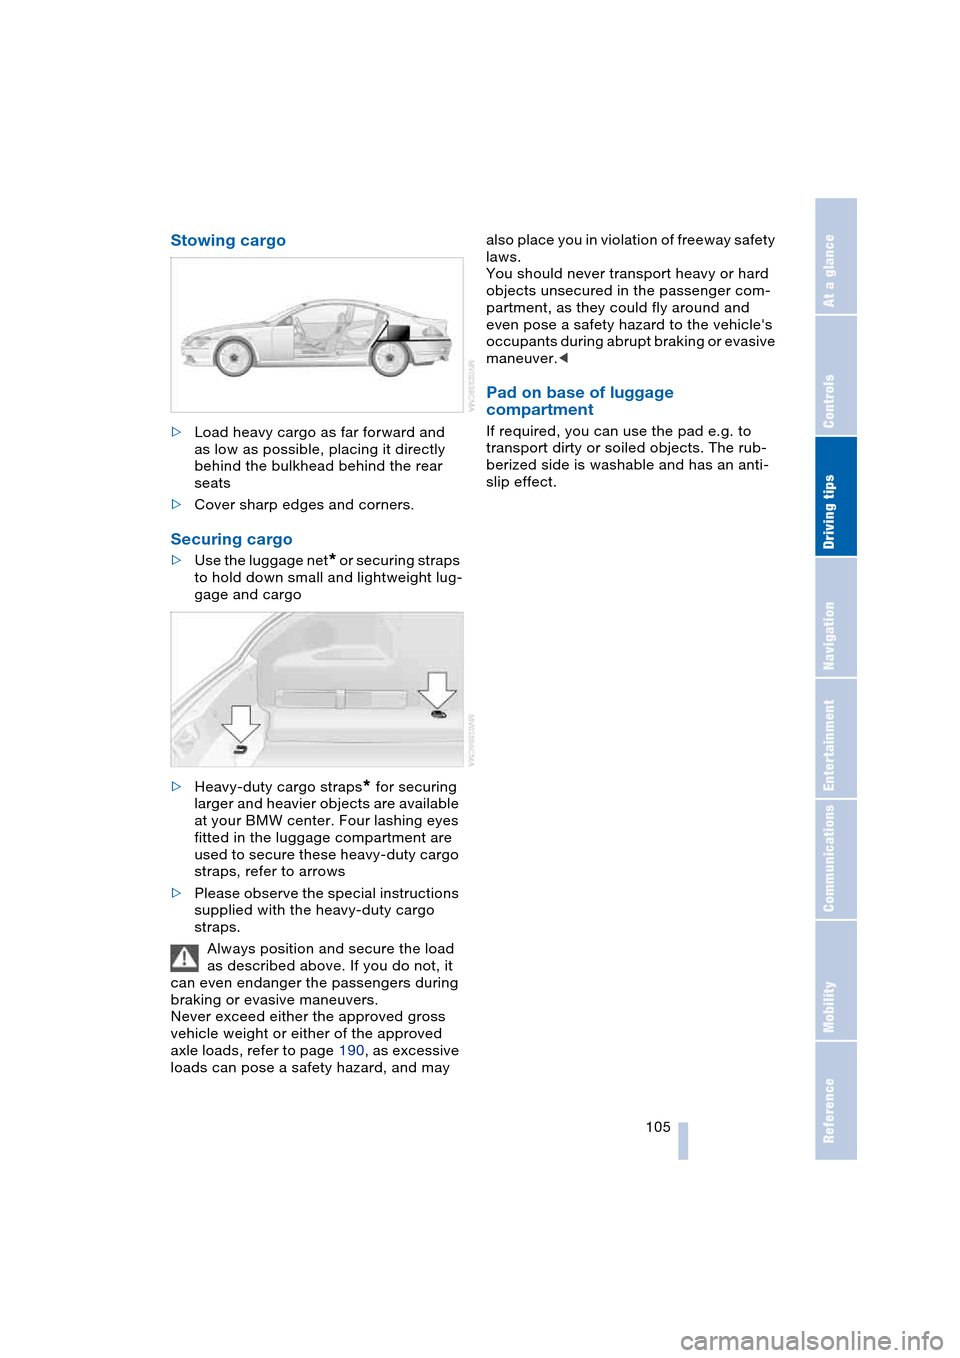
>Load heavy cargo as far forward and
as low as possible, placing it directly
behind the bulkhead behind the rear
seats
>Cover sharp edges and corners.
Securing cargo
>Use the luggage net* or securing straps
to hold down small and lightweight lug-
gage and cargo
>Heavy-duty cargo straps
* for securing
larger and heavier objects are available
at your BMW center. Four lashing eyes
fitted in the luggage compartment are
used to secure these heavy-duty cargo
straps, refer to arrows
>Please observe the special instructions
supplied with the heavy-duty cargo
straps.
Always position and secure the load
as described above. If you do not, it
can even endanger the passengers during
braking or evasive maneuvers.
Never exceed either the approved gross
vehicle weight or either of the approved
axle loads, refer to page 190, as excessive
loads can pose a safety hazard, and may also place you in violation of freeway safety
laws.
You should never transport heavy or hard
objects unsecured in the passenger com-
partment, as they could fly around and
even pose a safety hazard to the vehicle's
occupants during abrupt braking or evasive
maneuver.<
Pad on base of luggage
compartment
If required, you can use the pad e.g. to
transport dirty or soiled objects. The rub-
berized side is washable and has an anti-
slip effect.
Page 111 of 216

Navigation
Driving tips
109Reference
At a glance
Controls
Communications
Entertainment
Mobility
Display in assistance
window
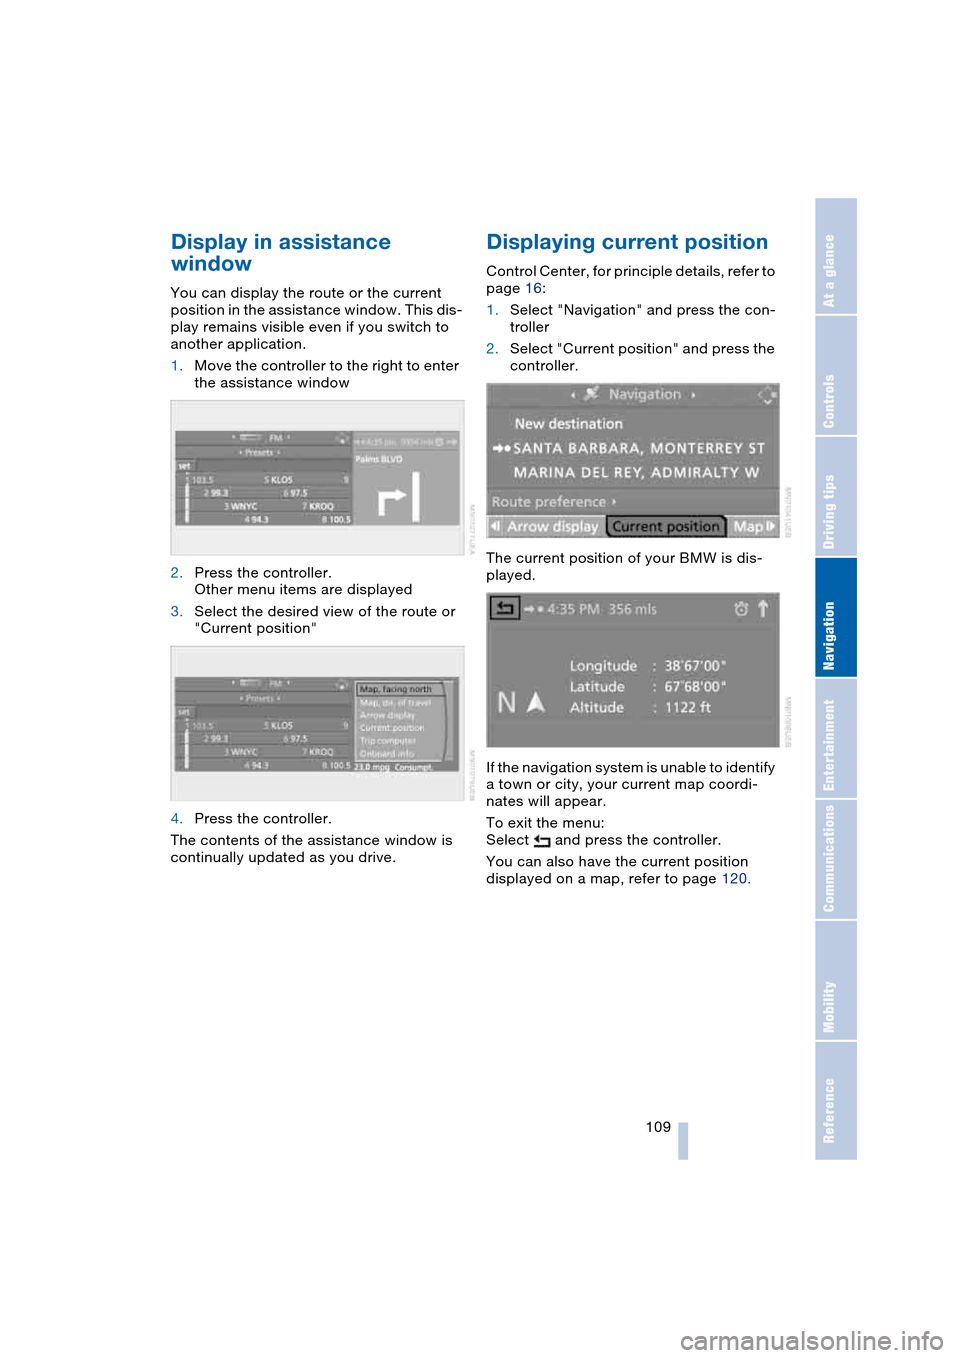
You can display the route or the current
position in the assistance window. This dis-
play remains visible even if you switch to
another application.
1.Move the controller to the right to enter
the assistance window
2.Press the controller.
Other menu items are displayed
3.Select the desired view of the route or
"Current position"
4.Press the controller.
The contents of the assistance window is
continually updated as you drive.
Displaying current position
Control Center, for principle details, refer to
page 16:
1.Select "Navigation" and press the con-
troller
2.Select "Current position" and press the
controller.
The current position of your BMW is dis-
played.
If the navigation system is unable to identify
a town or city, your current map coordi-
nates will appear.
To exit the menu:
Select and press the controller.
You can also have the current position
displayed on a map, refer to page 120.