2004 BMW 645CI COUPE&CONVERTIBLE door lock
[x] Cancel search: door lockPage 38 of 216
Opening and closing
36
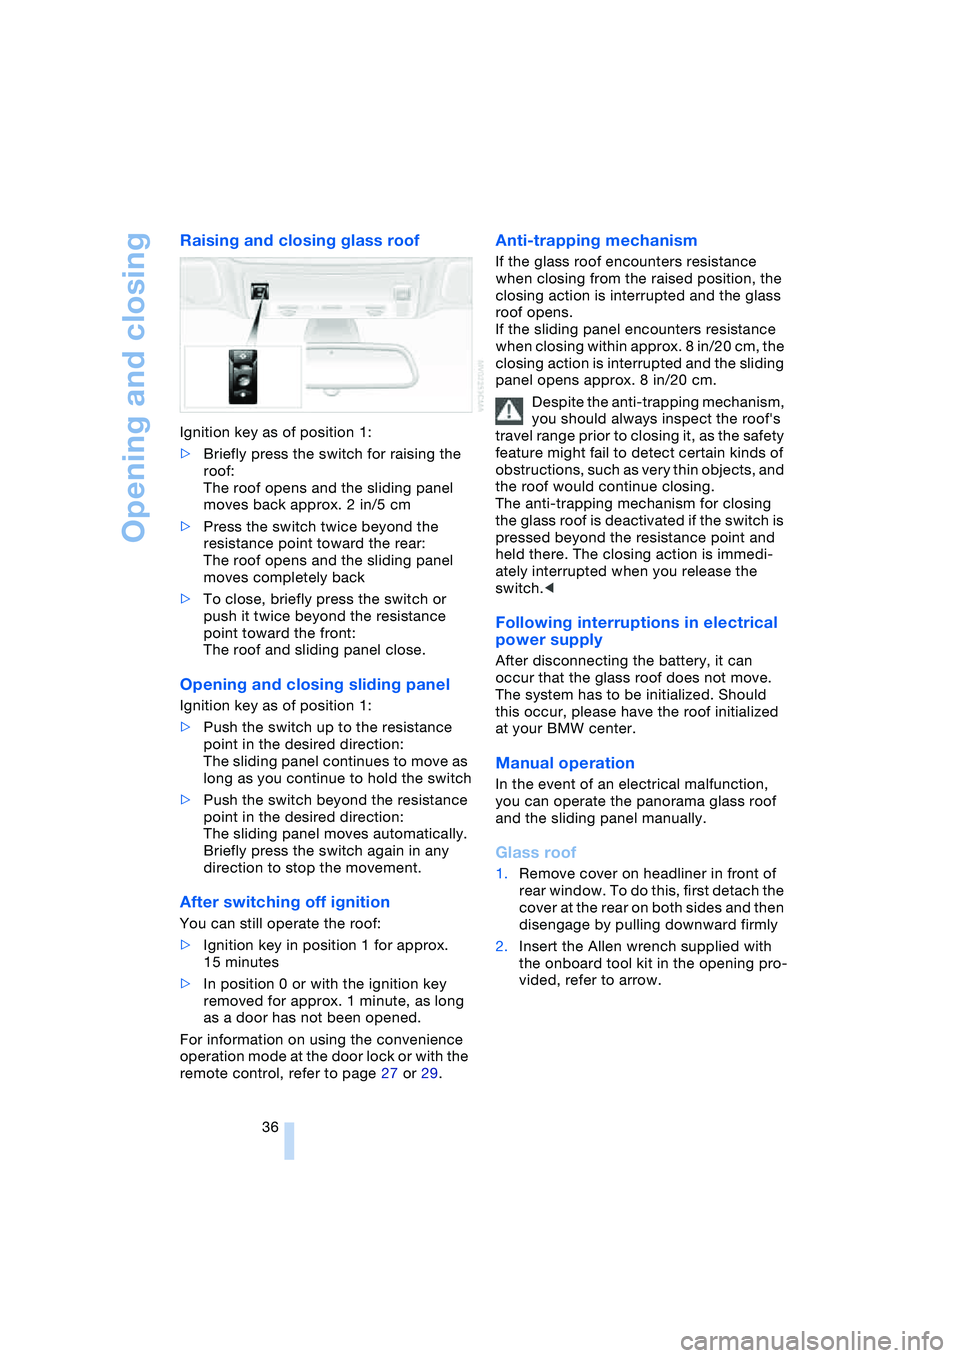
Raising and closing glass roof
Ignition key as of position 1:
>Briefly press the switch for raising the
roof:
The roof opens and the sliding panel
moves back approx. 2 in/5 cm
>Press the switch twice beyond the
resistance point toward the rear:
The roof opens and the sliding panel
moves completely back
>To close, briefly press the switch or
push it twice beyond the resistance
point toward the front:
The roof and sliding panel close.
Opening and closing sliding panel
Ignition key as of position 1:
>Push the switch up to the resistance
point in the desired direction:
The sliding panel continues to move as
long as you continue to hold the switch
>Push the switch beyond the resistance
point in the desired direction:
The sliding panel moves automatically.
Briefly press the switch again in any
direction to stop the movement.
After switching off ignition
You can still operate the roof:
>Ignition key in position 1 for approx.
15 minutes
>In position 0 or with the ignition key
removed for approx. 1 minute, as long
as a door has not been opened.
For information on using the convenience
operation mode at the door lock or with the
remote control, refer to page 27 or 29.
Anti-trapping mechanism
If the glass roof encounters resistance
when closing from the raised position, the
closing action is interrupted and the glass
roof opens.
If the sliding panel encounters resistance
when closing within approx. 8 in/20 cm, the
closing action is interrupted and the sliding
panel opens approx. 8 in/20 cm.
Despite the anti-trapping mechanism,
you should always inspect the roof's
travel range prior to closing it, as the safety
feature might fail to detect certain kinds of
obstructions, such as very thin objects, and
the roof would continue closing.
The anti-trapping mechanism for closing
the glass roof is deactivated if the switch is
pressed beyond the resistance point and
held there. The closing action is immedi-
ately interrupted when you release the
switch.<
Following interruptions in electrical
power supply
After disconnecting the battery, it can
occur that the glass roof does not move.
The system has to be initialized. Should
this occur, please have the roof initialized
at your BMW center.
Manual operation
In the event of an electrical malfunction,
you can operate the panorama glass roof
and the sliding panel manually.
Glass roof
1.Remove cover on headliner in front of
rear window. To do this, first detach the
cover at the rear on both sides and then
disengage by pulling downward firmly
2.Insert the Allen wrench supplied with
the onboard tool kit in the opening pro-
vided, refer to arrow.
Page 41 of 216
Controls
39Reference
At a glance
Driving tips
Communications
Navigation
Entertainment
Mobility
If the opening or closing action is inter-
rupted, it can happen that the luggage
compartment lid cannot be opened.<
Convenience operation using remote
control and driver's door lock
Refer to pages 27 and 29.
Manual closing in the event of an
electrical malfunction
Only close the convertible top manu-
ally if absolutely necessary; never
open it manually. The convertible top com-
partment lid cannot be locked in the event
of an electrical malfunction and would
open while the vehicle is being driven.
Improper handling can lead to damage.<
Before closing
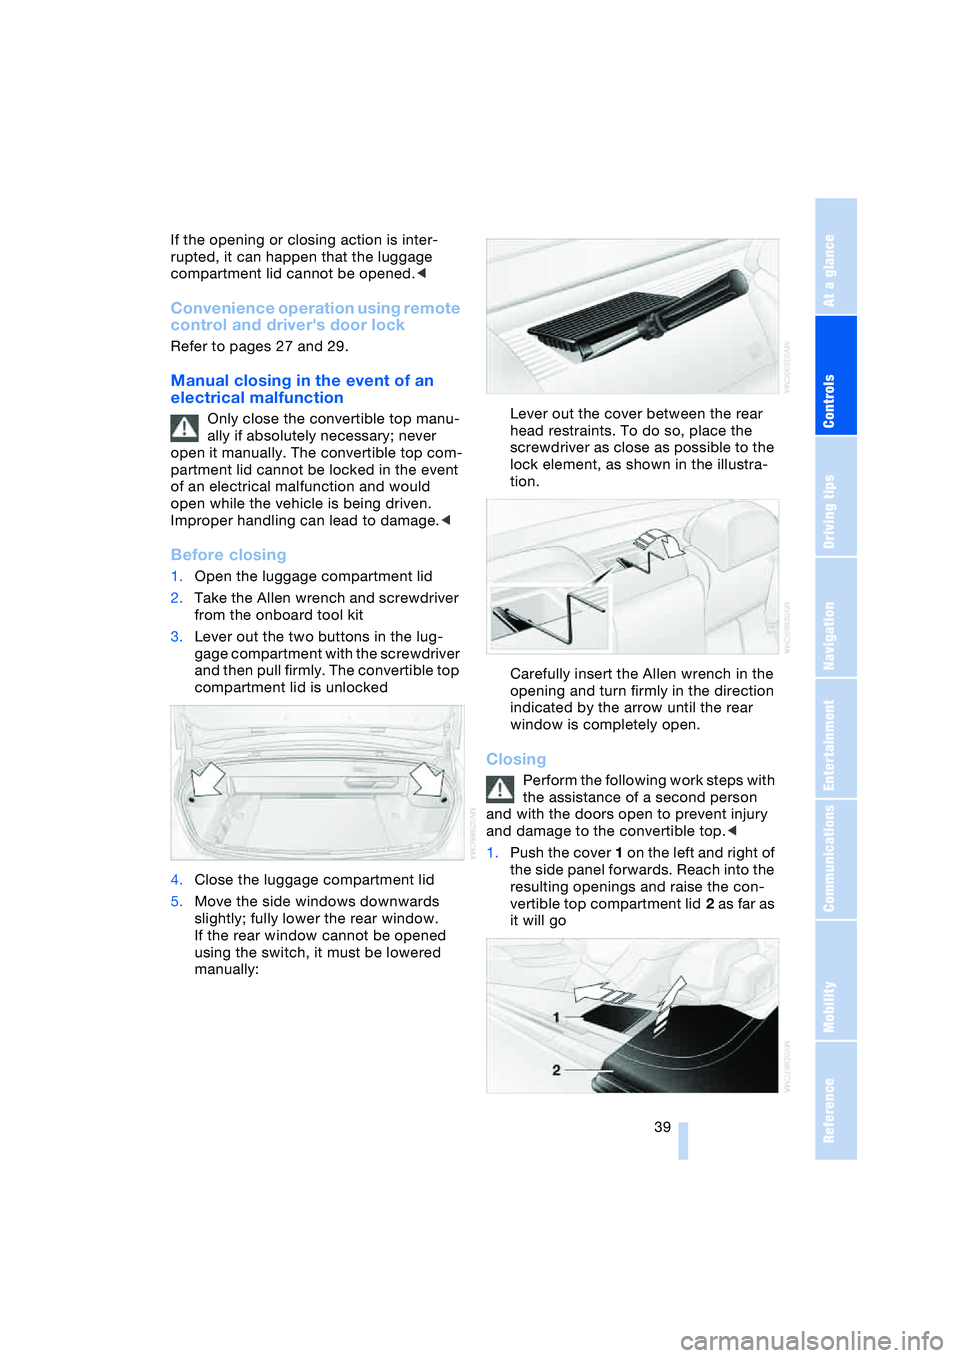
1.Open the luggage compartment lid
2.Take the Allen wrench and screwdriver
from the onboard tool kit
3.Lever out the two buttons in the lug-
gage compartment with the screwdriver
and then pull firmly. The convertible top
compartment lid is unlocked
4.Close the luggage compartment lid
5.Move the side windows downwards
slightly; fully lower the rear window.
If the rear window cannot be opened
using the switch, it must be lowered
manually:Lever out the cover between the rear
head restraints. To do so, place the
screwdriver as close as possible to the
lock element, as shown in the illustra-
tion.
Carefully insert the Allen wrench in the
opening and turn firmly in the direction
indicated by the arrow until the rear
window is completely open.
Closing
Perform the following work steps with
the assistance of a second person
and with the doors open to prevent injury
and damage to the convertible top.<
1.Push the cover 1 on the left and right of
the side panel forwards. Reach into the
resulting openings and raise the con-
vertible top compartment lid 2 as far as
it will go
Page 46 of 216
Adjustments
44
Seat, mirror and steering
wheel memory
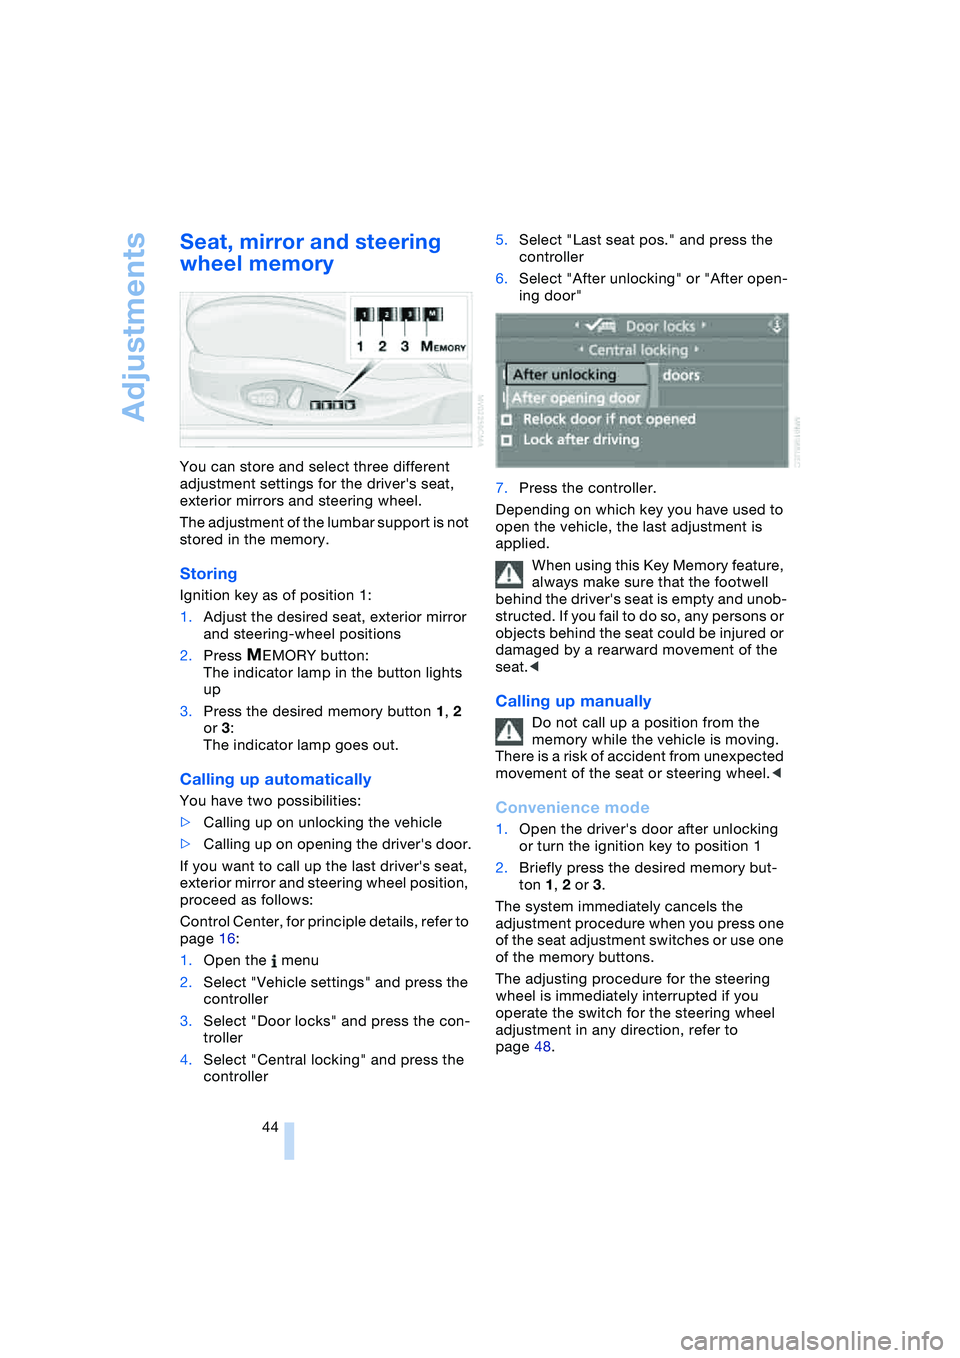
You can store and select three different
adjustment settings for the driver's seat,
exterior mirrors and steering wheel.
The adjustment of the lumbar support is not
stored in the memory.
Storing
Ignition key as of position 1:
1.Adjust the desired seat, exterior mirror
and steering-wheel positions
2.Press
MEMORY button:
The indicator lamp in the button lights
up
3.Press the desired memory button 1, 2
or 3:
The indicator lamp goes out.
Calling up automatically
You have two possibilities:
>Calling up on unlocking the vehicle
>Calling up on opening the driver's door.
If you want to call up the last driver's seat,
exterior mirror and steering wheel position,
proceed as follows:
Control Center, for principle details, refer to
page 16:
1.Open the menu
2.Select "Vehicle settings" and press the
controller
3.Select "Door locks" and press the con-
troller
4.Select "Central locking" and press the
controller5.Select "Last seat pos." and press the
controller
6.Select "After unlocking" or "After open-
ing door"
7.Press the controller.
Depending on which key you have used to
open the vehicle, the last adjustment is
applied.
When using this Key Memory feature,
always make sure that the footwell
behind the driver's seat is empty and unob-
structed. If you fail to do so, any persons or
objects behind the seat could be injured or
damaged by a rearward movement of the
seat.<
Calling up manually
Do not call up a position from the
memory while the vehicle is moving.
There is a risk of accident from unexpected
movement of the seat or steering wheel.<
Convenience mode
1.Open the driver's door after unlocking
or turn the ignition key to position 1
2.Briefly press the desired memory but-
ton 1, 2 or 3.
The system immediately cancels the
adjustment procedure when you press one
of the seat adjustment switches or use one
of the memory buttons.
The adjusting procedure for the steering
wheel is immediately interrupted if you
operate the switch for the steering wheel
adjustment in any direction, refer to
page 48.
Page 51 of 216
Controls
49Reference
At a glance
Driving tips
Communications
Navigation
Entertainment
Mobility
Automatic steering wheel
adjustment
In conjunction with seat, mirror and steer-
ing wheel memory.
The steering wheel automatically moves as
high up and far forward as possible to ease
driver entry and exit before then returning
to the standard position or stored memory
setting.
This automatic feature is governed by the
driver's door and the ignition lock.
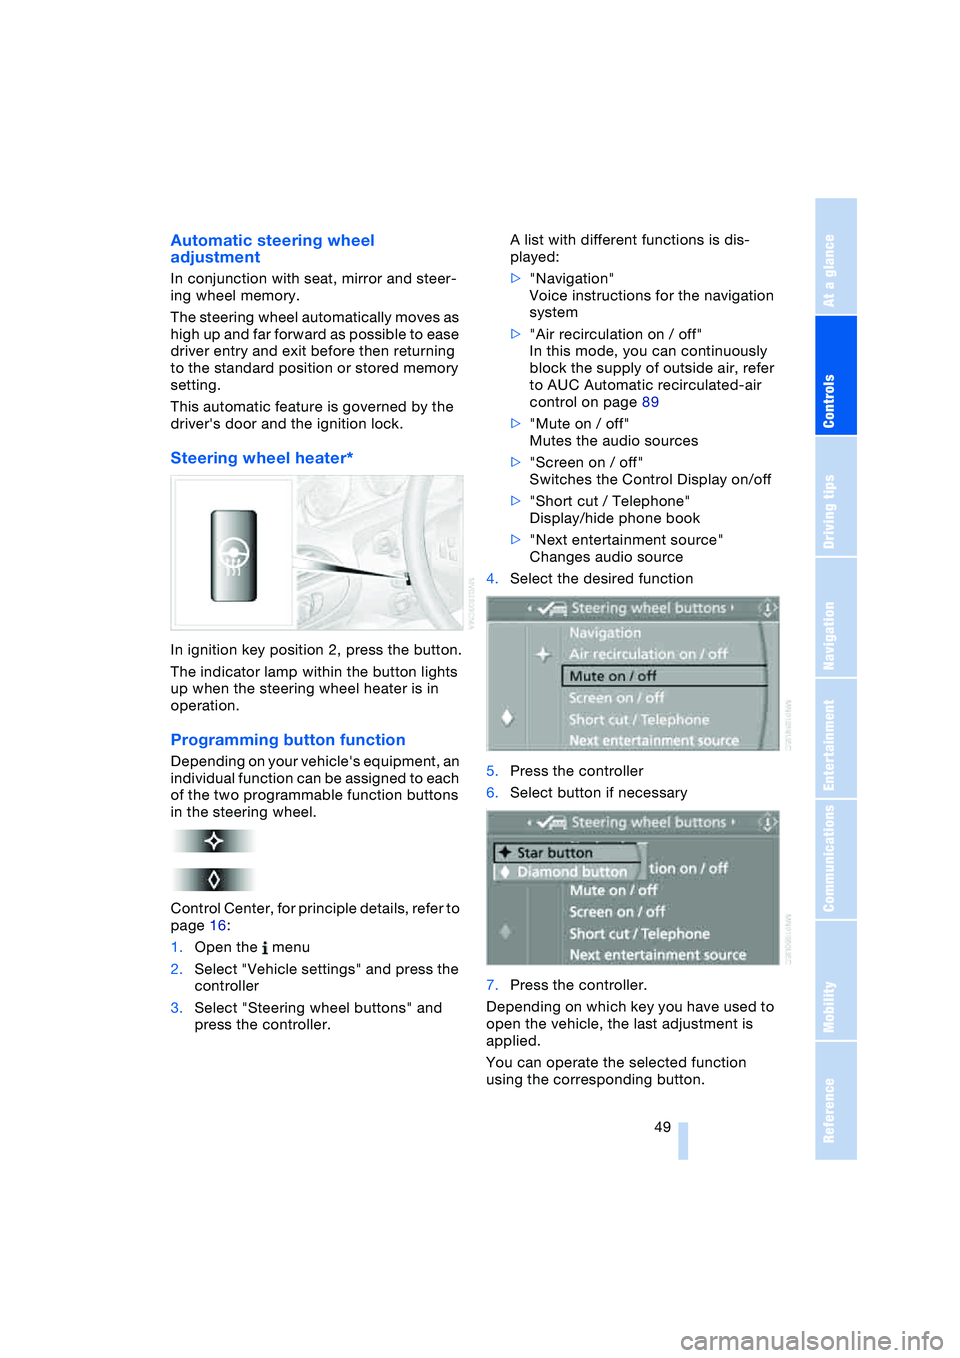
Steering wheel heater*
In ignition key position 2, press the button.
The indicator lamp within the button lights
up when the steering wheel heater is in
operation.
Programming button function
Depending on your vehicle's equipment, an
individual function can be assigned to each
of the two programmable function buttons
in the steering wheel.
Control Center, for principle details, refer to
page 16:
1.Open the menu
2.Select "Vehicle settings" and press the
controller
3.Select "Steering wheel buttons" and
press the controller.A list with different functions is dis-
played:
>"Navigation"
Voice instructions for the navigation
system
>"Air recirculation on / off"
In this mode, you can continuously
block the supply of outside air, refer
to AUC Automatic recirculated-air
control on page 89
>"Mute on / off"
Mutes the audio sources
>"Screen on / off"
Switches the Control Display on/off
>"Short cut / Telephone"
Display/hide phone book
>"Next entertainment source"
Changes audio source
4.Select the desired function
5.Press the controller
6.Select button if necessary
.
7.Press the controller.
Depending on which key you have used to
open the vehicle, the last adjustment is
applied.
You can operate the selected function
using the corresponding button.
Page 59 of 216
Controls
57Reference
At a glance
Driving tips
Communications
Navigation
Entertainment
Mobility
>One-touch function for Sequential
mode
+: manual upshifts
—: manual downshifts
>D: Drive mode.
N is automatically engaged if the
driver's door is opened with the
engine running and neither pedals, shift
paddles nor the selector lever are oper-
ated.
This is indicated by an acoustic signal and
the flashing display N in the instrument
cluster.<
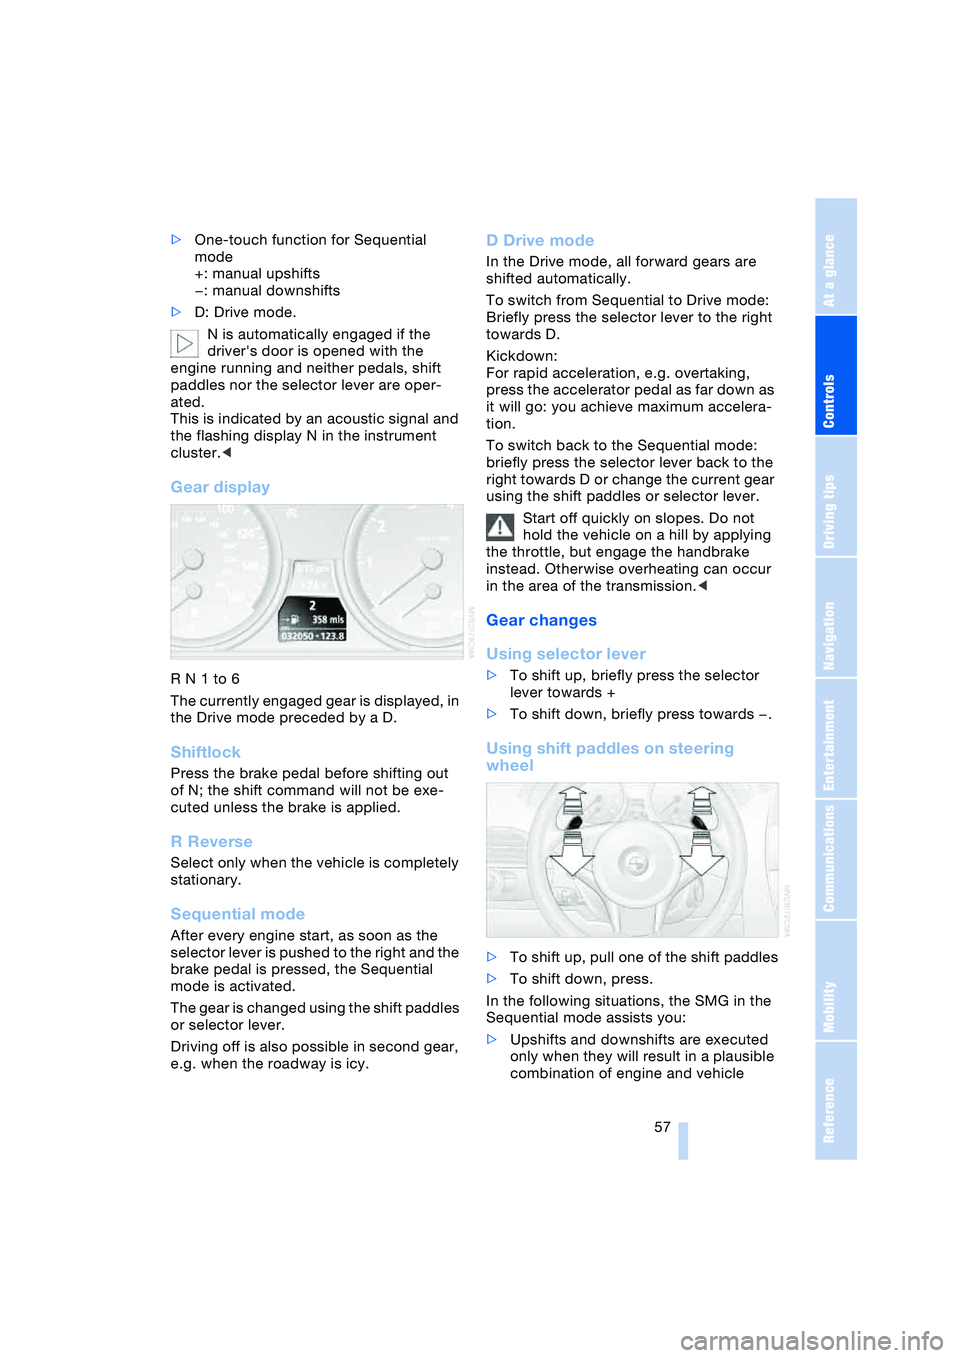
Gear display
R N 1 to 6
The currently engaged gear is displayed, in
the Drive mode preceded by a D.
Shiftlock
Press the brake pedal before shifting out
of N; the shift command will not be exe-
cuted unless the brake is applied.
R Reverse
Select only when the vehicle is completely
stationary.
Sequential mode
After every engine start, as soon as the
selector lever is pushed to the right and the
brake pedal is pressed, the Sequential
mode is activated.
The gear is changed using the shift paddles
or selector lever.
Driving off is also possible in second gear,
e.g. when the roadway is icy.
D Drive mode
In the Drive mode, all forward gears are
shifted automatically.
To switch from Sequential to Drive mode:
Briefly press the selector lever to the right
towards D.
Kickdown:
For rapid acceleration, e.g. overtaking,
press the accelerator pedal as far down as
it will go: you achieve maximum accelera-
tion.
To switch back to the Sequential mode:
briefly press the selector lever back to the
right towards D or change the current gear
using the shift paddles or selector lever.
Start off quickly on slopes. Do not
hold the vehicle on a hill by applying
the throttle, but engage the handbrake
instead. Otherwise overheating can occur
in the area of the transmission.<
Gear changes
Using selector lever
>To shift up, briefly press the selector
lever towards +
>To shift down, briefly press towards —.
Using shift paddles on steering
wheel
>To shift up, pull one of the shift paddles
>To shift down, press.
In the following situations, the SMG in the
Sequential mode assists you:
>Upshifts and downshifts are executed
only when they will result in a plausible
combination of engine and vehicle
Page 98 of 216
Practical interior accessories
96 Be sure that the flashlight is switched
off when it is inserted into its holder.
Failure to comply with this precaution
could lead to overcharging and damage.<
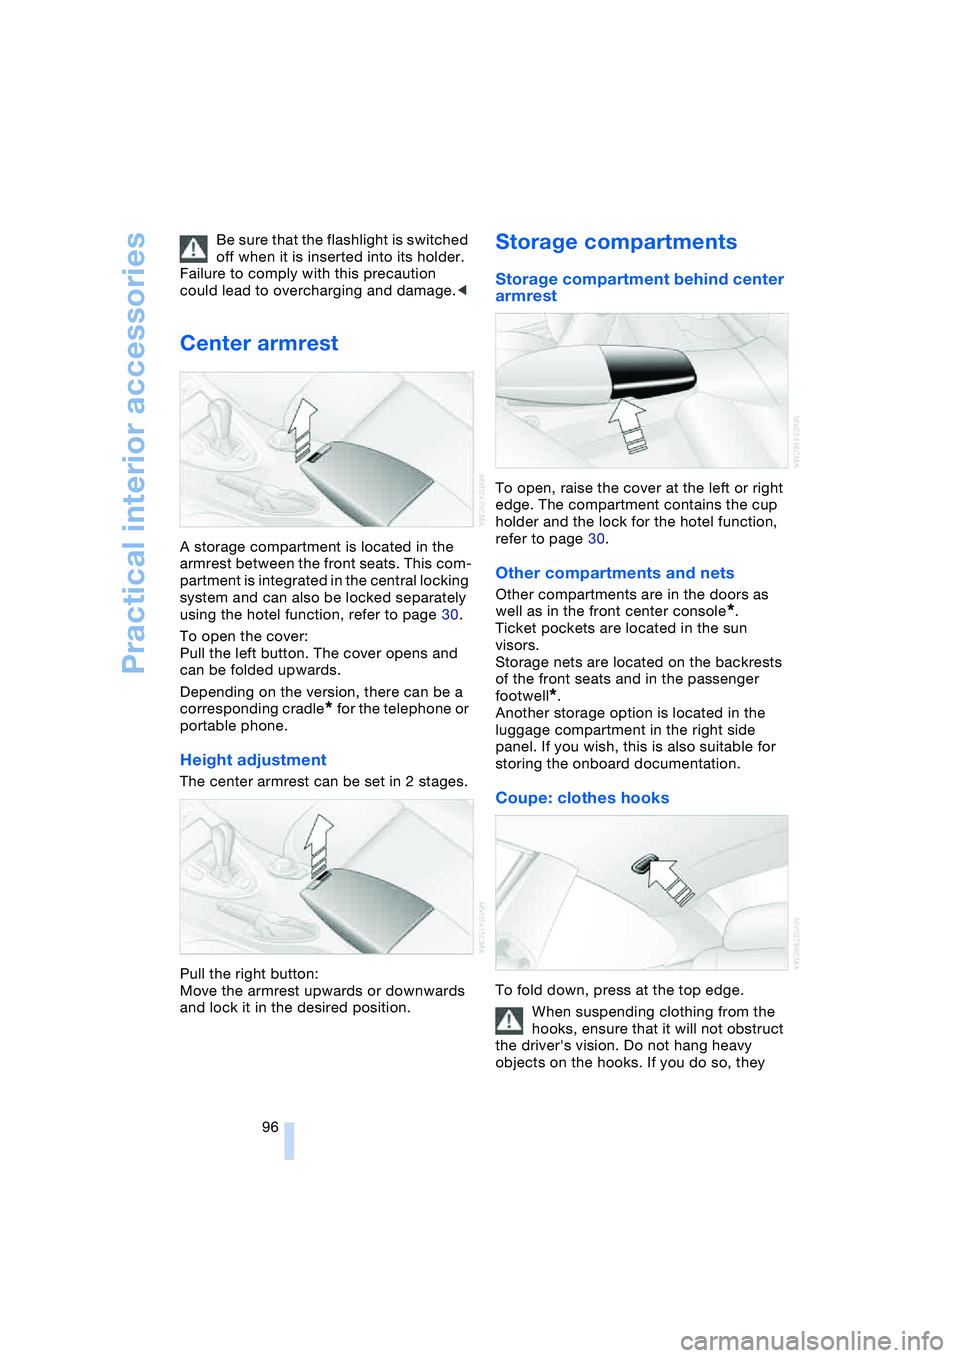
Center armrest
A storage compartment is located in the
armrest between the front seats. This com-
partment is integrated in the central locking
system and can also be locked separately
using the hotel function, refer to page 30.
To open the cover:
Pull the left button. The cover opens and
can be folded upwards.
Depending on the version, there can be a
corresponding cradle
* for the telephone or
portable phone.
Height adjustment
The center armrest can be set in 2 stages.
Pull the right button:
Move the armrest upwards or downwards
and lock it in the desired position.
Storage compartments
Storage compartment behind center
armrest
To open, raise the cover at the left or right
edge. The compartment contains the cup
holder and the lock for the hotel function,
refer to page 30.
Other compartments and nets
Other compartments are in the doors as
well as in the front center console
*.
Ticket pockets are located in the sun
visors.
Storage nets are located on the backrests
of the front seats and in the passenger
footwell
*.
Another storage option is located in the
luggage compartment in the right side
panel. If you wish, this is also suitable for
storing the onboard documentation.
Coupe: clothes hooks
To fold down, press at the top edge.
When suspending clothing from the
hooks, ensure that it will not obstruct
the driver's vision. Do not hang heavy
objects on the hooks. If you do so, they
Page 164 of 216
Refueling
162
Refueling
Always switch off the engine before
refueling. If you do not, fuel cannot be
filled into the tank and a message on the
Control Display will appear.<
Always observe all applicable precau-
tions and regulations when handling
fuels. Never carry spare fuel containers in
your vehicle. Whether empty or full, these
containers can leak, cause an explosion,
and lead to fire in the event of a collision.<
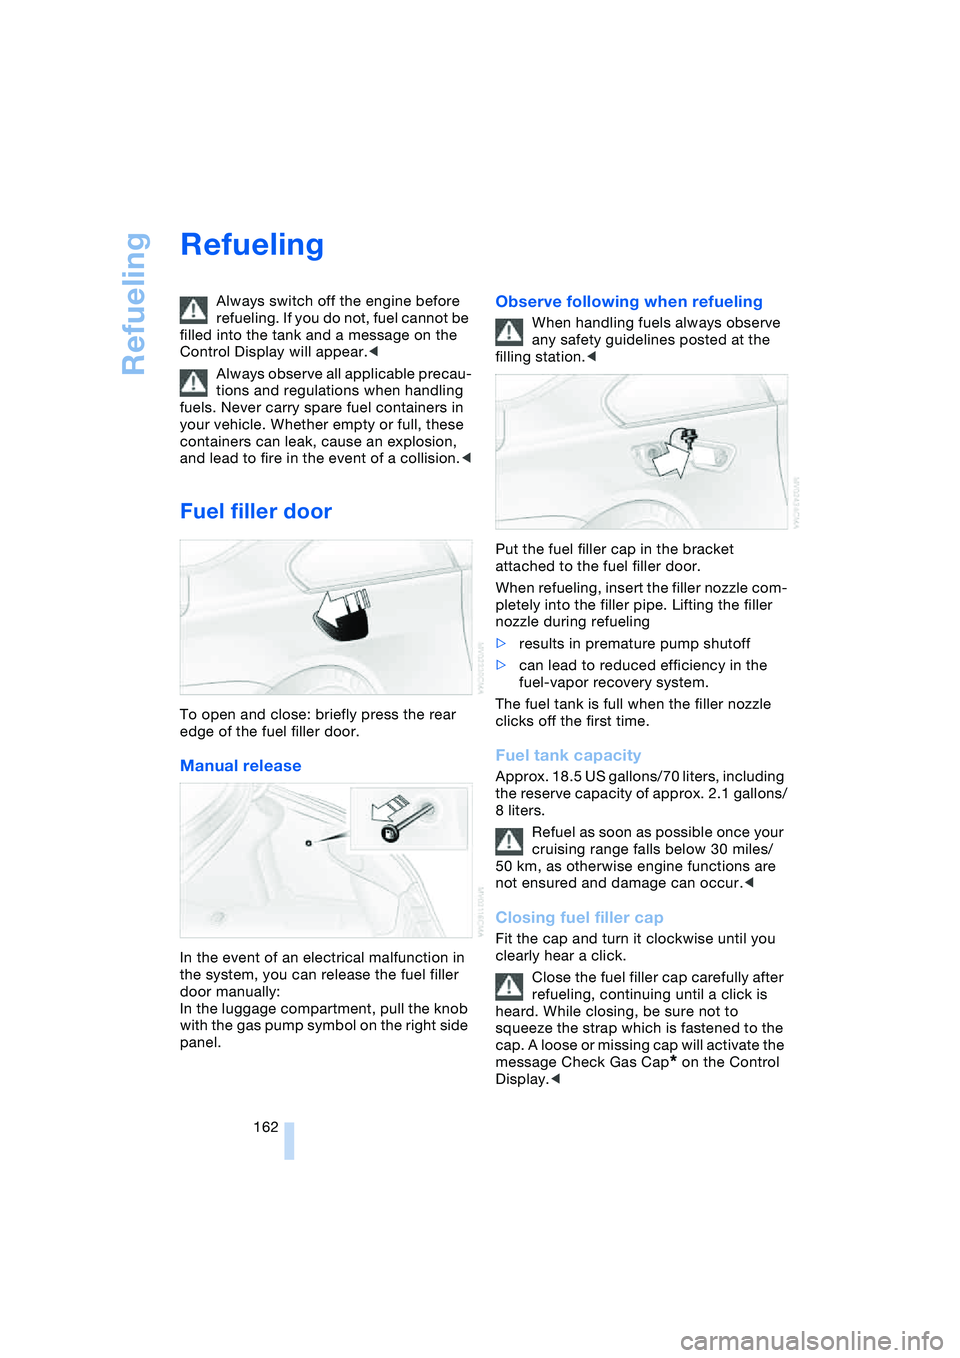
Fuel filler door
To open and close: briefly press the rear
edge of the fuel filler door.
Manual release
In the event of an electrical malfunction in
the system, you can release the fuel filler
door manually:
In the luggage compartment, pull the knob
with the gas pump symbol on the right side
panel.
Observe following when refueling
When handling fuels always observe
any safety guidelines posted at the
filling station.<
Put the fuel filler cap in the bracket
attached to the fuel filler door.
When refueling, insert the filler nozzle com-
pletely into the filler pipe. Lifting the filler
nozzle during refueling
>results in premature pump shutoff
>can lead to reduced efficiency in the
fuel-vapor recovery system.
The fuel tank is full when the filler nozzle
clicks off the first time.
Fuel tank capacity
Approx. 18.5 US gallons/70 liters, including
the reserve capacity of approx. 2.1 gallons/
8 liters.
Refuel as soon as possible once your
cruising range falls below 30 miles/
50 km, as otherwise engine functions are
not ensured and damage can occur.<
Closing fuel filler cap
Fit the cap and turn it clockwise until you
clearly hear a click.
Close the fuel filler cap carefully after
refueling, continuing until a click is
heard. While closing, be sure not to
squeeze the strap which is fastened to the
cap. A loose or missing cap will activate the
message Check Gas Cap
* on the Control
Display.<
Page 198 of 216
Short commands of the voice command system
196
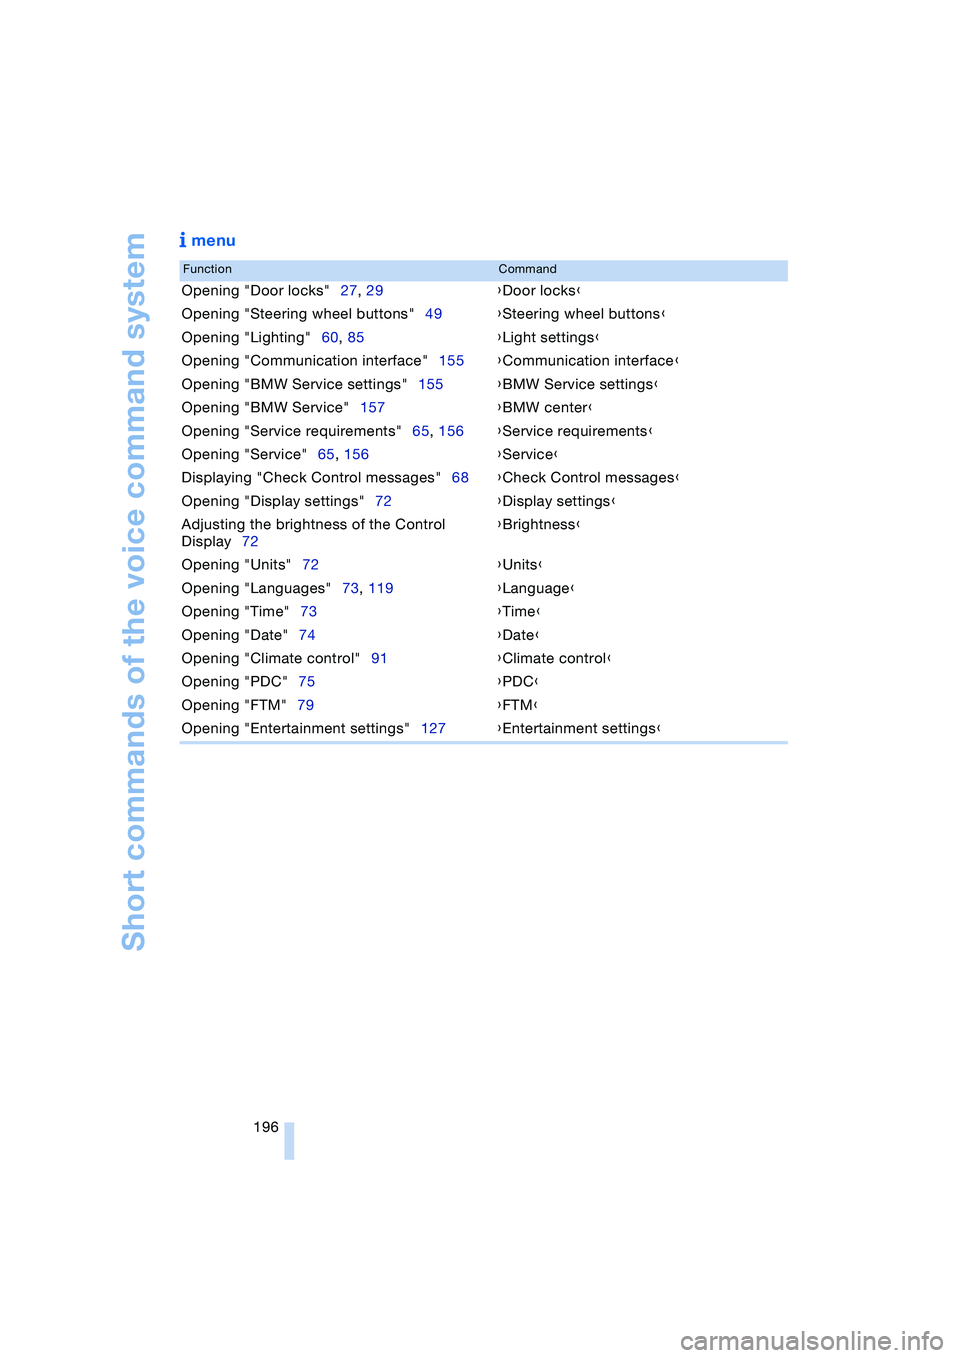
menu
FunctionCommand
Opening "Door locks"27, 29{Door locks}
Opening "Steering wheel buttons"49{Steering wheel buttons}
Opening "Lighting"60, 85{Light settings}
Opening "Communication interface"155{Communication interface}
Opening "BMW Service settings"155{BMW Service settings}
Opening "BMW Service"157{BMW center}
Opening "Service requirements"65, 156{Service requirements}
Opening "Service"65, 156{Service}
Displaying "Check Control messages"68{Check Control messages}
Opening "Display settings"72{Display settings}
Adjusting the brightness of the Control
Display72{Brightness}
Opening "Units"72{Units}
Opening "Languages"73, 119{Language}
Opening "Time"73{Time}
Opening "Date"74{Date}
Opening "Climate control"91{Climate control}
Opening "PDC"75{PDC}
Opening "FTM"79{FTM}
Opening "Entertainment settings"127{Entertainment settings}