2004 BMW 645CI COUPE&CONVERTIBLE warning
[x] Cancel search: warningPage 14 of 216
Cockpit
12
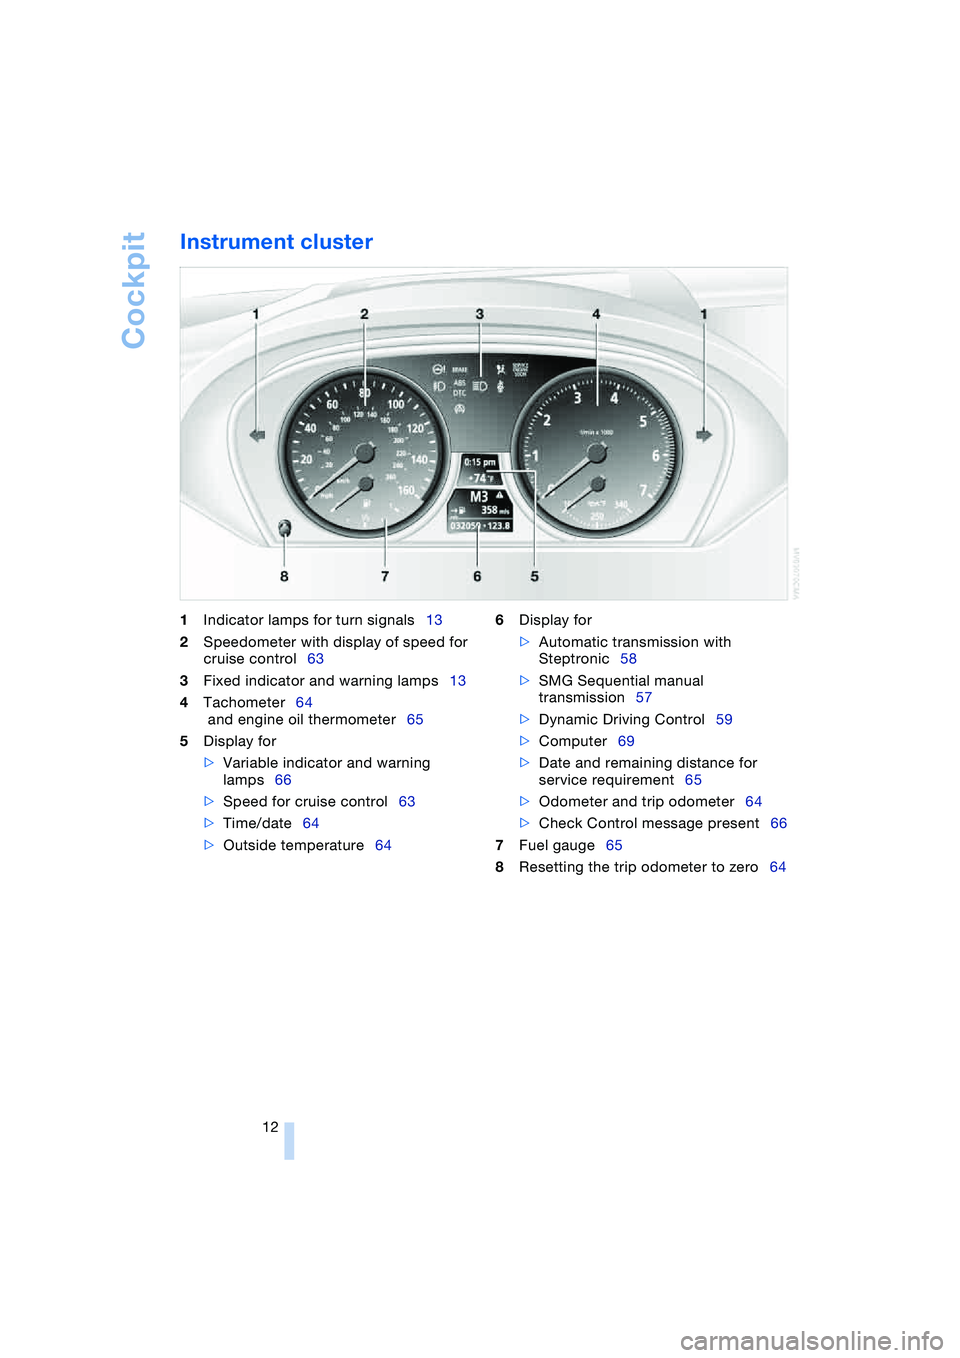
Instrument cluster
1Indicator lamps for turn signals13
2Speedometer with display of speed for
cruise control63
3Fixed indicator and warning lamps13
4Tachometer64
and engine oil thermometer65
5Display for
>Variable indicator and warning
lamps66
>Speed for cruise control63
>Time/date64
>Outside temperature646Display for
>Automatic transmission with
Steptronic58
>SMG Sequential manual
transmission57
>Dynamic Driving Control59
>Computer69
>Date and remaining distance for
service requirement65
>Odometer and trip odometer64
>Check Control message present66
7Fuel gauge65
8Resetting the trip odometer to zero64
Page 15 of 216
At a glance
13Reference
Controls
Driving tips
Communications
Navigation
Entertainment
Mobility
Indicator and warning
lamps
Technology that monitors itself
The indicator and warning lamps identified
by the
+ symbol are subjected to an oper-
ation check each time you switch on the
ignition or start the engine. They each light
up once for different periods of time.
When a malfunction occurs in a monitored
system, the corresponding lamp will either
fail to go out when the engine is started, or
it will come on again during normal driving,
usually accompanied by a Check Control
message. You will find more details on the
specified pages.
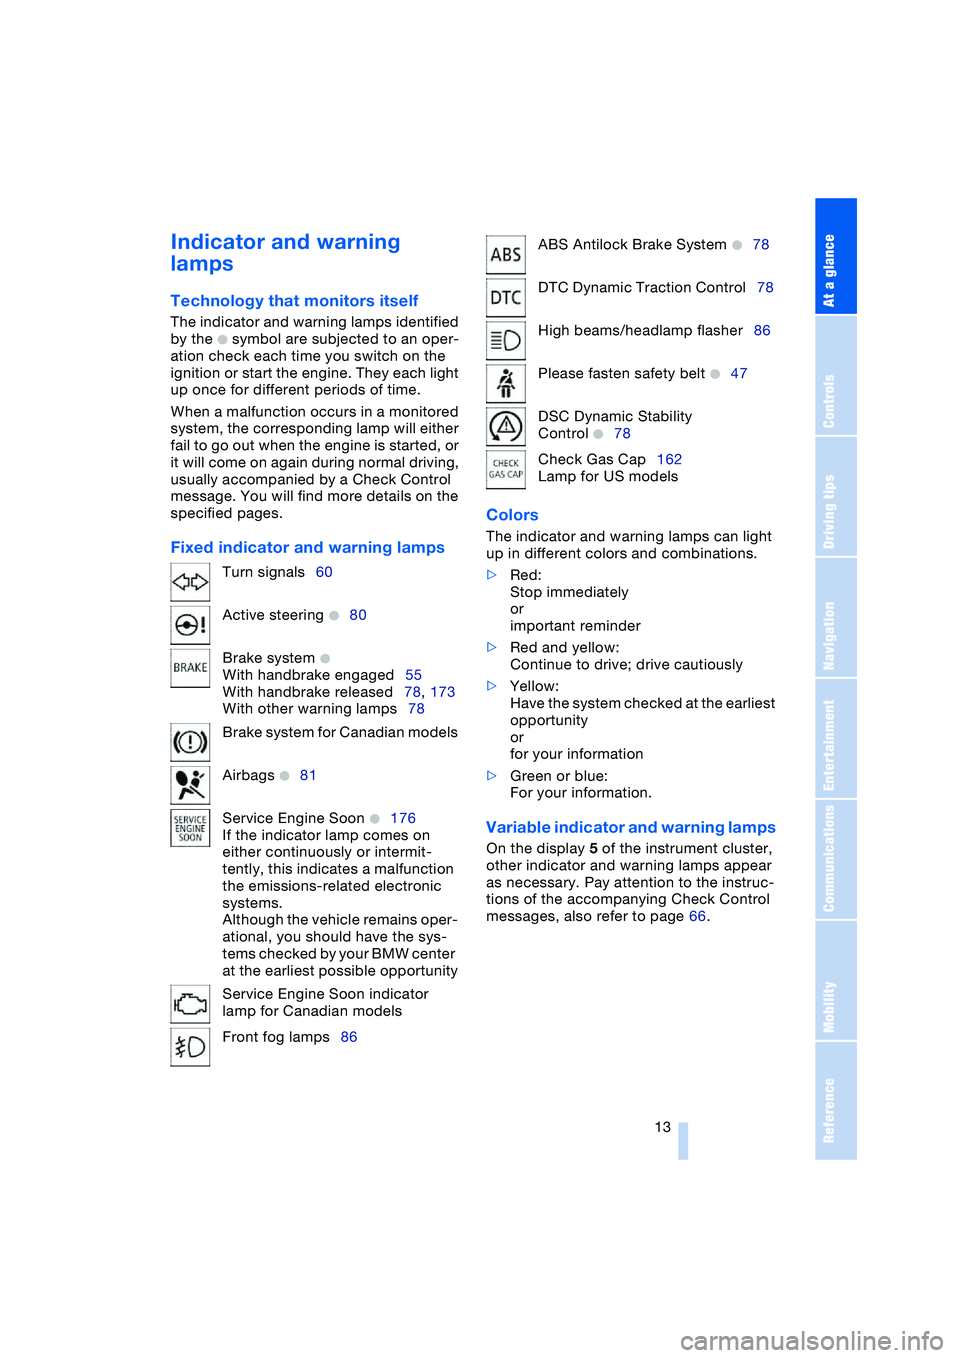
Fixed indicator and warning lampsColors The indicator and warning lamps can light
up in different colors and combinations.
>Red:
Stop immediately
or
important reminder
>Red and yellow:
Continue to drive; drive cautiously
>Yellow:
Have the system checked at the earliest
opportunity
or
for your information
>Green or blue:
For your information.
Variable indicator and warning lamps
On the display 5 of the instrument cluster,
other indicator and warning lamps appear
as necessary. Pay attention to the instruc-
tions of the accompanying Check Control
messages, also refer to page 66. Turn signals60
Active steering
+80
Brake system
+
With handbrake engaged55
With handbrake released78, 173
With other warning lamps78
Brake system for Canadian models
Airbags
+81
Service Engine Soon
+176
If the indicator lamp comes on
either continuously or intermit-
tently, this indicates a malfunction
the emissions-related electronic
systems.
Although the vehicle remains oper-
ational, you should have the sys-
tems checked by your BMW center
at the earliest possible opportunity
Service Engine Soon indicator
lamp for Canadian models
Front fog lamps86
ABS Antilock Brake System +78
DTC Dynamic Traction Control78
High beams/headlamp flasher86
Please fasten safety belt
+47
DSC Dynamic Stability
Control
+78
Check Gas Cap162
Lamp for US models
Page 17 of 216
At a glance
15Reference
Controls
Driving tips
Communications
Navigation
Entertainment
Mobility
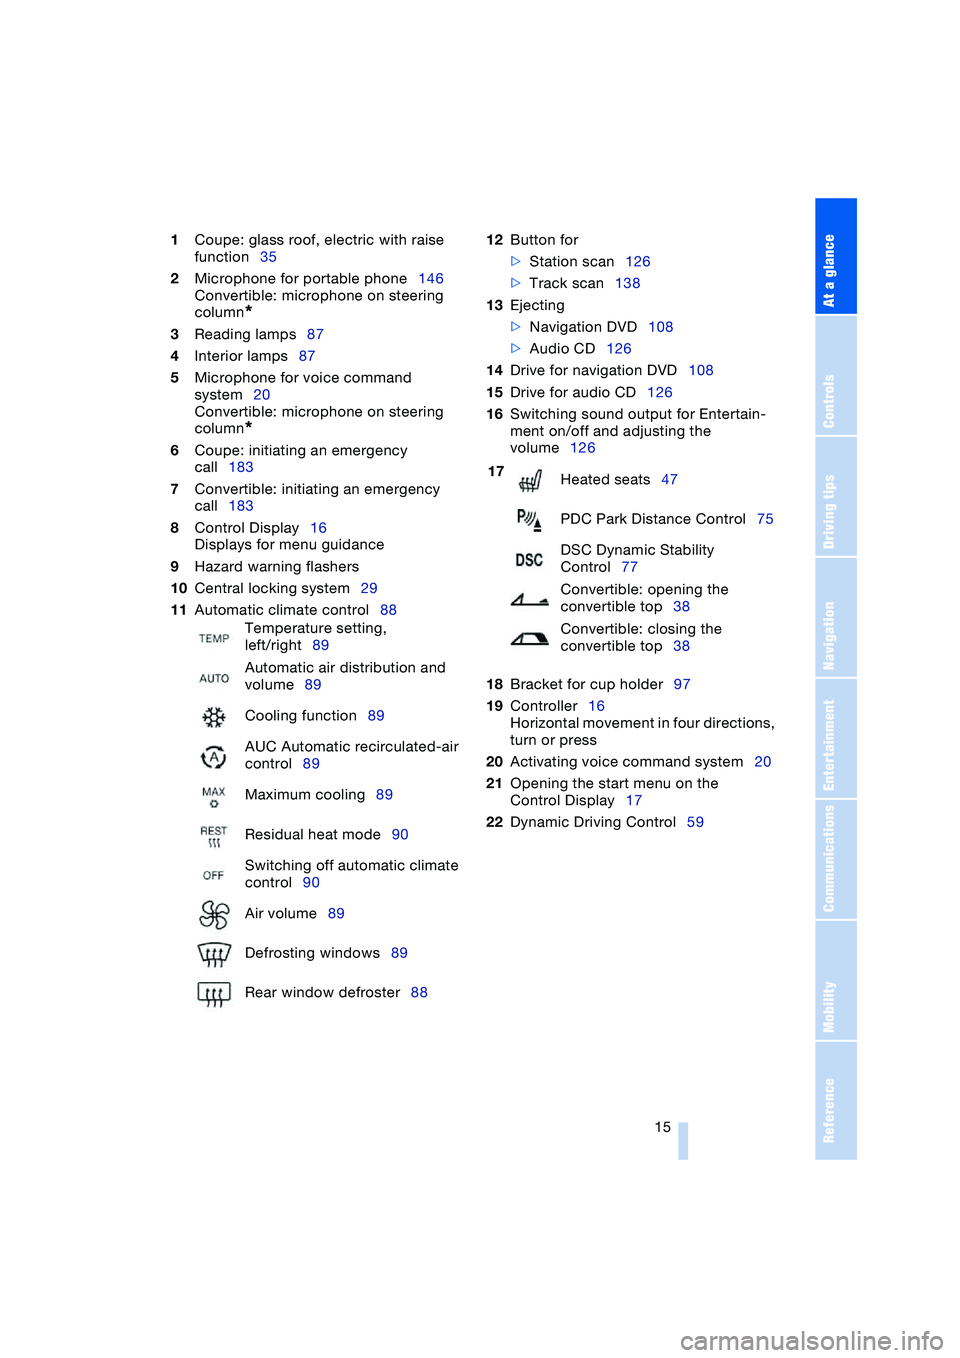
1Coupe: glass roof, electric with raise
function35
2Microphone for portable phone146
Convertible: microphone on steering
column
*
3Reading lamps87
4Interior lamps87
5Microphone for voice command
system20
Convertible: microphone on steering
column
*
6Coupe: initiating an emergency
call183
7Convertible: initiating an emergency
call183
8Control Display16
Displays for menu guidance
9Hazard warning flashers
10Central locking system29
11Automatic climate control8812Button for
>Station scan126
>Track scan138
13Ejecting
>Navigation DVD108
>Audio CD126
14Drive for navigation DVD108
15Drive for audio CD126
16Switching sound output for Entertain-
ment on/off and adjusting the
volume126
18Bracket for cup holder97
19Controller16
Horizontal movement in four directions,
turn or press
20Activating voice command system20
21Opening the start menu on the
Control Display17
22Dynamic Driving Control59 Temperature setting,
left/right89
Automatic air distribution and
volume89
Cooling function89
AUC Automatic recirculated-air
control89
Maximum cooling89
Residual heat mode90
Switching off automatic climate
control90
Air volume89
Defrosting windows89
Rear window defroster88
17
Heated seats47
PDC Park Distance Control75
DSC Dynamic Stability
Control77
Convertible: opening the
convertible top38
Convertible: closing the
convertible top38
Page 28 of 216
Opening and closing
26
Opening and closing
The key set
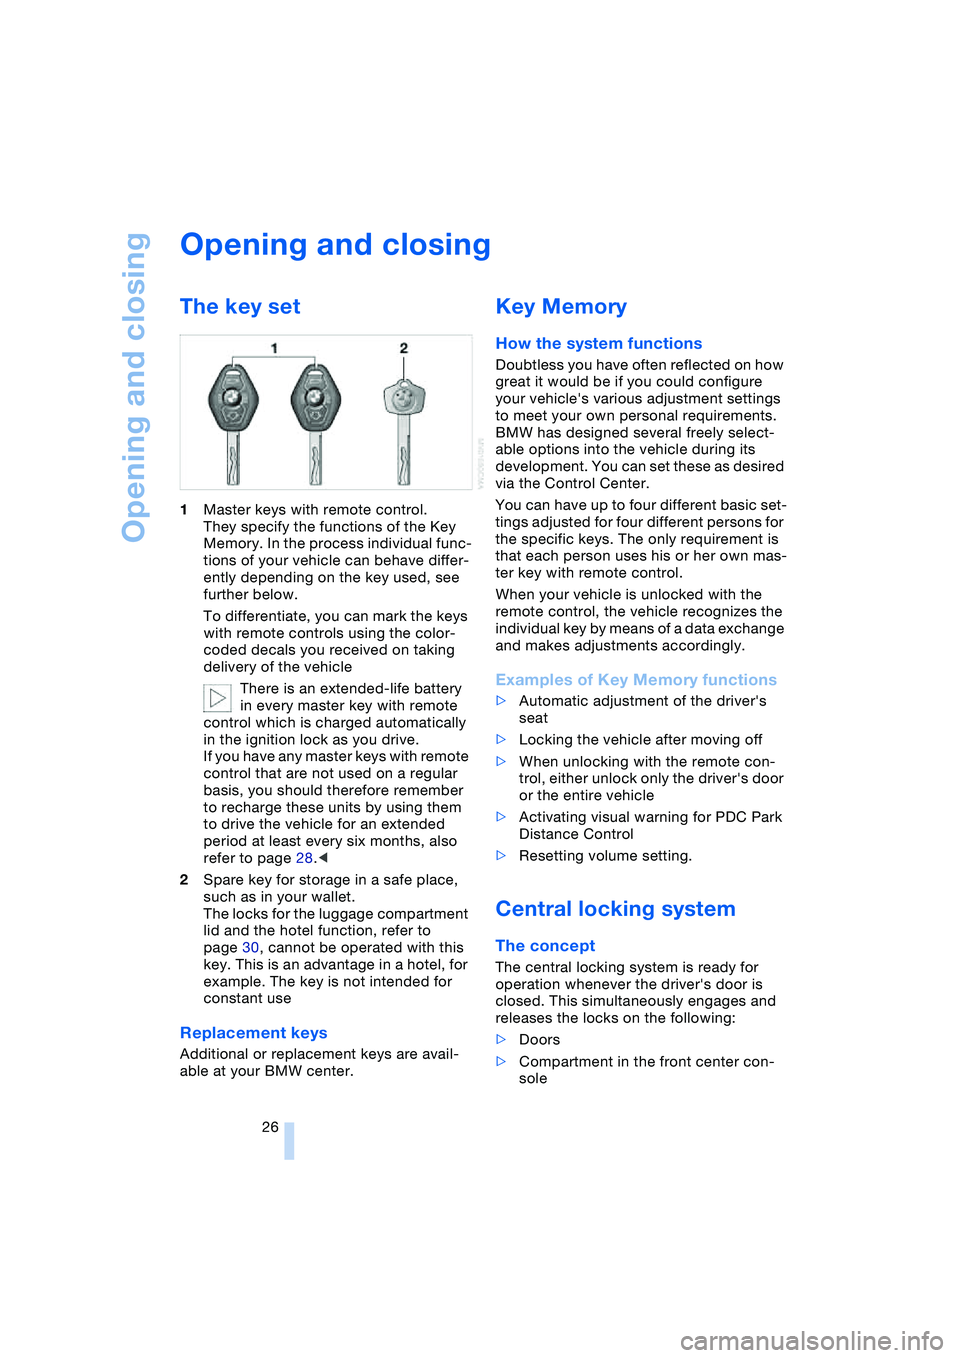
1Master keys with remote control.
They specify the functions of the Key
Memory. In the process individual func-
tions of your vehicle can behave differ-
ently depending on the key used, see
further below.
To differentiate, you can mark the keys
with remote controls using the color-
coded decals you received on taking
delivery of the vehicle
There is an extended-life battery
in every master key with remote
control which is charged automatically
in the ignition lock as you drive.
If you have any master keys with remote
control that are not used on a regular
basis, you should therefore remember
to recharge these units by using them
to drive the vehicle for an extended
period at least every six months, also
refer to page 28.<
2Spare key for storage in a safe place,
such as in your wallet.
The locks for the luggage compartment
lid and the hotel function, refer to
page 30, cannot be operated with this
key. This is an advantage in a hotel, for
example. The key is not intended for
constant use
Replacement keys
Additional or replacement keys are avail-
able at your BMW center.
Key Memory
How the system functions
Doubtless you have often reflected on how
great it would be if you could configure
your vehicle's various adjustment settings
to meet your own personal requirements.
BMW has designed several freely select-
able options into the vehicle during its
development. You can set these as desired
via the Control Center.
You can have up to four different basic set-
tings adjusted for four different persons for
the specific keys. The only requirement is
that each person uses his or her own mas-
ter key with remote control.
When your vehicle is unlocked with the
remote control, the vehicle recognizes the
individual key by means of a data exchange
and makes adjustments accordingly.
Examples of Key Memory functions
>Automatic adjustment of the driver's
seat
>Locking the vehicle after moving off
>When unlocking with the remote con-
trol, either unlock only the driver's door
or the entire vehicle
>Activating visual warning for PDC Park
Distance Control
>Resetting volume setting.
Central locking system
The concept
The central locking system is ready for
operation whenever the driver's door is
closed. This simultaneously engages and
releases the locks on the following:
>Doors
>Compartment in the front center con-
sole
Page 29 of 216
Controls
27Reference
At a glance
Driving tips
Communications
Navigation
Entertainment
Mobility
>Luggage compartment lid
>Fuel filler door.
The central locking system can be oper-
ated from the outside
>via the remote control
>via the door lock
and from inside via the button for the cen-
tral locking system.
If operated from the inside, the fuel filler
door and the compartment in the front
center console are not locked, refer to
page 29.
The anti-theft system is automatically acti-
vated whenever you activate the central
locking system from outside the vehicle.
It prevents the doors from being unlocked
using the safety lock buttons or door han-
dles. The alarm system is armed/disarmed
at the same time.
In the event of an accident, the central
locking system unlocks automatically. The
hazard warning flashers and interior lamps
also switch on.
Opening and closing: from
outside
Using the remote control
When you lock/unlock the vehicle, you
simultaneously activate/deactivate the
anti-theft system, arm/disarm the alarm
system, and switch the interior lamps on/
off.
Protect the remote control against
unauthorized use by handing over
only the spare key, for example when using
hotel valet parking.<
You can find more detailed information on
the alarm system on page 32.
Because any persons or animals left
unattended in a parked vehicle could
lock the doors from the inside, you should
always keep the remote control with you;
this precaution ensures that you will remain
able to unlock the vehicle from the outside
at all times.<
Unlocking
Use the button to unlock the vehicle
depending on the setting:
Control Center, for principle details, refer to
page 16:
1.Open the menu
2.Select "Vehicle settings" and press the
controller
3.Select "Door locks" and press the con-
troller
4.Select "Central locking" and press the
controller
5.Select "Unlock button" and press the
controller
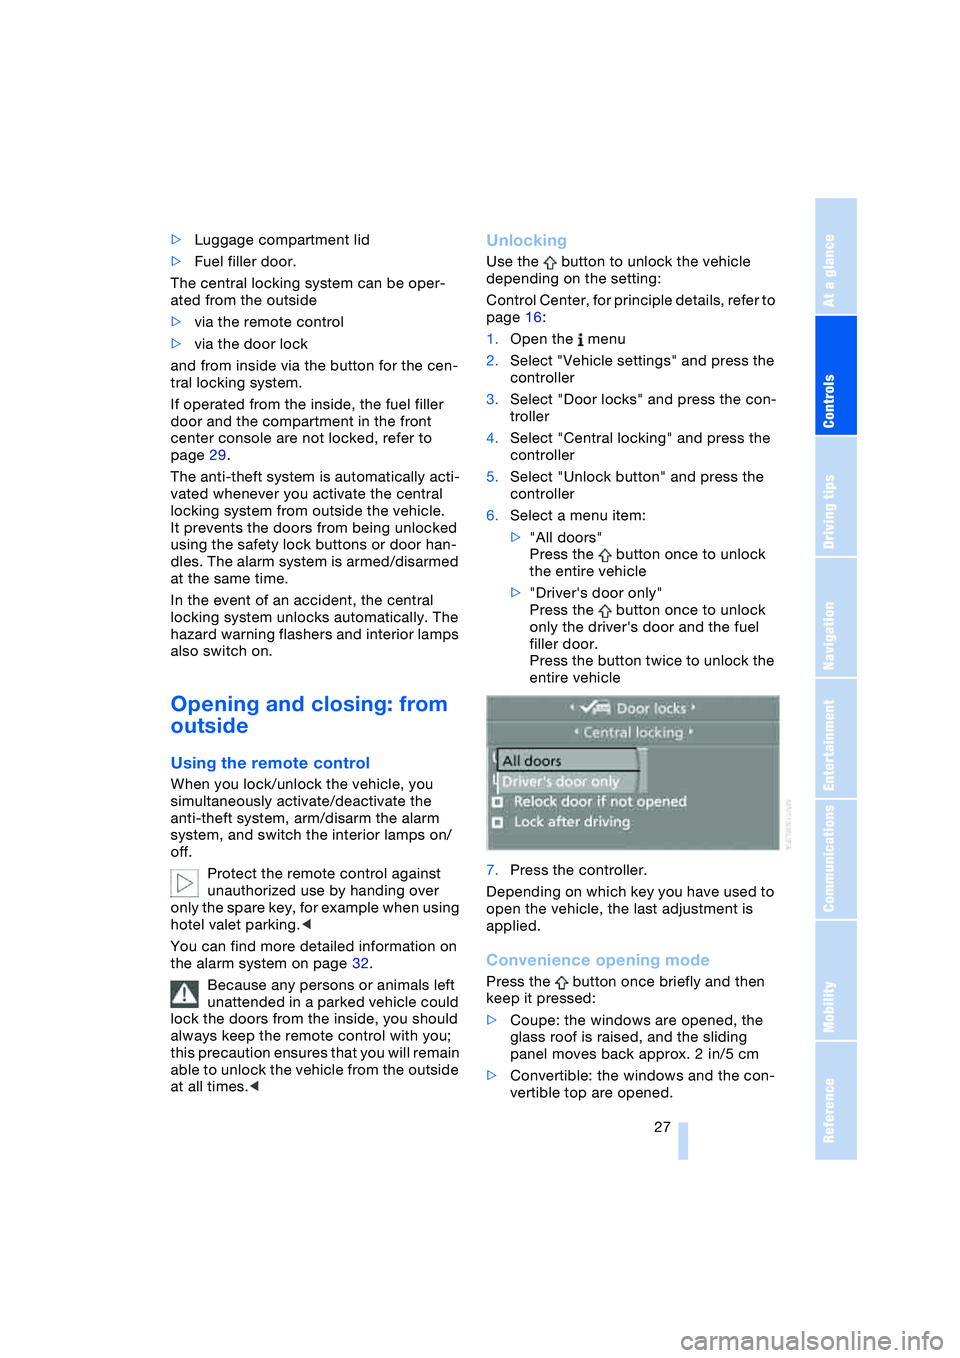
6.Select a menu item:
>"All doors"
Press the button once to unlock
the entire vehicle
>"Driver's door only"
Press the button once to unlock
only the driver's door and the fuel
filler door.
Press the button twice to unlock the
entire vehicle
7.Press the controller.
Depending on which key you have used to
open the vehicle, the last adjustment is
applied.
Convenience opening mode
Press the button once briefly and then
keep it pressed:
>Coupe: the windows are opened, the
glass roof is raised, and the sliding
panel moves back approx. 2 in/5 cm
>Convertible: the windows and the con-
vertible top are opened.
Page 34 of 216
Opening and closing
32 If special circumstances should make it
absolutely necessary to operate the vehicle
with the lid open:
1.Coupe: close both windows as well as
the glass roof
Convertible: with closed top, close all
windows
2.Adjust the automatic climate control to
supply a high air volume, refer to
page 89.
Luggage compartment
There are four lashing eyes on the inner
corners of the luggage compartment for
securing luggage nets or securing straps to
fix luggage in position.
Also refer to Cargo loading, page 104.
Convertible: increasing luggage
compartment capacity
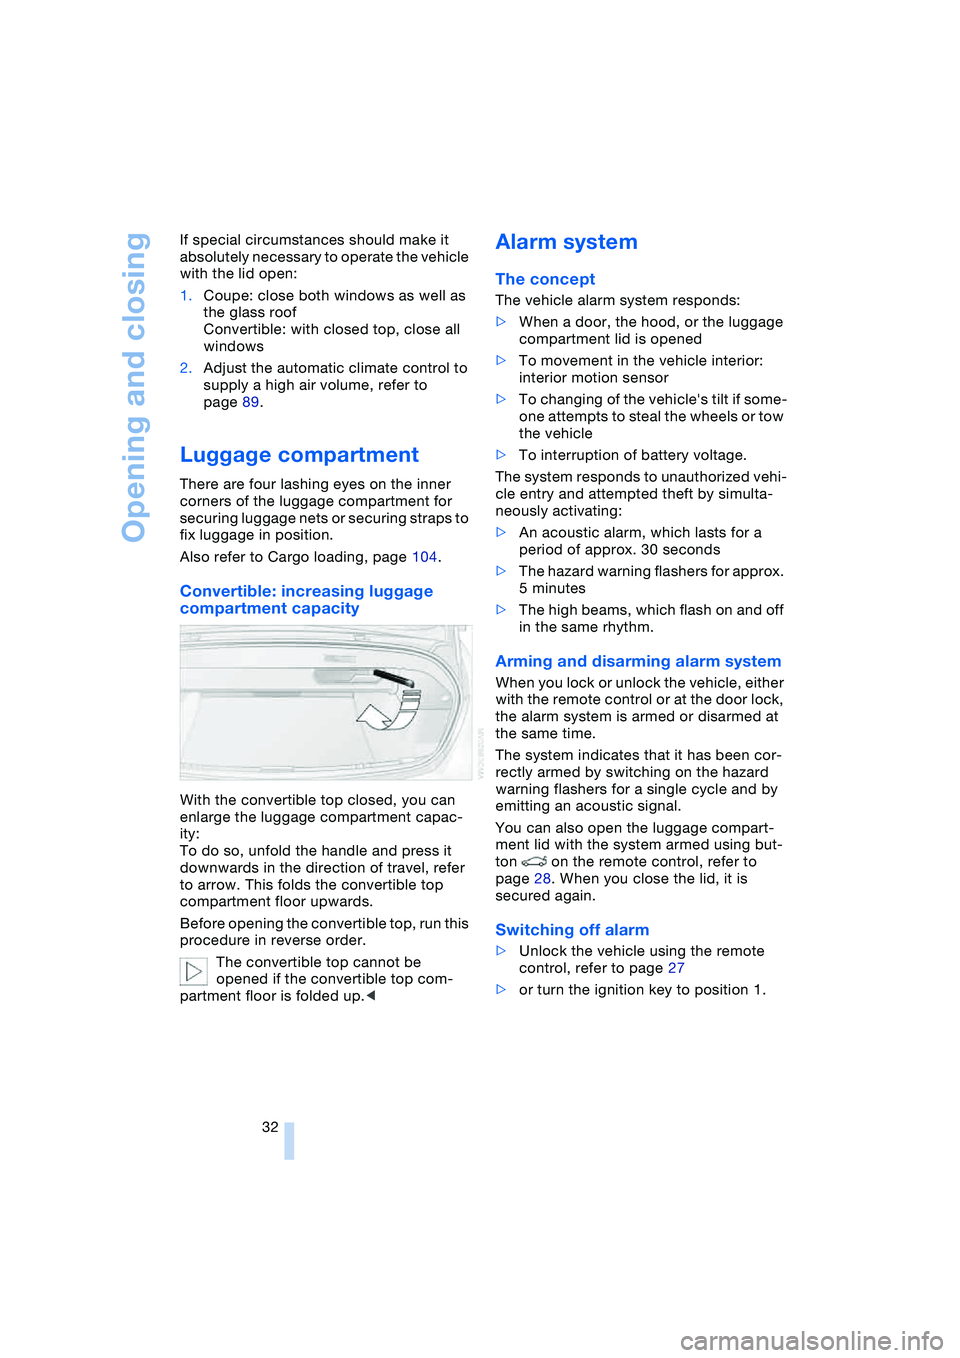
With the convertible top closed, you can
enlarge the luggage compartment capac-
ity:
To do so, unfold the handle and press it
downwards in the direction of travel, refer
to arrow. This folds the convertible top
compartment floor upwards.
Before opening the convertible top, run this
procedure in reverse order.
The convertible top cannot be
opened if the convertible top com-
partment floor is folded up.<
Alarm system
The concept
The vehicle alarm system responds:
>When a door, the hood, or the luggage
compartment lid is opened
>To movement in the vehicle interior:
interior motion sensor
>To changing of the vehicle's tilt if some-
one attempts to steal the wheels or tow
the vehicle
>To interruption of battery voltage.
The system responds to unauthorized vehi-
cle entry and attempted theft by simulta-
neously activating:
>An acoustic alarm, which lasts for a
period of approx. 30 seconds
>The hazard warning flashers for approx.
5 minutes
>The high beams, which flash on and off
in the same rhythm.
Arming and disarming alarm system
When you lock or unlock the vehicle, either
with the remote control or at the door lock,
the alarm system is armed or disarmed at
the same time.
The system indicates that it has been cor-
rectly armed by switching on the hazard
warning flashers for a single cycle and by
emitting an acoustic signal.
You can also open the luggage compart-
ment lid with the system armed using but-
ton on the remote control, refer to
page 28. When you close the lid, it is
secured again.
Switching off alarm
>Unlock the vehicle using the remote
control, refer to page 27
>or turn the ignition key to position 1.
Page 48 of 216
Adjustments
46
Adjusting tilt angle
Swivel the head restraints.
Entry to the rear
Before moving off, fold back both seat
backrests. Otherwise, there is a risk
of accident from unexpected movement.<
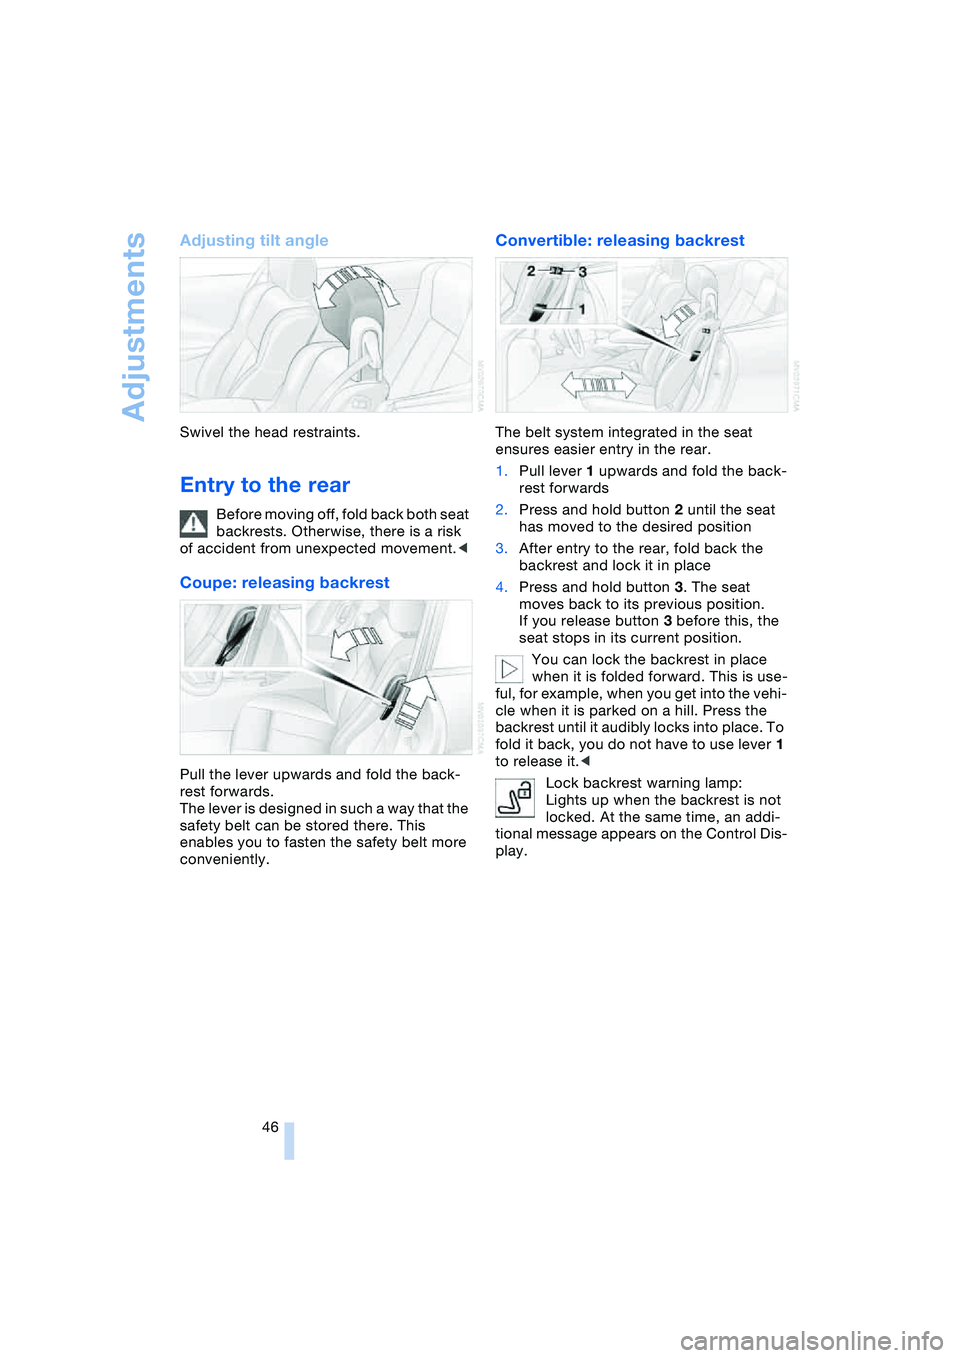
Coupe: releasing backrest
Pull the lever upwards and fold the back-
rest forwards.
The lever is designed in such a way that the
safety belt can be stored there. This
enables you to fasten the safety belt more
conveniently.
Convertible: releasing backrest
The belt system integrated in the seat
ensures easier entry in the rear.
1.Pull lever 1 upwards and fold the back-
rest forwards
2.Press and hold button 2 until the seat
has moved to the desired position
3.After entry to the rear, fold back the
backrest and lock it in place
4.Press and hold button 3. The seat
moves back to its previous position.
If you release button 3 before this, the
seat stops in its current position.
You can lock the backrest in place
when it is folded forward. This is use-
ful, for example, when you get into the vehi-
cle when it is parked on a hill. Press the
backrest until it audibly locks into place. To
fold it back, you do not have to use lever 1
to release it.<
Lock backrest warning lamp:
Lights up when the backrest is not
locked. At the same time, an addi-
tional message appears on the Control Dis-
play.
Page 49 of 216
Controls
47Reference
At a glance
Driving tips
Communications
Navigation
Entertainment
Mobility
Safety belts
Fasten your safety belt before starting any
trip. Airbags complement the safety belt as
an additional safety device, but they do not
represent a substitute.
Fastening
Make sure you hear the latch plate engage
in the belt buckle.
Please fasten safety belt
warning lamp:
Lights up until the driver and front
passenger have fastened their safety belts.
Depending on the model, a signal
* sounds
or a message
* appears on the Control Dis-
play at the same time.
The warning is also issued when the driver
or front passenger removes his or her
safety belt while driving.
The warning can also take place if
objects are placed on the passenger
seat.<
Releasing
1.Hold the belt firmly
2.Press the red button in the belt buckle
3.Guide the belt into its reel.
The shoulder strap's anchorage point will
be in the correct position for adults of every
build if the seat is correctly adjusted, refer
to page 43.
Damage to safety belts
If the safety belts are damaged or
stretched in an accident: have the
entire belt system, including the tensioning
mechanisms, replaced at your BMW cen-
ter. Have the belt anchorage points
inspected for damage at the same time.
Failure to observe this precaution may pre-
vent the safety belts from effectively pro-
viding optimal protection when needed.<
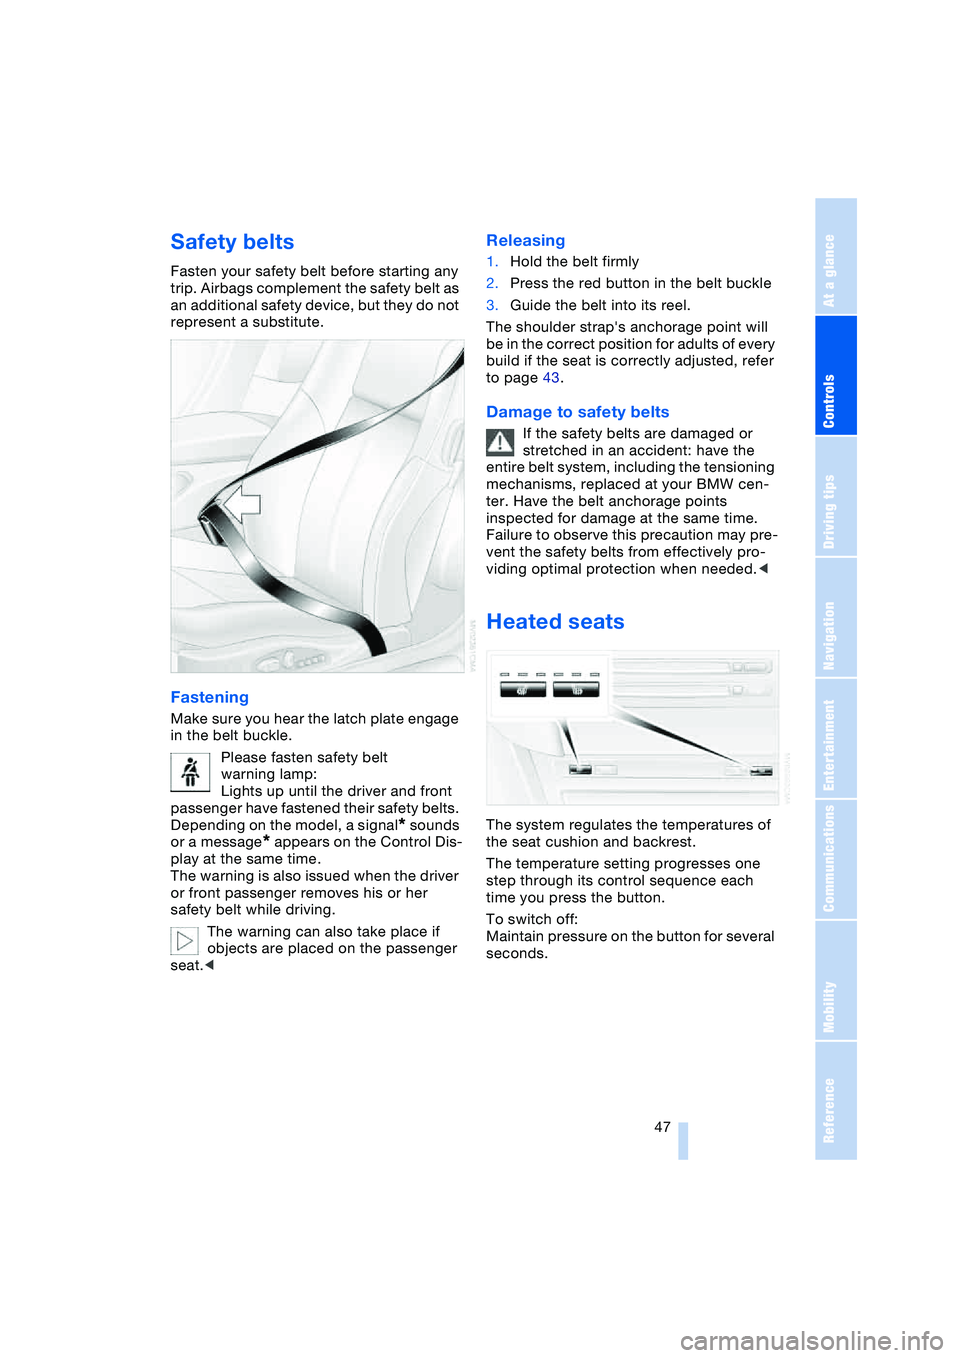
Heated seats
The system regulates the temperatures of
the seat cushion and backrest.
The temperature setting progresses one
step through its control sequence each
time you press the button.
To switch off:
Maintain pressure on the button for several
seconds.