2004 BMW 545I SEDAN navigation
[x] Cancel search: navigationPage 53 of 220
Controls
51Reference
At a glance
Driving tips
Communications
Navigation
Entertainment
Mobility
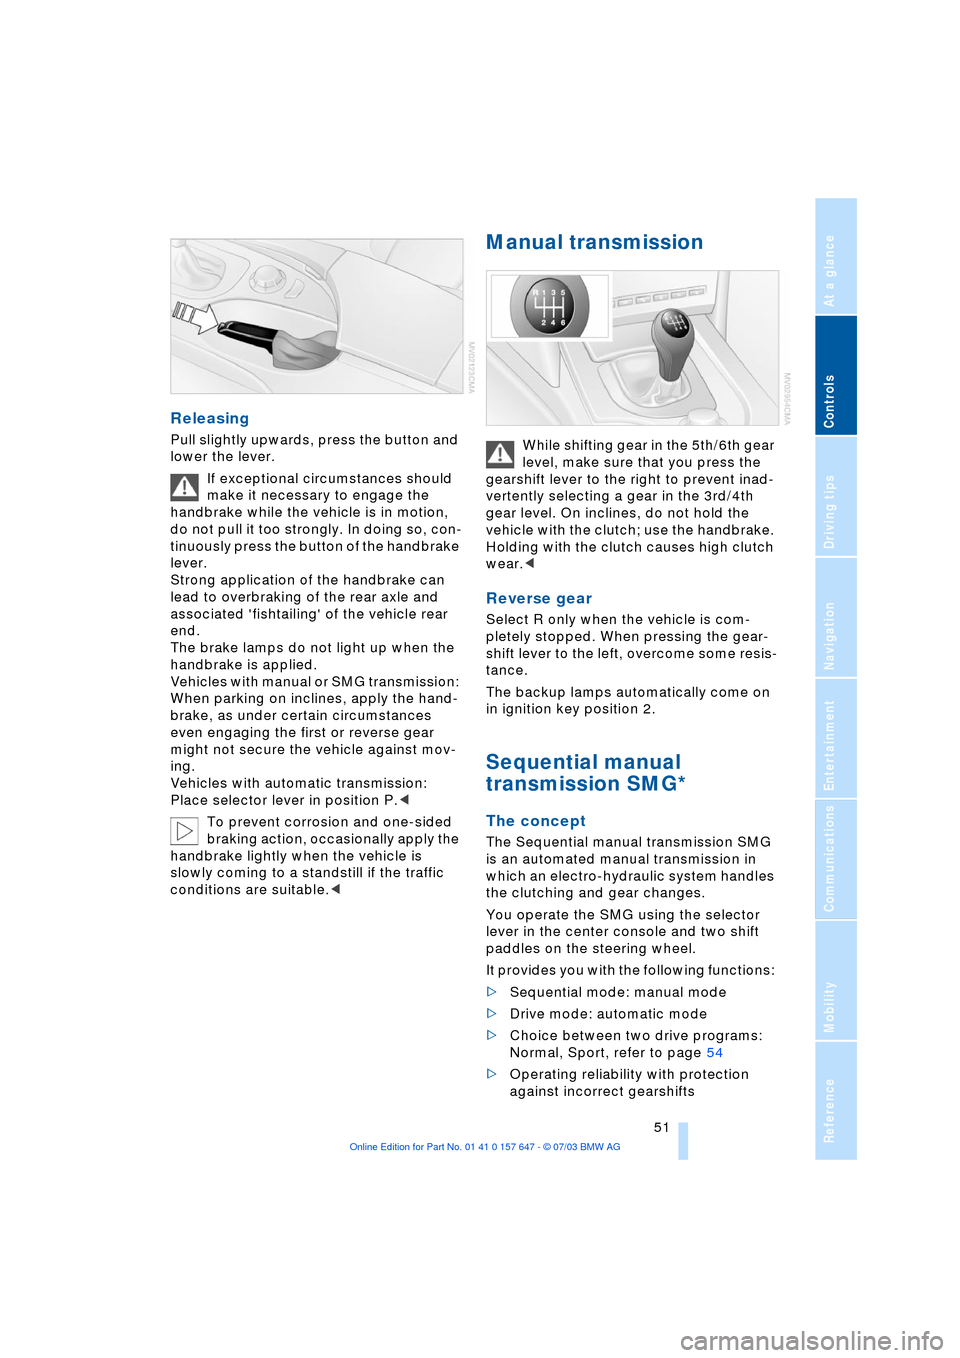
Releasing
Pull slightly upwards, press the button and
lower the lever.
If exceptional circumstances should
make it necessary to engage the
handbrake while the vehicle is in motion,
do not pull it too strongly. In doing so, con-
tinuously press the button of the handbrake
lever.
Strong application of the handbrake can
lead to overbraking of the rear axle and
associated 'fishtailing' of the vehicle rear
end.
The brake lamps do not light up when the
handbrake is applied.
Vehicles with manual or SMG transmission:
When parking on inclines, apply the hand-
brake, as under certain circumstances
even engaging the first or reverse gear
might not secure the vehicle against mov-
ing.
Vehicles with automatic transmission:
Place selector lever in position P.<
To prevent corrosion and one-sided
braking action, occasionally apply the
handbrake lightly when the vehicle is
slowly coming to a standstill if the traffic
conditions are suitable.<
Manual transmission
While shifting gear in the 5th/6th gear
level, make sure that you press the
gearshift lever to the right to prevent inad-
vertently selecting a gear in the 3rd/4th
gear level. On inclines, do not hold the
vehicle with the clutch; use the handbrake.
Holding with the clutch causes high clutch
wear.<
Reverse gear
Select R only when the vehicle is com-
pletely stopped. When pressing the gear-
shift lever to the left, overcome some resis-
tance.
The backup lamps automatically come on
in ignition key position 2.
Sequential manual
transmission SMG*
The concept
The Sequential manual transmission SMG
is an automated manual transmission in
which an electro-hydraulic system handles
the clutching and gear changes.
You operate the SMG using the selector
lever in the center console and two shift
paddles on the steering wheel.
It provides you with the following functions:
>Sequential mode: manual mode
>Drive mode: automatic mode
>Choice between two drive programs:
Normal, Sport, refer to page 54
>Operating reliability with protection
against incorrect gearshifts
Page 55 of 220
Controls
53Reference
At a glance
Driving tips
Communications
Navigation
Entertainment
Mobility
towards D or change the current gear using
the shift paddles or selector lever.
Gear changes
Using selector lever
>To shift up, briefly press the selector
lever towards +
>To shift down, briefly press towards Ñ.
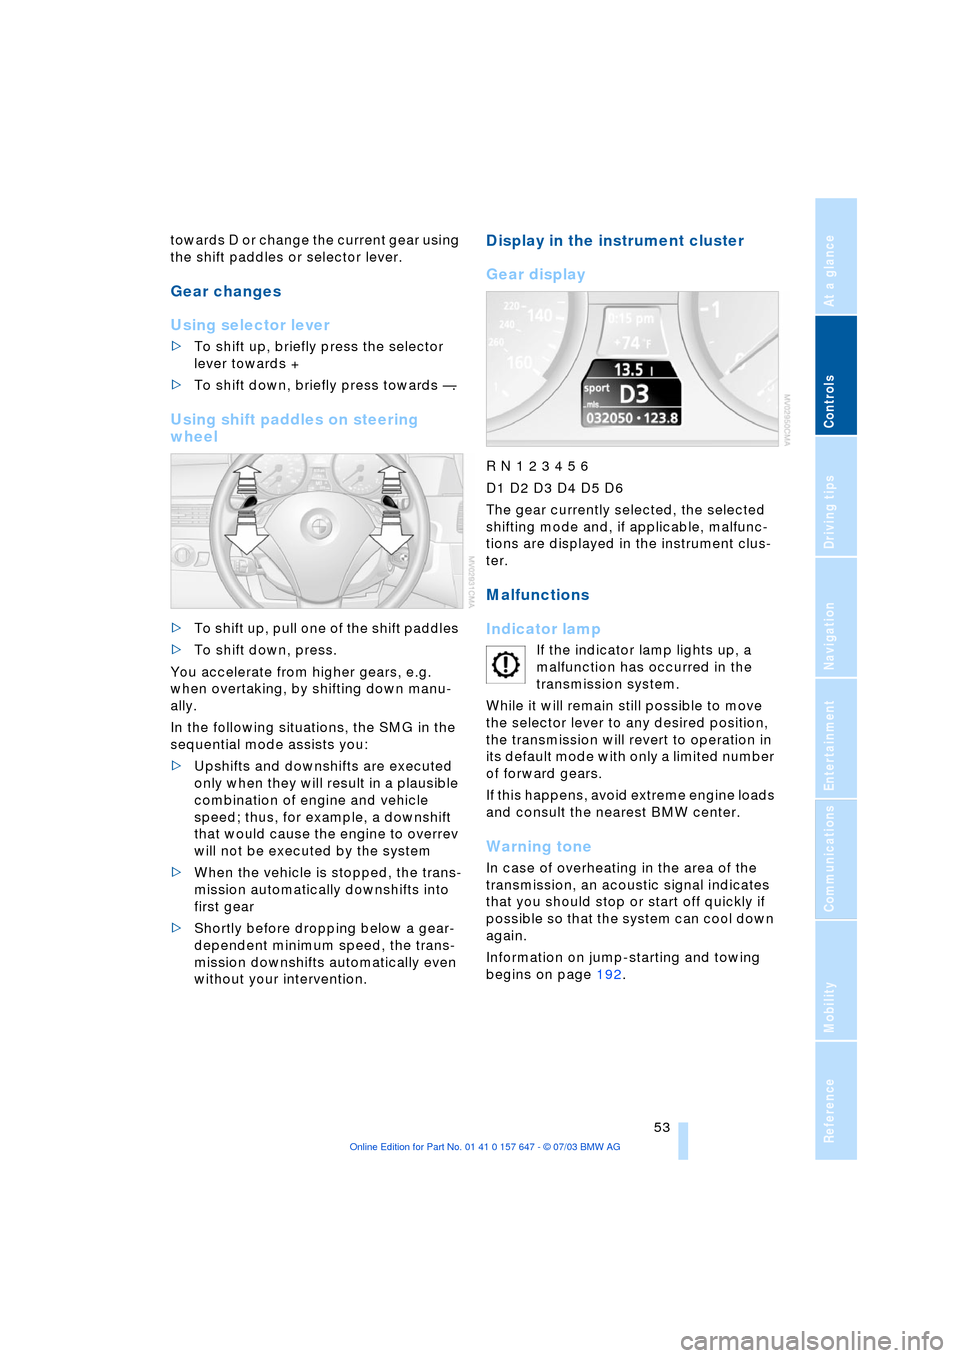
Using shift paddles on steering
wheel
>To shift up, pull one of the shift paddles
>To shift down, press.
You accelerate from higher gears, e.g.
when overtaking, by shifting down manu-
ally.
In the following situations, the SMG in the
sequential mode assists you:
>Upshifts and downshifts are executed
only when they will result in a plausible
combination of engine and vehicle
speed; thus, for example, a downshift
that would cause the engine to overrev
will not be executed by the system
>When the vehicle is stopped, the trans-
mission automatically downshifts into
first gear
>Shortly before dropping below a gear-
dependent minimum speed, the trans-
mission downshifts automatically even
without your intervention.
Display in the instrument cluster
Gear display
R N 1 2 3 4 5 6
D1 D2 D3 D4 D5 D6
The gear currently selected, the selected
shifting mode and, if applicable, malfunc-
tions are displayed in the instrument clus-
ter.
Malfunctions
Indicator lamp
If the indicator lamp lights up, a
malfunction has occurred in the
transmission system.
While it will remain still possible to move
the selector lever to any desired position,
the transmission will revert to operation in
its default mode with only a limited number
of forward gears.
If this happens, avoid extreme engine loads
and consult the nearest BMW center.
Warning tone
In case of overheating in the area of the
transmission, an acoustic signal indicates
that you should stop or start off quickly if
possible so that the system can cool down
again.
Information on jump-starting and towing
begins on page 192.
Page 57 of 220
Controls
55Reference
At a glance
Driving tips
Communications
Navigation
Entertainment
Mobility
Changing the selector-lever
positions
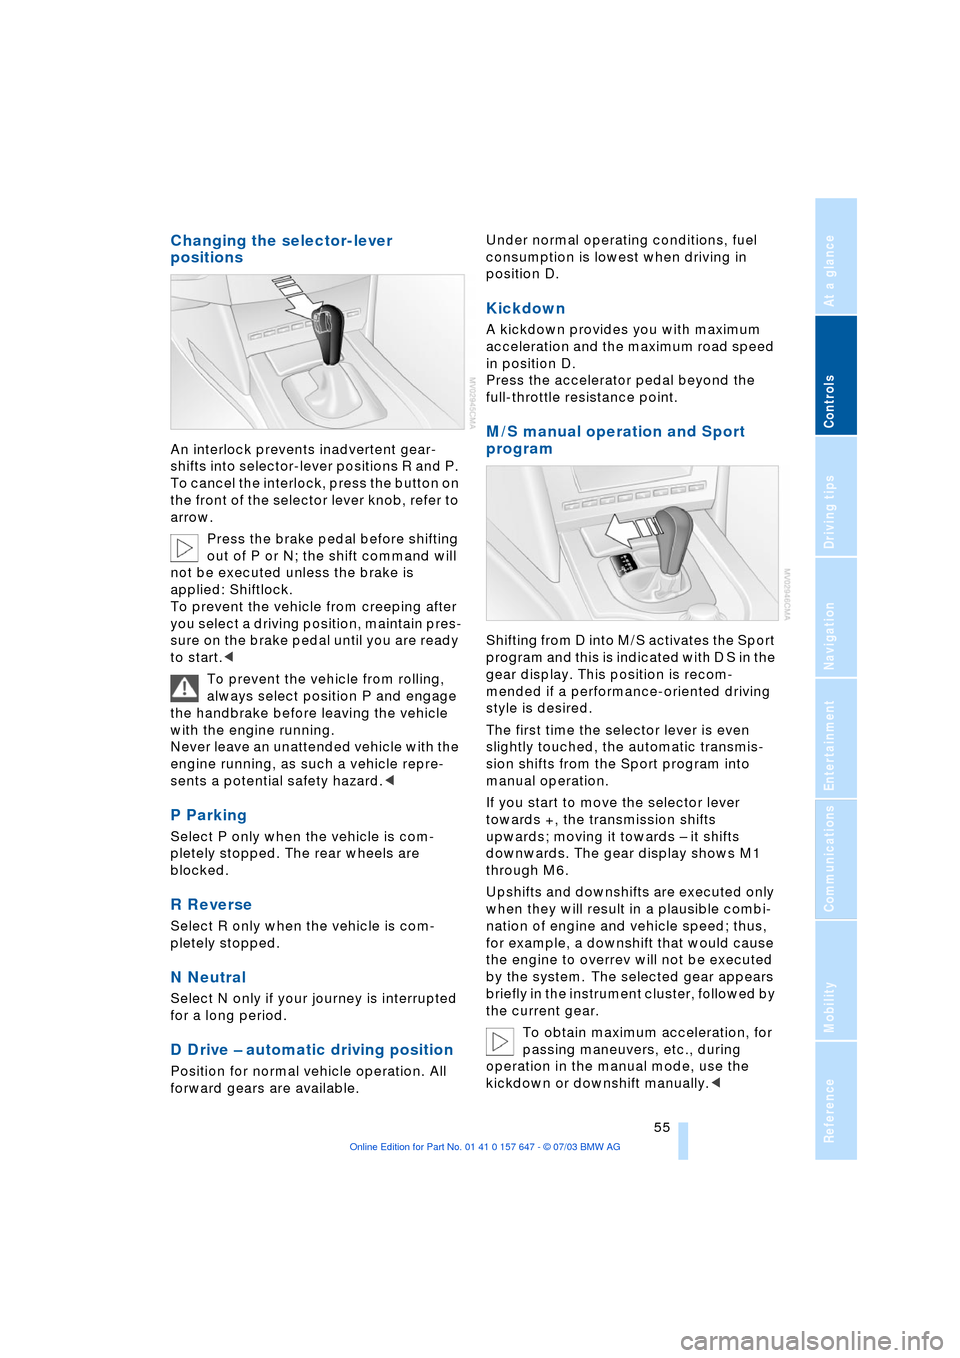
An interlock prevents inadvertent gear-
shifts into selector-lever positions R and P.
To cancel the interlock, press the button on
the front of the selector lever knob, refer to
arrow.
Press the brake pedal before shifting
out of P or N; the shift command will
not be executed unless the brake is
applied: Shiftlock.
To prevent the vehicle from creeping after
you select a driving position, maintain pres-
sure on the brake pedal until you are ready
to start.<
To prevent the vehicle from rolling,
always select position P and engage
the handbrake before leaving the vehicle
with the engine running.
Never leave an unattended vehicle with the
engine running, as such a vehicle repre-
sents a potential safety hazard.<
P Parking
Select P only when the vehicle is com-
pletely stopped. The rear wheels are
blocked.
R Reverse
Select R only when the vehicle is com-
pletely stopped.
N Neutral
Select N only if your journey is interrupted
for a long period.
D Drive Ð automatic driving position
Position for normal vehicle operation. All
forward gears are available.Under normal operating conditions, fuel
consumption is lowest when driving in
position D.
Kickdown
A kickdown provides you with maximum
acceleration and the maximum road speed
in position D.
Press the accelerator pedal beyond the
full-throttle resistance point.
M/S manual operation and Sport
program
Shifting from D into M/S activates the Sport
program and this is indicated with D S in the
gear display. This position is recom-
mended if a performance-oriented driving
style is desired.
The first time the selector lever is even
slightly touched, the automatic transmis-
sion shifts from the Sport program into
manual operation.
If you start to move the selector lever
towards +, the transmission shifts
upwards; moving it towards Ð it shifts
downwards. The gear display shows M1
through M6.
Upshifts and downshifts are executed only
when they will result in a plausible combi-
nation of engine and vehicle speed; thus,
for example, a downshift that would cause
the engine to overrev will not be executed
by the system. The selected gear appears
briefly in the instrument cluster, followed by
the current gear.
To obtain maximum acceleration, for
passing maneuvers, etc., during
operation in the manual mode, use the
kickdown or downshift manually.<
Page 59 of 220
Controls
57Reference
At a glance
Driving tips
Communications
Navigation
Entertainment
Mobility
Wiper system
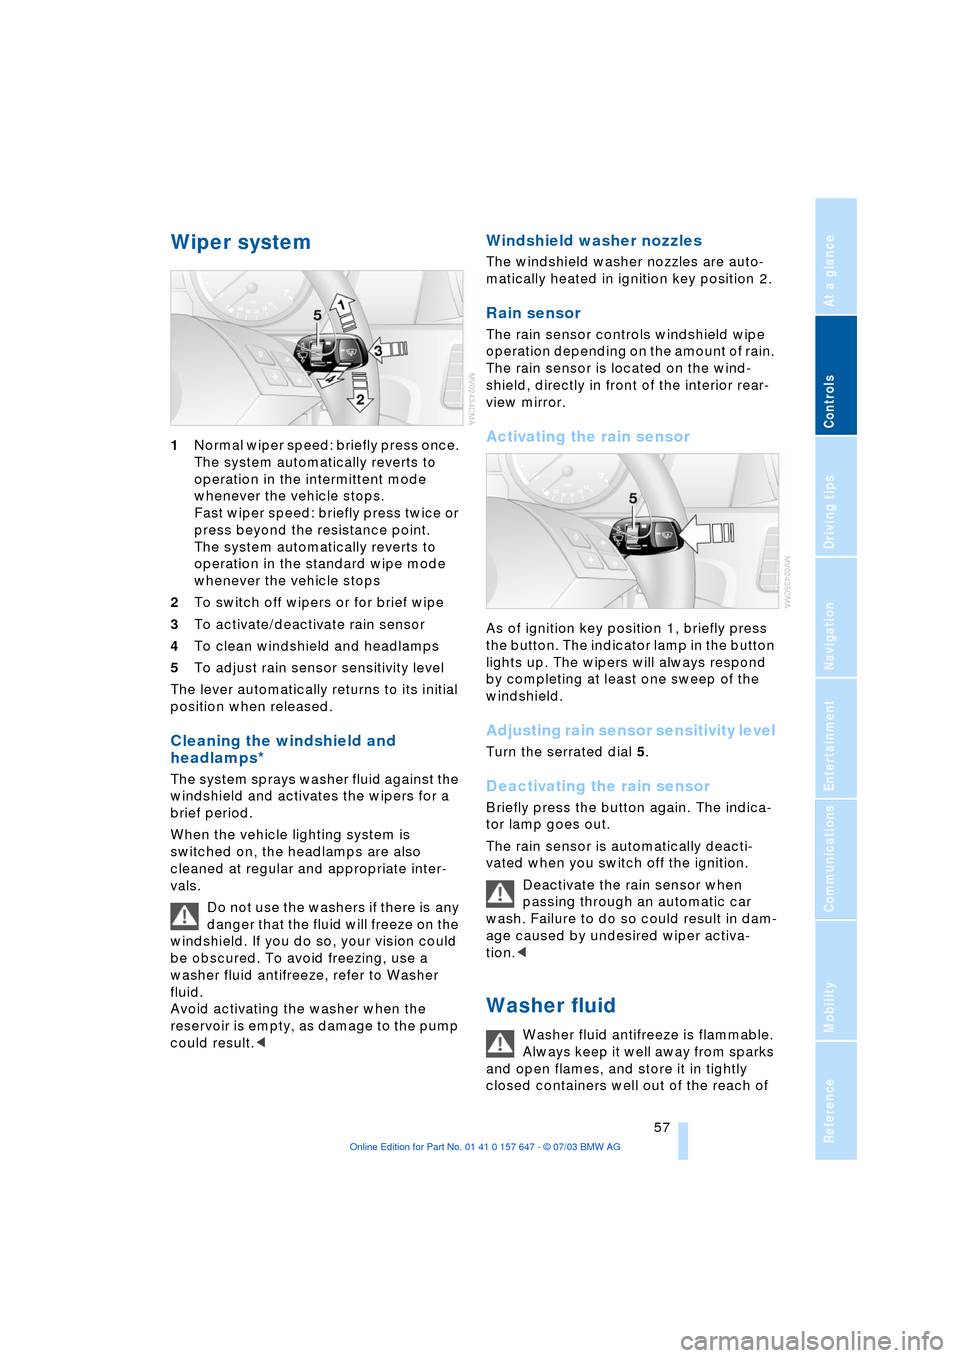
1Normal wiper speed: briefly press once.
The system automatically reverts to
operation in the intermittent mode
whenever the vehicle stops.
Fast wiper speed: briefly press twice or
press beyond the resistance point.
The system automatically reverts to
operation in the standard wipe mode
whenever the vehicle stops
2To switch off wipers or for brief wipe
3To activate/deactivate rain sensor
4To clean windshield and headlamps
5To adjust rain sensor sensitivity level
The lever automatically returns to its initial
position when released.
Cleaning the windshield and
headlamps*
The system sprays washer fluid against the
windshield and activates the wipers for a
brief period.
When the vehicle lighting system is
switched on, the headlamps are also
cleaned at regular and appropriate inter-
vals.
Do not use the washers if there is any
danger that the fluid will freeze on the
windshield. If you do so, your vision could
be obscured. To avoid freezing, use a
washer fluid antifreeze, refer to Washer
fluid.
Avoid activating the washer when the
reservoir is empty, as damage to the pump
could result.<
Windshield washer nozzles
The windshield washer nozzles are auto-
matically heated in ignition key position 2.
Rain sensor
The rain sensor controls windshield wipe
operation depending on the amount of rain.
The rain sensor is located on the wind-
shield, directly in front of the interior rear-
view mirror.
Activating the rain sensor
As of ignition key position 1, briefly press
the button. The indicator lamp in the button
lights up. The wipers will always respond
by completing at least one sweep of the
windshield.
Adjusting rain sensor sensitivity level
Turn the serrated dial 5.
Deactivating the rain sensor
Briefly press the button again. The indica-
tor lamp goes out.
The rain sensor is automatically deacti-
vated when you switch off the ignition.
Deactivate the rain sensor when
passing through an automatic car
wash. Failure to do so could result in dam-
age caused by undesired wiper activa-
tion.<
Washer fluid
Washer fluid antifreeze is flammable.
Always keep it well away from sparks
and open flames, and store it in tightly
closed containers well out of the reach of
Page 61 of 220
Controls
59Reference
At a glance
Driving tips
Communications
Navigation
Entertainment
Mobility
>when you press the clutch or engage
position N of the automatic transmis-
sion
>when the DSC system is in active oper-
ation.
4 Recalling stored speed
Press button 4 briefly: the vehicle acceler-
ates to and maintains the last speed stored.
Deactivating system
When the ignition is switched off, the sys-
tem is deactivated and the stored speed is
deleted.
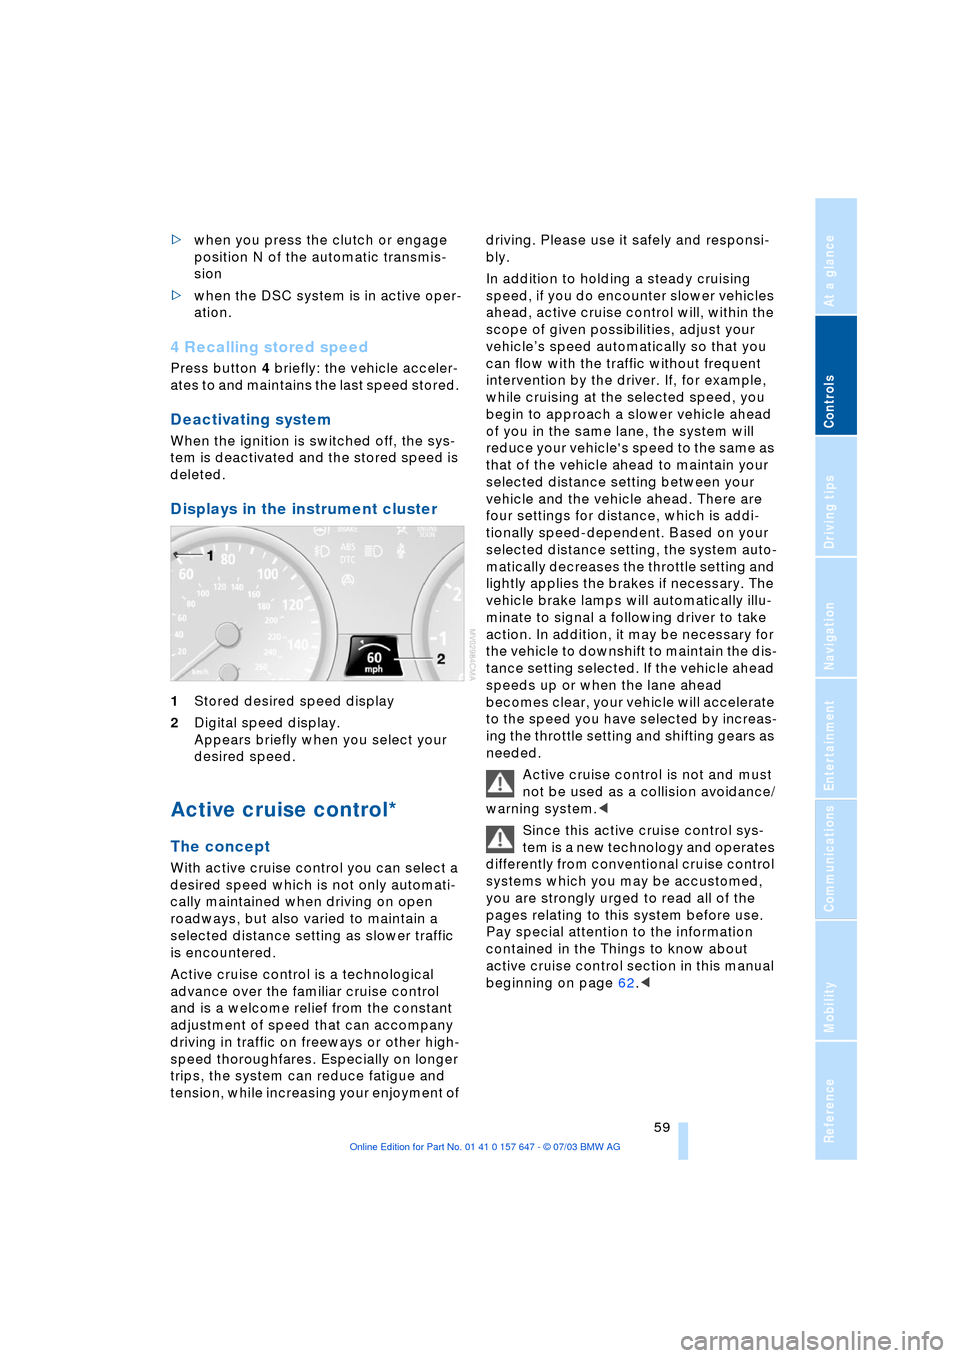
Displays in the instrument cluster
1Stored desired speed display
2Digital speed display.
Appears briefly when you select your
desired speed.
Active cruise control*
The concept
With active cruise control you can select a
desired speed which is not only automati-
cally maintained when driving on open
roadways, but also varied to maintain a
selected distance setting as slower traffic
is encountered.
Active cruise control is a technological
advance over the familiar cruise control
and is a welcome relief from the constant
adjustment of speed that can accompany
driving in traffic on freeways or other high-
speed thoroughfares. Especially on longer
trips, the system can reduce fatigue and
tension, while increasing your enjoyment of driving. Please use it safely and responsi-
bly.
In addition to holding a steady cruising
speed, if you do encounter slower vehicles
ahead, active cruise control will, within the
scope of given possibilities, adjust your
vehicleÕs speed automatically so that you
can flow with the traffic without frequent
intervention by the driver. If, for example,
while cruising at the selected speed, you
begin to approach a slower vehicle ahead
of you in the same lane, the system will
reduce your vehicle's speed to the same as
that of the vehicle ahead to maintain your
selected distance setting between your
vehicle and the vehicle ahead. There are
four settings for distance, which is addi-
tionally speed-dependent. Based on your
selected distance setting, the system auto-
matically decreases the throttle setting and
lightly applies the brakes if necessary. The
vehicle brake lamps will automatically illu-
minate to signal a following driver to take
action. In addition, it may be necessary for
the vehicle to downshift to maintain the dis-
tance setting selected. If the vehicle ahead
speeds up or when the lane ahead
becomes clear, your vehicle will accelerate
to the speed you have selected by increas-
ing the throttle setting and shifting gears as
needed.
Active cruise control is not and must
not be used as a collision avoidance/
warning system.<
Since this active cruise control sys-
tem is a new technology and operates
differently from conventional cruise control
systems which you may be accustomed,
you are strongly urged to read all of the
pages relating to this system before use.
Pay special attention to the information
contained in the Things to know about
active cruise control section in this manual
beginning on page 62.<
Page 63 of 220
Controls
61Reference
At a glance
Driving tips
Communications
Navigation
Entertainment
Mobility
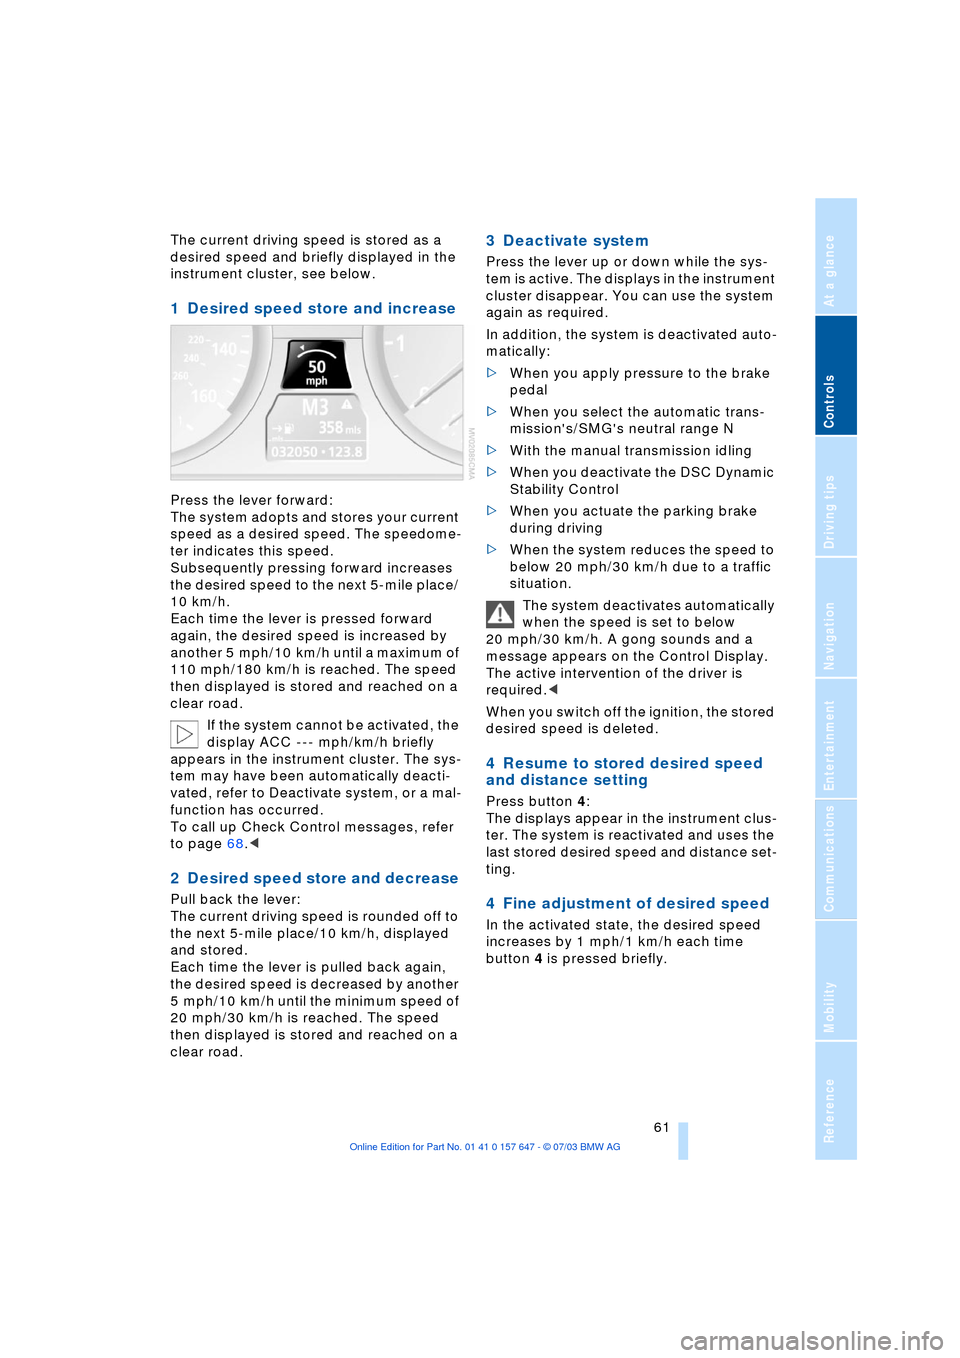
The current driving speed is stored as a
desired speed and briefly displayed in the
instrument cluster, see below.
1 Desired speed store and increase
Press the lever forward:
The system adopts and stores your current
speed as a desired speed. The speedome-
ter indicates this speed.
Subsequently pressing forward increases
the desired speed to the next 5-mile place/
10 km/h.
Each time the lever is pressed forward
again, the desired speed is increased by
another 5 mph/10 km/h until a maximum of
110 mph/180 km/h is reached. The speed
then displayed is stored and reached on a
clear road.
If the system cannot be activated, the
display ACC --- mph/km/h briefly
appears in the instrument cluster. The sys-
tem may have been automatically deacti-
vated, refer to Deactivate system, or a mal-
function has occurred.
To call up Check Control messages, refer
to page 68.<
2 Desired speed store and decrease
Pull back the lever:
The current driving speed is rounded off to
the next 5-mile place/10 km/h, displayed
and stored.
Each time the lever is pulled back again,
the desired speed is decreased by another
5 mph/10 km/h until the minimum speed of
20 mph/30 km/h is reached. The speed
then displayed is stored and reached on a
clear road.
3 Deactivate system
Press the lever up or down while the sys-
tem is active. The displays in the instrument
cluster disappear. You can use the system
again as required.
In addition, the system is deactivated auto-
matically:
>When you apply pressure to the brake
pedal
>When you select the automatic trans-
mission's/SMG's neutral range N
>With the manual transmission idling
>When you deactivate the DSC Dynamic
Stability Control
>When you actuate the parking brake
during driving
>When the system reduces the speed to
below 20 mph/30 km/h due to a traffic
situation.
The system deactivates automatically
when the speed is set to below
20 mph/30 km/h. A gong sounds and a
message appears on the Control Display.
The active intervention of the driver is
required.<
When you switch off the ignition, the stored
desired speed is deleted.
4 Resume to stored desired speed
and distance setting
Press button 4:
The displays appear in the instrument clus-
ter. The system is reactivated and uses the
last stored desired speed and distance set-
ting.
4 Fine adjustment of desired speed
In the activated state, the desired speed
increases by 1 mph/1 km/h each time
button 4 is pressed briefly.
Page 65 of 220
Controls
63Reference
At a glance
Driving tips
Communications
Navigation
Entertainment
Mobility
Always remember that the range and
ability of the system does have phys-
ical limitations. It will not apply the brakes
or decelerate your vehicle when there is a
slow-moving vehicle, stopped vehicle or
stationary object ahead of you, as for
example, at a traffic light or a parked vehi-
cle. Also, the system does not react to
oncoming traffic, pedestrians or other type
of potential traffic such as a rider on horse-
back. It is also possible that the system
may not detect smaller moving objects
such as motorcycles or bicycles. Be espe-
cially alert when encountering any of these
situations as the system will neither auto-
matically brake, nor provide a warning to
you. Also, be aware that every decrease in
the distance setting allows your vehicle to
come closer to a vehicle in front of you and
requires a heightened amount of alert-
ness.<
If while your vehicle is actively following a
vehicle in front of you and the vehicle
ahead speeds up or the lane ahead
becomes clear, then your vehicle will
accelerate to the speed you have selected.
Be aware that changing to a clear, unob-
structed lane will also result in your vehicle
accelerating.
Be certain to deactivate the system
when you pull into an exit lane for a
highway off-ramp.<
Also, vehicles traveling in a staggered man-
ner on a highway may cause a delay in the
system's reaction to a vehicle in front of
you or may cause the system to react to a
vehicle actually in the lane next to you.
Always be ready to take action or apply the
brakes if necessary.
Active cruise control can only decelerate
the vehicle to approx. 20 mph/30 km/h. If
the system reduces vehicle speed below
20 mph/30 km/h or if DSC/ABS is engaged
while driving, the system will automatically
deactivate.
Remember, the system cannot stop
your vehicle. In addition, the system is
deactivated whenever the driver applies
the vehicle brakes, shifts the transmission
from drive/D to neutral/N, or deactivates DSC. After any deactivation, the system
will no longer automatically activate the
vehicle brakes, which means the driver
must intervene and resume manual brak-
ing. You should then reactivate the system
only when you are fully aware of the prior
speed and distance settings.<
Active cruise control may brake when you
reduce the stored desired speed; however,
the driver must constantly monitor traffic
and intervene if necessary.
When you switch off the engine or ignition,
active cruise control is fully switched off,
too, and any settings you have selected are
canceled.
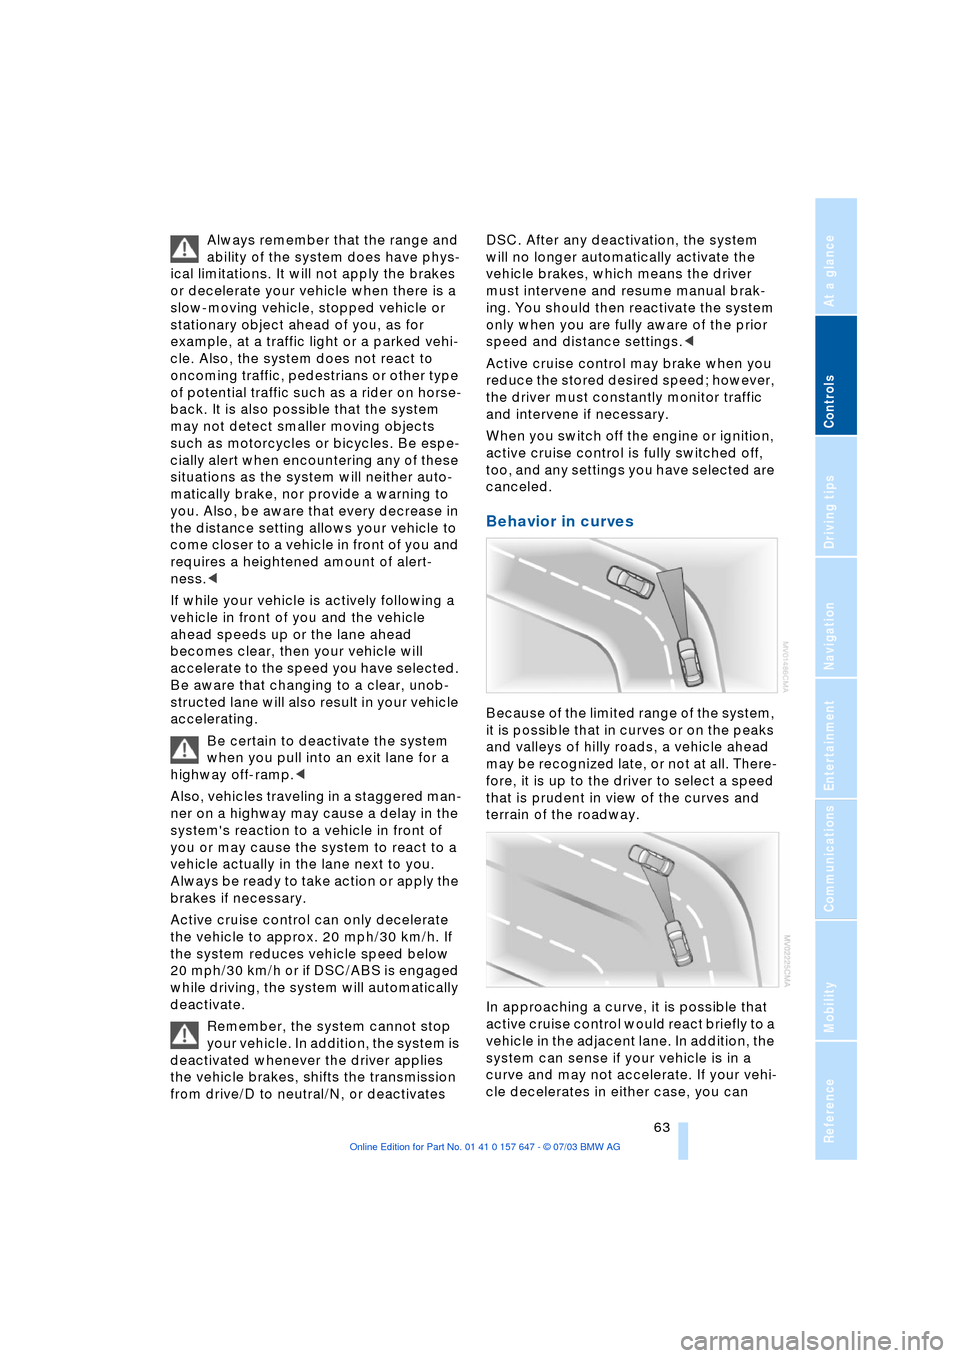
Behavior in curves
Because of the limited range of the system,
it is possible that in curves or on the peaks
and valleys of hilly roads, a vehicle ahead
may be recognized late, or not at all. There-
fore, it is up to the driver to select a speed
that is prudent in view of the curves and
terrain of the roadway.
In approaching a curve, it is possible that
active cruise control would react briefly to a
vehicle in the adjacent lane. In addition, the
system can sense if your vehicle is in a
curve and may not accelerate. If your vehi-
cle decelerates in either case, you can
Page 67 of 220
Controls
65Reference
At a glance
Driving tips
Communications
Navigation
Entertainment
Mobility
Everything under control
Odometer, outside
temperature display, clock
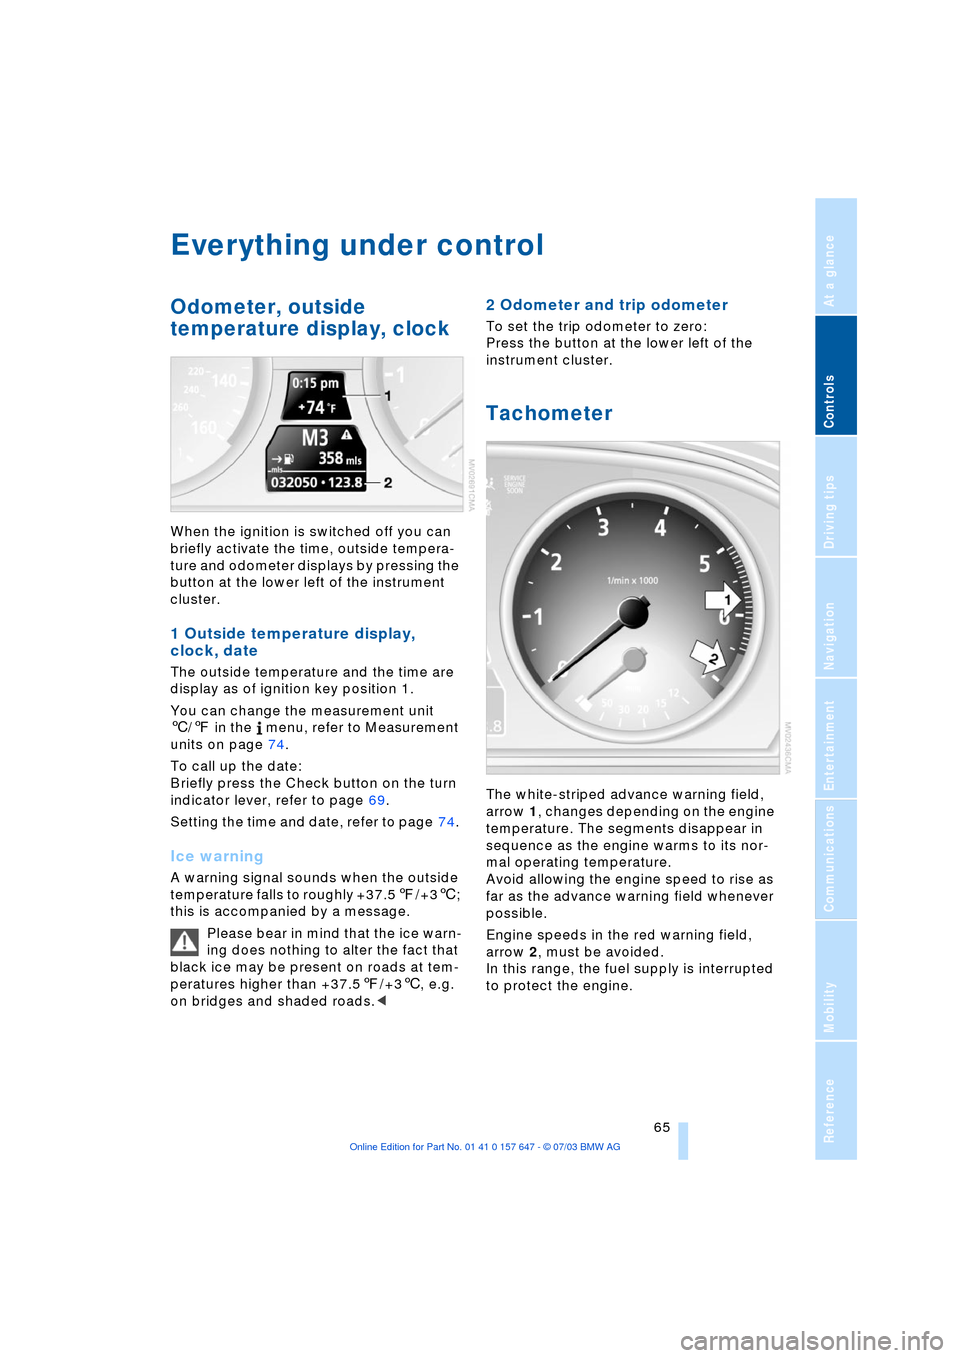
When the ignition is switched off you can
briefly activate the time, outside tempera-
ture and odometer displays by pressing the
button at the lower left of the instrument
cluster.
1 Outside temperature display,
clock, date
The outside temperature and the time are
display as of ignition key position 1.
You can change the measurement unit
6/7 in the menu, refer to Measurement
units on page 74.
To call up the date:
Briefly press the Check button on the turn
indicator lever, refer to page 69.
Setting the time and date, refer to page 74.
Ice warning
A warning signal sounds when the outside
temperature falls to roughly +37.57/+36;
this is accompanied by a message.
Please bear in mind that the ice warn-
ing does nothing to alter the fact that
black ice may be present on roads at tem-
peratures higher than +37.57/+36, e.g.
on bridges and shaded roads.<
2 Odometer and trip odometer
To set the trip odometer to zero:
Press the button at the lower left of the
instrument cluster.
Tachometer
The white-striped advance warning field,
arrow 1, changes depending on the engine
temperature. The segments disappear in
sequence as the engine warms to its nor-
mal operating temperature.
Avoid allowing the engine speed to rise as
far as the advance warning field whenever
possible.
Engine speeds in the red warning field,
arrow 2, must be avoided.
In this range, the fuel supply is interrupted
to protect the engine.