2004 BMW 525I SEDAN turn signal
[x] Cancel search: turn signalPage 70 of 220
Everything under control
68
Check Control
Display of a message
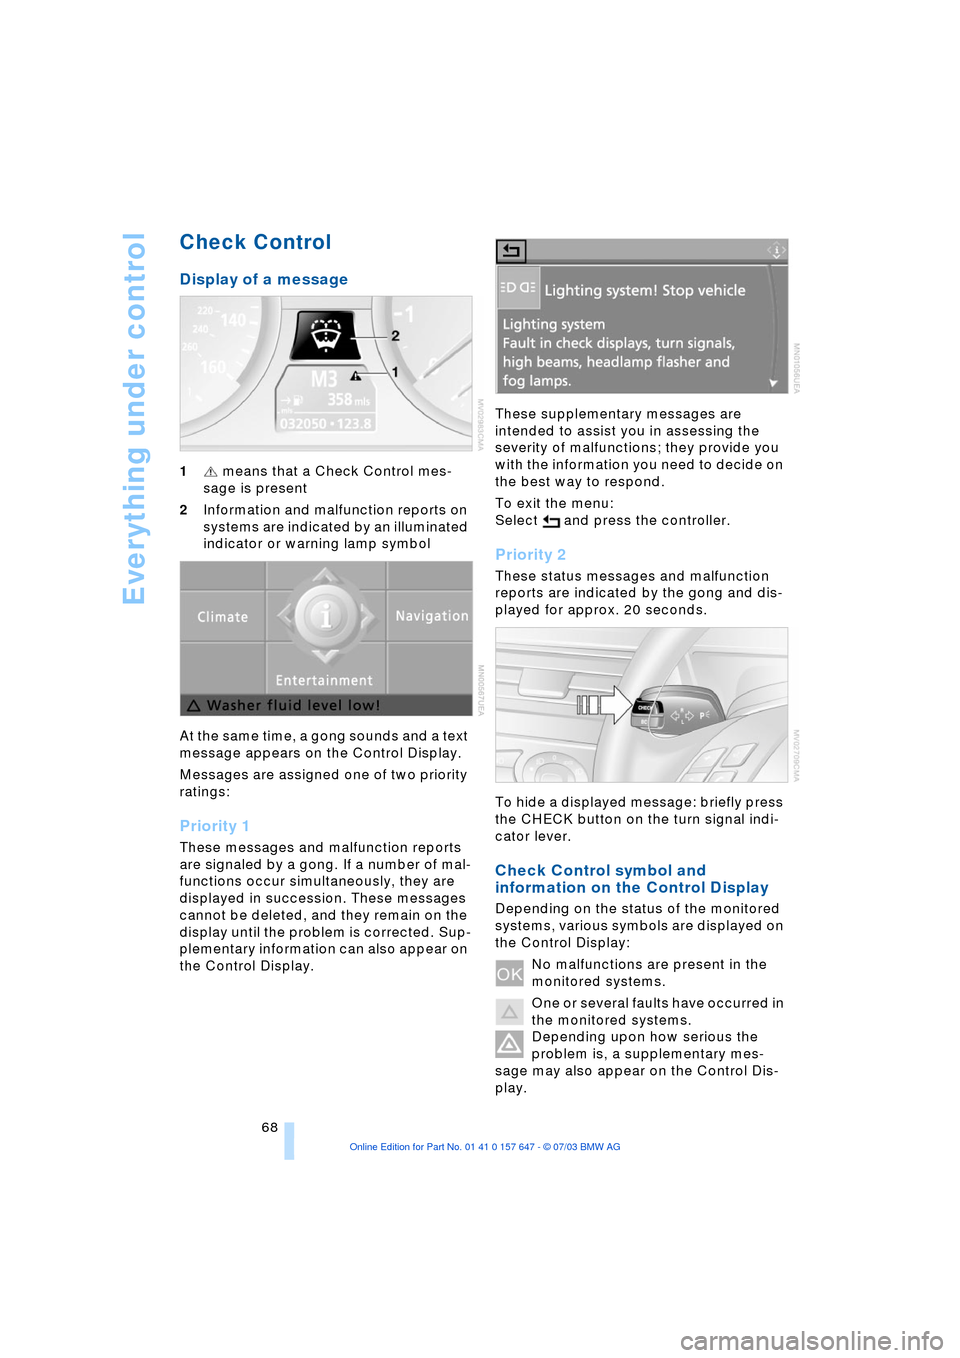
1 means that a Check Control mes-
sage is present
2Information and malfunction reports on
systems are indicated by an illuminated
indicator or warning lamp symbol
At the same time, a gong sounds and a text
message appears on the Control Display.
Messages are assigned one of two priority
ratings:
Priority 1
These messages and malfunction reports
are signaled by a gong. If a number of mal-
functions occur simultaneously, they are
displayed in succession. These messages
cannot be deleted, and they remain on the
display until the problem is corrected. Sup-
plementary information can also appear on
the Control Display. These supplementary messages are
intended to assist you in assessing the
severity of malfunctions; they provide you
with the information you need to decide on
the best way to respond.
To exit the menu:
Select and press the controller.
Priority 2
These status messages and malfunction
reports are indicated by the gong and dis-
played for approx. 20 seconds.
To hide a displayed message: briefly press
the CHECK button on the turn signal indi-
cator lever.
Check Control symbol and
information on the Control Display
Depending on the status of the monitored
systems, various symbols are displayed on
the Control Display:
No malfunctions are present in the
monitored systems.
One or several faults have occurred in
the monitored systems.
Depending upon how serious the
problem is, a supplementary mes-
sage may also appear on the Control Dis-
play.
Page 72 of 220
Everything under control
70
Computer
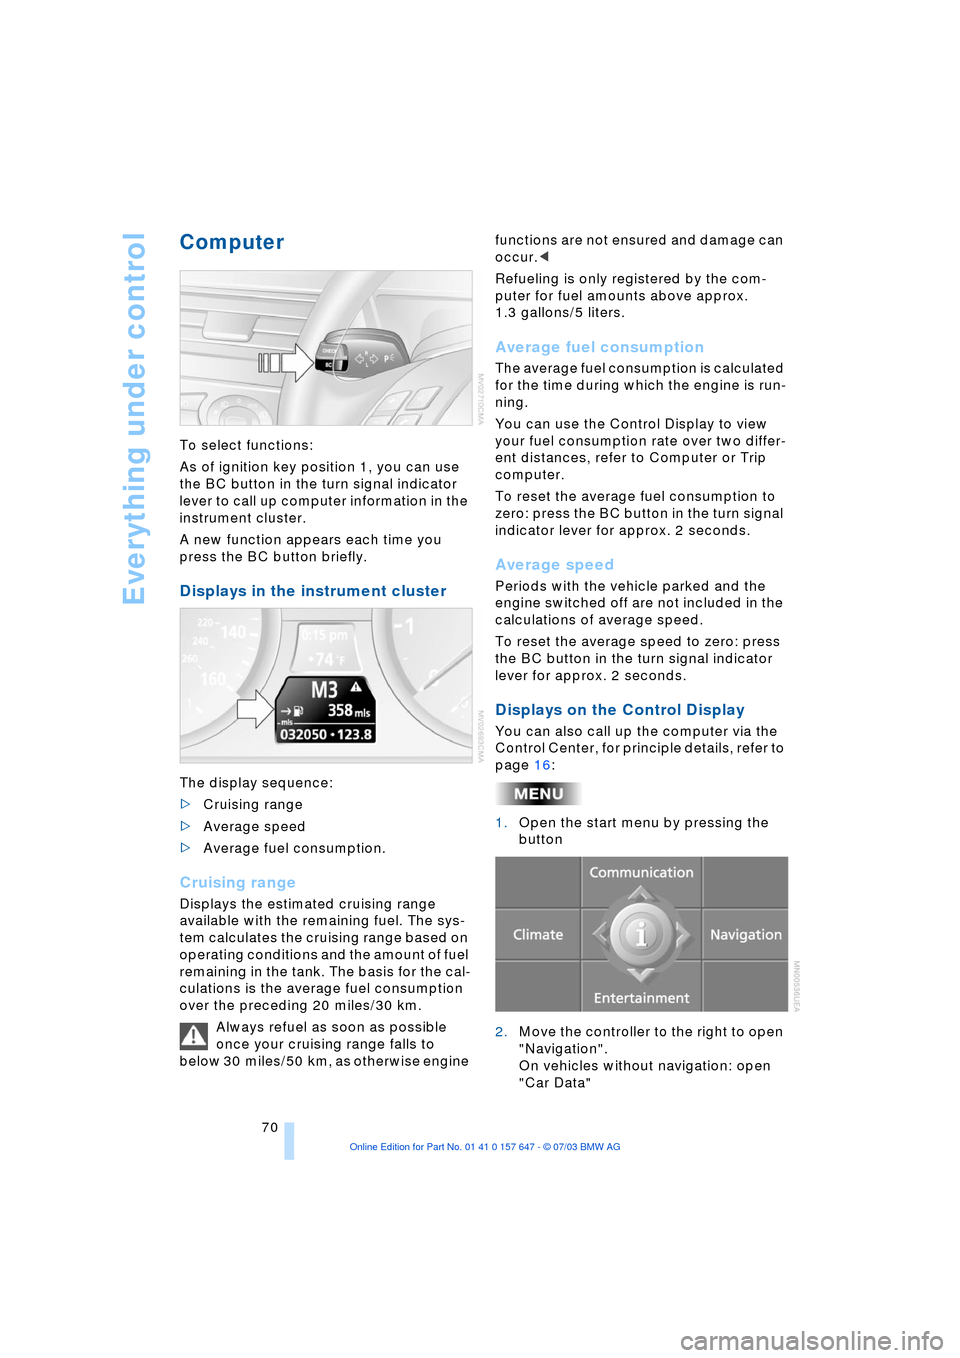
To select functions:
As of ignition key position 1, you can use
the BC button in the turn signal indicator
lever to call up computer information in the
instrument cluster.
A new function appears each time you
press the BC button briefly.
Displays in the instrument cluster
The display sequence:
>Cruising range
>Average speed
>Average fuel consumption.
Cruising range
Displays the estimated cruising range
available with the remaining fuel. The sys-
tem calculates the cruising range based on
operating conditions and the amount of fuel
remaining in the tank. The basis for the cal-
culations is the average fuel consumption
over the preceding 20 miles/30 km.
Always refuel as soon as possible
once your cruising range falls to
below 30 miles/50 km, as otherwise engine functions are not ensured and damage can
occur.<
Refueling is only registered by the com-
puter for fuel amounts above approx.
1.3 gallons/5 liters.
Average fuel consumption
The average fuel consumption is calculated
for the time during which the engine is run-
ning.
You can use the Control Display to view
your fuel consumption rate over two differ-
ent distances, refer to Computer or Trip
computer.
To reset the average fuel consumption to
zero: press the BC button in the turn signal
indicator lever for approx. 2 seconds.
Average speed
Periods with the vehicle parked and the
engine switched off are not included in the
calculations of average speed.
To reset the average speed to zero: press
the BC button in the turn signal indicator
lever for approx. 2 seconds.
Displays on the Control Display
You can also call up the computer via the
Control Center, for principle details, refer to
page 16:
1.Open the start menu by pressing the
button
2.Move the controller to the right to open
"Navigation".
On vehicles without navigation: open
"Car Data"
Page 89 of 220
Controls
87Reference
At a glance
Driving tips
Communications
Navigation
Entertainment
Mobility
Lamps
Parking lamps/low beams
Parking lamps
With the switch in this position, the
front, rear and side vehicle lighting
is switched on. You can use the side
marker lamps for parking. For lighting on
one side for parking as an additional fea-
ture, refer to page 88.
Low beams
When you switch off the ignition
with the headlamps on, the head-
lamps go out, and only the parking
lamps remain on.
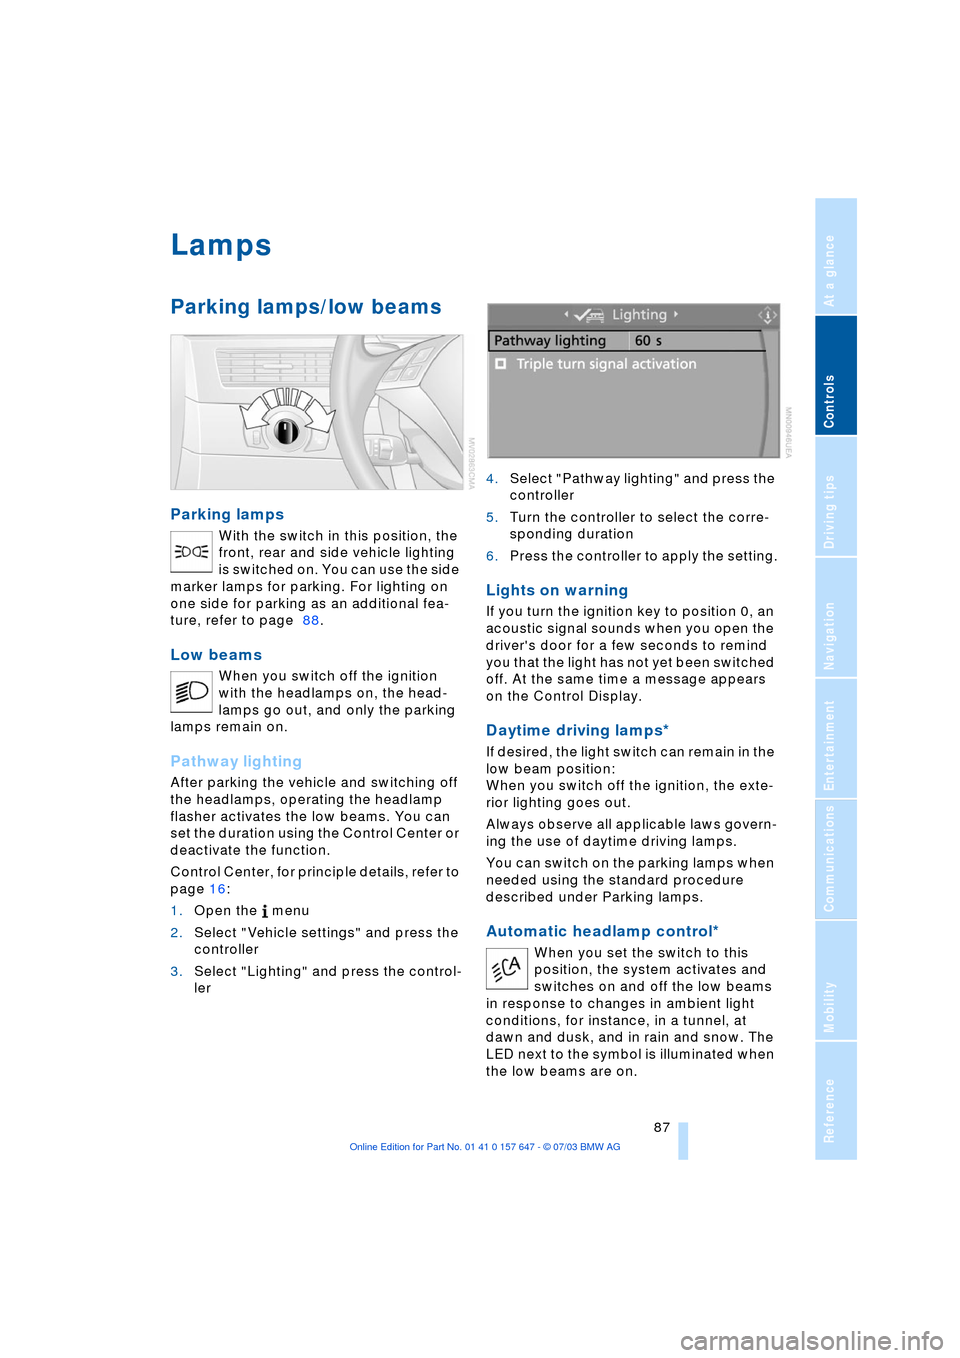
Pathway lighting
After parking the vehicle and switching off
the headlamps, operating the headlamp
flasher activates the low beams. You can
set the duration using the Control Center or
deactivate the function.
Control Center, for principle details, refer to
page 16:
1.Open the menu
2.Select "Vehicle settings" and press the
controller
3.Select "Lighting" and press the control-
ler 4.Select "Pathway lighting" and press the
controller
5.Turn the controller to select the corre-
sponding duration
6.Press the controller to apply the setting.
Lights on warning
If you turn the ignition key to position 0, an
acoustic signal sounds when you open the
driver's door for a few seconds to remind
you that the light has not yet been switched
off. At the same time a message appears
on the Control Display.
Daytime driving lamps*
If desired, the light switch can remain in the
low beam position:
When you switch off the ignition, the exte-
rior lighting goes out.
Always observe all applicable laws govern-
ing the use of daytime driving lamps.
You can switch on the parking lamps when
needed using the standard procedure
described under Parking lamps.
Automatic headlamp control*
When you set the switch to this
position, the system activates and
switches on and off the low beams
in response to changes in ambient light
conditions, for instance, in a tunnel, at
dawn and dusk, and in rain and snow. The
LED next to the symbol is illuminated when
the low beams are on.
Page 98 of 220
Practical interior accessories
96
Practical interior accessories
Integrated universal remote
control*
The concept
The integrated universal remote control
replaces up to three different hand-held
transmitters for various remote-controlled
equipment such as door openers and
house alarm systems. The integrated uni-
versal remote control registers and stores
signals from the original hand-held trans-
mitters.
The signal of an original hand-held trans-
mitter can be programmed on one of the
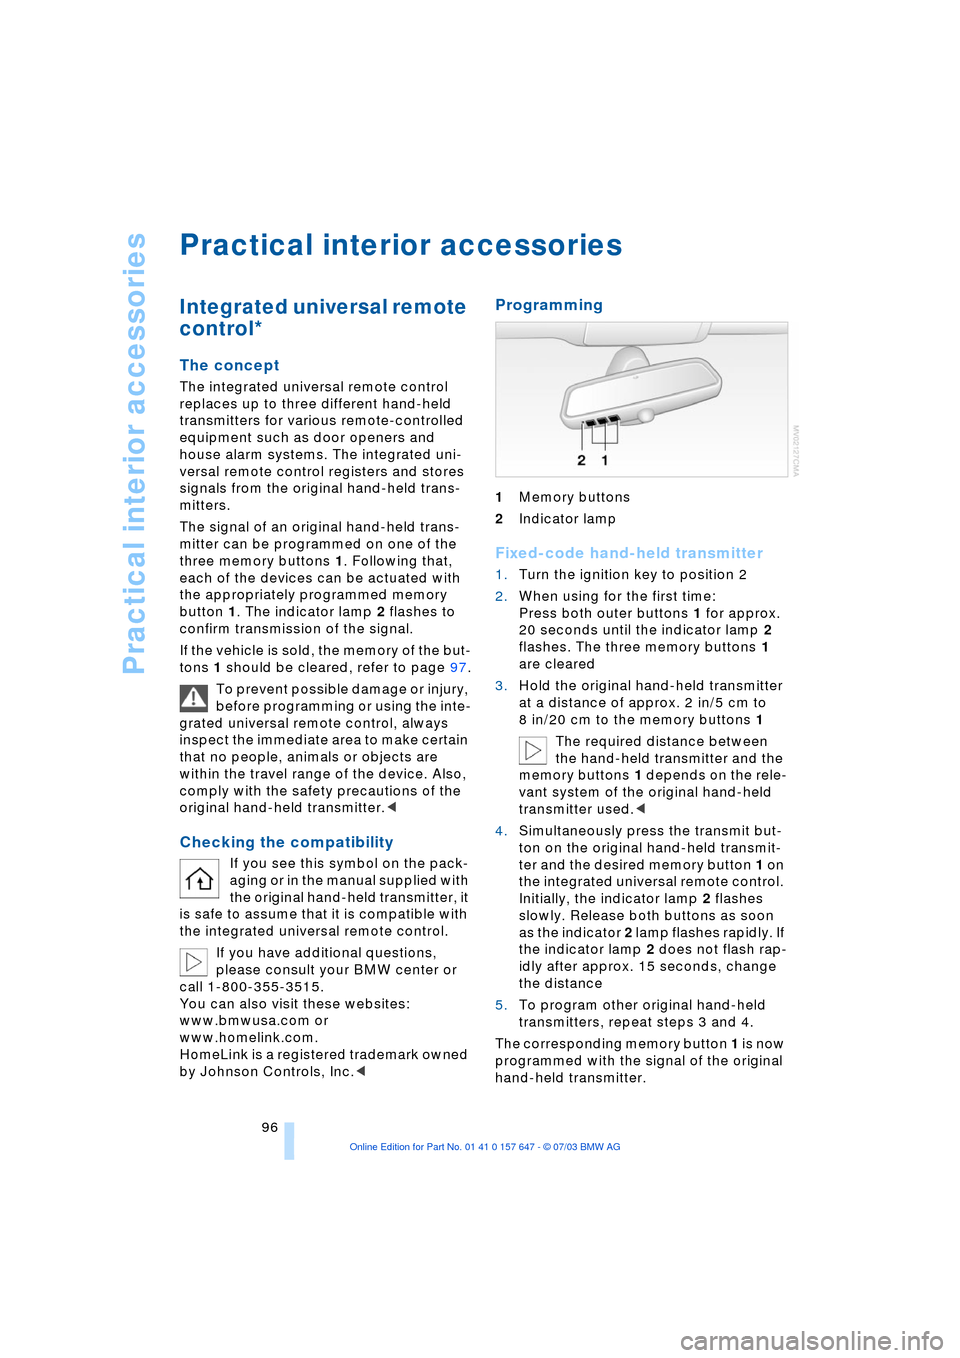
three memory buttons 1. Following that,
each of the devices can be actuated with
the appropriately programmed memory
button 1. The indicator lamp 2 flashes to
confirm transmission of the signal.
If the vehicle is sold, the memory of the but-
tons 1 should be cleared, refer to page 97.
To prevent possible damage or injury,
before programming or using the inte-
grated universal remote control, always
inspect the immediate area to make certain
that no people, animals or objects are
within the travel range of the device. Also,
comply with the safety precautions of the
original hand-held transmitter.<
Checking the compatibility
If you see this symbol on the pack-
aging or in the manual supplied with
the original hand-held transmitter, it
is safe to assume that it is compatible with
the integrated universal remote control.
If you have additional questions,
please consult your BMW center or
call 1-800-355-3515.
You can also visit these websites:
www.bmwusa.com or
www.homelink.com.
HomeLink is a registered trademark owned
by Johnson Controls, Inc.<
Programming
1Memory buttons
2Indicator lamp
Fixed-code hand-held transmitter
1.Turn the ignition key to position 2
2.When using for the first time:
Press both outer buttons 1 for approx.
20 seconds until the indicator lamp 2
flashes. The three memory buttons 1
are cleared
3.Hold the original hand-held transmitter
at a distance of approx. 2 in/5 cm to
8 in/20 cm to the memory buttons 1
The required distance between
the hand-held transmitter and the
memory buttons 1 depends on the rele-
vant system of the original hand-held
transmitter used.<
4.Simultaneously press the transmit but-
ton on the original hand-held transmit-
ter and the desired memory button 1 on
the integrated universal remote control.
Initially, the indicator lamp 2 flashes
slowly. Release both buttons as soon
as the indicator 2 lamp flashes rapidly. If
the indicator lamp 2 does not flash rap-
idly after approx. 15 seconds, change
the distance
5.To program other original hand-held
transmitters, repeat steps 3 and 4.
The corresponding memory button 1 is now
programmed with the signal of the original
hand-held transmitter.
Page 129 of 220
Navigation
Driving tips
127Reference
At a glance
Controls
Communications
Entertainment
Mobility
What to do if É
What to do if É
>you request the current position of your
vehicle, but do not receive a precise
display?
The system is unable to receive enough
GPS signals at your current position
owing to obstructions, your position is
not yet available on your navigation CD/
DVD, or the system is in the process of
calculating your position. As a rule, por-
table communications GSM / GPS
reception is guaranteed under a clear
sky
>the destination guidance does not
adopt a destination?
The data of the destination is not stored
on the navigation CD/DVD that is
loaded. Select a destination that is as
close as possible to the original
>the destination guidance does not
adopt an address without the street
name?
On the navigation CD/DVD, no down-
town area can be determined for the
city or town entered. Enter any street,
or a destination such as the railway sta-
tion etc., then start the destination guid-
ance
>you want to enter a destination for the
destination guidance system, but it is
not possible to select the letters for
your desired entry?
The destination data is not recorded on
the navigation CD/DVD that is loaded.
In this case, the system will not offer
you any letters to choose from. Select a
destination that is as close as possible
to the original
>the system stops furnishing directions
on which way to turn as you approach
intersections?
You are driving in an area that has not
yet been completely recorded on the
navigation CD/DVD. Instead of an arrow
indicating a turn, you will see an arrow
which indicates the general direction of your planned route. Or you have left the
recommended route and the system
requires a few seconds to calculate a
new recommended route
>the battery has been disconnected?
It will take approx. 15 minutes for the
system to resume operation.
Page 140 of 220
Radio
138
Satellite radio*
You can receive up to 100 different chan-
nels with high tone quality.
You can listen to one of these channels free
of charge at any time to obtain a first
impression. The channel is marked
with .
To listen to additional channels of your
choice, you must have these channels acti-
vated.
You may experience signal drops and
muting events related to this new
technology.<
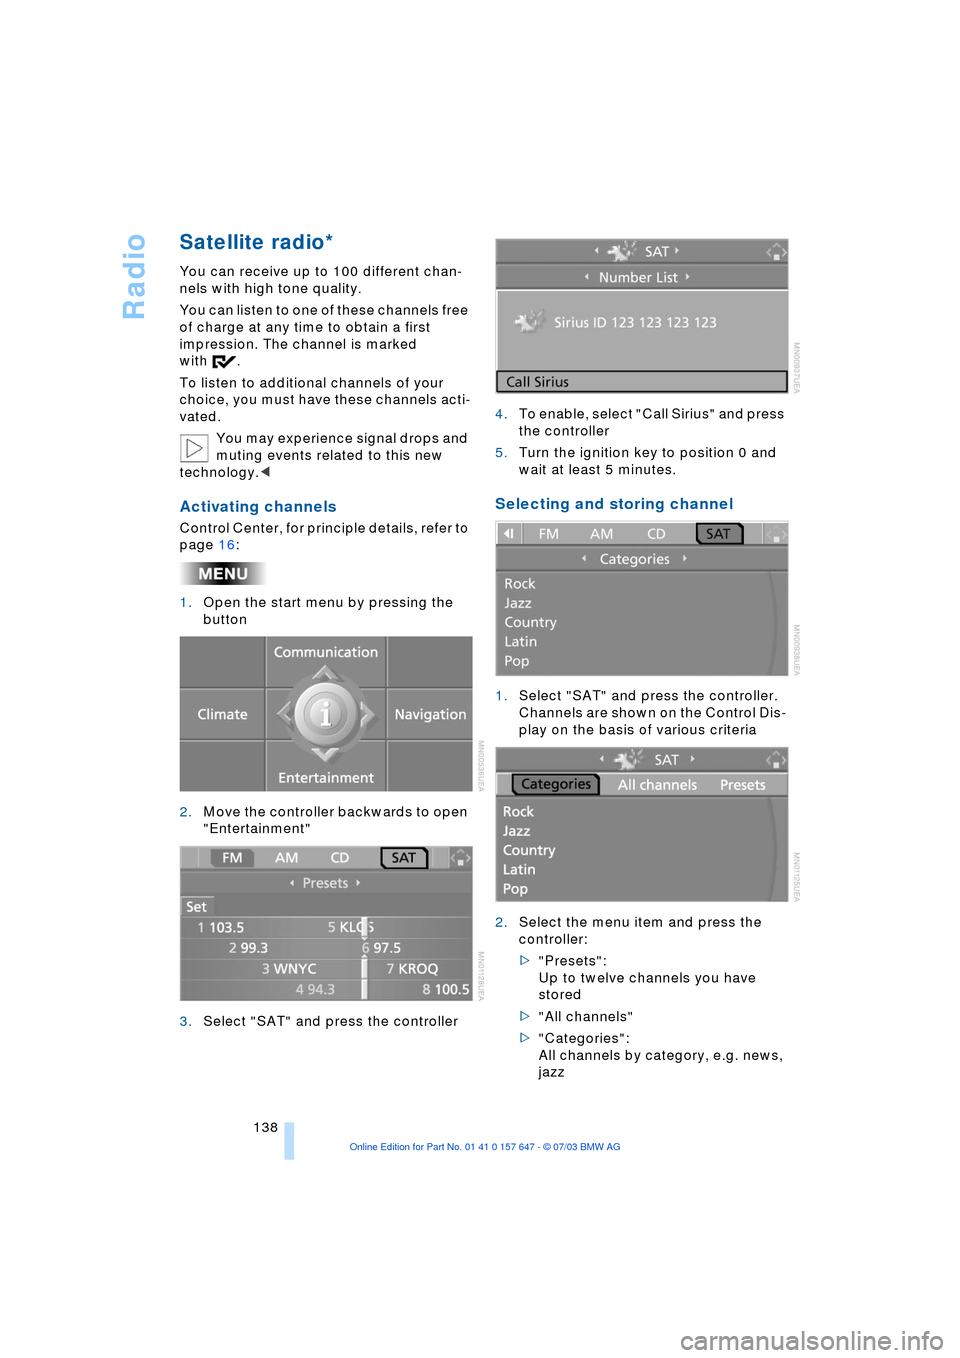
Activating channels
Control Center, for principle details, refer to
page 16:
1.Open the start menu by pressing the
button
2.Move the controller backwards to open
"Entertainment"
3.Select "SAT" and press the controller4.To enable, select "Call Sirius" and press
the controller
5.Turn the ignition key to position 0 and
wait at least 5 minutes.
Selecting and storing channel
1.Select "SAT" and press the controller.
Channels are shown on the Control Dis-
play on the basis of various criteria
2.Select the menu item and press the
controller:
>"Presets":
Up to twelve channels you have
stored
>"All channels"
>"Categories":
All channels by category, e.g. news,
jazz
Page 187 of 220
Mobility
185Reference
At a glance
Controls
Driving tips
Communications
Navigation
Entertainment
For checking and adjusting headlamp
aim, please contact your BMW cen-
ter.<
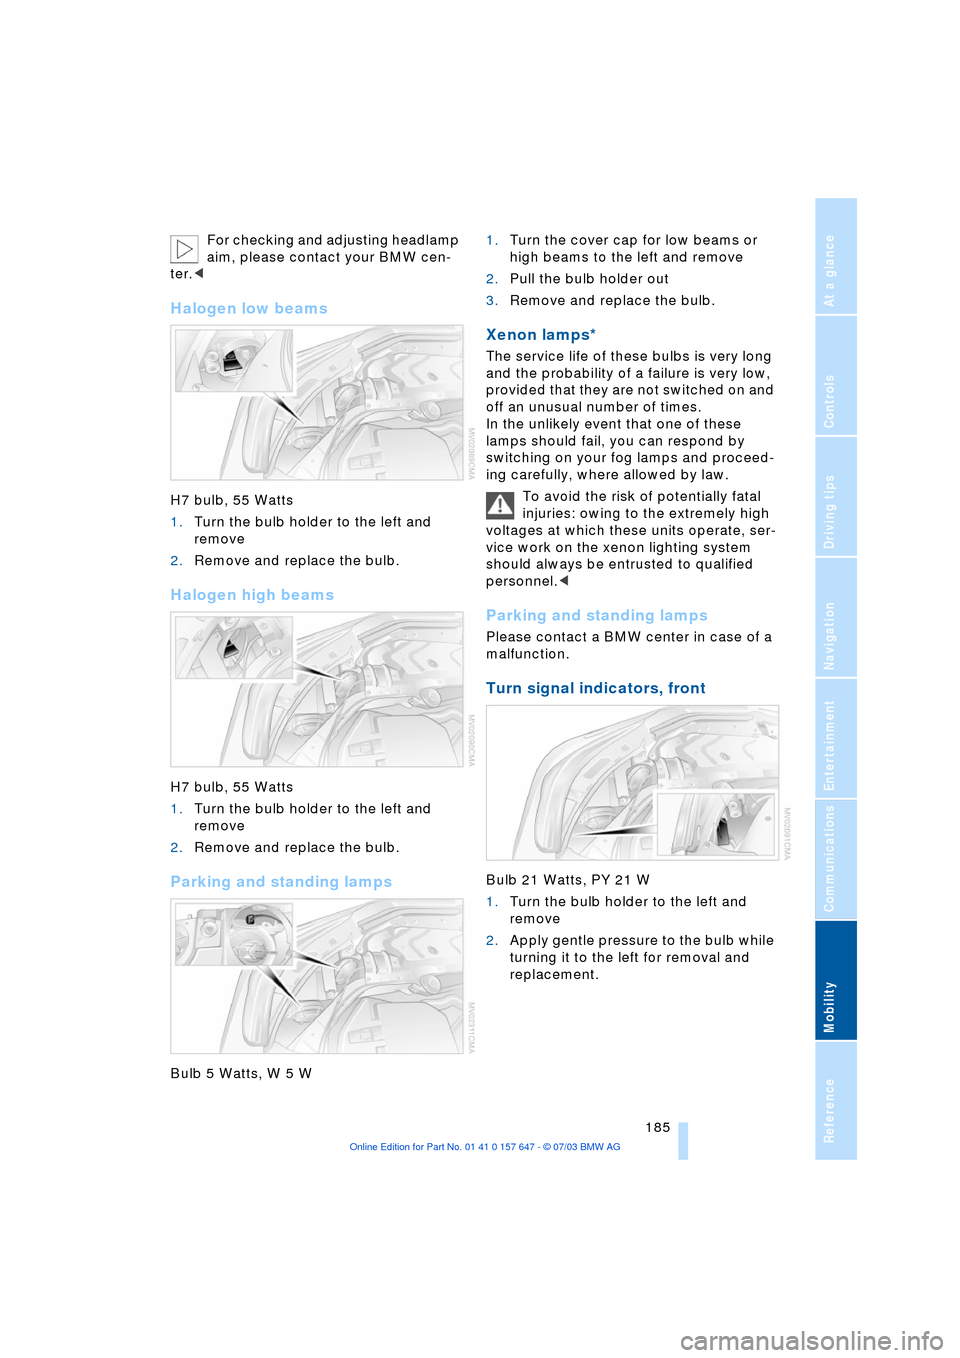
Halogen low beams
H7 bulb, 55 Watts
1.Turn the bulb holder to the left and
remove
2.Remove and replace the bulb.
Halogen high beams
H7 bulb, 55 Watts
1.Turn the bulb holder to the left and
remove
2.Remove and replace the bulb.
Parking and standing lamps
Bulb 5 Watts, W 5 W 1.Turn the cover cap for low beams or
high beams to the left and remove
2.Pull the bulb holder out
3.Remove and replace the bulb.
Xenon lamps*
The service life of these bulbs is very long
and the probability of a failure is very low,
provided that they are not switched on and
off an unusual number of times.
In the unlikely event that one of these
lamps should fail, you can respond by
switching on your fog lamps and proceed-
ing carefully, where allowed by law.
To avoid the risk of potentially fatal
injuries: owing to the extremely high
voltages at which these units operate, ser-
vice work on the xenon lighting system
should always be entrusted to qualified
personnel.<
Parking and standing lamps
Please contact a BMW center in case of a
malfunction.
Turn signal indicators, front
Bulb 21 Watts, PY 21 W
1.Turn the bulb holder to the left and
remove
2.Apply gentle pressure to the bulb while
turning it to the left for removal and
replacement.
Page 188 of 220
Replacing components
186
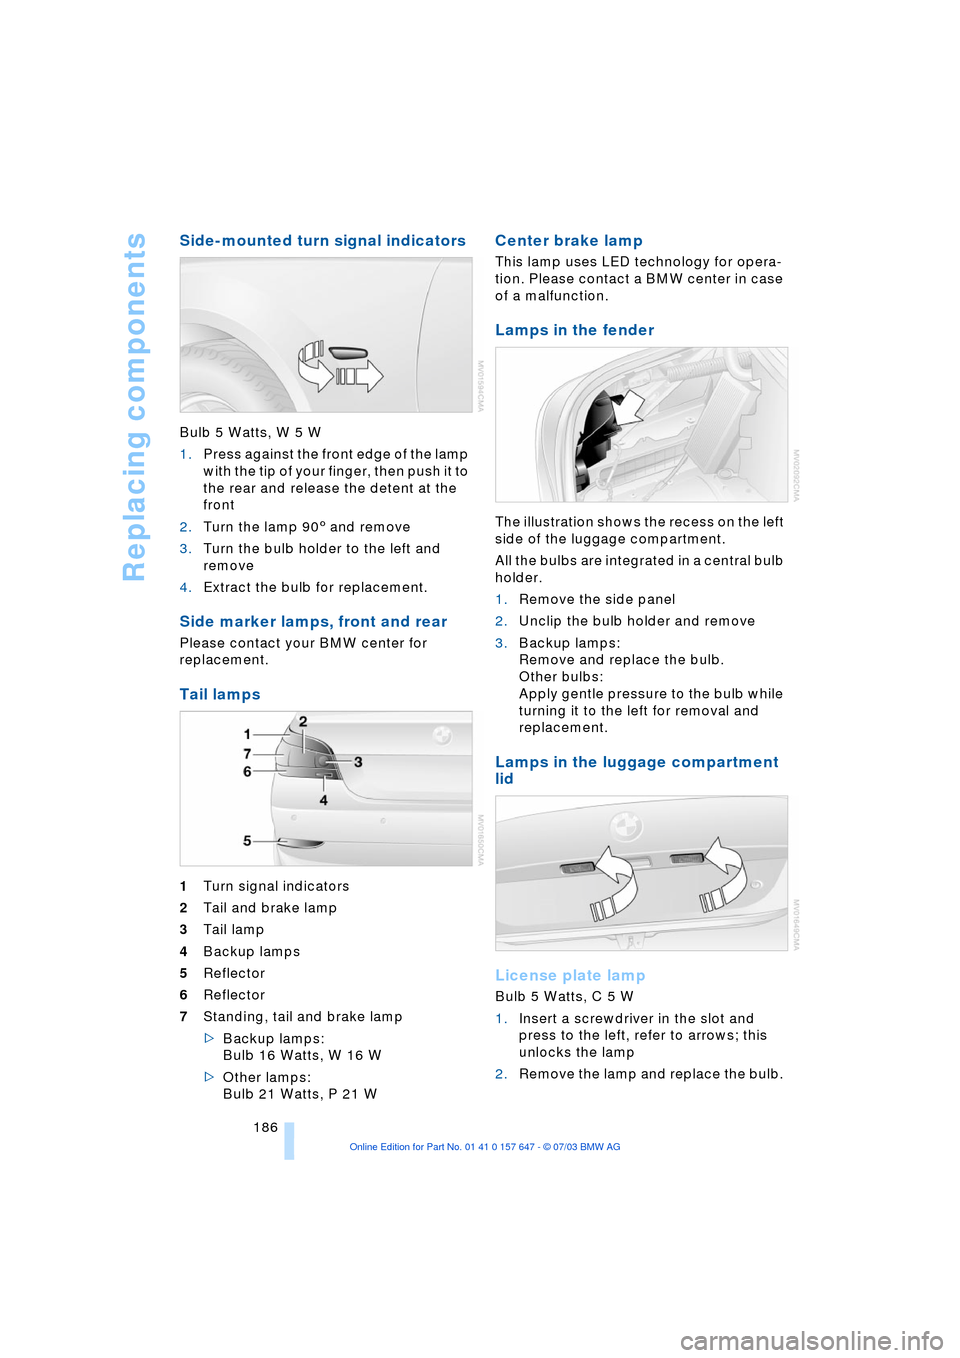
Side-mounted turn signal indicators
Bulb 5 Watts, W 5 W
1.Press against the front edge of the lamp
with the tip of your finger, then push it to
the rear and release the detent at the
front
2.Turn the lamp 903 and remove
3.Turn the bulb holder to the left and
remove
4.Extract the bulb for replacement.
Side marker lamps, front and rear
Please contact your BMW center for
replacement.
Tail lamps
1Turn signal indicators
2Tail and brake lamp
3Tail lamp
4Backup lamps
5Reflector
6Reflector
7Standing, tail and brake lamp
>Backup lamps:
Bulb 16 Watts, W 16 W
>Other lamps:
Bulb 21 Watts, P 21 W
Center brake lamp
This lamp uses LED technology for opera-
tion. Please contact a BMW center in case
of a malfunction.
Lamps in the fender
The illustration shows the recess on the left
side of the luggage compartment.
All the bulbs are integrated in a central bulb
holder.
1.Remove the side panel
2.Unclip the bulb holder and remove
3.Backup lamps:
Remove and replace the bulb.
Other bulbs:
Apply gentle pressure to the bulb while
turning it to the left for removal and
replacement.
Lamps in the luggage compartment
lid
License plate lamp
Bulb 5 Watts, C 5 W
1.Insert a screwdriver in the slot and
press to the left, refer to arrows; this
unlocks the lamp
2.Remove the lamp and replace the bulb.