2004 BMW 525I SEDAN fuel
[x] Cancel search: fuelPage 57 of 220
Controls
55Reference
At a glance
Driving tips
Communications
Navigation
Entertainment
Mobility
Changing the selector-lever
positions
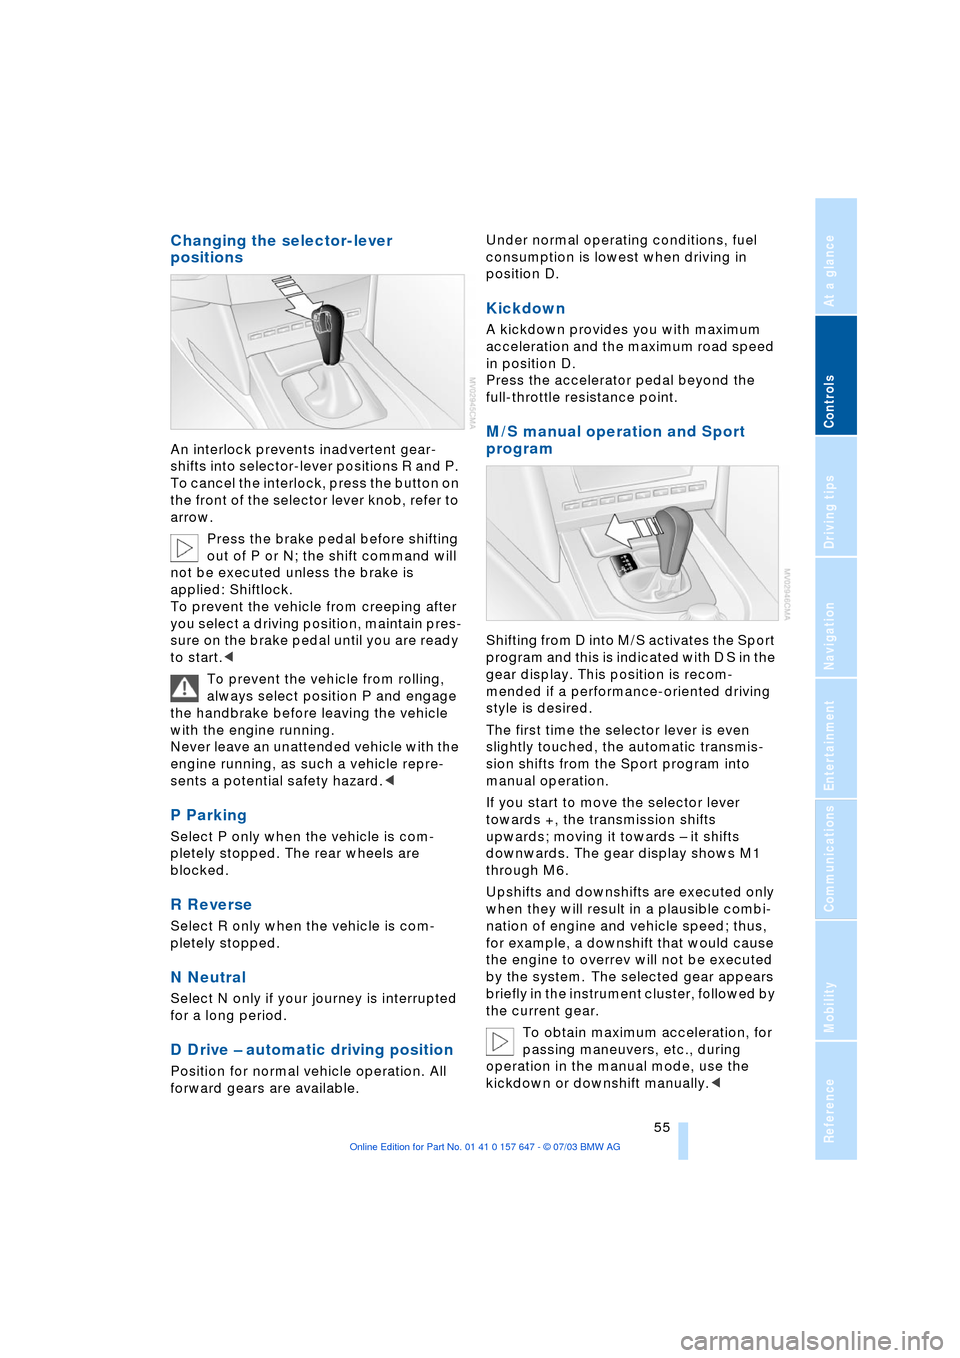
An interlock prevents inadvertent gear-
shifts into selector-lever positions R and P.
To cancel the interlock, press the button on
the front of the selector lever knob, refer to
arrow.
Press the brake pedal before shifting
out of P or N; the shift command will
not be executed unless the brake is
applied: Shiftlock.
To prevent the vehicle from creeping after
you select a driving position, maintain pres-
sure on the brake pedal until you are ready
to start.<
To prevent the vehicle from rolling,
always select position P and engage
the handbrake before leaving the vehicle
with the engine running.
Never leave an unattended vehicle with the
engine running, as such a vehicle repre-
sents a potential safety hazard.<
P Parking
Select P only when the vehicle is com-
pletely stopped. The rear wheels are
blocked.
R Reverse
Select R only when the vehicle is com-
pletely stopped.
N Neutral
Select N only if your journey is interrupted
for a long period.
D Drive Ð automatic driving position
Position for normal vehicle operation. All
forward gears are available.Under normal operating conditions, fuel
consumption is lowest when driving in
position D.
Kickdown
A kickdown provides you with maximum
acceleration and the maximum road speed
in position D.
Press the accelerator pedal beyond the
full-throttle resistance point.
M/S manual operation and Sport
program
Shifting from D into M/S activates the Sport
program and this is indicated with D S in the
gear display. This position is recom-
mended if a performance-oriented driving
style is desired.
The first time the selector lever is even
slightly touched, the automatic transmis-
sion shifts from the Sport program into
manual operation.
If you start to move the selector lever
towards +, the transmission shifts
upwards; moving it towards Ð it shifts
downwards. The gear display shows M1
through M6.
Upshifts and downshifts are executed only
when they will result in a plausible combi-
nation of engine and vehicle speed; thus,
for example, a downshift that would cause
the engine to overrev will not be executed
by the system. The selected gear appears
briefly in the instrument cluster, followed by
the current gear.
To obtain maximum acceleration, for
passing maneuvers, etc., during
operation in the manual mode, use the
kickdown or downshift manually.<
Page 67 of 220
Controls
65Reference
At a glance
Driving tips
Communications
Navigation
Entertainment
Mobility
Everything under control
Odometer, outside
temperature display, clock
When the ignition is switched off you can
briefly activate the time, outside tempera-
ture and odometer displays by pressing the
button at the lower left of the instrument
cluster.
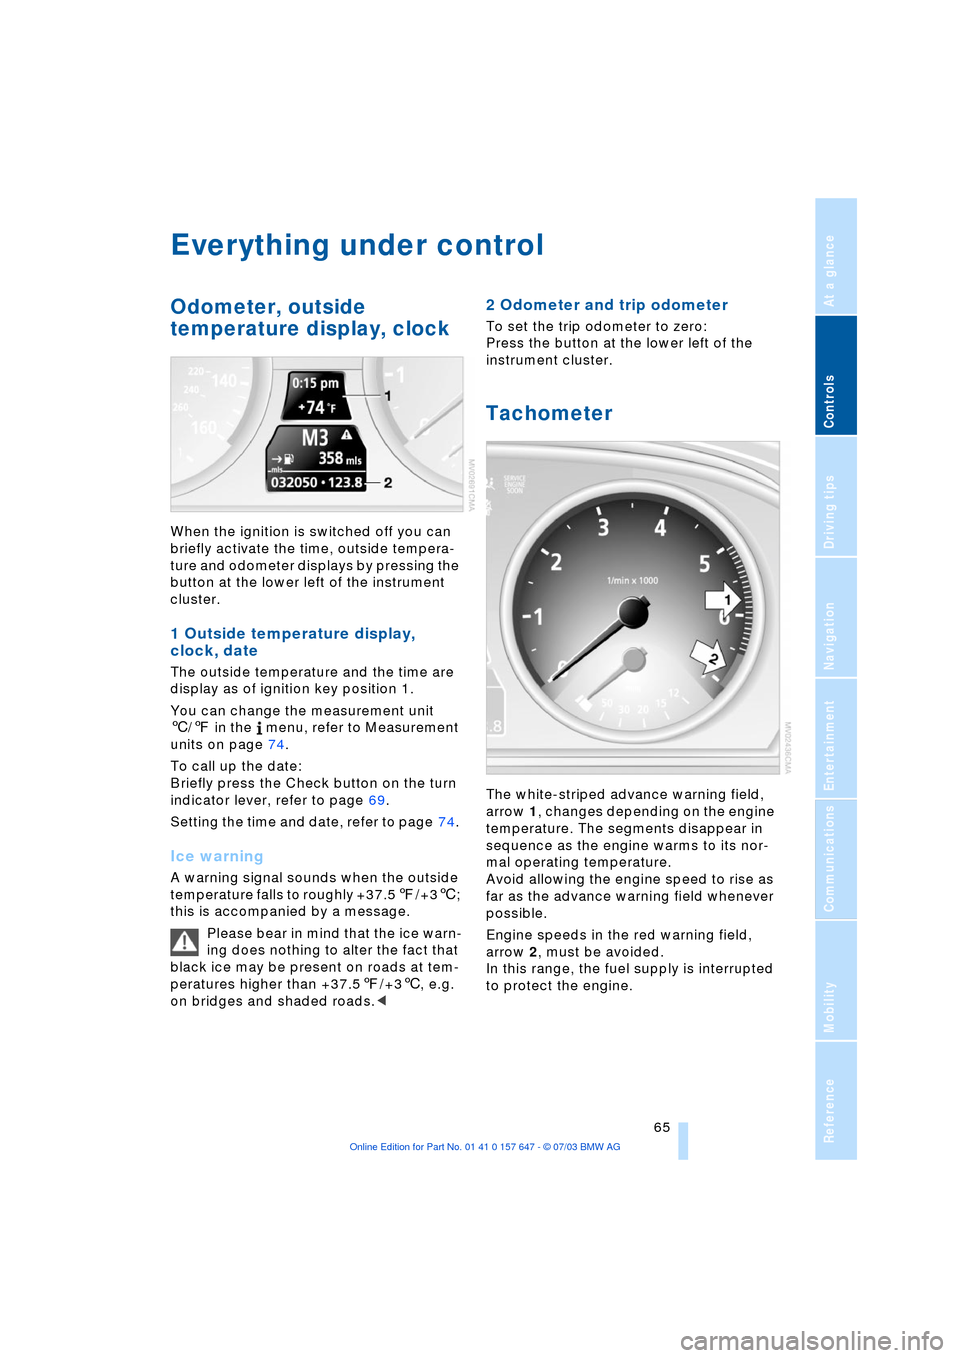
1 Outside temperature display,
clock, date
The outside temperature and the time are
display as of ignition key position 1.
You can change the measurement unit
6/7 in the menu, refer to Measurement
units on page 74.
To call up the date:
Briefly press the Check button on the turn
indicator lever, refer to page 69.
Setting the time and date, refer to page 74.
Ice warning
A warning signal sounds when the outside
temperature falls to roughly +37.57/+36;
this is accompanied by a message.
Please bear in mind that the ice warn-
ing does nothing to alter the fact that
black ice may be present on roads at tem-
peratures higher than +37.57/+36, e.g.
on bridges and shaded roads.<
2 Odometer and trip odometer
To set the trip odometer to zero:
Press the button at the lower left of the
instrument cluster.
Tachometer
The white-striped advance warning field,
arrow 1, changes depending on the engine
temperature. The segments disappear in
sequence as the engine warms to its nor-
mal operating temperature.
Avoid allowing the engine speed to rise as
far as the advance warning field whenever
possible.
Engine speeds in the red warning field,
arrow 2, must be avoided.
In this range, the fuel supply is interrupted
to protect the engine.
Page 68 of 220
Everything under control
66
Energy Control/Current fuel
consumption
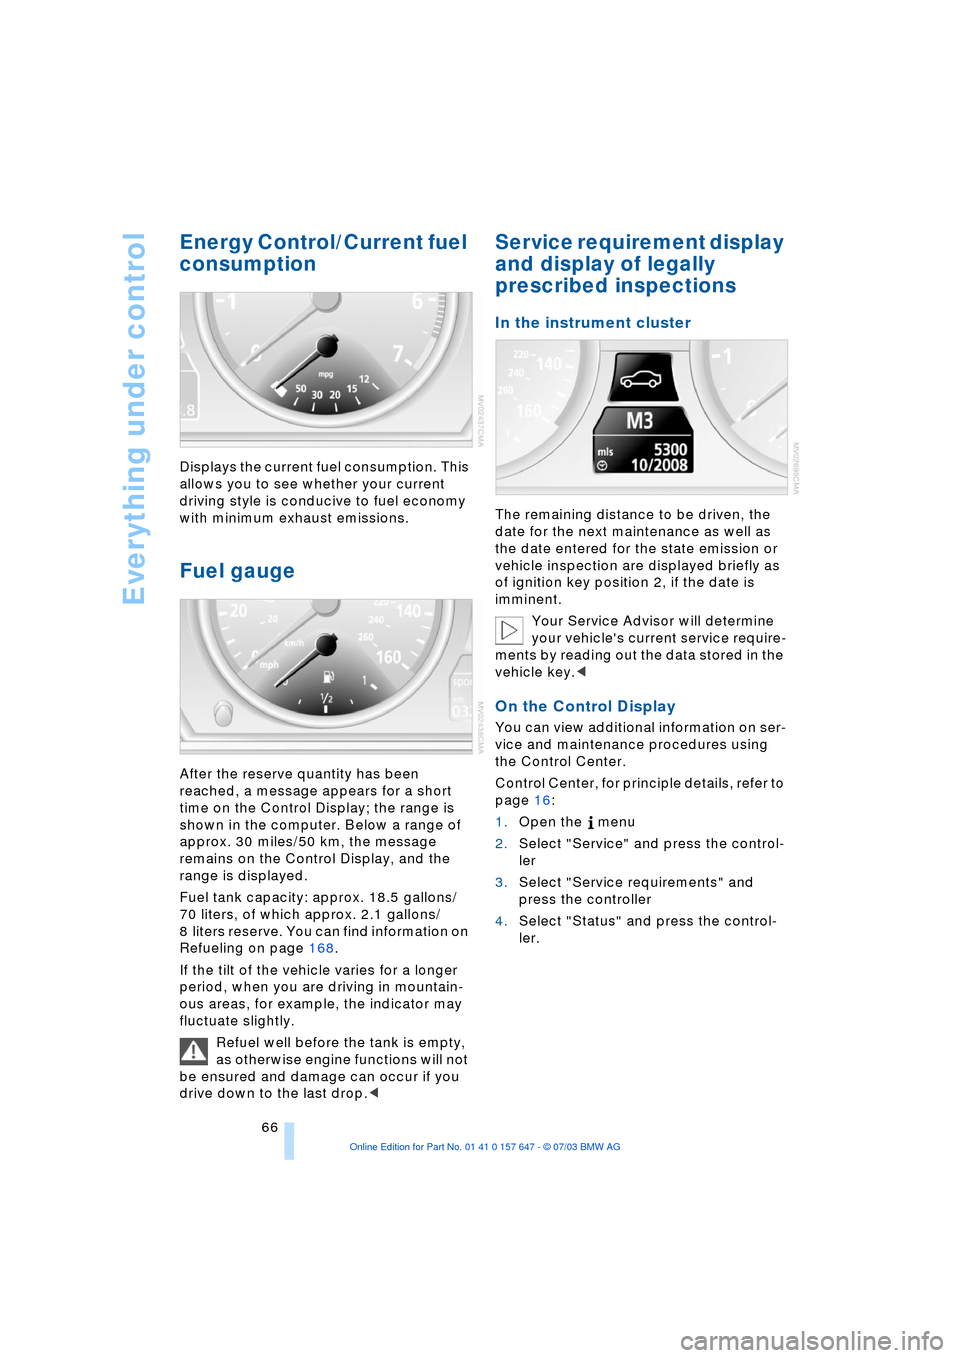
Displays the current fuel consumption. This
allows you to see whether your current
driving style is conducive to fuel economy
with minimum exhaust emissions.
Fuel gauge
After the reserve quantity has been
reached, a message appears for a short
time on the Control Display; the range is
shown in the computer. Below a range of
approx. 30 miles/50 km, the message
remains on the Control Display, and the
range is displayed.
Fuel tank capacity: approx. 18.5 gallons/
70 liters, of which approx. 2.1 gallons/
8 liters reserve. You can find information on
Refueling on page 168.
If the tilt of the vehicle varies for a longer
period, when you are driving in mountain-
ous areas, for example, the indicator may
fluctuate slightly.
Refuel well before the tank is empty,
as otherwise engine functions will not
be ensured and damage can occur if you
drive down to the last drop.<
Service requirement display
and display of legally
prescribed inspections
In the instrument cluster
The remaining distance to be driven, the
date for the next maintenance as well as
the date entered for the state emission or
vehicle inspection are displayed briefly as
of ignition key position 2, if the date is
imminent.
Your Service Advisor will determine
your vehicle's current service require-
ments by reading out the data stored in the
vehicle key.<
On the Control Display
You can view additional information on ser-
vice and maintenance procedures using
the Control Center.
Control Center, for principle details, refer to
page 16:
1.Open the menu
2.Select "Service" and press the control-
ler
3.Select "Service requirements" and
press the controller
4.Select "Status" and press the control-
ler.
Page 72 of 220
Everything under control
70
Computer
To select functions:
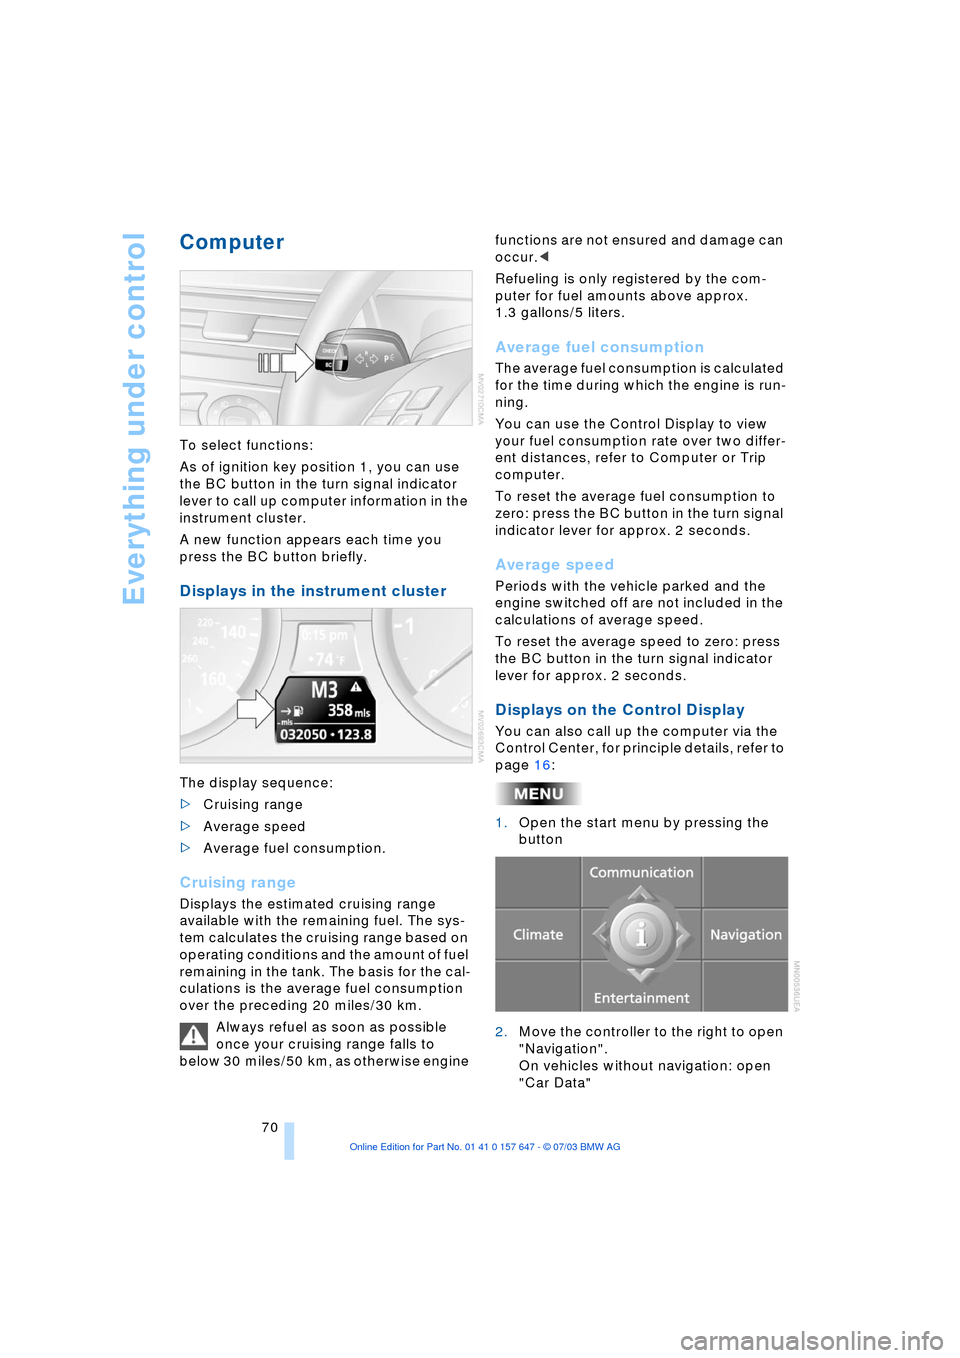
As of ignition key position 1, you can use
the BC button in the turn signal indicator
lever to call up computer information in the
instrument cluster.
A new function appears each time you
press the BC button briefly.
Displays in the instrument cluster
The display sequence:
>Cruising range
>Average speed
>Average fuel consumption.
Cruising range
Displays the estimated cruising range
available with the remaining fuel. The sys-
tem calculates the cruising range based on
operating conditions and the amount of fuel
remaining in the tank. The basis for the cal-
culations is the average fuel consumption
over the preceding 20 miles/30 km.
Always refuel as soon as possible
once your cruising range falls to
below 30 miles/50 km, as otherwise engine functions are not ensured and damage can
occur.<
Refueling is only registered by the com-
puter for fuel amounts above approx.
1.3 gallons/5 liters.
Average fuel consumption
The average fuel consumption is calculated
for the time during which the engine is run-
ning.
You can use the Control Display to view
your fuel consumption rate over two differ-
ent distances, refer to Computer or Trip
computer.
To reset the average fuel consumption to
zero: press the BC button in the turn signal
indicator lever for approx. 2 seconds.
Average speed
Periods with the vehicle parked and the
engine switched off are not included in the
calculations of average speed.
To reset the average speed to zero: press
the BC button in the turn signal indicator
lever for approx. 2 seconds.
Displays on the Control Display
You can also call up the computer via the
Control Center, for principle details, refer to
page 16:
1.Open the start menu by pressing the
button
2.Move the controller to the right to open
"Navigation".
On vehicles without navigation: open
"Car Data"
Page 73 of 220
Controls
71Reference
At a glance
Driving tips
Communications
Navigation
Entertainment
Mobility
3.Select "Car Data" and press the con-
troller.
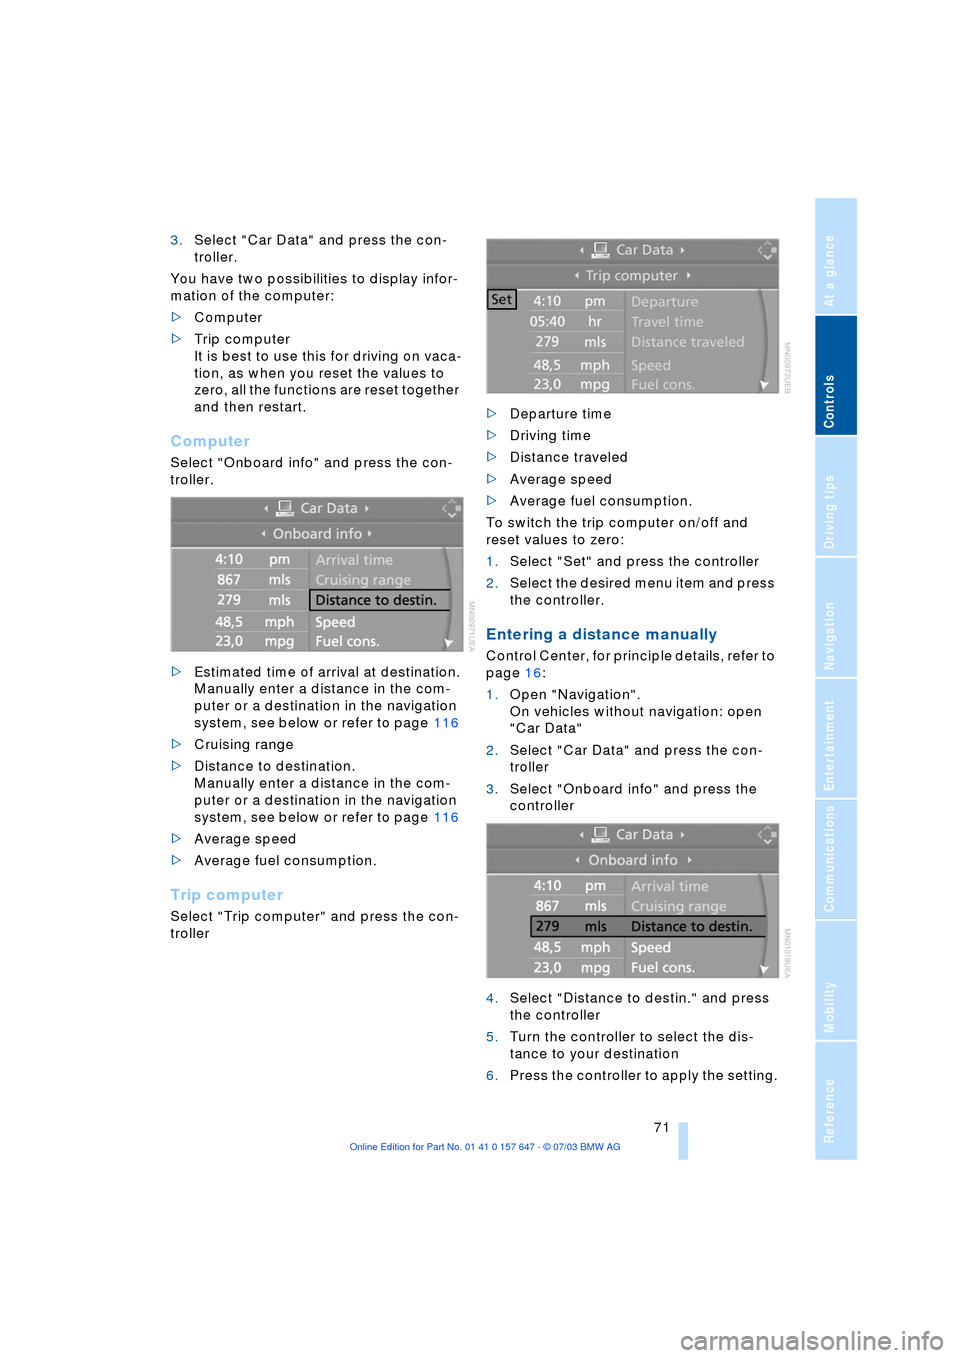
You have two possibilities to display infor-
mation of the computer:
>Computer
>Trip computer
It is best to use this for driving on vaca-
tion, as when you reset the values to
zero, all the functions are reset together
and then restart.
Computer
Select "Onboard info" and press the con-
troller.
>Estimated time of arrival at destination.
Manually enter a distance in the com-
puter or a destination in the navigation
system, see below or refer to page 116
>Cruising range
>Distance to destination.
Manually enter a distance in the com-
puter or a destination in the navigation
system, see below or refer to page 116
>Average speed
>Average fuel consumption.
Trip computer
Select "Trip computer" and press the con-
troller>Departure time
>Driving time
>Distance traveled
>Average speed
>Average fuel consumption.
To switch the trip computer on/off and
reset values to zero:
1.Select "Set" and press the controller
2.Select the desired menu item and press
the controller.
Entering a distance manually
Control Center, for principle details, refer to
page 16:
1.Open "Navigation".
On vehicles without navigation: open
"Car Data"
2.Select "Car Data" and press the con-
troller
3.Select "Onboard info" and press the
controller
4.Select "Distance to destin." and press
the controller
5.Turn the controller to select the dis-
tance to your destination
6.Press the controller to apply the setting.
Page 152 of 220
Telephoning
150
Telephoning
Safety notice
For your own safety
A car phone makes life more convenient in
many ways, and can even save lives in an
emergency. While you should consult your
portable phone's separate Owner's Manual
for a detailed description of safety precau-
tions and information, we request that you
direct your particular attention to the fol-
lowing:
Adjustments
To avoid posing a danger to yourself
and other road users, never adjust the
system settings unless your vehicle is com-
pletely stationary.<
Using the phone in your vehicle
Using a portable phone to make and
receive calls while driving is now ille-
gal in virtually every country in the world.
Always use your hands-free unit, or stop
your vehicle in an area where you will not
pose a safety hazard to other road users.<
Vehicles and portable phones
Do not use your phone from within a
garage, or near an open hood. The air
in these areas could contain fuel vapors,
and the portable phone might generate
sparks that could result in burns.
This same precaution applies to open lug-
gage compartment lids on vehicles
equipped for operation using natural gas or
hydrogen, and to all vehicles with luggage
compartment-mounted batteries.<
Antenna
When using the phone, ensure that all
persons in the area are at least 20 in/
50 cm from the antenna. Never use your
BMW portable phone if the antenna is dam-
aged. Contact between your skin and a
damaged antenna can result in minor burns.
If the antenna is damaged, have it replaced
immediately.<
Special environmental conditions
Always switch off your BMW portable
phone in areas where blasting work is
being conducted with explosives. The
phone signals could potentially act as a
high-frequency transmitter and set off
explosions.
Always switch off your BMW portable
phone in areas where an increased explo-
sion danger is present. This category
includes filling stations along with fuel and
chemical storage depots, etc., and all
areas in which the air can contain fuel,
chemicals or metal particles. Under these
conditions, your BMW portable phone
could conceivably generate sparks that
could lead to a fire or explosion. Always
observe all legal regulations governing the
use of portable phones in the vicinity of fill-
ing stations, chemical factories and other
areas where an explosion potential exists.
Never use the BMW portable phone in air-
craft; do not use this portable phone in hos-
pitals, care centers or at other locations
where medical equipment may be in oper-
ation, such as accident sites, etc.
Your service provider can furnish you with
more detailed information on legal regula-
tions governing the use of your phone.<
Medical equipment
Portable phones can generate inter-
ference capable of preventing hearing
aids and cardiac pacemakers from operat-
ing correctly. If you or any occupant of the
vehicle will be using such equipment, con-
sult a physician or the manufacturer of the
equipment to determine whether it is ade-
quately shielded against high-frequency
energy.<
Page 169 of 220
Mobility
This section helps you maintain your
mobility by supplying important
information on vital topics including
fuels and lubricants, wheels and tires,
service, maintenance and how to deal
with any problems that may occur.
Page 170 of 220
Refueling
168
Refueling
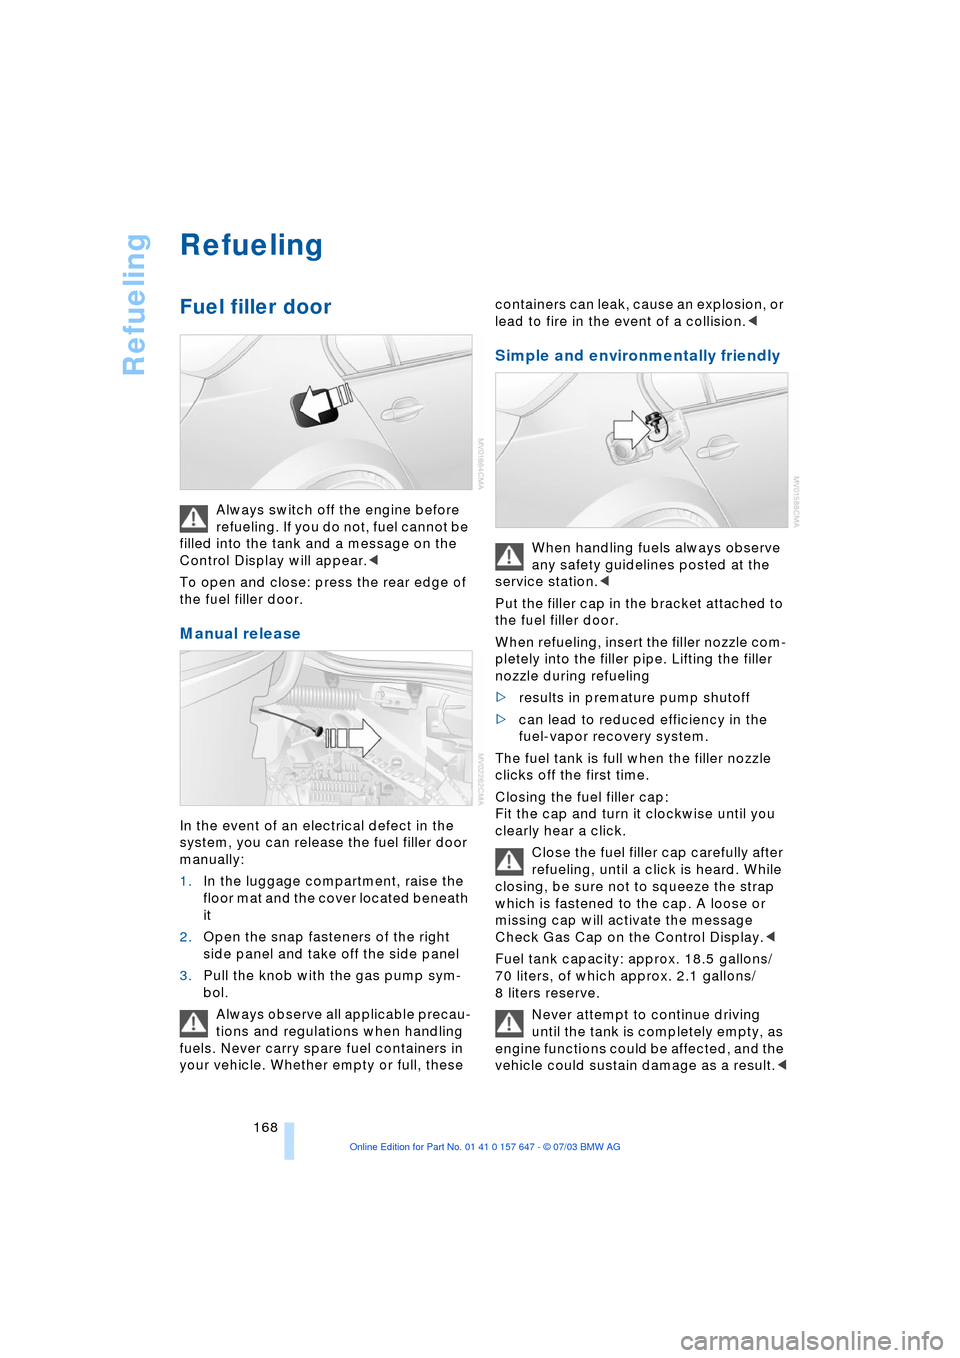
Fuel filler door
Always switch off the engine before
refueling. If you do not, fuel cannot be
filled into the tank and a message on the
Control Display will appear.<
To open and close: press the rear edge of
the fuel filler door.
Manual release
In the event of an electrical defect in the
system, you can release the fuel filler door
manually:
1.In the luggage compartment, raise the
floor mat and the cover located beneath
it
2.Open the snap fasteners of the right
side panel and take off the side panel
3.Pull the knob with the gas pump sym-
bol.
Always observe all applicable precau-
tions and regulations when handling
fuels. Never carry spare fuel containers in
your vehicle. Whether empty or full, these containers can leak, cause an explosion, or
lead to fire in the event of a collision.<
Simple and environmentally friendly
When handling fuels always observe
any safety guidelines posted at the
service station.<
Put the filler cap in the bracket attached to
the fuel filler door.
When refueling, insert the filler nozzle com-
pletely into the filler pipe. Lifting the filler
nozzle during refueling
>results in premature pump shutoff
>can lead to reduced efficiency in the
fuel-vapor recovery system.
The fuel tank is full when the filler nozzle
clicks off the first time.
Closing the fuel filler cap:
Fit the cap and turn it clockwise until you
clearly hear a click.
Close the fuel filler cap carefully after
refueling, until a click is heard. While
closing, be sure not to squeeze the strap
which is fastened to the cap. A loose or
missing cap will activate the message
Check Gas Cap on the Control Display.<
Fuel tank capacity: approx. 18.5 gallons/
70 liters, of which approx. 2.1 gallons/
8 liters reserve.
Never attempt to continue driving
until the tank is completely empty, as
engine functions could be affected, and the
vehicle could sustain damage as a result.<