2004 BMW 525I SEDAN change wheel
[x] Cancel search: change wheelPage 132 of 220
On/off, tone
130
On/off, tone
Depending on the equipment options you
have chosen, the following audio sources
are available:
>Radio Business
>CD player
>CD changer.
The following section summarizes the com-
mon controls and setting options for the
audio sources. Thereafter, the individual
audio sources are described in detail.
Controls
The audio sources can be operated using:
>The center console
>The Control Center
>Buttons on the steering wheel, refer to
page 11.
Operation using the center console
The layout of the buttons can vary depend-
ing on your vehicle's equipment.
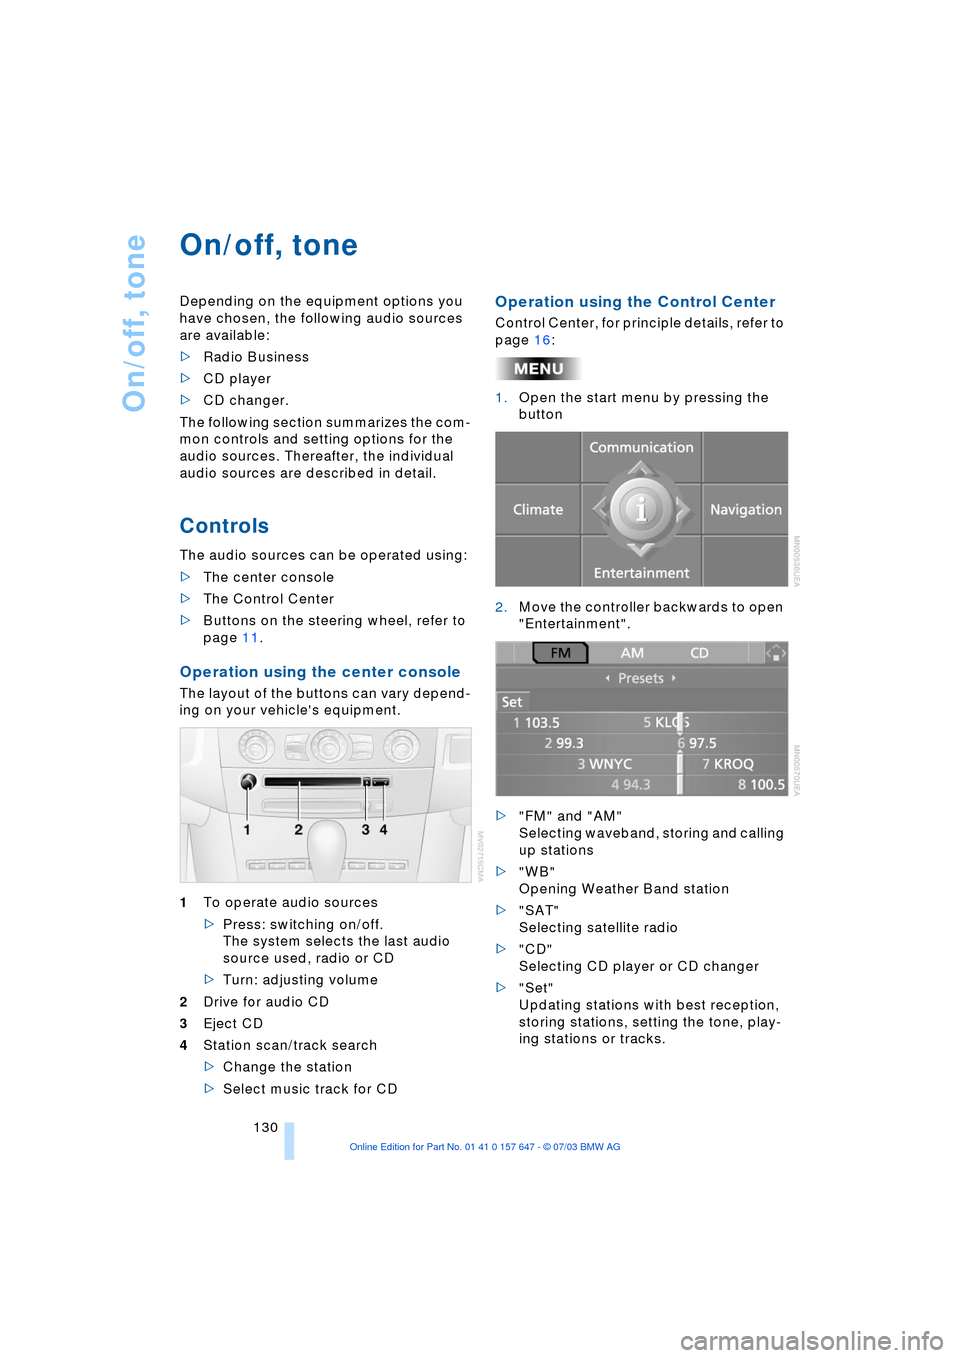
1To operate audio sources
>Press: switching on/off.
The system selects the last audio
source used, radio or CD
>Turn: adjusting volume
2Drive for audio CD
3Eject CD
4Station scan/track search
>Change the station
>Select music track for CD
Operation using the Control Center
Control Center, for principle details, refer to
page 16:
1.Open the start menu by pressing the
button
2.Move the controller backwards to open
"Entertainment".
>"FM" and "AM"
Selecting waveband, storing and calling
up stations
>"WB"
Opening Weather Band station
>"SAT"
Selecting satellite radio
>"CD"
Selecting CD player or CD changer
>"Set"
Updating stations with best reception,
storing stations, setting the tone, play-
ing stations or tracks.
Page 176 of 220

Wheels and tires
174 even when only small amounts of water are
present on the road surface.
As winter tires display a noticeable loss in
their ability to cope with cold-weather driv-
ing conditions once the tread wears to
below 0.16 in/4 mm, to ensure continued
safety you should always have such tires
replaced.
Wear indicators at the tread-groove base,
refer to arrow, are distributed over the tire's
circumference and are marked on the side
of the tire with TWI Ð Tread Wear Indicator.
These indicators signal at a tread depth of
0.063 in/1.6 mm that the legal wear limit
has been reached.
Tire damage
Unusual vibrations encountered dur-
ing normal vehicle operation can indi-
cate tire failure or some other vehicle
defect. This can, for example, be caused by
driving over curbs. These kinds of prob-
lems may also be signaled by other
changes in vehicle response, such as a
strong tendency to pull to the left or right.
Should this occur, respond by immediately
reducing your speed. Carefully proceed Ð
or have your vehicle towed Ð to the nearest
BMW center or tire dealer to have the
wheels or tires inspected. Tire damage,
extending to sudden and complete loss of
pressure in extreme cases, can pose a
potentially lethal safety hazard for the vehi-
cle's occupants and other road users
alike.<
Replacing wheels/tires
Unprofessional attempts by laymen to
service tires can lead to damage and
accidents. Have this work performed by
skilled professionals only. The technicians
at your BMW center will be glad to assist
you with the required professional knowl-
edge and specialized equipment.<
The correct combination of wheels and
tires is another vital factor in ensuring reli-
able operation of various vehicle systems
such as ABS and DSC.
Have the wheel and tire assemblies bal-
anced every time either a wheel or a tire is
replaced.
BMW does not recommend the use of
retreaded tires, as otherwise driving
safety may be reduced. Possible variations
in the design and the age Ð which could be
substantial Ð of the carcasses can lead to
unusually rapid wear.<
The right wheels and tires
BMW recommends that you use only
wheel and tire combinations that
BMW has tested and approved for your
particular vehicle. Variations in factors such
as manufacturing tolerances mean that
even wheels and tires with identical official
size ratings could actually have different
dimensions than the approved units Ð these
differences could lead to body contact, and
with it the risk of severe accidents. If non-
approved wheels and tires are used, BMW
cannot evaluate their suitability, and there-
fore cannot be held liable for driving
safety.<
To maintain good handling and vehicle
response, use only tires of a single tread
configuration from a single manufacturer.
After a flat tire, always remember to have
the specified wheel and tire combination
remounted on the vehicle as soon as pos-
sible.
Recommended tire brands
BMW tests certain tire brands for each tire
size, classifies them as road-safe and
Page 178 of 220
Wheels and tires
176 can estimate the possible distance for con-
tinued driving on the basis of the following
guide values:
>With low load:
1 to 2 persons without luggage:
Approx. 155 miles/250 km
>With medium load:
2 persons, luggage compartment full, or
4 persons without luggage:
Approx. 90 miles/150 km
>With full load:
4 persons or more, luggage compart-
ment full:
Approx. 30 miles/50 km.
Drive reservedly and do not exceed a
speed of 50 mph/80 km/h. With infla-
tion pressure loss, the driving characteris-
tics change, for example reduced track sta-
bility on braking, extended braking
distance, and altered self-steering charac-
teristics.
For safety reasons, BMW recommends that
you do not have damaged run-flat tires
repaired and that you consult your BMW
center in this case.<
Snow chains*
BMW only tests certain snow chains, clas-
sifies them as road-safe and approves
them. Consult your BMW center for more
information. BMW recommends only using
these approved, narrow-link snow chains.
These snow chains are approved exclu-
sively for use on summer or winter tires in
pairs on the rear wheels.
Observe the manufacturer's instructions
when installing snow chains.
Do not exceed a vehicle speed of 30 mph/
50 km/h with the chains mounted.
After mounting snow chains, do not
activate the Flat Tire Monitor.
When you are driving with snow chains, it
can be beneficial to switch off DSC briefly,
refer to page 78.<
Page 189 of 220
Mobility
187Reference
At a glance
Controls
Driving tips
Communications
Navigation
Entertainment
Changing a wheel
Safety measures in the event of a
breakdown or wheel change:
Park the vehicle as far away as possible
from moving traffic and on firm ground.
Switch on the hazard warning flashers.
Lock the steering wheel in straight-ahead
setting of the wheels. Apply the handbrake
and engage first gear, reverse gear or
selector lever to position P.
Have all vehicle occupants get out of the
vehicle and ensure that they remain outside
the immediate area in a safe place, such as
behind a guardrail.
If a warning triangle or portable hazard
warning lamp is required, set it up on the
roadside at an appropriate distance from
the rear of the vehicle.
Comply with all safety guidelines and regu-
lations.
Change the wheel only on a level, firm sur-
face which is not slippery.
The vehicle or the jack could slip to the side
if you attempt to raise the vehicle on a soft
or slippery surface such as snow, ice, tiles,
etc.
Position the jack on a firm support surface.
Do not use a wooden block or similar
object as a support base for the jack, as
this would prevent it from extending to its
full support height and reduce its load-car-
rying capacity.
To avoid serious or fatal injury: never lie
under the vehicle, and never start the
engine while it is supported by the jack.<
What you will need
To avoid rattling noises later on, note the
positions of the tools before removing
them, then return them to their initial posi-
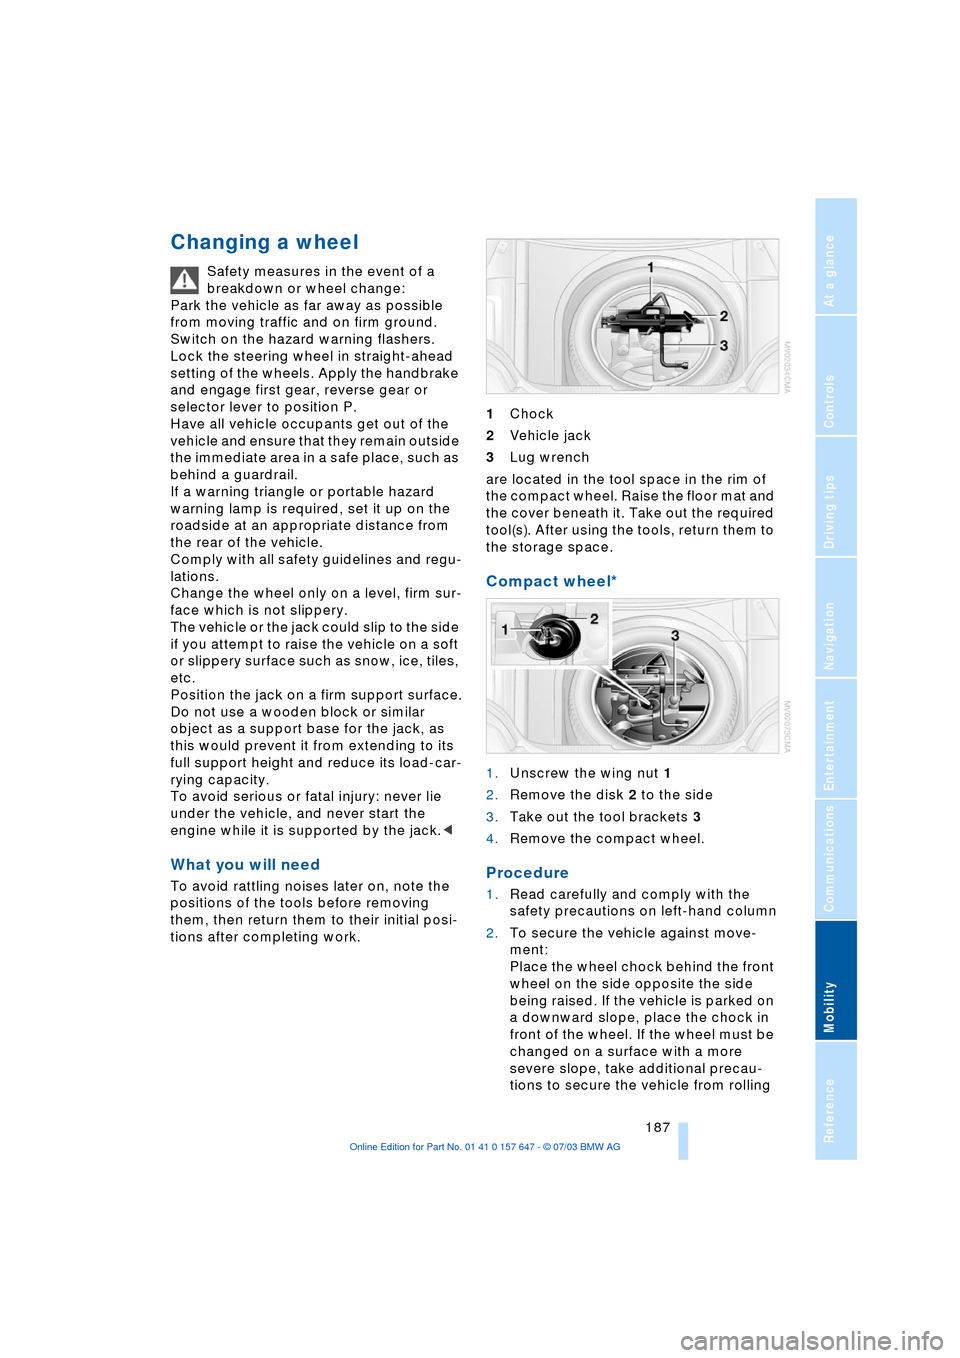
tions after completing work.1Chock
2Vehicle jack
3Lug wrench
are located in the tool space in the rim of
the compact wheel. Raise the floor mat and
the cover beneath it. Take out the required
tool(s). After using the tools, return them to
the storage space.
Compact wheel*
1.Unscrew the wing nut 1
2.Remove the disk 2 to the side
3.Take out the tool brackets 3
4.Remove the compact wheel.
Procedure
1.Read carefully and comply with the
safety precautions on left-hand column
2.To secure the vehicle against move-
ment:
Place the wheel chock behind the front
wheel on the side opposite the side
being raised. If the vehicle is parked on
a downward slope, place the chock in
front of the wheel. If the wheel must be
changed on a surface with a more
severe slope, take additional precau-
tions to secure the vehicle from rolling
Page 190 of 220
Replacing components
188 3.Loosen the lug bolts 1/2 a turn
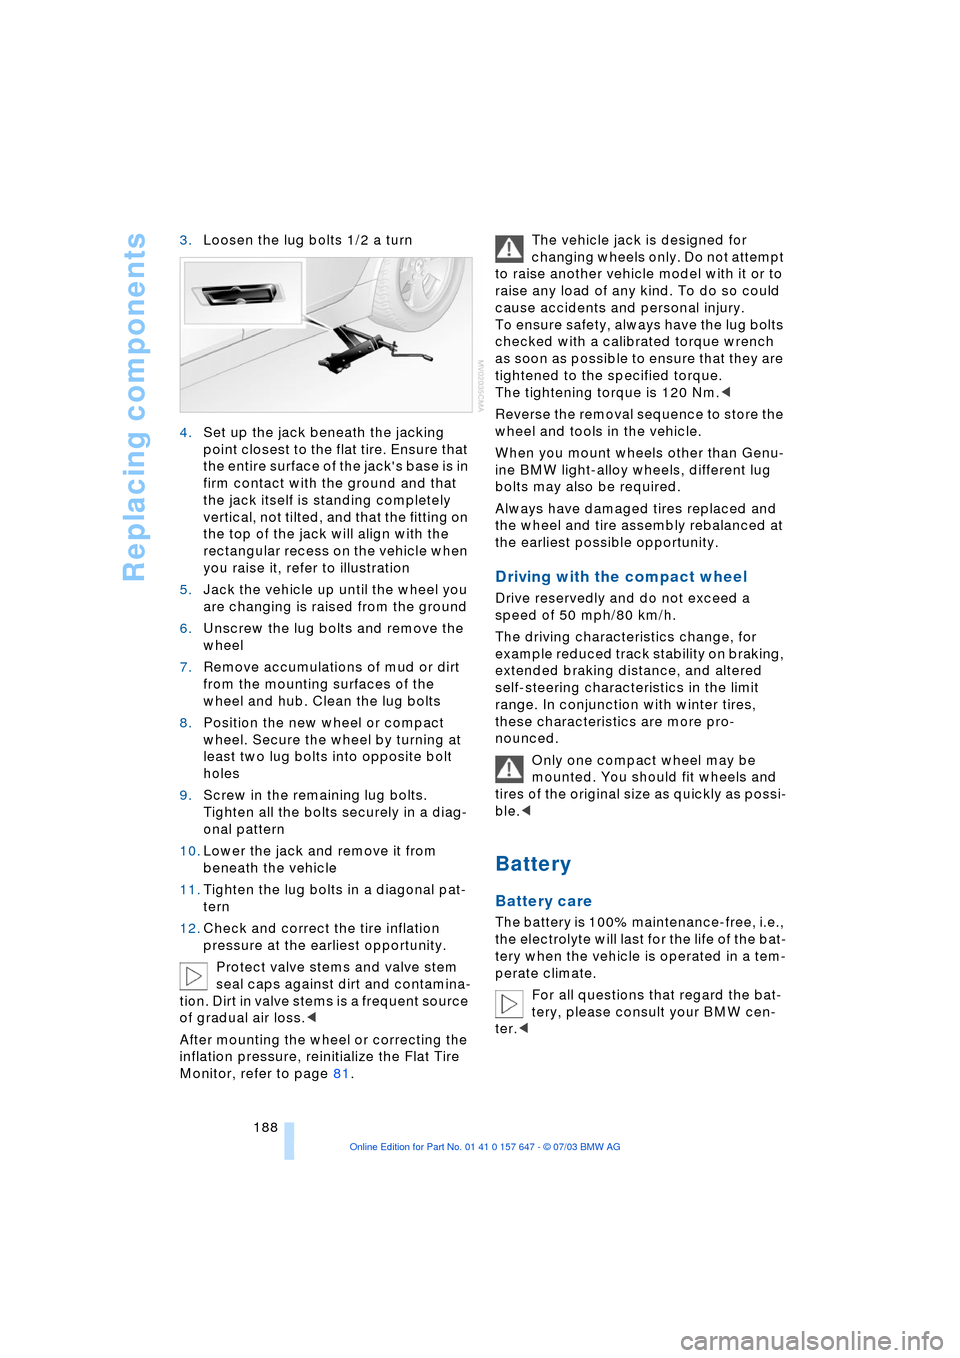
4.Set up the jack beneath the jacking
point closest to the flat tire. Ensure that
the entire surface of the jack's base is in
firm contact with the ground and that
the jack itself is standing completely
vertical, not tilted, and that the fitting on
the top of the jack will align with the
rectangular recess on the vehicle when
you raise it, refer to illustration
5.Jack the vehicle up until the wheel you
are changing is raised from the ground
6.Unscrew the lug bolts and remove the
wheel
7.Remove accumulations of mud or dirt
from the mounting surfaces of the
wheel and hub. Clean the lug bolts
8.Position the new wheel or compact
wheel. Secure the wheel by turning at
least two lug bolts into opposite bolt
holes
9.Screw in the remaining lug bolts.
Tighten all the bolts securely in a diag-
onal pattern
10.Lower the jack and remove it from
beneath the vehicle
11.Tighten the lug bolts in a diagonal pat-
tern
12.Check and correct the tire inflation
pressure at the earliest opportunity.
Protect valve stems and valve stem
seal caps against dirt and contamina-
tion. Dirt in valve stems is a frequent source
of gradual air loss.<
After mounting the wheel or correcting the
inflation pressure, reinitialize the Flat Tire
Monitor, refer to page 81.The vehicle jack is designed for
changing wheels only. Do not attempt
to raise another vehicle model with it or to
raise any load of any kind. To do so could
cause accidents and personal injury.
To ensure safety, always have the lug bolts
checked with a calibrated torque wrench
as soon as possible to ensure that they are
tightened to the specified torque.
The tightening torque is 120 Nm.<
Reverse the removal sequence to store the
wheel and tools in the vehicle.
When you mount wheels other than Genu-
ine BMW light-alloy wheels, different lug
bolts may also be required.
Always have damaged tires replaced and
the wheel and tire assembly rebalanced at
the earliest possible opportunity.
Driving with the compact wheel
Drive reservedly and do not exceed a
speed of 50 mph/80 km/h.
The driving characteristics change, for
example reduced track stability on braking,
extended braking distance, and altered
self-steering characteristics in the limit
range. In conjunction with winter tires,
these characteristics are more pro-
nounced.
Only one compact wheel may be
mounted. You should fit wheels and
tires of the original size as quickly as possi-
ble.<
Battery
Battery care
The battery is 100% maintenance-free, i.e.,
the electrolyte will last for the life of the bat-
tery when the vehicle is operated in a tem-
perate climate.
For all questions that regard the bat-
tery, please consult your BMW cen-
ter.<
Page 206 of 220

Everything from A to Z
204 Cargo, securing 109
Cargo area
Ð locking separately 31
Caring for artificial leather,
refer to Caring for your
vehicle brochure
Caring for leather, refer to
Caring for your vehicle
brochure
Caring for light-alloy
wheels, refer to Caring for
your vehicle brochure
Caring for plastic, refer to
Caring for your vehicle
brochure
Caring for the carpet, refer
to Caring for your vehicle
brochure
Caring for the vehicle finish,
refer to Caring for your
vehicle brochure
Car jack
Ð jacking points 188
Car keys, refer to Central
keys with remote
control 26
Car phone 151
Ð installation location, refer
to Center armrest 98
Ð refer to Portable
phone 150
Ð refer to separate Owner's
Manual
Car radio, refer to
Radio 134
Car wash 106
Ð refer also to Caring for
your vehicle brochure
Catalytic converter, refer to
High temperatures 106
"Categories" 138
CBC Cornering Brake
Control 78
CBS Condition Based
Service 181
"CD" 130CD changer 144
Ð adjusting the tone 131
Ð controls 130
Ð fast forward/reverse 146
Ð installation location 144
Ð listening to a CD 144
Ð playing a track 145
Ð random order 146
Ð repeating a track 145
Ð selecting track 145
Ð switching on/off 130
Ð volume 131
CD for navigation 114
CD player 141
Ð adjusting the tone 131
Ð controls 130
Ð fast forward/reverse 142
Ð playing a track 142
Ð random order 142
Ð repeating a track 142
Ð selecting tracks 141
Ð switching on/off 130
Ð volume 131
Center armrest 98
Center console, refer to
Comfort area 14
Central keys with remote
control 26
"Central locking" 38
Central locking system 27
Ð from inside vehicle 30
Ð from outside vehicle 27
Changes, technical, refer to
Parts and accessories 6
Changing a wheel 187
Changing selector-lever
positions 55
Changing the direction
display for navigation 124
Changing the language on
the Control Display 74
Changing the
measurement units on the
Control Display 74
Changing wheels 174
CHECK button 69
Check Control 68
"Check Control
messages" 69
Check Gas Cap 168Checking the air pressure,
refer to Tire inflation
pressure 170
Child's seat 45
Child-restraint fixing
LATCH 47
Child restraints 45
Child-restraint system 45
Child-safety lock 48
Chock 187
Chrome parts, care, refer to
Caring for your vehicle
brochure
Cigarette lighter 100
Circulation of air, refer to
Recirculated-air mode 91
"City" for destination
entry 117
Cleaning, refer to Caring for
your vehicle brochure
Cleaning headlamps
Ð washer fluid 57
Cleaning windshield 57
"Climate" 41
Clock 65
Ð 12/24 hour mode 74
Ð setting the time and
date 74
Closing
Ð from inside 30
Ð from outside 27
Cockpit 10
Comfort area 14
Comfort seat 37
"Communication" 152
"Communication
interface" 161
Compact Disc
Ð refer to CD changer 144
Ð refer to CD player 141
Compact wheel
Ð inflation pressure 171
Ð wheel change 187
Compression ratio, refer to
Engine data 198
Computer 70
Ð clock, 12/24 hour
mode 74
Ð displays on the Control
Display 70
Page 209 of 220
Reference 207
At a glance
Controls
Driving tips
Communications
Navigation
Entertainment
Mobility
ESP Electronic Stability
Program, refer to DSC
Dynamic Stability
Control 78
Exhaust system, refer to
High temperatures 106
Exterior mirrors 42
Ð automatic dimming
feature 43
F
"Fader", audio systems 132
Failure messages, refer to
Check Control 68
False alarms, refer to
Avoiding unintentional
alarms 33
False alarms with the Flat
Tire Monitor 80
Fastening safety belts, refer
to Safety belt
Ð indicator lamp 40
"Fastest route" for
navigation 121
Fastest route for
navigation 121
First aid, refer to First aid
kit 191
First aid kit 191
Fitting for towing 193
Flashlight, refer to
Rechargeable
flashlight 98
Flash when locking/
unlocking 28
Flat tire
Ð compact wheel 187
Ð Flat Tire Monitor 81
Ð refer also to Changing a
wheel 187
Ð refer also to Tire
condition 173
Ð run-flat tires 81, 175
Flat Tire Monitor 80
Ð false alarms 80
Ð indicator lamp 81
Ð initializing the system 81
Ð malfunctions 82
Floods, refer to Water on
the road 107"FM", waveband 130, 134
FM, waveband 134
Fog lamps 89
Ð indicator lamp 89
Fold down rear seat 101
Folding rear seat back 101
Footwell lamps 89
Forward, fast
Ð CD changer 146
Ð CD player 142
For your own safety 6
Front airbags 83
Front armrest 98
Front head restraints 40
Front seat adjustment 36
Front-to-rear adjustment in
Audio mode 132
"FTM" 81
Fuel 169
Ð display 66
Ð quality 169
Ð tank volume 66
Fuel clock, refer to Fuel
gauge 66
Fuel display, refer to Fuel
gauge 66
Fuel filler door 168
Ð releasing in the event of
electrical malfunction 168
Fuel specifications 169
Fuses 189
G
Garage door opener, refer
to Integrated universal
remote control 96
Gasoline, refer to Fuel
quality 169
Gasoline display, refer to
Fuel gauge 66
Gear changes, refer to
Automatic transmission
with Steptronic 55
Gear display 54
Gearshift lever
Ð automatic transmission
with Steptronic 55
Ð manual transmission 51
Ð Sequential manual
transmission SMG 51General car care, refer to
Caring for your vehicle
brochure
General driving notes 106
Glass roof, electrical 34
Ð closing in the event of an
electrical defect 35
Ð convenience operation 29
Ð remote control 28
Glove compartment 98
Ð lighting 98
GPS navigation, refer to
Navigation system 114
Grilles of the automatic
climate control 90
Gross vehicle weight, refer
to Weights 200
H
Halogen lamps 185
Handbrake 50
Ð indicator lamp 50
Hands-free unit 151
Hazard warning flashers 14
Head airbags 83
Headlamp control,
automatic 87
Headlamp flasher 56
Headlamps 87
Ð care, refer to Caring for
your vehicle brochure
Ð replacing the bulbs 185
Headlamp washers 57
Head Light, refer to
Adaptive Head Light 88
Head restraints 39
Ð front 39
Ð front, active 40
Ð rear 40
"Head-Up Display" 44
Head-Up Display 85
Heated mirrors 43
Heated rear window 91
Heated seats 41
Heated steering wheel 44
"Heated steering wheel on /
off" 44
Heater, rear window 91
Page 210 of 220
Everything from A to Z
208 Heating 90
Ð mirrors 43
Ð steering wheel 44
Heating while stopped 92
Heavy cargo, refer to
Stowing cargo 109
Height, refer to
Dimensions 199
Height adjustment
Ð head restraints 39
Ð seats 37
Ð steering wheel 43
High beams 88
Ð headlight flasher 88
Ð indicator lamp 13
Ð replacing the bulbs 185
Hills 107
Holder for beverages 99
"Horn" 44
Horn 10
"Hour memo" 75
"House number" for
destination entry 117
Hydraulic brake assistant,
refer to DBC 79
Hydroplaning 106, 174
I
Ice warning 65
iDrive, refer to Control
Center 16
Ignition key 26
Ignition key positions, refer
to Ignition lock 49
Ignition lock 49
Independent ventilation
Ð switching on and off
directly 94
Independent ventilation/
heating
Ð entering switch-on
times 95
Ð preselecting switch-on
times 95Indicator/warning lamp
Ð active steering 82
Ð airbags 84
Ð Flat Tire Monitor 81
Ð front fog lamps 11
Ð overview 13
Ð safety belt warning 40
Individual air distribution 93
Individual button
assignment options on
steering wheel 44
Individual settings, refer to
Key Memory 26
Inflation pressure, refer to
Tire inflation
pressure 170
"Information" for
navigation 118
Information for navigation
Ð on a different city 118
Ð on city of destination 118
Ð on current position 118
"Information on
destination" 119
"Input map" 118
Installation location
Ð CD changer 144
Ð navigation computer 114
Ð portable phone 151
Instructions for navigation
system, refer to Voice
instructions 124
Instrument cluster 12
Instrument combination,
refer to Instrument
cluster 12
Instrument lighting 88
Instrument panel, refer to
Instrument cluster 10
Integrated universal remote
control 96
Interesting destination 118
"Interim time" 73
Interior lamps 89
Ð remote control 28
Interior mirror, refer to
Interior rearview mirror 43
Interior motion sensor 33
Ð switching off 28Interior rearview mirror 43
Ð automatic dimming
feature 43
Interlock, refer to Steering
locked 49
Intermittent mode of the
wipers 57
J
Jacking points 188
Joystick, refer to Control
Center 16
Jump-starting 192
K
Key Memory 26
"Keypad" 156
Keys 26
Key set, refer Central keys
with remote control 26
Kickdown 55
Knock control 169
L
Lamps and bulbs 184
"Languages" 74
"Languages" for
navigation 124
Lashing eyes, refer to
Securing the load 109
"Last seat position" 38
LATCH child-restraint
fixing 47
LEDs light-emitting
diodes 89
Length, refer to
Dimensions 199
Letter symbol on portable
phone 156
License plate light
Ð replacing the bulbs 186
Light-emitting diodes
LEDs 89
Lighter 100
Ð socket 100
"Lighting" 56, 87