2004 BMW 525I navigation system
[x] Cancel search: navigation systemPage 73 of 220
Controls
71Reference
At a glance
Driving tips
Communications
Navigation
Entertainment
Mobility
3.Select "Car Data" and press the con-
troller.
You have two possibilities to display infor-
mation of the computer:
>Computer
>Trip computer
It is best to use this for driving on vaca-
tion, as when you reset the values to
zero, all the functions are reset together
and then restart.
Computer
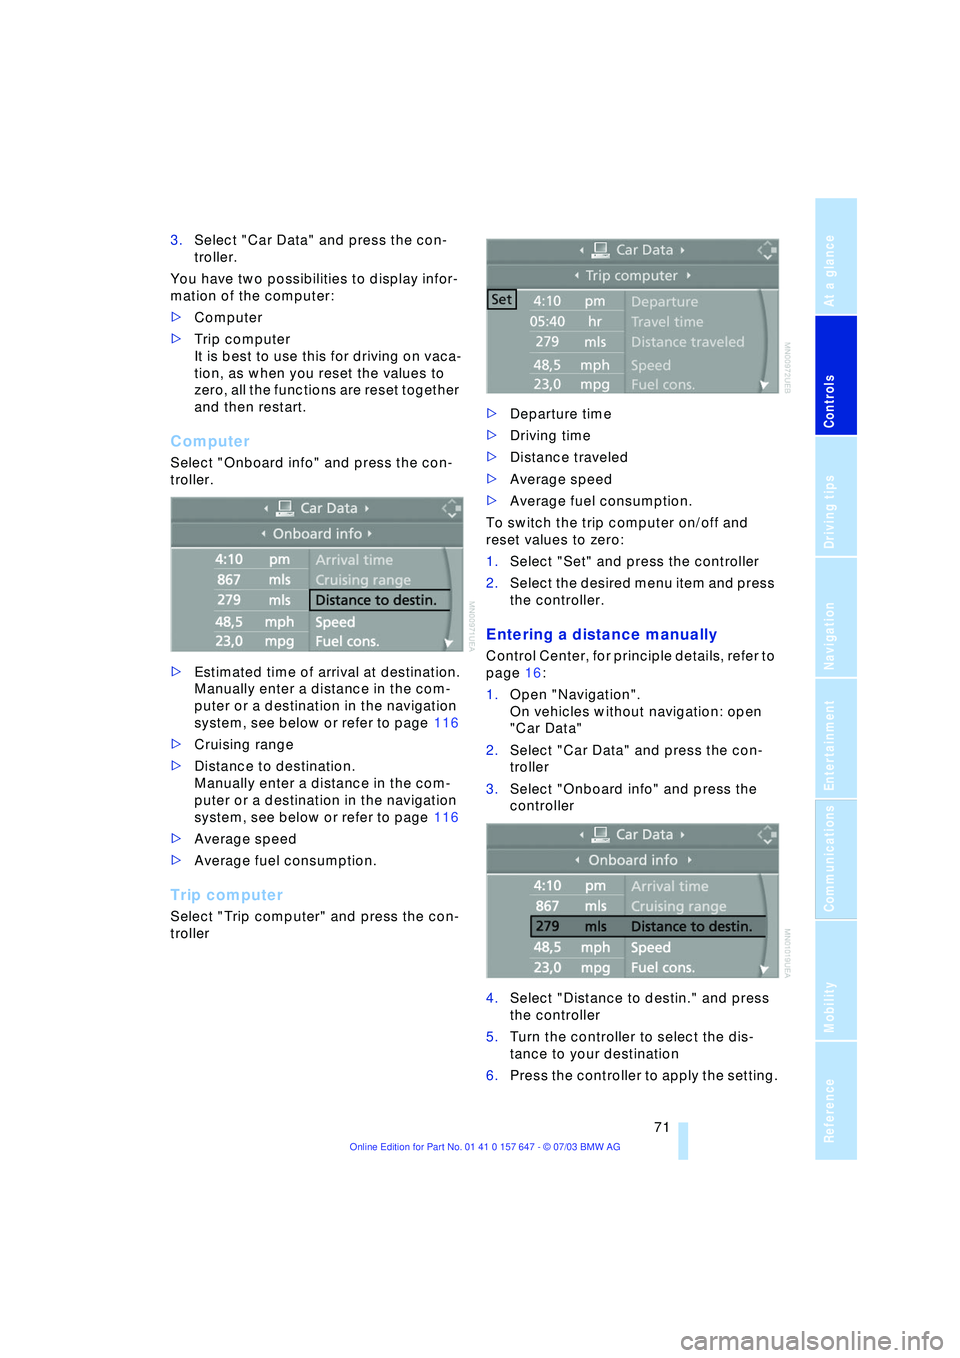
Select "Onboard info" and press the con-
troller.
>Estimated time of arrival at destination.
Manually enter a distance in the com-
puter or a destination in the navigation
system, see below or refer to page 116
>Cruising range
>Distance to destination.
Manually enter a distance in the com-
puter or a destination in the navigation
system, see below or refer to page 116
>Average speed
>Average fuel consumption.
Trip computer
Select "Trip computer" and press the con-
troller>Departure time
>Driving time
>Distance traveled
>Average speed
>Average fuel consumption.
To switch the trip computer on/off and
reset values to zero:
1.Select "Set" and press the controller
2.Select the desired menu item and press
the controller.
Entering a distance manually
Control Center, for principle details, refer to
page 16:
1.Open "Navigation".
On vehicles without navigation: open
"Car Data"
2.Select "Car Data" and press the con-
troller
3.Select "Onboard info" and press the
controller
4.Select "Distance to destin." and press
the controller
5.Turn the controller to select the dis-
tance to your destination
6.Press the controller to apply the setting.
Page 75 of 220
Controls
73Reference
At a glance
Driving tips
Communications
Navigation
Entertainment
Mobility
3.Select "Limit" and press the controller
4.Select "Select current speed" and
press the controller. The system adopts
your current speed as the limit.
Stopwatch
Control Center, for principle details, refer to
page 16:
1.Open "Navigation".
On vehicles without navigation: open
"Car Data"
2.Select "Car Data" and press the con-
troller
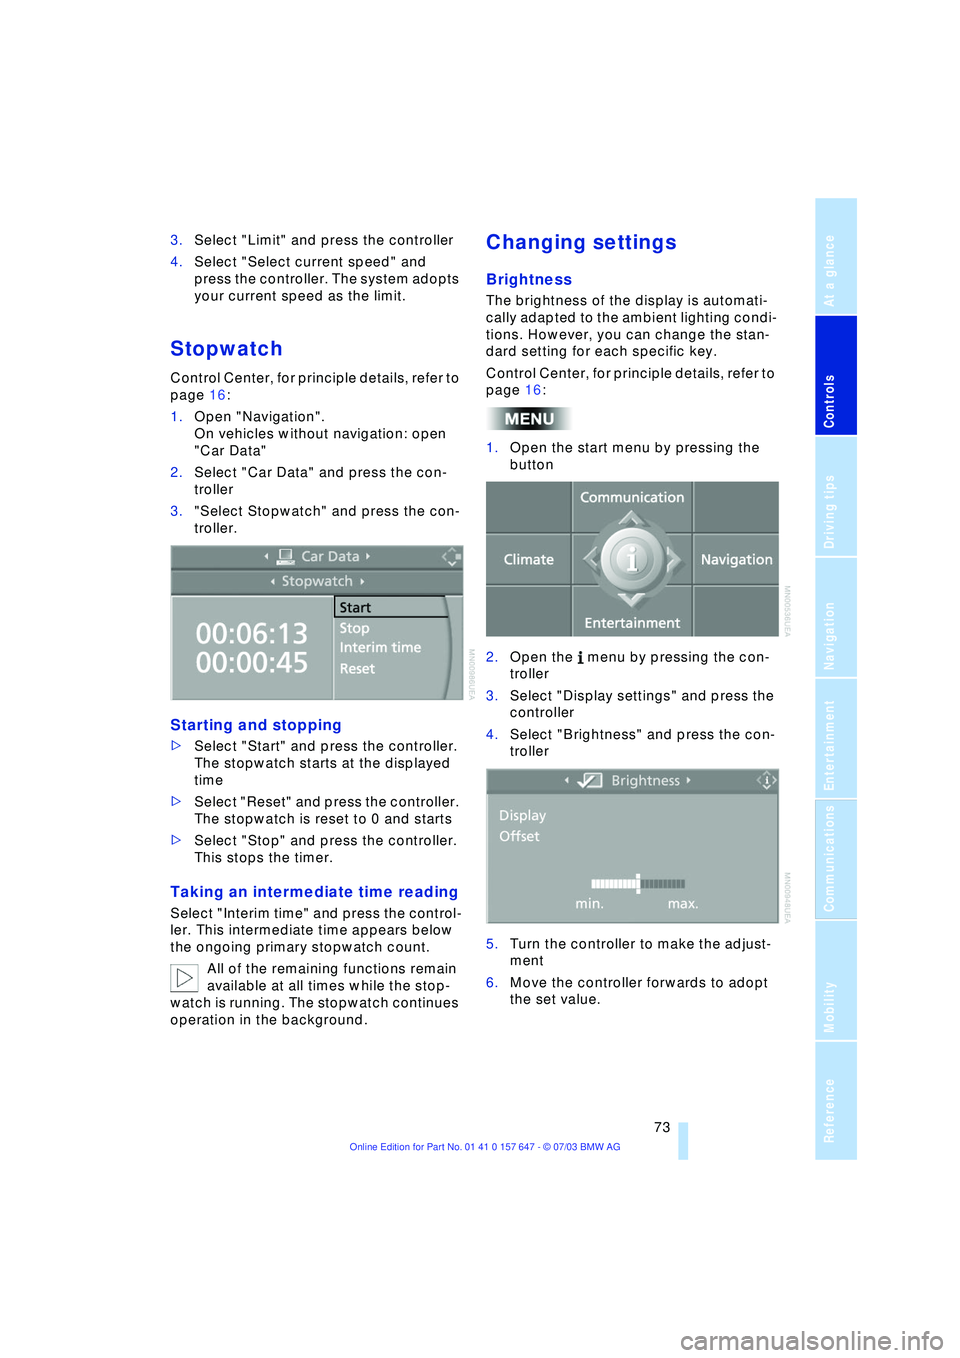
3."Select Stopwatch" and press the con-
troller.
Starting and stopping
>Select "Start" and press the controller.
The stopwatch starts at the displayed
time
>Select "Reset" and press the controller.
The stopwatch is reset to 0 and starts
>Select "Stop" and press the controller.
This stops the timer.
Taking an intermediate time reading
Select "Interim time" and press the control-
ler. This intermediate time appears below
the ongoing primary stopwatch count.
All of the remaining functions remain
available at all times while the stop-
watch is running. The stopwatch continues
operation in the background.
Changing settings
Brightness
The brightness of the display is automati-
cally adapted to the ambient lighting condi-
tions. However, you can change the stan-
dard setting for each specific key.
Control Center, for principle details, refer to
page 16:
1.Open the start menu by pressing the
button
2.Open the menu by pressing the con-
troller
3.Select "Display settings" and press the
controller
4.Select "Brightness" and press the con-
troller
5.Turn the controller to make the adjust-
ment
6.Move the controller forwards to adopt
the set value.
Page 79 of 220

Controls
77Reference
At a glance
Driving tips
Communications
Navigation
Entertainment
Mobility
ence of objects in green before they are
close enough to generate a signal tone.
Control Center, for principle details, refer to
page 16:
1.Open the start menu by pressing the
button
2.Open the menu by pressing the con-
troller
3.Select "Vehicle settings" and press the
controller
4.Select "PDC" and press the controller
5.Select "Monitor display on" and press
the controller.
is displayed with the PDC image
switched on.
The display then appears on the Control
Display as soon as PDC is automatically
activated.
The previous display automatically reap-
pears after the system is deactivated.
Limits of the system
Even with PDC, final responsibility for
estimating the distance between the
vehicle and any obstructions always
remains with the driver. Even when sensors are involved, there is a blind spot in which
objects cannot be detected. The system is
also subject to the physical limits that apply
to all forms of ultrasonic measurement,
such as those encountered with thin and
wedge-shaped objects, etc. Low objects
already displayed, e.g. a curb, can also dis-
appear from the detection area of the sen-
sors again before a continuous tone
sounds.
Loud noises from outside and inside your
vehicle may prevent you from hearing the
PDC signal tone.<
Keep the sensors clean and free of ice
or snow in order to ensure that they
will continue to operate effectively.
Do not apply high pressure spray to the
sensors for a prolonged period of time.
Keep the spray at least 4 in/10 cm away
from the sensors.<
Driving stability control/
ABS Antilock Brake System
Your BMW is equipped with an extended
array of systems designed to enhance and
maintain vehicle stability under extreme
conditions. The following section describes
these functions based on ABS and DSC.
The concept
ABS enhances active safety by preventing
the wheels from locking under braking.
The ABS is operational every time you start
the engine. ABS includes the functions
CBC Cornering Brake Control and EBV
Electronic Brake Force Distribution.
In case of malfunction
If the indicator lamp lights up in yel-
low, this indicates that ABS has
been deactivated in response to a
system malfunction. Conventional braking
efficiency remains available without limita-
tions. Please have the system inspected at
your BMW center.
Page 81 of 220
Controls
79Reference
At a glance
Driving tips
Communications
Navigation
Entertainment
Mobility
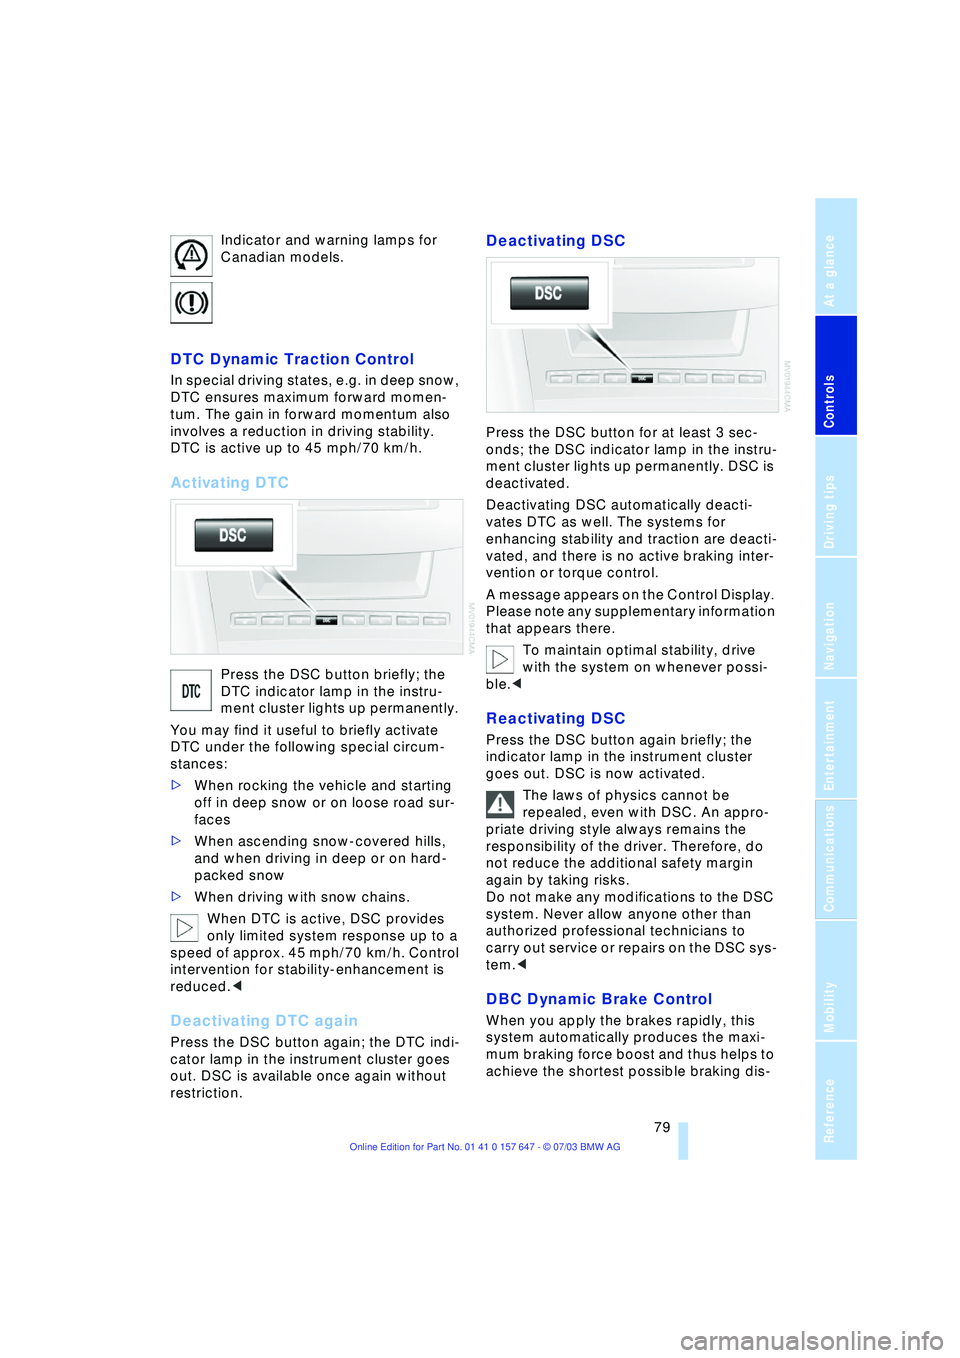
Indicator and warning lamps for
Canadian models.
DTC Dynamic Traction Control
In special driving states, e.g. in deep snow,
DTC ensures maximum forward momen-
tum. The gain in forward momentum also
involves a reduction in driving stability.
DTC is active up to 45 mph/70 km/h.
Activating DTC
Press the DSC button briefly; the
DTC indicator lamp in the instru-
ment cluster lights up permanently.
You may find it useful to briefly activate
DTC under the following special circum-
stances:
>When rocking the vehicle and starting
off in deep snow or on loose road sur-
faces
>When ascending snow-covered hills,
and when driving in deep or on hard-
packed snow
>When driving with snow chains.
When DTC is active, DSC provides
only limited system response up to a
speed of approx. 45 mph/70 km/h. Control
intervention for stability-enhancement is
reduced.<
Deactivating DTC again
Press the DSC button again; the DTC indi-
cator lamp in the instrument cluster goes
out. DSC is available once again without
restriction.
Deactivating DSC
Press the DSC button for at least 3 sec-
onds; the DSC indicator lamp in the instru-
ment cluster lights up permanently. DSC is
deactivated.
Deactivating DSC automatically deacti-
vates DTC as well. The systems for
enhancing stability and traction are deacti-
vated, and there is no active braking inter-
vention or torque control.
A message appears on the Control Display.
Please note any supplementary information
that appears there.
To maintain optimal stability, drive
with the system on whenever possi-
ble.<
Reactivating DSC
Press the DSC button again briefly; the
indicator lamp in the instrument cluster
goes out. DSC is now activated.
The laws of physics cannot be
repealed, even with DSC. An appro-
priate driving style always remains the
responsibility of the driver. Therefore, do
not reduce the additional safety margin
again by taking risks.
Do not make any modifications to the DSC
system. Never allow anyone other than
authorized professional technicians to
carry out service or repairs on the DSC sys-
tem.<
DBC Dynamic Brake Control
When you apply the brakes rapidly, this
system automatically produces the maxi-
mum braking force boost and thus helps to
achieve the shortest possible braking dis-
Page 83 of 220
Controls
81Reference
At a glance
Driving tips
Communications
Navigation
Entertainment
Mobility
natural, even pressure drop in all four
tires.<
In the following situations, on the other
hand, there can be delays in detecting tire
pressure losses, and even system failure:
>When you are driving on snow-covered
or slippery road surfaces
>If you are using a sports driving style:
slip on the drive wheels, high lateral
acceleration
>False alarms and undetected loss of
pressure may occur when you are driv-
ing with snow chains fitted
>When you are driving with the compact
wheel, the Flat Tire Monitor is unable to
function.
Initializing the system
Perform the initialization immediately
after correcting the inflation pressure,
after changing a tire or changing a wheel or
all wheels. A drive is necessary for this pur-
pose.<
Control Center, for principle details, refer to
page 16:
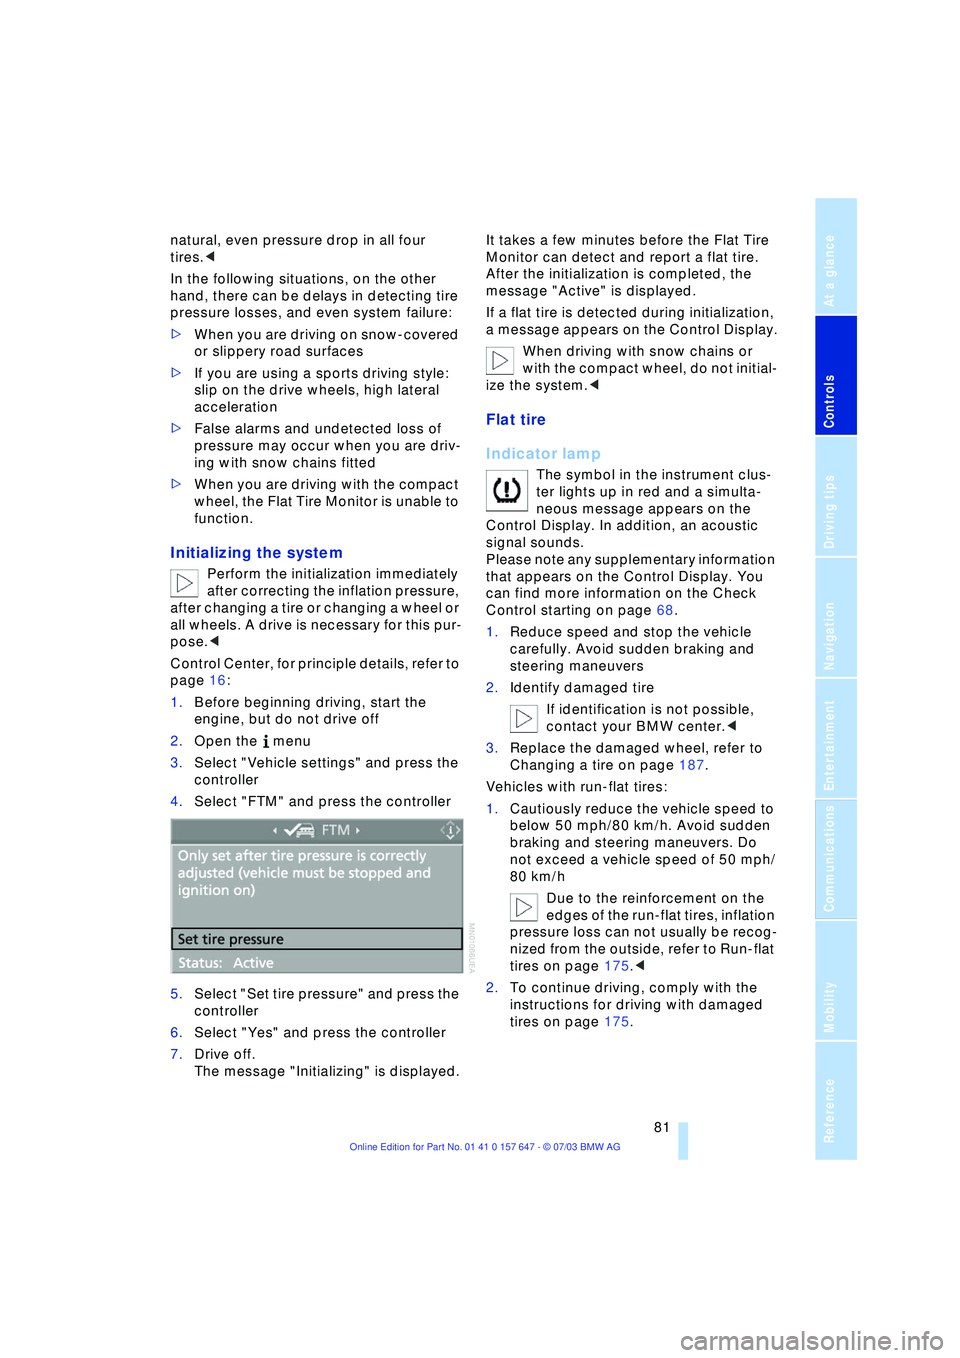
1.Before beginning driving, start the
engine, but do not drive off
2.Open the menu
3.Select "Vehicle settings" and press the
controller
4.Select "FTM" and press the controller
5.Select "Set tire pressure" and press the
controller
6.Select "Yes" and press the controller
7.Drive off.
The message "Initializing" is displayed.It takes a few minutes before the Flat Tire
Monitor can detect and report a flat tire.
After the initialization is completed, the
message "Active" is displayed.
If a flat tire is detected during initialization,
a message appears on the Control Display.
When driving with snow chains or
with the compact wheel, do not initial-
ize the system.<
Flat tire
Indicator lamp
The symbol in the instrument clus-
ter lights up in red and a simulta-
neous message appears on the
Control Display. In addition, an acoustic
signal sounds.
Please note any supplementary information
that appears on the Control Display. You
can find more information on the Check
Control starting on page 68.
1.Reduce speed and stop the vehicle
carefully. Avoid sudden braking and
steering maneuvers
2.Identify damaged tire
If identification is not possible,
contact your BMW center.<
3.Replace the damaged wheel, refer to
Changing a tire on page 187.
Vehicles with run-flat tires:
1.Cautiously reduce the vehicle speed to
below 50 mph/80 km/h. Avoid sudden
braking and steering maneuvers. Do
not exceed a vehicle speed of 50 mph/
80 km/h
Due to the reinforcement on the
edges of the run-flat tires, inflation
pressure loss can not usually be recog-
nized from the outside, refer to Run-flat
tires on page 175.<
2.To continue driving, comply with the
instructions for driving with damaged
tires on page 175.
Page 85 of 220
Controls
83Reference
At a glance
Driving tips
Communications
Navigation
Entertainment
Mobility
Airbags
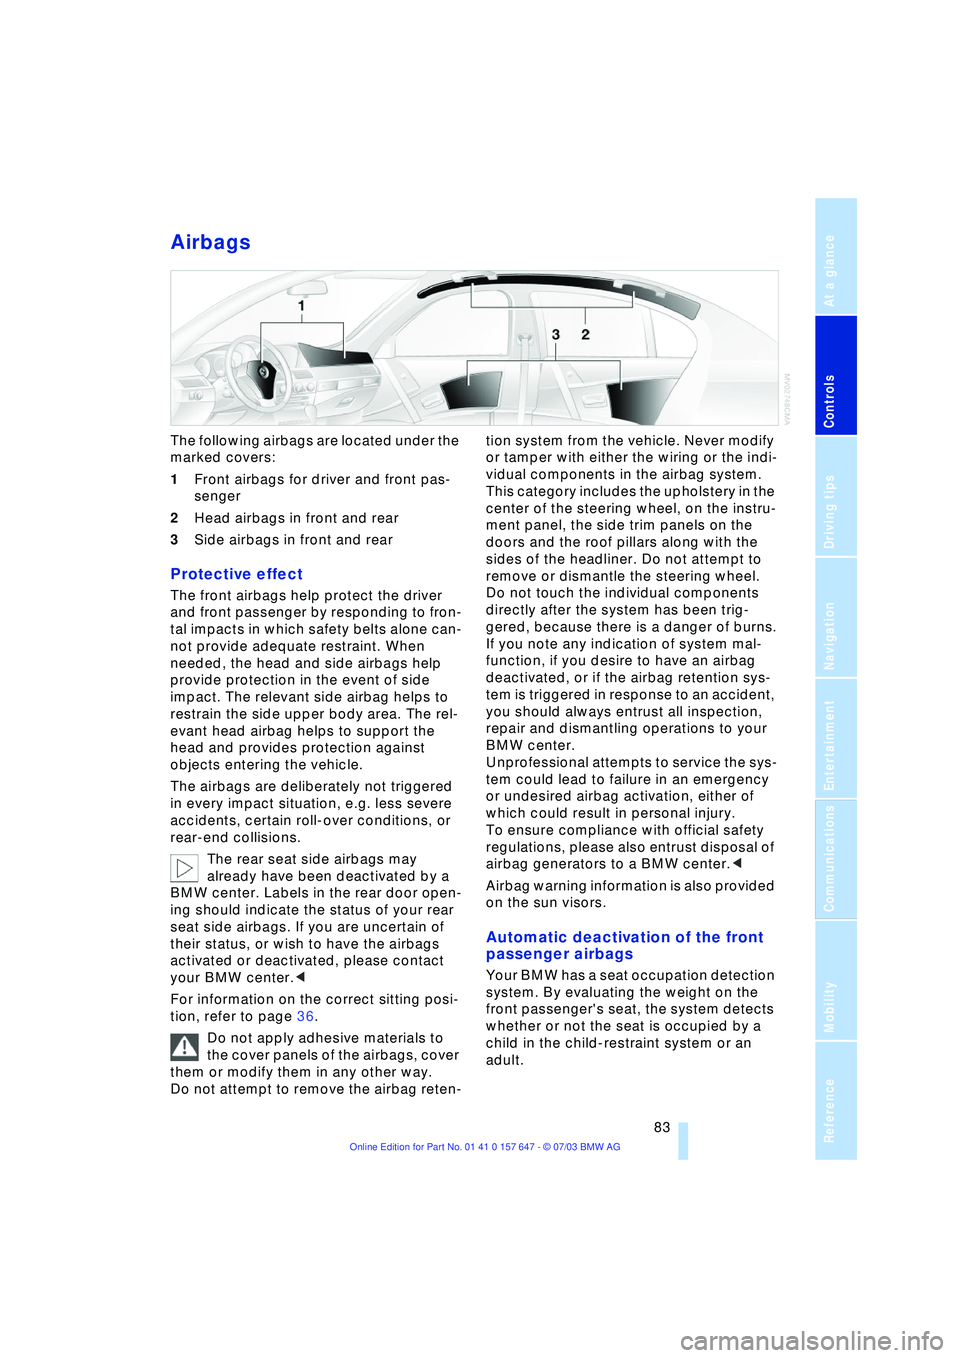
The following airbags are located under the
marked covers:
1Front airbags for driver and front pas-
senger
2Head airbags in front and rear
3Side airbags in front and rear
Protective effect
The front airbags help protect the driver
and front passenger by responding to fron-
tal impacts in which safety belts alone can-
not provide adequate restraint. When
needed, the head and side airbags help
provide protection in the event of side
impact. The relevant side airbag helps to
restrain the side upper body area. The rel-
evant head airbag helps to support the
head and provides protection against
objects entering the vehicle.
The airbags are deliberately not triggered
in every impact situation, e.g. less severe
accidents, certain roll-over conditions, or
rear-end collisions.
The rear seat side airbags may
already have been deactivated by a
BMW center. Labels in the rear door open-
ing should indicate the status of your rear
seat side airbags. If you are uncertain of
their status, or wish to have the airbags
activated or deactivated, please contact
your BMW center.<
For information on the correct sitting posi-
tion, refer to page 36.
Do not apply adhesive materials to
the cover panels of the airbags, cover
them or modify them in any other way.
Do not attempt to remove the airbag reten-tion system from the vehicle. Never modify
or tamper with either the wiring or the indi-
vidual components in the airbag system.
This category includes the upholstery in the
center of the steering wheel, on the instru-
ment panel, the side trim panels on the
doors and the roof pillars along with the
sides of the headliner. Do not attempt to
remove or dismantle the steering wheel.
Do not touch the individual components
directly after the system has been trig-
gered, because there is a danger of burns.
If you note any indication of system mal-
function, if you desire to have an airbag
deactivated, or if the airbag retention sys-
tem is triggered in response to an accident,
you should always entrust all inspection,
repair and dismantling operations to your
BMW center.
Unprofessional attempts to service the sys-
tem could lead to failure in an emergency
or undesired airbag activation, either of
which could result in personal injury.
To ensure compliance with official safety
regulations, please also entrust disposal of
airbag generators to a BMW center.<
Airbag warning information is also provided
on the sun visors.
Automatic deactivation of the front
passenger airbags
Your BMW has a seat occupation detection
system. By evaluating the weight on the
front passenger's seat, the system detects
whether or not the seat is occupied by a
child in the child-restraint system or an
adult.
Page 87 of 220
Controls
85Reference
At a glance
Driving tips
Communications
Navigation
Entertainment
Mobility
Head-Up Display*
The concept
The Head-Up Display can be used to
project important information into the field
of vision of the driver, e.g. instructions of
the navigation system. You can assimilate
this information without taking your eyes off
the road.
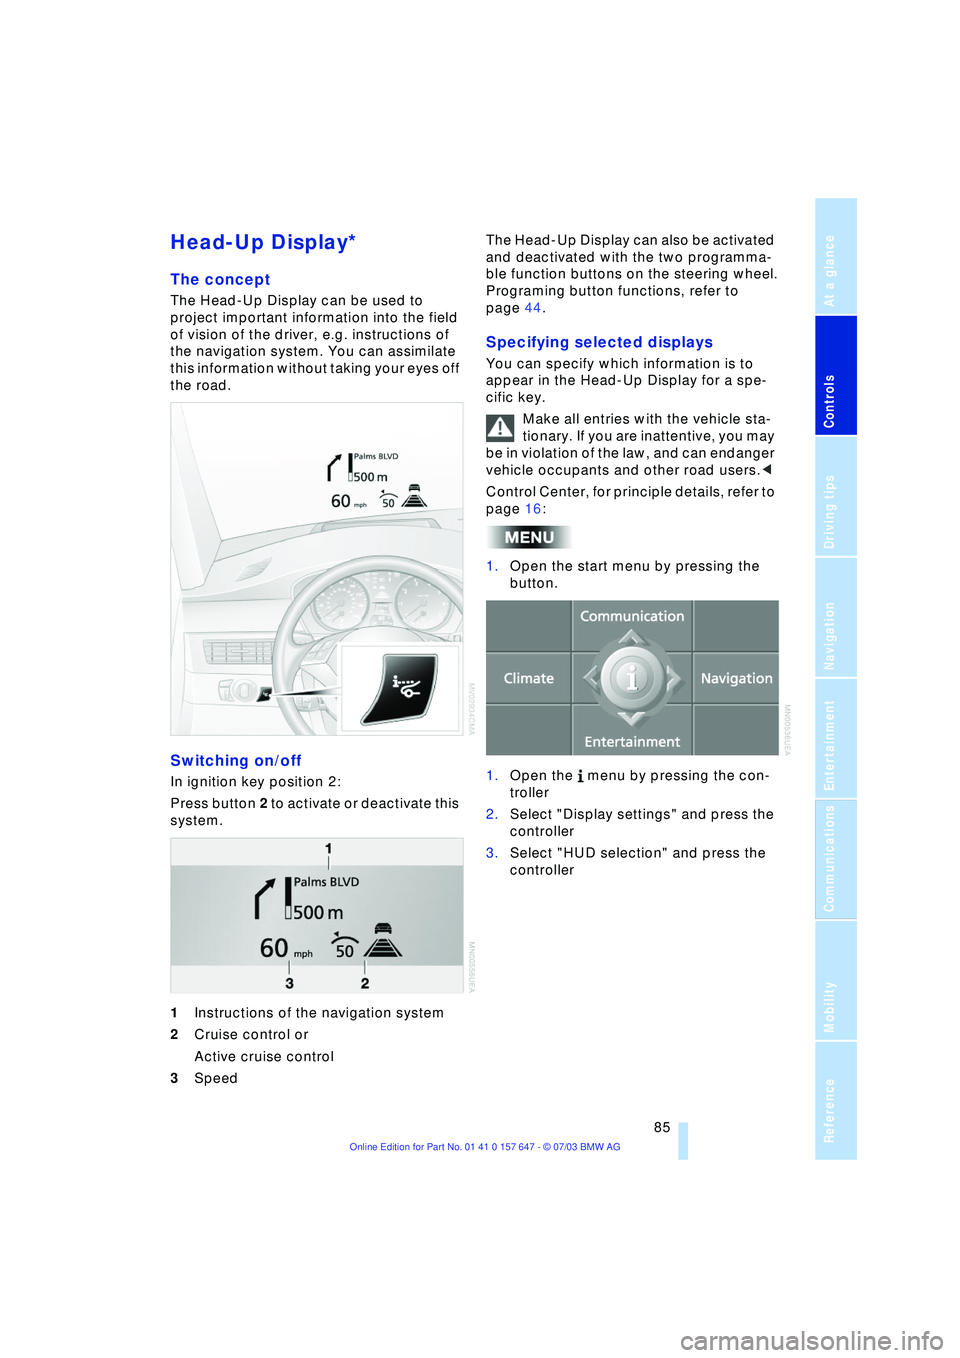
Switching on/off
In ignition key position 2:
Press button 2 to activate or deactivate this
system.
1Instructions of the navigation system
2Cruise control or
Active cruise control
3Speed The Head-Up Display can also be activated
and deactivated with the two programma-
ble function buttons on the steering wheel.
Programing button functions, refer to
page 44.
Specifying selected displays
You can specify which information is to
appear in the Head-Up Display for a spe-
cific key.
Make all entries with the vehicle sta-
tionary. If you are inattentive, you may
be in violation of the law, and can endanger
vehicle occupants and other road users.<
Control Center, for principle details, refer to
page 16:
1.Open the start menu by pressing the
button.
1.Open the menu by pressing the con-
troller
2.Select "Display settings" and press the
controller
3.Select "HUD selection" and press the
controller
Page 89 of 220
Controls
87Reference
At a glance
Driving tips
Communications
Navigation
Entertainment
Mobility
Lamps
Parking lamps/low beams
Parking lamps
With the switch in this position, the
front, rear and side vehicle lighting
is switched on. You can use the side
marker lamps for parking. For lighting on
one side for parking as an additional fea-
ture, refer to page 88.
Low beams
When you switch off the ignition
with the headlamps on, the head-
lamps go out, and only the parking
lamps remain on.
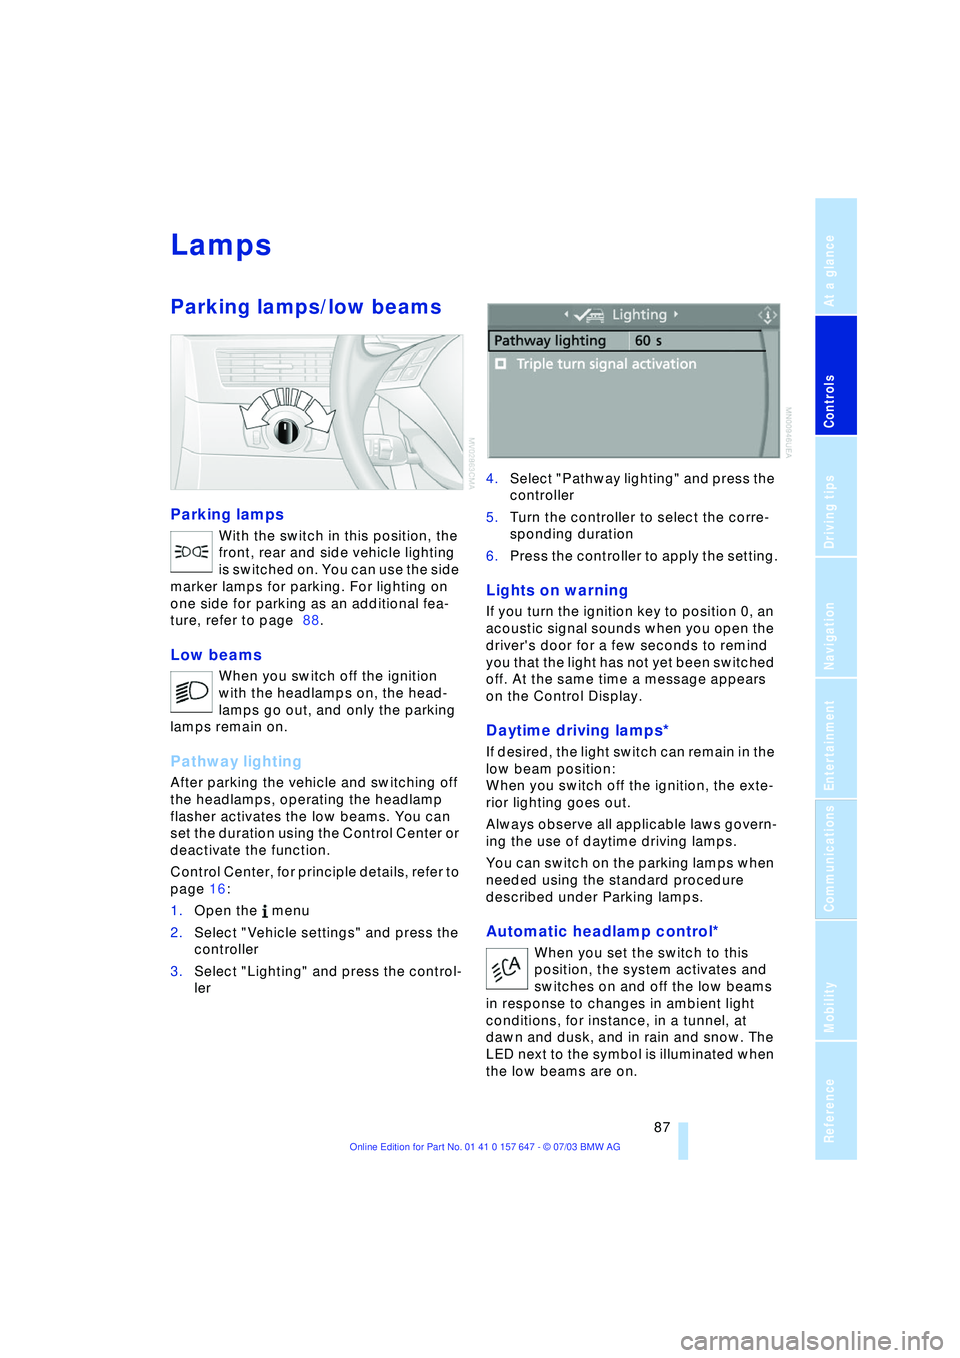
Pathway lighting
After parking the vehicle and switching off
the headlamps, operating the headlamp
flasher activates the low beams. You can
set the duration using the Control Center or
deactivate the function.
Control Center, for principle details, refer to
page 16:
1.Open the menu
2.Select "Vehicle settings" and press the
controller
3.Select "Lighting" and press the control-
ler 4.Select "Pathway lighting" and press the
controller
5.Turn the controller to select the corre-
sponding duration
6.Press the controller to apply the setting.
Lights on warning
If you turn the ignition key to position 0, an
acoustic signal sounds when you open the
driver's door for a few seconds to remind
you that the light has not yet been switched
off. At the same time a message appears
on the Control Display.
Daytime driving lamps*
If desired, the light switch can remain in the
low beam position:
When you switch off the ignition, the exte-
rior lighting goes out.
Always observe all applicable laws govern-
ing the use of daytime driving lamps.
You can switch on the parking lamps when
needed using the standard procedure
described under Parking lamps.
Automatic headlamp control*
When you set the switch to this
position, the system activates and
switches on and off the low beams
in response to changes in ambient light
conditions, for instance, in a tunnel, at
dawn and dusk, and in rain and snow. The
LED next to the symbol is illuminated when
the low beams are on.