Page 95 of 134
4-2
E
1. Put the watercraft on land in a horizontal
position.
2. Open the flushing hose connector
cap1, and then insert the garden hose
adapter 2 into the flushing hose con-
nector 3 and turn it until it is securely
connected.
3. Connect the garden hose adapter to a
water tap using a hose.
4. Start the engine, and then immediately
turn the water supply on until water flows
out continually from the cooling water
pilot outlet.
5. Run the engine at idling speed for about
3 minutes watching the engine condition.
If the engine stops while flushing, turn
the water supply off immediately and
repeat the above steps.
6. Turn the water supply off, and then force
the remaining water out from the cooling
passages by alternately squeezing, and
releasing the throttle lever for 10 to
15 seconds.
7. Stop the engine.
8. Remove the garden hose adapter and
secure the cap.
UGU572.book Page 2 Wednesday, August 28, 2002 1:31 PM
Page 96 of 134

4-3
E
EJU01325
Lubrication
WARNING@ To reduce the risk of fire or explosion:
Never pour or spray gasoline, or any sub-
stance other than engine fogging oil
through the holes in the carburetor
silencer cover.
@
CAUTION:@ �Be sure to replace the caps securely
after fogging the engine. Otherwise
water could enter the engine and
cause damage.
�Do not attempt to run the engine at full
throttle or for more than 15 seconds
while the watercraft is out of the water,
otherwise the engine may overheat
and/or seize.
@
1. Open the silencer caps 1 on the
silencer.
2. Start the engine with the watercraft in a
well-ventilated area.
3. With the engine running at a fast idle,
quickly spray as much fogging oil as pos-
sible through the holes in the silencer
cover. Keep spraying until the engine
stalls (or a maximum of 15 seconds).
4. Install the caps securely.
5. Lubricate all cables such as the throttle,
choke, and steering cables.
NOTE:@ Use a suitable marine grease applicator to
pressure lubricate the cables and purge out
any moisture between the inner and outer
cables.
@
6. Lubricate the areas of the watercraft
specified under Lubrication points on
page 4-16.
UGU572.book Page 3 Wednesday, August 28, 2002 1:31 PM
Page 97 of 134

4-4
E
EJU01964
Fuel system
Draining the fuel system prevents buildup
of varnishes and other harmful deposits that
result when gasoline sits for a prolonged
period of time.
WARNING@ GASOLINE AND ITS VAPORS ARE
HIGHLY FLAMMABLE AND EXPLOSIVE!
�Do not smoke when refueling, and
keep away from sparks, flames, or
other sources of ignition.
�Stop engine before refueling.
�Refuel in a well-ventilated area with
the watercraft in a horizontal position.
�Do not stand or sit on the watercraft
while refueling in case of fire.
�Take care not to spill gasoline. If gaso-
line spills, wipe it up immediately with
dry rags. Always properly dispose of
gasoline-soaked rags.
�Avoid overfilling the fuel tank. Stop fill-
ing when the fuel level just reaches the
bottom of the filler tube. Do not fill up
the filler tube because fuel expands as
it warms up and could overflow. If tem-
porarily leaving the watercraft with a
full fuel tank, do not leave it in direct
sunlight. Leave it in a well-ventilated
area with the watercraft in a horizontal
position.
�Tighten the filler cap securely after
refueling.
�If you should swallow some gasoline,
inhale a lot of gasoline vapor, or get
gasoline in your eyes, get immediate
medical attention.
�If any gasoline spills onto your skin,
immediately wash with soap and
water. Change clothing if gasoline
spills on it.
@
UGU572.book Page 4 Wednesday, August 28, 2002 1:31 PM
Page 110 of 134
4-17
E
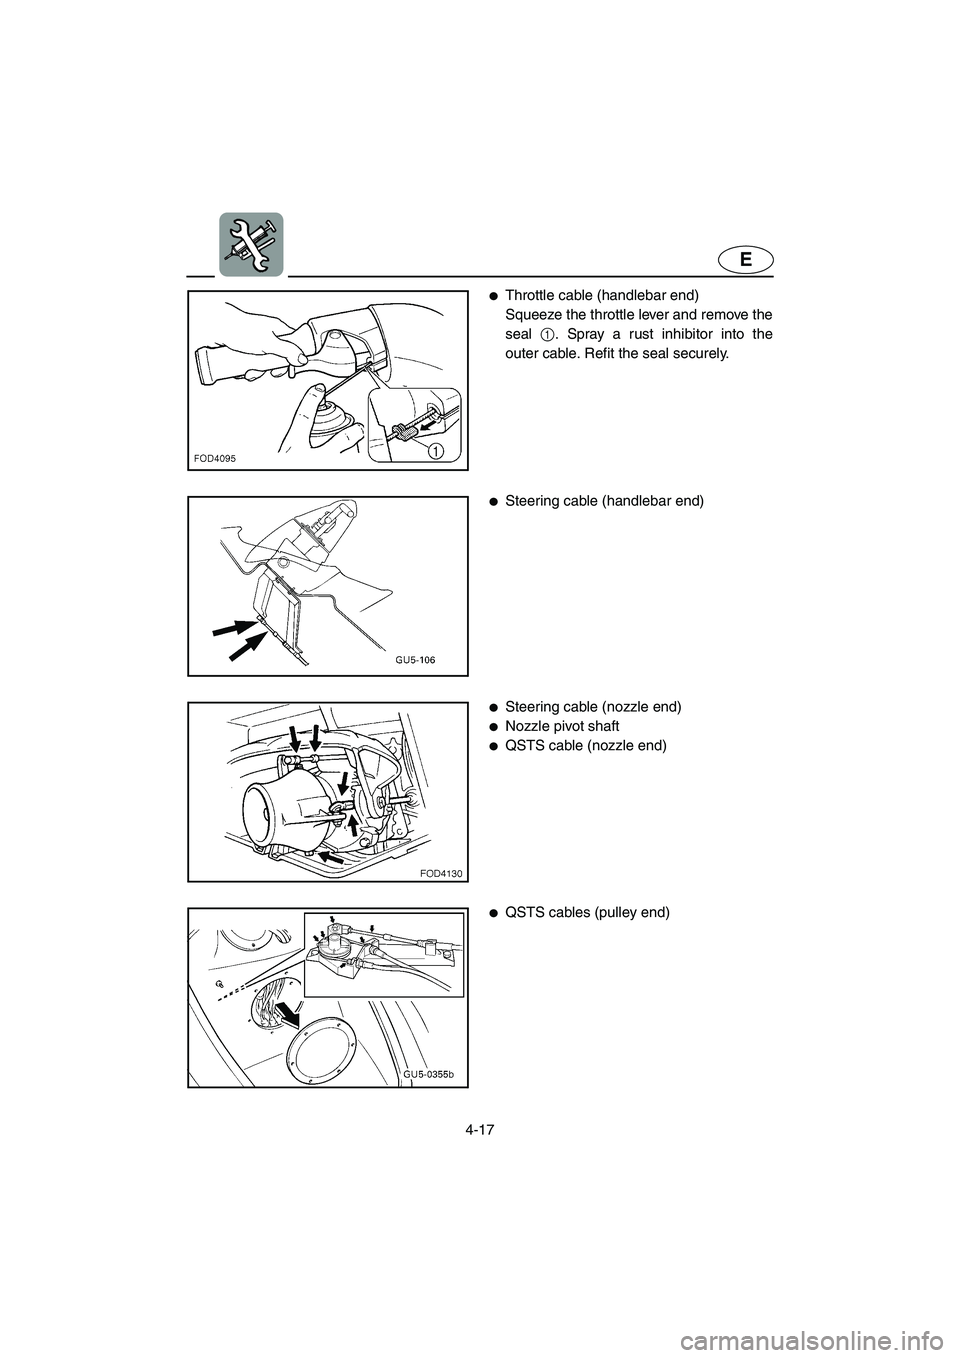
�Throttle cable (handlebar end)
Squeeze the throttle lever and remove the
seal 1. Spray a rust inhibitor into the
outer cable. Refit the seal securely.
�Steering cable (handlebar end)
�Steering cable (nozzle end)
�Nozzle pivot shaft
�QSTS cable (nozzle end)
�QSTS cables (pulley end)
UGU572.book Page 17 Wednesday, August 28, 2002 1:31 PM
Page 113 of 134

4-20
E
EJU01971
Inspecting the battery
Check the level of the battery electrolyte
and make sure that the negative and posi-
tive leads are securely tightened.
WARNING@ �Battery electrolyte is poisonous and
dangerous, causing severe burns, etc.
Electrolyte contains sulfuric acid.
Avoid contact with skin, eyes, or cloth-
ing.
Antidotes
External: Flush with water.
Internal: Drink large quantities of water
or milk. Follow with milk of magnesia,
beaten egg, or vegetable oil. Call phy-
sician immediately.
Eyes: Flush with water for 15 minutes
and get prompt medical attention.
Batteries produce explosive gases.
Keep sparks, flame, cigarettes, etc.,
well away. If using or charging the bat-
tery in an enclosed space, make sure
that it is well ventilated. Always shield
your eyes when working near batter-
ies.
KEEP OUT OF THE REACH OF CHIL-
DREN.
�Be sure to connect the breather hose
to the battery. Fire or explosion could
result if the breather hose is damaged,
obstructed, or not connected properly.
@
CAUTION:@ �Be careful not to place the battery on
its side.
�Be sure to remove the battery from the
battery compartment when adding
electrolyte or charging the battery.
@
UGU572.book Page 20 Wednesday, August 28, 2002 1:31 PM
Page 114 of 134

4-21
E
To replenish the battery:
1. Make sure that the electrolyte level is
between the upper 1 and lower 2 level
marks.
2. Refill the battery with distilled water if
necessary.
CAUTION:@ Normal tap water contains minerals that
are harmful to a battery. Use only dis-
tilled water for replenishing the battery.
@
To recharge the battery:
CAUTION:@ Do not attempt to charge a battery hast-
ily. Battery life could be shortened.
@
It is recommended to have a Yamaha
dealer charge the battery. If you charge the
battery yourself, carefully read the battery
charger instructions before charging and fol-
low the points below.
1. Remove all caps from the battery cell.
2. Add distilled water to the specified level if
the electrolyte level is low.
3. Set the charging rate to 1.9 ampere and
charge the battery slowly until the explo-
sive gases are discharged vigorously
from the battery cells.
To connect the battery terminals:
1. Make sure that the connections are cor-
rect when you install the battery in the
watercraft.
2. Make sure that the breather hose is
properly connected and that it is not
damaged or obstructed.
3. Make sure that the battery is securely
held in place.
1Positive (+): Red lead
2Negative (–): Black lead
3Breather hose
UGU572.book Page 21 Wednesday, August 28, 2002 1:31 PM
Page 125 of 134
 jumper cable 1
to the positive (+) terminals of both bat-
teries.
2. Connect one end of the negative (–)
jumper cable 2 to t")
5-6
E
EJU01882
Connecting the jumper cables
1. Connect the positive (+) jumper cable 1
to the positive (+) terminals of both bat-
teries.
2. Connect one end of the negative (–)
jumper cable 2 to the negative (–) termi-
nal of the booster battery 3.
3. Connect the other end of the negative (–)
cable to an unpainted bolt on the cylinder
head.
CAUTION:@ Do not connect the end of the jumper
cable to the negative (–) terminal on the
watercraft battery! Be sure all connec-
tions are secure and correct before
attempting to start the engine. Any
wrong connection may damage the elec-
trical system.
@
4. Start the engine, and then disconnect
the cables by reversing the steps above.
CAUTION:@ �Never push the start switch while the
engine is running.
�Do not operate the start switch for
more than 5 seconds, otherwise the
battery will be discharged and the
engine will not start. Also, the starter
motor may be damaged. If the engine
does not start in 5 seconds, release
the start switch, wait 15 seconds, and
try again.
@
UGU572.book Page 6 Wednesday, August 28, 2002 1:31 PM
Page:
< prev 1-8 9-16 17-24