Page 91 of 116
6-40
PERIODIC MAINTENANCE AND MINOR REPAIR
6
EAU03618
Replacing a rear turn signal
light bulb
Turn signal light bulb (rear), replacing1. Place the scooter on the center-
stand.
2. Remove cowling C. (See page
6-10 for cowling removal and
installation procedures.)
EAU03619
Replacing a tail/brake light
bulb
Tail/brake light bulb, replacing1. Place the scooter on the center-
stand.
2. Remove cowling C. (See page
6-10 for cowling removal and
installation procedures.)
3. Remove the socket (together
with the bulb) by turning it coun-
terclockwise.
4. Remove the defective bulb by
pulling it out.
5. Insert a new bulb into the socket.
6. Install the socket (together with
the bulb) by turning it clockwise.
7. Install the cowling.
1
1. Socket
5SJ-28199-E1 7/11/02 11:03 AM Page 89
Page 92 of 116
6-41
PERIODIC MAINTENANCE AND MINOR REPAIR
63. Remove the socket (together
with the bulb) by turning it coun-
terclockwise.
4. Remove the defective bulb by
pushing it in and turning it coun-
terclockwise.
5. Insert a new bulb into the socket,
push it in, and then turn it clock-
wise until it stops.
6. Install the socket (together with
the bulb) by turning it clockwise.
7. Install the cowling.
1
1. Socket
3. Remove the license plate light
lens by removing the screws.
12
1. License plate light lens
2. Screw (×2)
EAU03621
Replacing the license plate
light bulb
License plate light bulb, replacing1. Place the scooter on the center-
stand.
2. Remove cowling C. (See page
6-10 for cowling removal and
installation procedures.)
5SJ-28199-E1 7/11/02 11:03 AM Page 90
Page 95 of 116

6-44
PERIODIC MAINTENANCE AND MINOR REPAIR
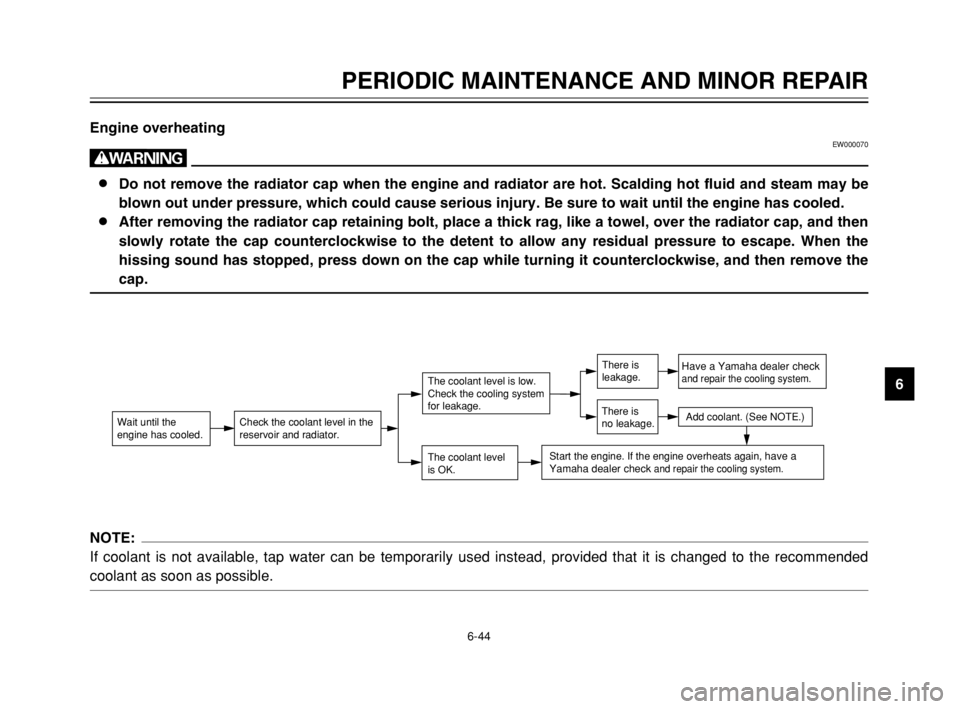
6 Engine overheating
EW000070
w
8 8
Do not remove the radiator cap when the engine and radiator are hot. Scalding hot fluid and steam may be
blown out under pressure, which could cause serious injury. Be sure to wait until the engine has cooled.
8 8
After removing the radiator cap retaining bolt, place a thick rag, like a towel, over the radiator cap, and then
slowly rotate the cap counterclockwise to the detent to allow any residual pressure to escape. When the
hissing sound has stopped, press down on the cap while turning it counterclockwise, and then remove the
cap.
NOTE:
If coolant is not available, tap water can be temporarily used instead, provided that it is changed to the recommended
coolant as soon as possible.
Wait until the
engine has cooled.Check the coolant level in the
reservoir and radiator.
The coolant level
is OK.
The coolant level is low.
Check the cooling system
for leakage.
Have a Yamaha dealer checkand repair the cooling system.
Add coolant. (See NOTE.)
Start the engine. If the engine overheats again, have a
Yamaha dealer check and repair the cooling system.
There is
leakage.
There is
no leakage.
5SJ-28199-E1 7/11/02 11:03 AM Page 93
Page 107 of 116
8-4
SPECIFICATIONS
8
Bulb voltage, wattage ×quantity
Headlight 12 V, 60/55 W ×1
12 V, 55 W ×1
Tail/brake light 12 V, 5/21 W ×2
Front turn signal light 12 V, 21 W ×2
Rear turn signal light 12 V, 18 W ×2
Auxiliary light 12 V, 5 W ×1
License plate light 12 V, 5 W ×1
Meter lighting 12 V, 1.7 W ×4
High beam indicator light 12 V, 1.7 W ×1
Turn signal indicator light 12 V, 3.4 W ×2
Oil change indicator light 12 V, 1.7 W ×1
ABS warning light 12 V, 1.7 W ×1
Fuses
Main fuse 30 A
ABS motor fuse 30 A
Headlight fuse 15 A
Signaling system fuse 15 A
ABS control unit fuse 10 A
Ignition fuse 7.5 A
Radiator fan fuse 4 A
Clock (Backup) fuse 10 A
5SJ-28199-E1 7/11/02 11:03 AM Page 105