Page 11 of 265
22003 MR2 from Aug. ’03 Prod. (OM17511U)
Instrument panel overview
1. Side vents
2. Instrument cluster
3. Center vents
4. Interior light
5. Glove box
6. Manual transmission gear shift lever orsequential manual transmission selector
lever
7. Parking brake lever
8. Power window switches
9. Power rear view mirror control switches
10. Power window lock switch 11. Power door lock switch
12. Front fog light switch
13. Instrument panel light control switch
03 07.07
SB11025b
Page 17 of 265

82003 MR2 from Aug. ’03 Prod. (OM17511U)
Keys
SB12039
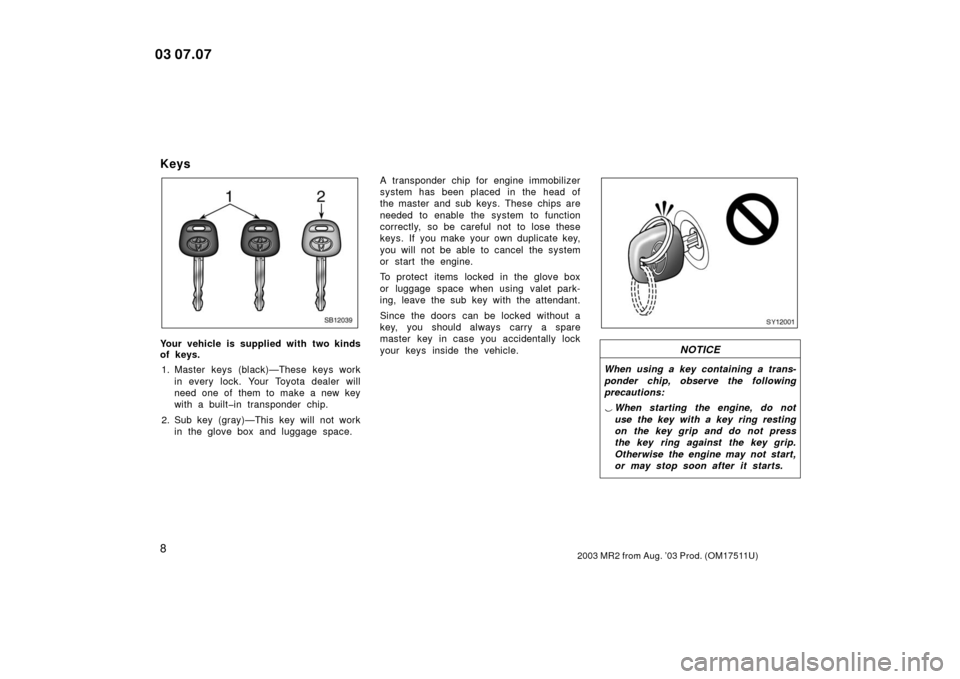
Your vehicle is supplied with two kinds
of keys.1. Master keys (black)—These keys work in every lock. Your Toyota dealer will
need one of them to make a new key
with a built�in transponder chip.
2. Sub key (gray)—This key will not work in the glove box and luggage space. A transponder chip for engine immobilizer
system has been placed in the head of
the master and sub keys. These chips are
needed to enable the system to function
correctly, so be careful not to lose these
keys. If you make your own duplicate key,
you will not be able to cancel the system
or start the engine.
To protect items locked in the glove box
or luggage space when using valet park-
ing, leave the sub key with the attendant.
Since the doors can be locked without a
key, you should always carry a spare
master key in case you accidentally lock
your keys inside the vehicle.
SY12001
NOTICE
When using a key containing a trans-
ponder chip, observe the following
precautions:
�
When starting the engine, do not
use the key with a key ring resting
on the key grip and do not press
the key ring against the key grip.
Otherwise the engine may not start,
or may stop soon after it starts.
03 07.07
Page 24 of 265
152003 MR2 from Aug. ’03 Prod. (OM17511U)
Trunk lid—
SB12043
To open the trunk lid:1. Open the glove box door, and then pull the trunk lid lock release lever.
The trunk lid will spring up slightly.
CAUTION
Before driving, be sure that the trunk
lid is closed and securely locked.
Otherwise, the trunk lid may open un-
expectedly while driving and an acci-
dent may occur.
SB12037a
2. In front of the vehicle, pull up theauxiliary catch l ever and lift the
trunk lid.
SB12068a
Front box cover
3. Hold the trunk lid open by inserting the support rod into the slot.
To insert the support rod into the slot,
move it straight up. If it is moved to the
side or toward the inside of the vehicle,
it may become detached.
Before closing the trunk lid, return the
support rod to its clip—this prevents
rattles. Then lower the trunk lid and make
sure it locks into place. If necessary,
press down gently on the front edge to
lock it.
03 07.07
Page 25 of 265

162003 MR2 from Aug. ’03 Prod. (OM17511U)
CAUTION
�After inserting the support rod into
the slot, make sure the rod sup-
ports the trunk lid securely from
falling down on to your head or
body.
�Before closing the trunk lid, lock
the front box cover securely.
This prevents the front box from
being damaged.
�Keep the trunk lid closed while
driving. This keeps the luggage
from being thrown out.
NOTICE
Be sure to return the support rod to
its clip before closing the trunk lid.
Closing the trunk lid with the support
rod up could cause the trunk lid to
bend.
—Luggage security system
SB12091
If you do not want to activate the trunk
lid lock release lever, insert the master
key to the glove box, and turn it clock-
wise.
Engine hood
SB12086a
To open the engine hood:1. Pull the engine hood lock release lever. The engine hood will spring up
slightly.
The engine hood lock release lever can
be locked by the key.
CAUTION
Before driving, be sure that the en-
gine hood is closed and securely
locked. Otherwise, the engine hood
may open unexpectedly while driving
and an accident may occur.
03 07.07
Page 54 of 265

452003 MR2 from Aug. ’03 Prod. (OM17511U)
�When the ignition key is turned to the
“ON” position, the light does not come
on, remains on or flashes.
�The light comes on or starts flashing
while driving.
SB13067a
In the following cases, contact your Toyota
dealer as soon as possible:
�The SRS airbags have been inflated.
�The front of the vehicle (shaded in the
illustration) was involved in an accident
that was not severe enough to cause
the SRS airbags to inflate.
�The pad section of the steering wheel
or passenger airbag cover (shaded in
the illustration) is scratched, cracked,
or otherwise damaged.
NOTICE
Do not disconnect the battery cables
before contacting your Toyota dealer.
SB13106a
Indicator light
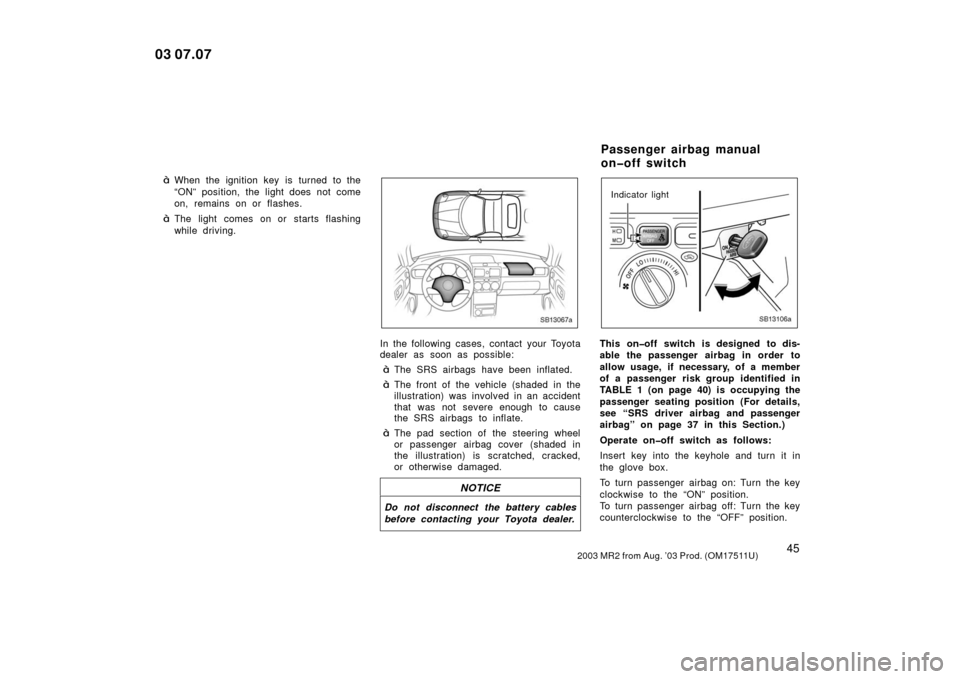
This on�off switch is designed to dis-
able the passenger airbag in order to
allow usage, if necessary, of a member
of a passenger risk group identified in
TABLE 1 (on page 40) is occupying the
passenger seating position (For details,
see “SRS driver airbag and passenger
airbag” on page 37 in this Section.)
Operate on�off switch as follows:
Insert key into the keyhole and turn it in
the glove box.
To turn passenger airbag on: Turn the key
clockwise to the “ON” position.
To turn passenger airbag off: Turn the key
counterclockwise to the “OFF” position.
03 07.07
Passenger airbag manual
on�off switch
Page 68 of 265

592003 MR2 from Aug. ’03 Prod. (OM17511U)
SB13113
2. Fix the child restraint system withthe seat belt.
Latch the hook onto the anchor
bracket and tighten the top strap.
For instructions to install the child re-
straint system, see “Child restraint” on
page 46.
CAUTION
Make sure the top strap is securely
latched, and check that the child re-
straint system is secure by pushing
and pulling it in different directions.
Follow all the installation instructions
provided by its manufacturer.
Store a removed cover in a safe place
such as the glove box.
Be sure to replace a cover when the an-
chor bracket is not in use.
SB13116
The lower anchorages for the child re-
straint system interfaced with the
FMVSS225 specification are installed in
the passenger seat.
The anchorages are installed in the clear-
ance between the seat cushion and seat-
back of passenger seat.
Child restraint system interfaced with the
FMVSS225 specification can be fixed with
these anchorages. In this case, it is not
necessary to fix the child restraint system
with a seat belt on the vehicle.
03 07.07
—Installation with child
restraint lower anchorages
Page 130 of 265

1212003 MR2 from Aug. ’03 Prod. (OM17511U)
OPERATION OF INSTRUMENTS AND
CONTROLS
Other equipment
Clock122
. . . . . . . . . . . . . . . . . . . . . . . . . . . . . . . . . . . . .\
. . . . . . . . . . . . . . . . .
Cigarette lighter and ashtray 122
. . . . . . . . . . . . . . . . . . . . . . . . . . . . . . . . .
Glove box 123
. . . . . . . . . . . . . . . . . . . . . . . . . . . . . . . . . . . . \
. . . . . . . . . . . . . .
Front box 123
. . . . . . . . . . . . . . . . . . . . . . . . . . . . . . . . . . . . \
. . . . . . . . . . . . . .
Auxiliary box 124
. . . . . . . . . . . . . . . . . . . . . . . . . . . . . . . . . . . . \
. . . . . . . . . . .
Luggage space 125
. . . . . . . . . . . . . . . . . . . . . . . . . . . . . . . . . . . . \
. . . . . . . . .
Cup holders 127
. . . . . . . . . . . . . . . . . . . . . . . . . . . . . . . . . . . . \
. . . . . . . . . . . .
Floor mat 128
. . . . . . . . . . . . . . . . . . . . . . . . . . . . . . . . . . . . \
. . . . . . . . . . . . . .
03 07.07
SECTION 1� 10
Page 132 of 265
1232003 MR2 from Aug. ’03 Prod. (OM17511U)
ASHTRAY
To use the ashtray, pull out the lid.
When finished with your cigarette, thor-
oughly extinguish it in the ashtray to pre-
vent other cigarette butts from catching
fire. After using the ashtray, close the lid
completely.
To remove the ashtray, pull the lid and
pull it out.
CAUTION
To reduce the chance of injury in
case of an accident or sudden stop
while driving, always completely close
the ashtray after use.
Glove box
SB19026
To use the glove box, do this.
To open: Compress the lock release but-
tons.
To lock: Insert the master key and turn it
clockwise.
CAUTION
To reduce the chance of injury in
case of an accident or a sudden stop,
always keep the glove box door
closed while driving.
Front box
SB41047
To use the front box in the trunk, do
this.1. Open the trunk lid, and pull the lock release lever.
03 07.07