Page 7 of 312
’03 L/C U (L/O 0301)
3
1. Headlight, turn signal and front foglight switches
2. Cruise control switch
3. Ignition switch
4. Wiper and washer switches
5. Emergency flasher switch
6. Clock, outside temperature and trip infor- mation display
7. Car audio
8. Front passenger ’s seat belt reminder light
9. Air conditioning controls
10. Outside rear view mirror heater switch 11. Rear air conditioning switch
12. Rear window defogger switch
13. Center differential lock switch
14. Power antenna switch
15. Power tilt and telescopic steering switch
16. Instrument panel light control dial
17. Power rear view mirror control switches
18. Power quarter window switch (left�hand side)
19. Power quarter window switch (right� hand side)
20. Roll sensing of curtain shield airbags off switch
�
View B
Page 102 of 312

98
—Compass
13C013
The compass indicates the direction in
which the vehicle is heading. The illustra-
tion shown above indicates the vehicle is
heading north.Displays
Directio")
’03 L/C U (L/O 0301)
98
—Compass
13C013
The compass indicates the direction in
which the vehicle is heading. The illustra-
tion shown above indicates the vehicle is
heading north.Displays
Directions
N
NE E
SE
S
SW W
NWNorth
Northeast East
Southeast
South
Southwest West
Northwest
Pushing the “AUTO” button for longer
3 seconds turns on or off the compass
display.
The compass may not show the correct
direction in the following conditions:
�The vehicle is stopped immediately af-
ter turning. The compass does not ad-
just while the vehicle is stopped.
�The ignition switch is turned off imme-
diately after turning.
�The vehicle is on an inclined surface.
�The vehicle is in a place where the
earth’s magnetic field is subject to in-
terference by artificial magnetic fields
(underground parking, under a steel
tower, between buildings, roof parking,
near a crossing, near a large vehicle,
etc.).
�The vehicle is magnetized. (There is a
magnet or a metal object on or near
the inside rear view mirror.)
�The battery has been disconnected.
�Any door is open.
The compass works to calibrate the direc-
tion automatically while the vehicle is in
motion, if deviation is small.
For obtaining additional precision or for
complete calibrating, see “Calibrating the
compass” below.
NOTICE
Do not put magnets or a metal object
near the inside rear view mirror. Do-
ing this may cause malfunction of the
compass sensor.
CALIBRATING THE COMPASS (deviation
calibration)
The direction display on the compass
deviates from the true direction deter-
mined by the earth’s magnetic field, The
amount of deviation varies according to
the geographic position of the vehicle.
To adjust for this deviation, stop the ve-
hicle and push the button for longer than
about 6 seconds until the number (1�15)
appears on the display. Then push the
button again, referring to the following
map to select the number of the zone
where the vehicle is.
Page 103 of 312
’03 L/C U (L/O 0301)
99
If the direction is displayed several sec-
onds after adjustment, the calibration is
finished.
CAUTION
Do not adjust the display while the
vehicle is moving. Be sure to adjust
the display only when the vehicle is
stopped.
13C015
Zone number�Hawaii is included in zone 5.
Page 104 of 312

100
13C011
CALIBRATING THE COMPASS (circling
calibration)
“C” appears on the display in case the
circling calibration is required due to a
drastic change in the magnetic")
’03 L/C U (L/O 0301)
100
13C011
CALIBRATING THE COMPASS (circling
calibration)
“C” appears on the display in case the
circling calibration is required due to a
drastic change in the magnetic field. To
rectify this, follow the calibration proce-
dure below.
13C012
Drive the vehicle slowly (at 8km/h (5mph)
or lower) in a circle until the direction is
displayed. If there is not enough space to
drive in a circle, drive around the block
until the direction is displayed.
After driving in 1 to 3 circles in the above
method, calibration is complete with the
direction shown on the display.
If calibration cannot be performed because
of the magnetized vehicle, etc., take your
vehicle to Toyota dealer.
�Do not perform circling calibration of
the compass in a place where the
earth’s magnetic field is subject to in-
terference by artificial magnetic fields
(underground parking, under a steel
tower, between buildings, roof parking,
near a crossing, near a large vehicle,
etc.).
�During calibration, do not operate elec-
tric systems (moon roof, power win-
dows, etc.) as they may interfere with
the calibration.
CAUTION
�When doing the circling calibration,
be sure to secure a wide space,
and watch out for people and ve-
hicles in the neighborhood. Do not
violate any local traffic rules while
performing circling calibration.
�Do not adjust the display while the
vehicle is moving. Be sure to adjust
the display only when the vehicle is
stopped.
Page 117 of 312
’03 L/C U (L/O 0301)
11 3
OPERATION OF INSTRUMENTS AND
CONTROLS
Gauges, Meters and Service reminder indicators
Fuel gauge11 4
. . . . . . . . . . . . . . . . . . . . . . . . . . . . . . . . . . . . .\
. . . . . . . . . . .
Engine coolant temperature gauge 11 4
. . . . . . . . . . . . . . . . . . . . . . . . . . .
Engine oil pressure gauge 11 5
. . . . . . . . . . . . . . . . . . . . . . . . . . . . . . . . . . .
Vo ltme te r 11 6
. . . . . . . . . . . . . . . . . . . . . . . . . . . . . . . . . . . . \
. . . . . . . . . . . . . .
Tachometer 11 6
. . . . . . . . . . . . . . . . . . . . . . . . . . . . . . . . . . . . \
. . . . . . . . . . . .
Odometer and two trip meters 11 7
. . . . . . . . . . . . . . . . . . . . . . . . . . . . . . . .
Service reminder indicators and warning buzzers 11 8
. . . . . . . . . . . . . .
Trip information display 125
. . . . . . . . . . . . . . . . . . . . . . . . . . . . . . . . . . . . \
. .
SECTION 1� 5
Page 121 of 312
’03 L/C U (L/O 0301)
11 7
Odometer and two trip meters
This meter displays the odometer and
two trip meters.1. Odometer—Shows the total distance the vehicle has been driven.
2. Two trip meters—Show two different distances independently driven since
the last time each trip meter was set
to zero.
You can use one trip meter to calculate
the fuel economy and the other to
measure the distance on each trip. All
trip meter data is cancelled if the elec-
trical power source is disconnected.
3. Trip meter reset knob—Resets the two trip meters to zero, and also change
the meter display. To change the meter display, quickly
push and release the knob. The meter
display changes in the order from the
odometer to trip meter A to trip meter
B, then back to the odometer each
time you push.
To reset the trip meter A to zero, dis-
play the meter A reading, then push
and hold the knob until the meter is
set to zero. The same process can be
applied for resetting the trip meter B.
Page 129 of 312

125
(n) Key Reminder Buzzer
This buzzer reminds you to remove the
key when you open the driver ’s door with
the ignition key in the ”ACC” or ”LOCK”
position.
CHECKING")
’03 L/C U (L/O 0301)
125
(n) Key Reminder Buzzer
This buzzer reminds you to remove the
key when you open the driver ’s door with
the ignition key in the ”ACC” or ”LOCK”
position.
CHECKING SERVICE REMINDER INDICA-
TORS (except the low fuel level warning
light)1. Apply the parking brake.
2. Open one of the side doors or back door.
The open door warning light should
come on.
3. Close the door. The open door warning light should go
off.
4. Place the four�wheel drive control lever in ”N” position and the selector lever
in ”P” position.
5. Turn the ignition key to ”ON”, but do not start the engine.
All the service reminder indicators ex-
cept the open door warning light should
come on. The ”ABS”, ”VSC/TRAC”,
”VSC OFF”, ”TRAC”, and slip indicator
light go off after a few seconds. The
SRS warning light goes off after about
6 seconds. There may be the case that the ”ABS”,
”VSC/TRAC” and ”VSC OFF” stay on
for about 60 seconds after the ignition
key is turned to “ON” position. It is
normal if they go out after a while.
If any service reminder indicator or warn-
ing buzzer does not function as described
above, have it checked by your Toyota
dealer as soon as possible.
Trip information display
The following information is shown with
the ignition key turned on. Each time
you push the “MODE” button, the dis-
played information is changed.
�Average vehicle speed
�Driving distance after engine starting
�Available driving range
�Average fuel consumption after refuel-
ing
�Current fuel consumption
The displayed cruise information values
indicate the general driving condition and
may not always reflect precise and actual
conditions.
Page 130 of 312
’03 L/C U (L/O 0301)
126
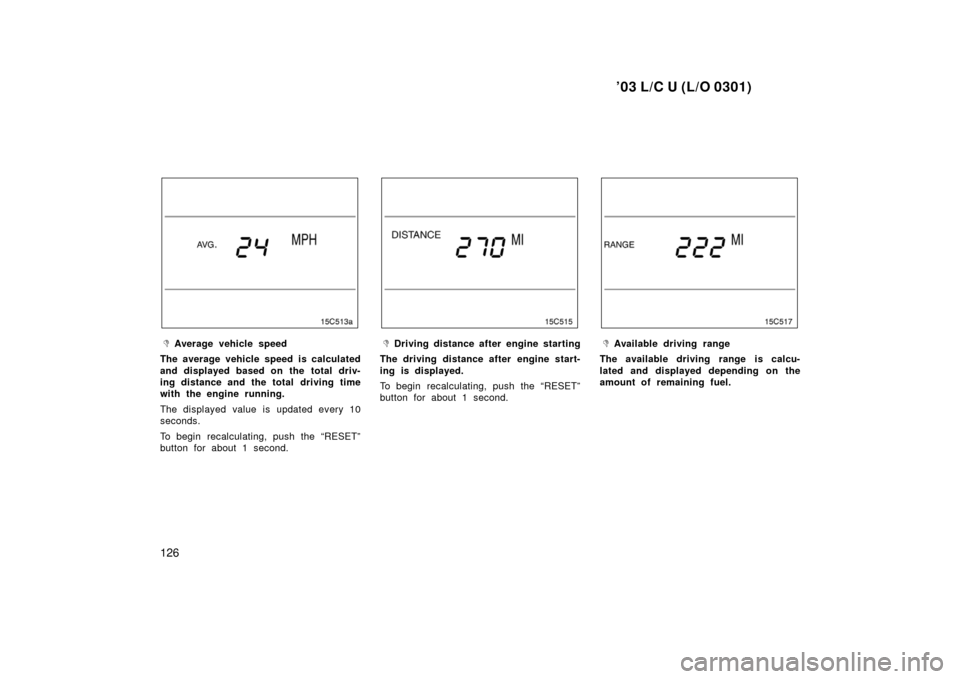
�Average vehicle speed
The average vehicle speed is calculated
and displayed based on the total driv-
ing distance and the total driving time
with the engine running.
The displayed value is updated every 10
seconds.
To begin recalculating, push the “RESET”
button for about 1 second.�Driving distance after engine starting
The driving distance after engine start-
ing is displayed.
To begin recalculating, push the “RESET”
button for about 1 second.�Available driving range
The available driving range is calcu-
lated and displayed depending on the
amount of remaining fuel.

3
1. Headlight, turn signal and front foglight switches
2. Cruise control switch
3. Ignition switch
4. Wiper and washer switches
5. Emergency flasher switch
6. Clock, outside te")

99
If the direction is displayed several sec-
onds after adjustment, the calibration is
finished.
CAUTION
Do not adjust the display while the
vehicle is moving. Be sure to adjus")

11 3
OPERATION OF INSTRUMENTS AND
CONTROLS
Gauges, Meters and Service reminder indicators
Fuel gauge11 4
. . . . . . . . . . . . . . . . . . . . . . . . . . . . . . . . . . . .")

11 7
Odometer and two trip meters
This meter displays the odometer and
two trip meters.1. Odometer—Shows the total distance the vehicle has been driven.
2. Two trip meters—S")