2003 TOYOTA 4RUNNER Navigation Manual
-
 1
1 -
 2
2 -
 3
3 -
 4
4 -
 5
5 -
 6
6 -
 7
7 -
 8
8 -
 9
9 -
 10
10 -
 11
11 -
 12
12 -
 13
13 -
 14
14 -
 15
15 -
 16
16 -
 17
17 -
 18
18 -
 19
19 -
 20
20 -
 21
21 -
 22
22 -
 23
23 -
 24
24 -
 25
25 -
 26
26 -
 27
27 -
 28
28 -
 29
29 -
 30
30 -
 31
31 -
 32
32 -
 33
33 -
 34
34 -
 35
35 -
 36
36 -
 37
37 -
 38
38 -
 39
39 -
 40
40 -
 41
41 -
 42
42 -
 43
43 -
 44
44 -
 45
45 -
 46
46 -
 47
47 -
 48
48 -
 49
49 -
 50
50 -
 51
51 -
 52
52 -
 53
53 -
 54
54 -
 55
55 -
 56
56 -
 57
57 -
 58
58 -
 59
59 -
 60
60 -
 61
61 -
 62
62 -
 63
63 -
 64
64 -
 65
65 -
 66
66 -
 67
67 -
 68
68 -
 69
69 -
 70
70 -
 71
71 -
 72
72 -
 73
73 -
 74
74 -
 75
75 -
 76
76 -
 77
77 -
 78
78 -
 79
79 -
 80
80 -
 81
81 -
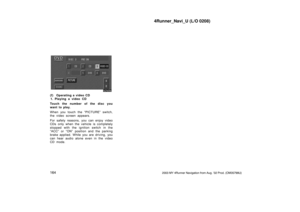
 82
82 -
 83
83 -
 84
84 -
 85
85 -
 86
86 -
 87
87 -
 88
88 -
 89
89 -
 90
90 -
 91
91 -
 92
92 -
 93
93 -
 94
94 -
 95
95 -
 96
96 -
 97
97 -
 98
98 -
 99
99 -
 100
100 -
 101
101 -
 102
102 -
 103
103 -
 104
104 -
 105
105 -
 106
106 -
 107
107 -
 108
108 -
 109
109 -
 110
110 -
 111
111 -
 112
112 -
 113
113 -
 114
114 -
 115
115 -
 116
116 -
 117
117 -
 118
118 -
 119
119 -
 120
120 -
 121
121 -
 122
122 -
 123
123 -
 124
124 -
 125
125 -
 126
126 -
 127
127 -
 128
128 -
 129
129 -
 130
130 -
 131
131 -
 132
132 -
 133
133 -
 134
134 -
 135
135 -
 136
136 -
 137
137 -
 138
138 -
 139
139 -
 140
140 -
 141
141 -
 142
142 -
 143
143 -
 144
144 -
 145
145 -
 146
146 -
 147
147 -
 148
148 -
 149
149 -
 150
150 -
 151
151 -
 152
152 -
 153
153 -
 154
154 -
 155
155 -
 156
156 -
 157
157 -
 158
158 -
 159
159 -
 160
160 -
 161
161 -
 162
162 -
 163
163 -
 164
164 -
 165
165 -
 166
166 -
 167
167 -
 168
168 -
 169
169 -
 170
170 -
 171
171 -
 172
172 -
 173
173 -
 174
174 -
 175
175 -
 176
176 -
 177
177 -
 178
178 -
 179
179 -
 180
180 -
 181
181 -
 182
182 -
 183
183 -
 184
184 -
 185
185 -
 186
186

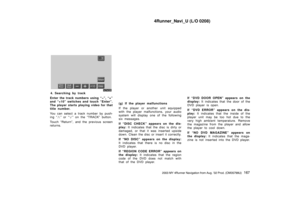
1692003 MY 4Runner Navigation from Aug. ’02 Prod. (OM35799U)
Indicates NTSC
format of color TV.
Indicates the number
of audio tracks.
Indicates the number
of language subti")

1702003 MY 4Runner Navigation from Aug. ’02 Prod. (OM35799U)
DVD video discs: Digital Versatile Disc
that holds video. DVD video discs have
adopted “MPEG2”, one of the")

1712003 MY 4Runner Navigation from Aug. ’02 Prod. (OM35799U)
Audio remote controls")

1722003 MY 4Runner Navigation from Aug. ’02 Prod. (OM35799U)
Some parts of the audio system can be
adjusted with the button on the steering
wheel.
Details of the specific b")

1732003 MY 4Runner Navigation from Aug. ’02 Prod. (OM35799U)
1. Volume control button
Push “+” to increase the volume. The
volume continues to increase while the
button")

1742003 MY 4Runner Navigation from Aug. ’02 Prod. (OM35799U)
There must be at least 3 seconds of
blank space between tracks for the
switch to work correctly. In addition, t")

1752003 MY 4Runner Navigation from Aug. ’02 Prod. (OM35799U)
3. “MODE” button
Push the “MODE” button to select an
audio mode. Each time you push this
button, the sy")

1762003 MY 4Runner Navigation from Aug. ’02 Prod. (OM35799U)
Static and fluttering—These occur when
signals are blocked by buildings, trees, or
other large objects. Incre")